Table of Contents
Suddenly running out of free space on your Mac? Then it’s a good idea to equip your computer with a disk space analyzer. Such a tool can optimize your Mac’s storage space and eliminate the need for you to manually search through the computer, desperately trying to find unwanted or junk files.
On the fence? Watch the short video below to see a real-world macOS cleanup and how a disk space analyzer fits into it – then use the 4-feature summary to decide if one deserves a spot in your toolkit.
Do You Need a Disk Space Analyzer for Mac?
Most of our team members use disk space analyzers on their Macs to help them stay organized, but we also found them to be indispensable for helping us test more accurately. In our case, using a disk space analyzer makes sense.
Before diving into our list of the best disk space analyzers, we provided a summary of the 4 “core” features you can expect from apps in this category and how they can help you clean up and maintain your Mac. This short list should decide whether or not a disk space analyzer has room in your toolbox.
- Visual maps – Visual representations of how your storage is distributed among your files and folders. They can help you figure out where (literally) your storage space is going. Common visual maps include tree maps, sunburst diagrams, and bar graphs.
- Advanced storage analysis – Detailed breakdowns of your storage allocation, which allows you to efficiently prioritize cleanup tasks and identify future problem areas (in terms of space).
- Enhanced search and filter tools – Advanced and customizable search and filter options allow you to quickly analyze your data the way that it makes sense to you. You can browse files by size, data, type, or other parameters that better suit your needs.
- Monitoring and alerts – Many disk space analyzer apps provide a real-time monitoring feature, which alerts you’re starting to run low on space (you’re often given the option to customize the threshold).
Best Free Disk Space Analyzers for Mac
After testing out quite a few disk space analyzer tools for Macs, we can say without a doubt that the ones listed below are worthy and have the right capabilities to fulfill your daily disk space analyzer tasks.
| Number of tested tools | 8 |
| macOS version | macOS Sonoma 14.3 |
| Cheapest tool | OmniDiskSweeper (Free) |
| Most expensive tool | CleanMyMac X ($34.95 per year) |
1. CleverFiles Cleaner
CleverFiles Cleaner landed at the top of our favorite macOS disk usage analyzers. First of all, it has a modern and clean design making it easy to use and suitable for all users regardless of their tech knowledge. Also, it took just a few seconds to scan the disk for files and build a visual data map allowing you to see how much space exactly a specific file is occupying.
Moreover, this tool can also map HDDs, USB flash drives, SD cards, and other devices connected to your computer. So even though the app is not free, it’s a pretty nice deal for the price.

✅ Pros:
- Clean and intuitive design
- Quick scanning process
- Groups the files according to their type or size
- Analyzes the whole disk or separate folders
📛 Cons:
- No free trial version
💲 Pricing Options: One-time payment of $2.99 for the lifetime license.
2. GrandPerspective
This tool is great if you want to delete large files on your Mac. But if you want to find the unnecessary ones, it will take more time with this app since you’ll have to move your mouse cursor over each rectangle to see what file it is.

✅ Pros:
- Has a free unlimited version
- Interesting way of presenting the files
- Easy to spot files that occupy the most space
📛 Cons:
- Slightly outdated design
- Finding unnecessary files takes more time
💲 Pricing Options: Free or a one-time payment of $2.99 if you want to get the Apple Store version with automatic updates.
3. OmniDiskSweeper
The tool lets you easily navigate through your folders, as well as view any of the files directly through the app and instantly erase the unnecessary ones.

✅ Pros:
- Entirely no-cost utility
- Easy to navigate
- Presents the files in a list sorted by size
📛 Cons:
- Doesn’t graphically show the files on your disk
- Lacks extra features
💲 Pricing Options: Free
4. Disk Analyzer Pro
Moreover, you can perform any action you want with a certain file directly through the application: whether you wish to copy it, move to a different location, or just delete it.

✅ Pros:
- Has a free trial version
- Quick scanning of disk
- Clean and simple user interface
📛 Cons:
- A bit pricey
💲 Pricing Options: The full version of the tool with a lifetime license costs $9.99.
5. Disk Inventory X
Moreover, the tool gives you the option to analyze either the whole drive or a specific folder. But overall, its features are limited to that.

✅ Pros:
- Free to download and use
- Presents the files both in a graphical and textual way
- Can be used to analyze separate folders
📛 Cons:
- Limited features
- Doesn’t support newer macOS versions
💲 Pricing Options: Free
6. Disk Space Analyzer
All of the actions that can be performed with the files (such as deletion, transferring, etc.) can be done directly through this utility app.

✅ Pros:
- Clean design
- Quick scanning
- Compatible with external storages
📛 Cons:
- Pricey
💲 Pricing Options: A free limited trial version is available. The subscription plan cost starts at $4.95 per month for 1 Mac.
7. DaisyDisk
Moreover, the developers constantly release new updates, which is why the tool is compatible with the latest macOS versions (such as macOS Ventura, macOS Sonoma, etc.) as well as with M1 Macs.

✅ Pros:
- Stunning graphical display
- Quick scan
- You can preview the files before deletion directly through the app
- Compatible with the latest macOS versions
📛 Cons:
- Doesn’t detect duplicate files
- Slightly pricey
💲 Pricing Options: A free limited trial version is available. The full version of the tool with a lifetime license costs $9.99.
8. CleanMyMac X
Overall, the tool does its job pretty well. But it’s totally up to you to decide whether it’s worth the price since it’s on the pricey side.

✅ Pros:
- Packed with extra features
- Comes equipped with other cleaning tools
- Protects system files
- Easily locates large and unneeded files
📛 Cons:
- More expensive than similar tools
💲 Pricing Options: A free limited trial version is available. The prices for the paid version of this tool start at $34.95 per year.
Built-in Methods to Analyze Disk Space on Mac
If you don’t want to use a third-party app to analyze your Mac’s disk space, macOS itself provides native utilities that provide useful information about your disks. While the third-party apps we previously discussed as much more powerful and feature-rich, the Mac’s native utilities may just be enough for some users to get by.
We’ll briefly cover these tools and how to use them in the sections below.
Using Finder
Finder doesn’t just allow you to explore your files and folders, but it also allows you to interact with your disks in the sidebar. Specifically, the Get Info option in your disk’s right-click menu (in Finder) can display a window with ample information about that disk’s storage capacity, current available space, and used space.
It’s not much, but you’ll know how much usable space you have left.

The Finder app is located on every Mac in the Dock. To open it, simply click its icon (it is the first tool from the left side). Once you’ve opened the application, follow these steps to check the storage space on your Mac:
- Make sure that all disks and drives are visible in Finder on your Mac (to do this, go to Finder > Settings > Sidebar tab and place a tick near the disk options).

- Go back to the main Finder window.
- Right-click the disk that you wish to analyze from the sidebar on the left.
- Click Get Info and look at the information in the General section.
About This Mac
macOS also provides its own limited version of a disk analyzer in the Storage menu. It displays a simple visualization that represents how much storage space is being used by each data type.
Again, it’s not a lot of information – but it can quickly tell you what data type is “costing” you the most space. You can even delete files from this menu, depending on the data type.
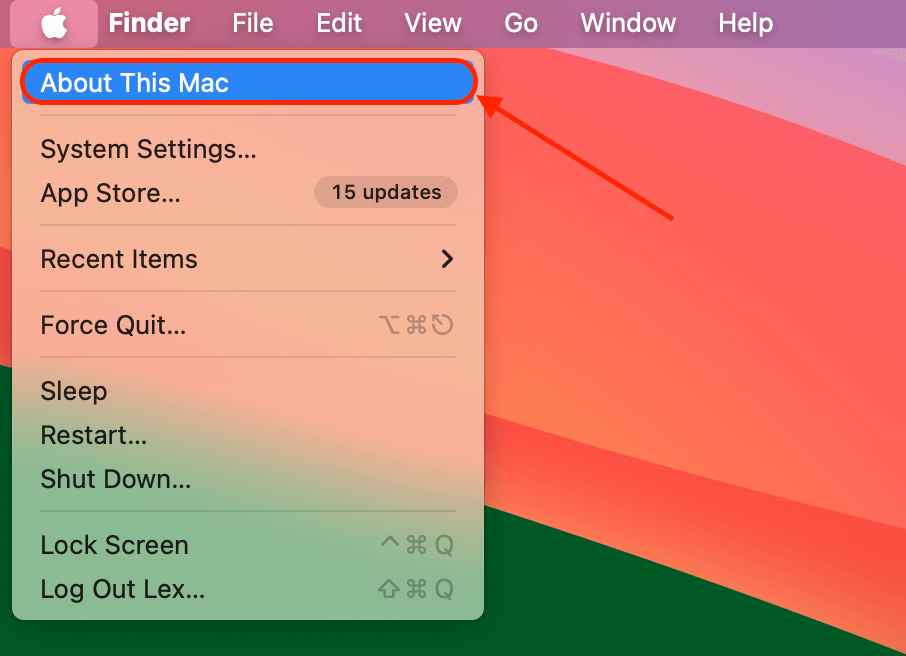
- Click the Apple button > About This Mac.

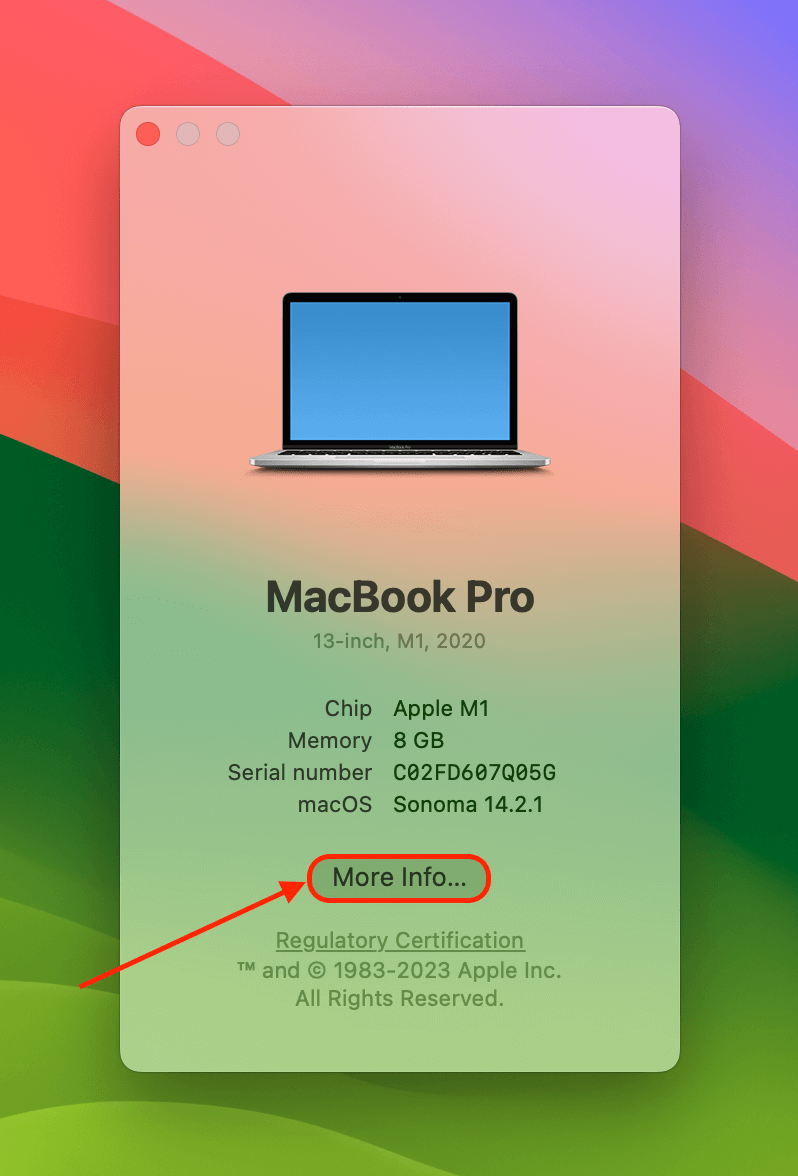
- Click More Info…

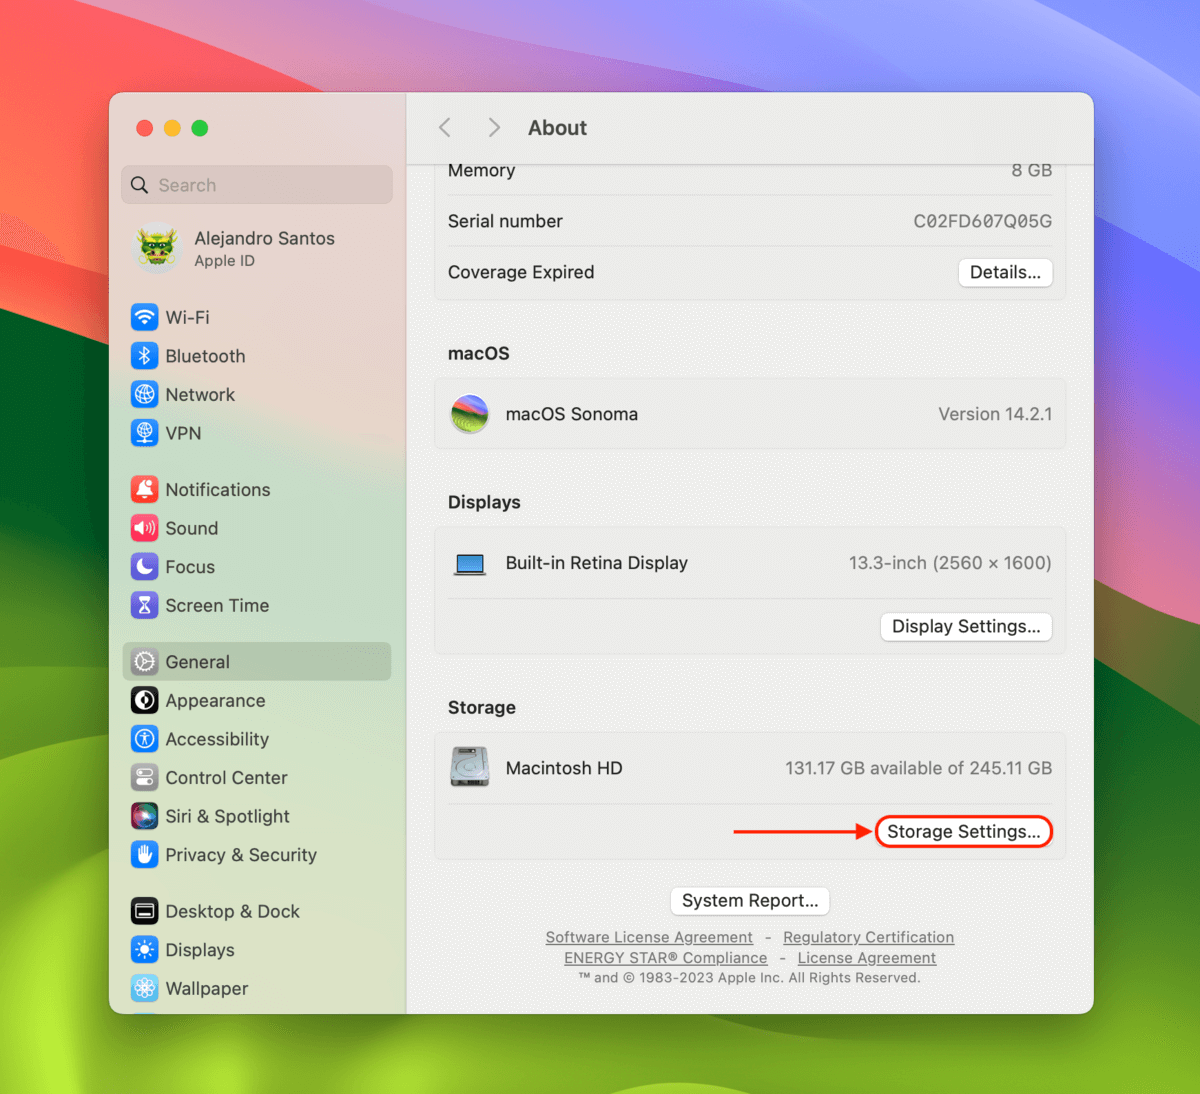
- Under Storage, click Storage Settings…

- Analyze the bar graph at the top of the window. Then, you click the i button beside any data type for further information or actions (such as deletion).

FAQ
Follow these steps to check how much free space is left on your Mac:
- Click the apple icon on the left side of the menu at the top.
- Click About this Mac.
- Open the Storage tab and wait for it to refresh.
- Move the mouse cursor over the darker gray area to see how much space is available on your computer.
Follow these steps to manage disk space on your Mac:
- Click the apple icon on the left side of the menu at the top.
- Click About this Mac.
- Open the Storage tab and click the Manage button.
- On the sidebar on the left, you can see how much space each file type occupies on your Mac.
- Click the Recommendations tab to see what can be done to increase the storage space.
The best way to free disk space on a Mac is with the help of a disk utility or disk space analyzer like CleverFiles Cleaner. Here’s how to do it:
- Download the CleverFiles Cleaner app on your Mac.
- Launch the tool.
- Scan your Mac’s main hard drive.
- Delete the unused or unneeded files from the drive.
GrandPerspective, CleanMyMac X, Disk Space Analyzer, and OmniDiskSweeper are a few of the best Mac disk space analyzers on the market. But our recommendation is the CleverFiles Cleaner disk utility app since it has a clean and simple design, does an excellent job in mapping the files, and allows you to perform any action with the files directly through the application. And even though the tool is not free, the price feels pretty fair.
Conclusion
Any of the disk space analyzers from this review can be trusted. But it’s up to you to choose the one suitable for your needs since even though they are all quite similar, at the same time they have some differences in the price, features, etc.
If you don’t want to make a choice off the top of your head, we recommend the CleverFiles Cleaner since this utility app has proven to be effective and is simply a great offer for such a cost.


