
Table of Contents
This article is a straightforward guide for recovering data from an external hard drive on a Mac. In the sections below, we’ll teach you how to diagnose your drive and evaluate your chances of recovery based on your scenario.
Can Data Be Recovered From an External Hard Drive?
In most cases, external hard drive recovery on Mac is possible. However, while trying to recreate data loss scenarios, we found that the cause of data loss greatly affects the chances of successful recovery.
To help you determine your odds, we compiled every data loss scenario that users commonly experience on external hard drives into a table along with each scenario’s probability of recovery.
| Reasons for Data Loss | Chances of Recovery |
| Accidental deletion | Very High. Deleted file data is still stored in the hard drive’s file system, marked to be overwritten by new file data. If it hasn’t been overwritten, the data is still recoverable. |
| Formatting | High. Similar to deleted files, formatted data remains on the drive until it’s overwritten. Perform the recovery ASAP to prevent permanent data loss. |
| Logical errors (file system corruption) | Moderate to High. File system corruption can prevent your Mac from communicating with the drive. In less severe cases, tools like data recovery software can bypass these errors to read or recognize the drive. |
| Mechanical failure | Low to Moderate. Head crashes, motor failure, platter damage, etc. are physical drive malfunctions. This scenario requires professional assistance. |
| Software malfunction | High (if no physical damage). Partition table corruption, OS errors, software or firmware bugs, incompatible file systems, etc. are logical issues that simply make your drive inaccessible. Tools like data recovery software can bypass the errors to access your files. |
| Virus or malware attack | Moderate to High. It depends on the extent and scope of the attack. Some viruses simply render your data inaccessible or delete your data without overwriting. Others may overwrite files with infected data, which results in permanent data loss. |
| Direct physical damage (e.g. water, drops) | Low. Water, extreme temperatures, breakage, etc. may cause unpredictable behavior on your hard drive and is unsafe to recover yourself. You’ll need the assistance of professional data recovery services. |
| Overwriting files | Very Low. Data recovery tools rely on the file data that remains on the drive to perform recovery. If the data has been overwritten by new files (e.g. you downloaded a PDF from the internet), you won’t be able to recover it anymore. |
| Power surges/failure | Moderate. If the power surge or failure resulted in logical damage (software malfunction, corruption, etc.), you have a good chance of recovering your data. But if it caused physical or mechanical damage, your chances are lower. |
| Age and wear of the drive | Low to Moderate. Physical wear on an external hard drive can be unpredictable due to its numerous moving parts as well as environmental factors. The older/more worn it is, the lower your chances of recovery. |
3 Proven Ways to Recover Files From External Hard Drive on a Mac
As we previously mentioned, successfully recovering your data depends on correctly diagnosing the cause of your external hard drive’s data loss and using the most appropriate solution.
Due to the numerous factors you need to consider, we understand it can be hard to keep track. To help you get to the right solution quicker and increase your chances of recovery, we matched each scenario with the most suitable recovery method in the table below.
| Recovery Method | Best Suited For Scenarios | Ease of use | Success Rate |
| Time Machine Backup | Accidental deletion, system crashes, file corruption | Easy for regular users | Very High if a backup is recent and intact |
| Data Recovery Software | Deletion, formatting, partition loss, corruption | Moderate (user-friendly interfaces) | High, varies by software and condition of data |
| Professional Data Recovery Service | Mechanical failure, severe corruption, physical damage | No user effort is required (but time-consuming) | Moderate to High, depends on damage severity |
Method 1: Time Machine
Prevention is the best cure. Time Machine is a native app for macOS that allows you to make hourly, daily, and weekly backups of your data that you can easily restore.
If you’ve never set up Time Machine before and need another recovery method, click here to jump to Method 2.
What you’ll need:
- A MacBook with Time Machine
- An external storage device such as a USB drive, a Thunderbolt Drive, or an External Hard Drive you’ll be using to store your backup
How to backup your files:
- Connect an external storage device to your Mac. This will serve as your Time Machine backup drive. If you want to backup an external storage device, connect that to your Mac as well.
- Click the Apple button > System Settings. Then, click General > Time Machine.
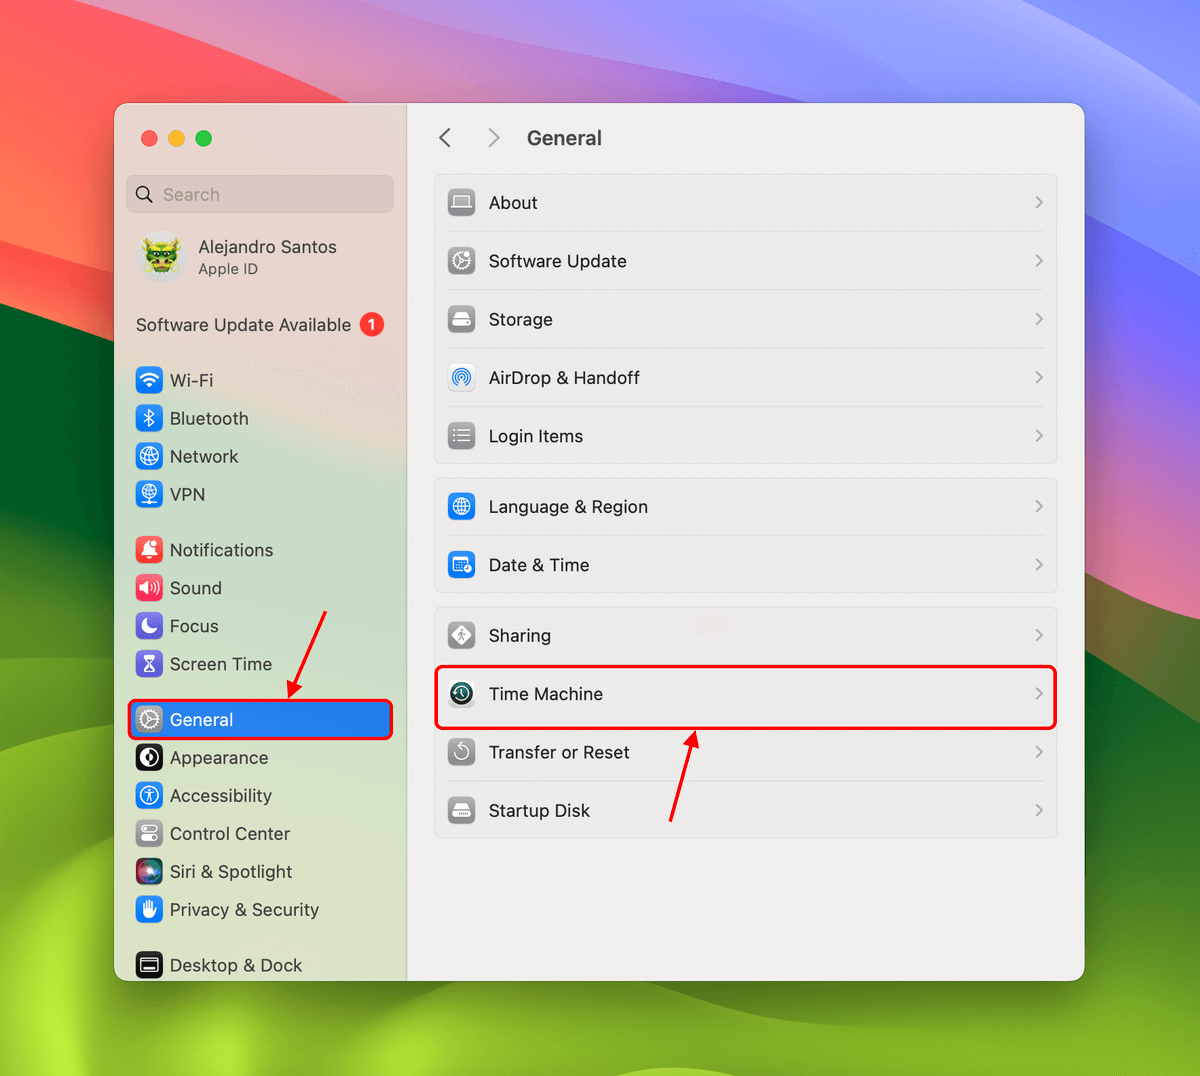
- Click Add Backup Disk…

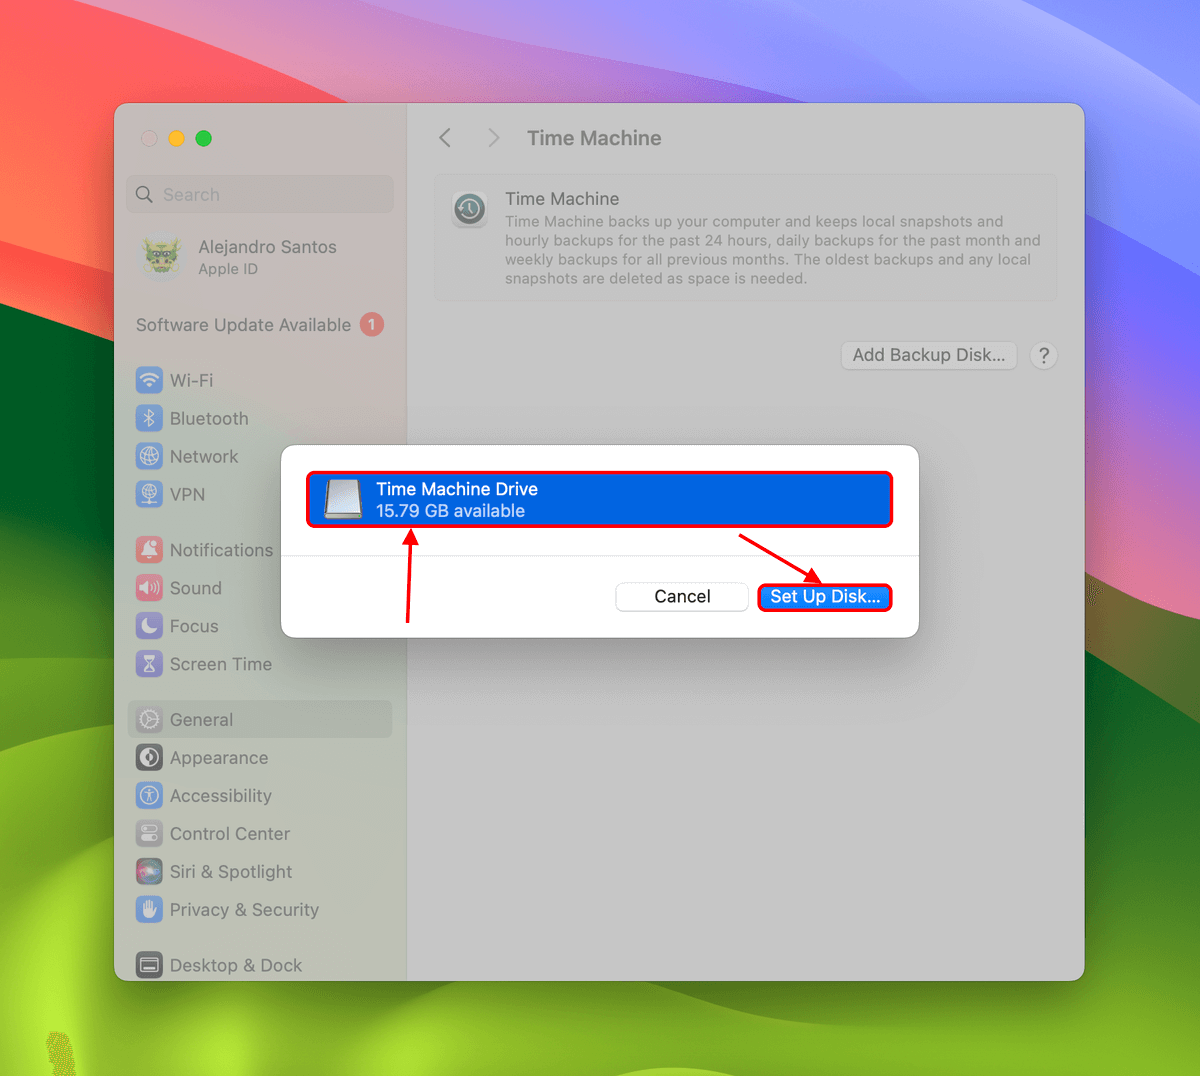
- Select the drive you connected in step 1 and click Set Up Disk…
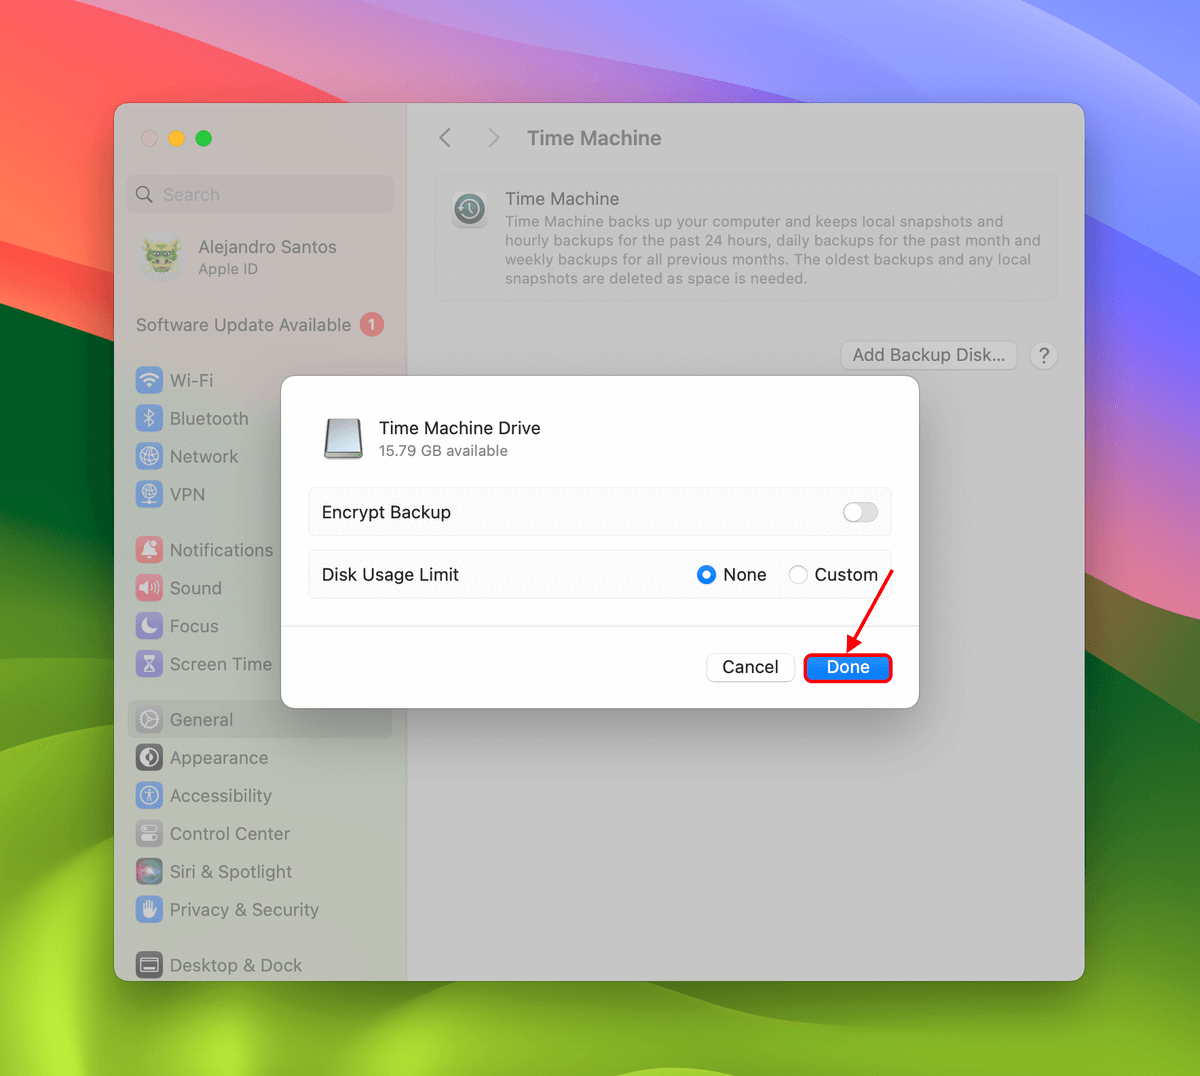
- In the dialogue box that appears, you can choose to encrypt your drive or not. Once you’re done with the setup, click Done.


How to restore your files:
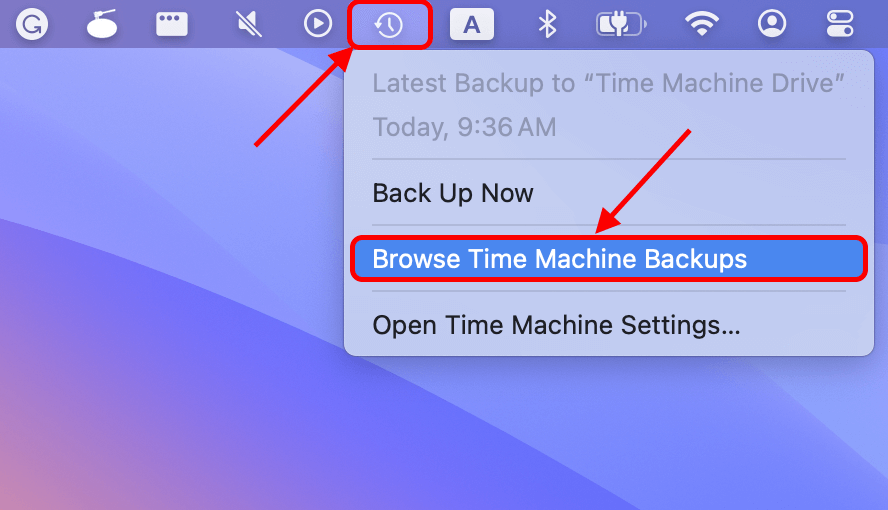
- Connect your Time Machine backup drive to your Mac. Then, on the Apple menu bar, click the Time Machine button > Browse Time Machine backups.
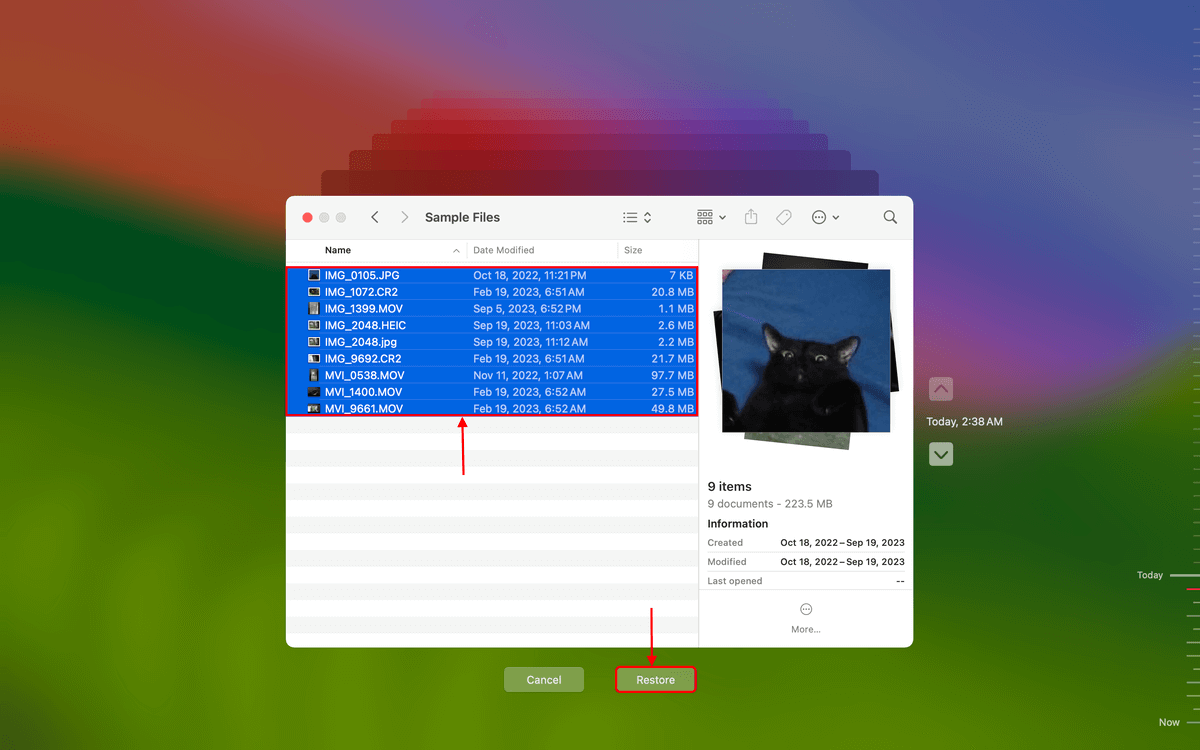
- Navigate your external drive. Then, use the arrows on the right to browse past instances of its directory until you find the snapshots of your files and folders. Select them and click Restore.


Method 2: Data Recovery Software
If you failed to create a backup and you accidentally deleted a file, it’s still most likely fully intact in your system, waiting to be overwritten by new data. But once that file is overwritten, it’s pretty much lost.
This is why it’s important to never write new files to a drive that you want to restore. In this case, data recovery software can go in and restore that file.
In cases where your drive suffered logical damage and your drive has been corrupted, data recovery software can repair the damaged partition table or file system to recover your files.
Now, the only time that software can’t help you is when your storage device suffers physical damage. If this is the case for you, go ahead and skip to the next step.
What you’ll need:
- Disk Drill for Mac (see below for installation instructions)
- The affected external hard drive
Steps
Installing Disk Drill
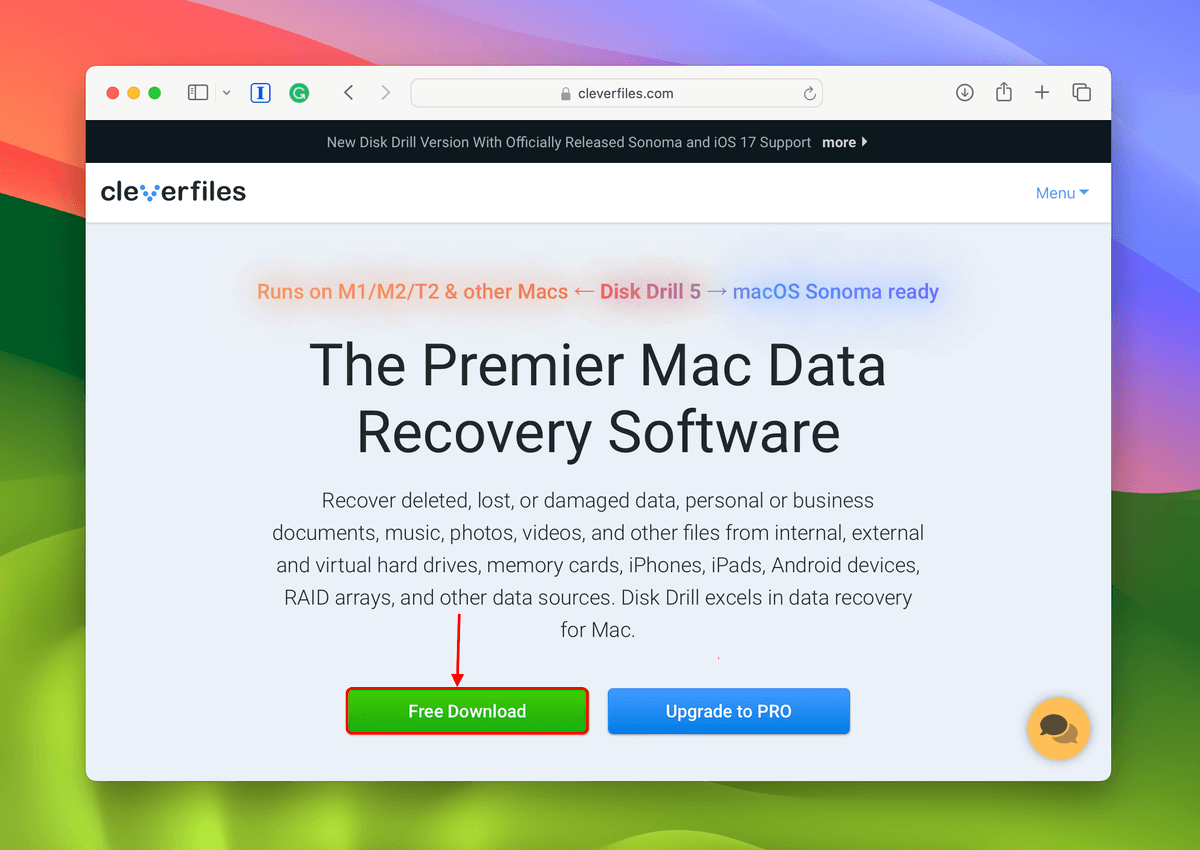
- Download Disk Drill from the Cleverfiles website.
- Double-click the installer to begin setup.

- When prompted, drag the Disk Drill icon to the icon of your Applications folder inside the setup menu.


Restoring Files on Disk Drill
- Open Disk Drill (Finder > Applications).

- When prompted by macOS, click Open.

- Select your drive from the list and click Search for lost data.

- Wait for Disk Drill to finish scanning your external hard drive. Then, click Review found items.

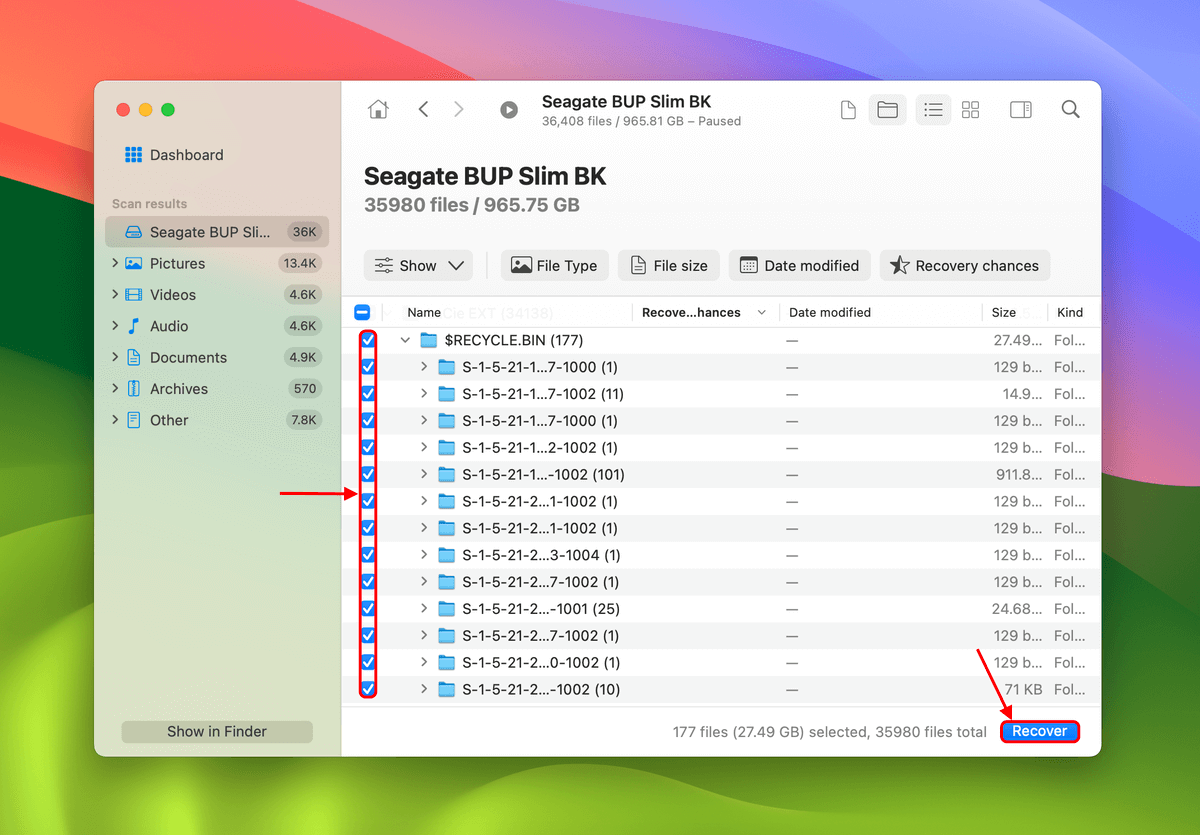
- Locate your missing files in the Deleted or lost and Reconstructed sections. These categories represent different techniques used by Disk Drill to recover your data so check them both. You can use filters and the search tool if you’re looking for specific files.

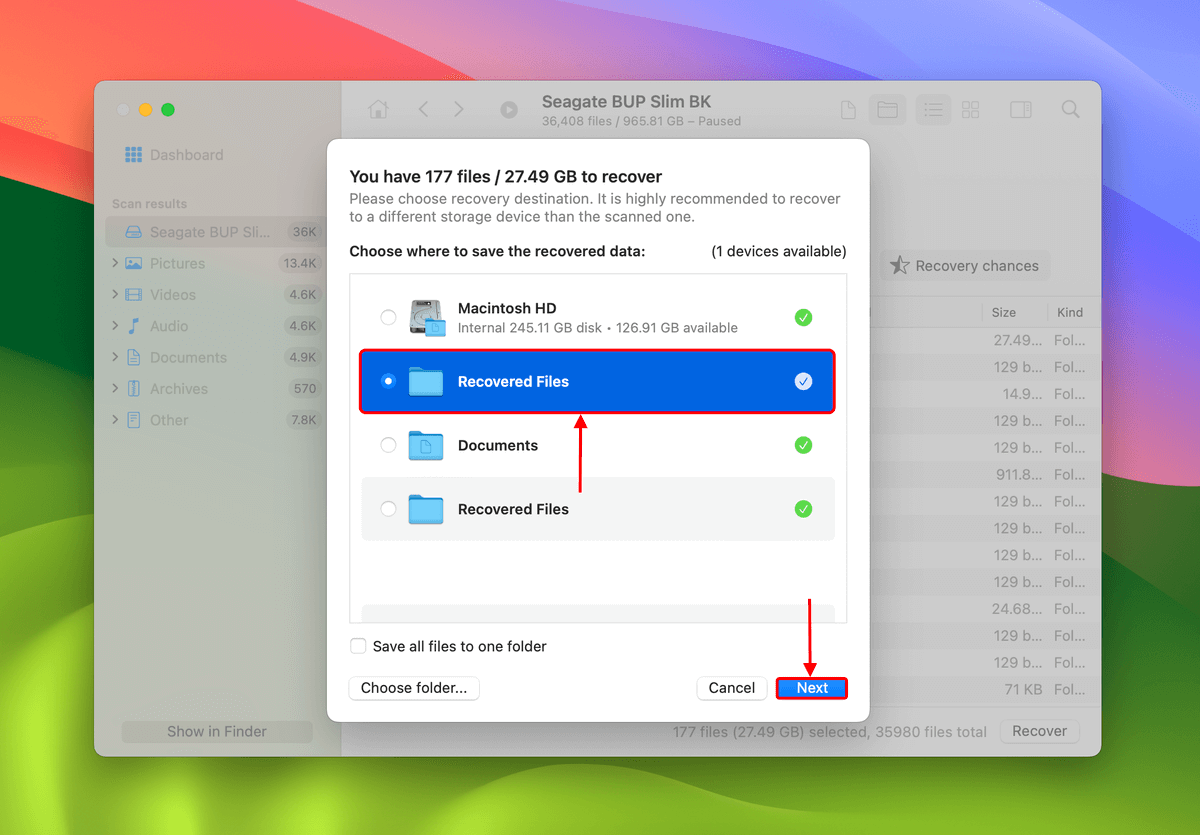
- You can preview files by hovering your mouse pointer beside them and clicking the eye button that appears (the preview opens in a new window). Then, mark the boxes beside the files and folders you want to restore and click Recover.
- Choose a destination on your Mac where Disk Drill will save the recovered files. Then, click Next to start the recovery process.


Method 3: Professional Data Recovery Service
If all else fails and you’re desperate to recover your files, you’ll have to take your drive to a professional data recovery service. This is most likely your step #1 if your external drive suffered any physical damage that can’t be repaired by software alone.
Here’s how professional data recovery services typically go:
Steps:
- Search for the nearest data recovery service near you. Make sure to check reviews and look at the company’s client record.
- You will have a free (most of the time) evaluation with the company where you should explain any damage you think your drive endured.
- The company’s recovery engineers will determine the failure of the hard drive and suggest the fastest and most cost-effective recovery method, as well as a quote.
- You’ll send your drive-through shipping or take it to the service company in person.
Bonus Solution: Disk Utility
Just like Time Machine, Disk Utility is a native app on macOS. You can use it to restore your entire volume to another volume – such as an external hard drive, for example.
Disk Utility creates a full copy of the restored volume to the destination volume, which means that your external hard drive will be totally erased. Please keep this in mind.
What you’ll need:
- A MacBook with Disk Utility
- A drive to save your restored volume
Steps:
- Open Finder and click the Applications folder on the left sidebar and scroll down until you find the Utilities folder.
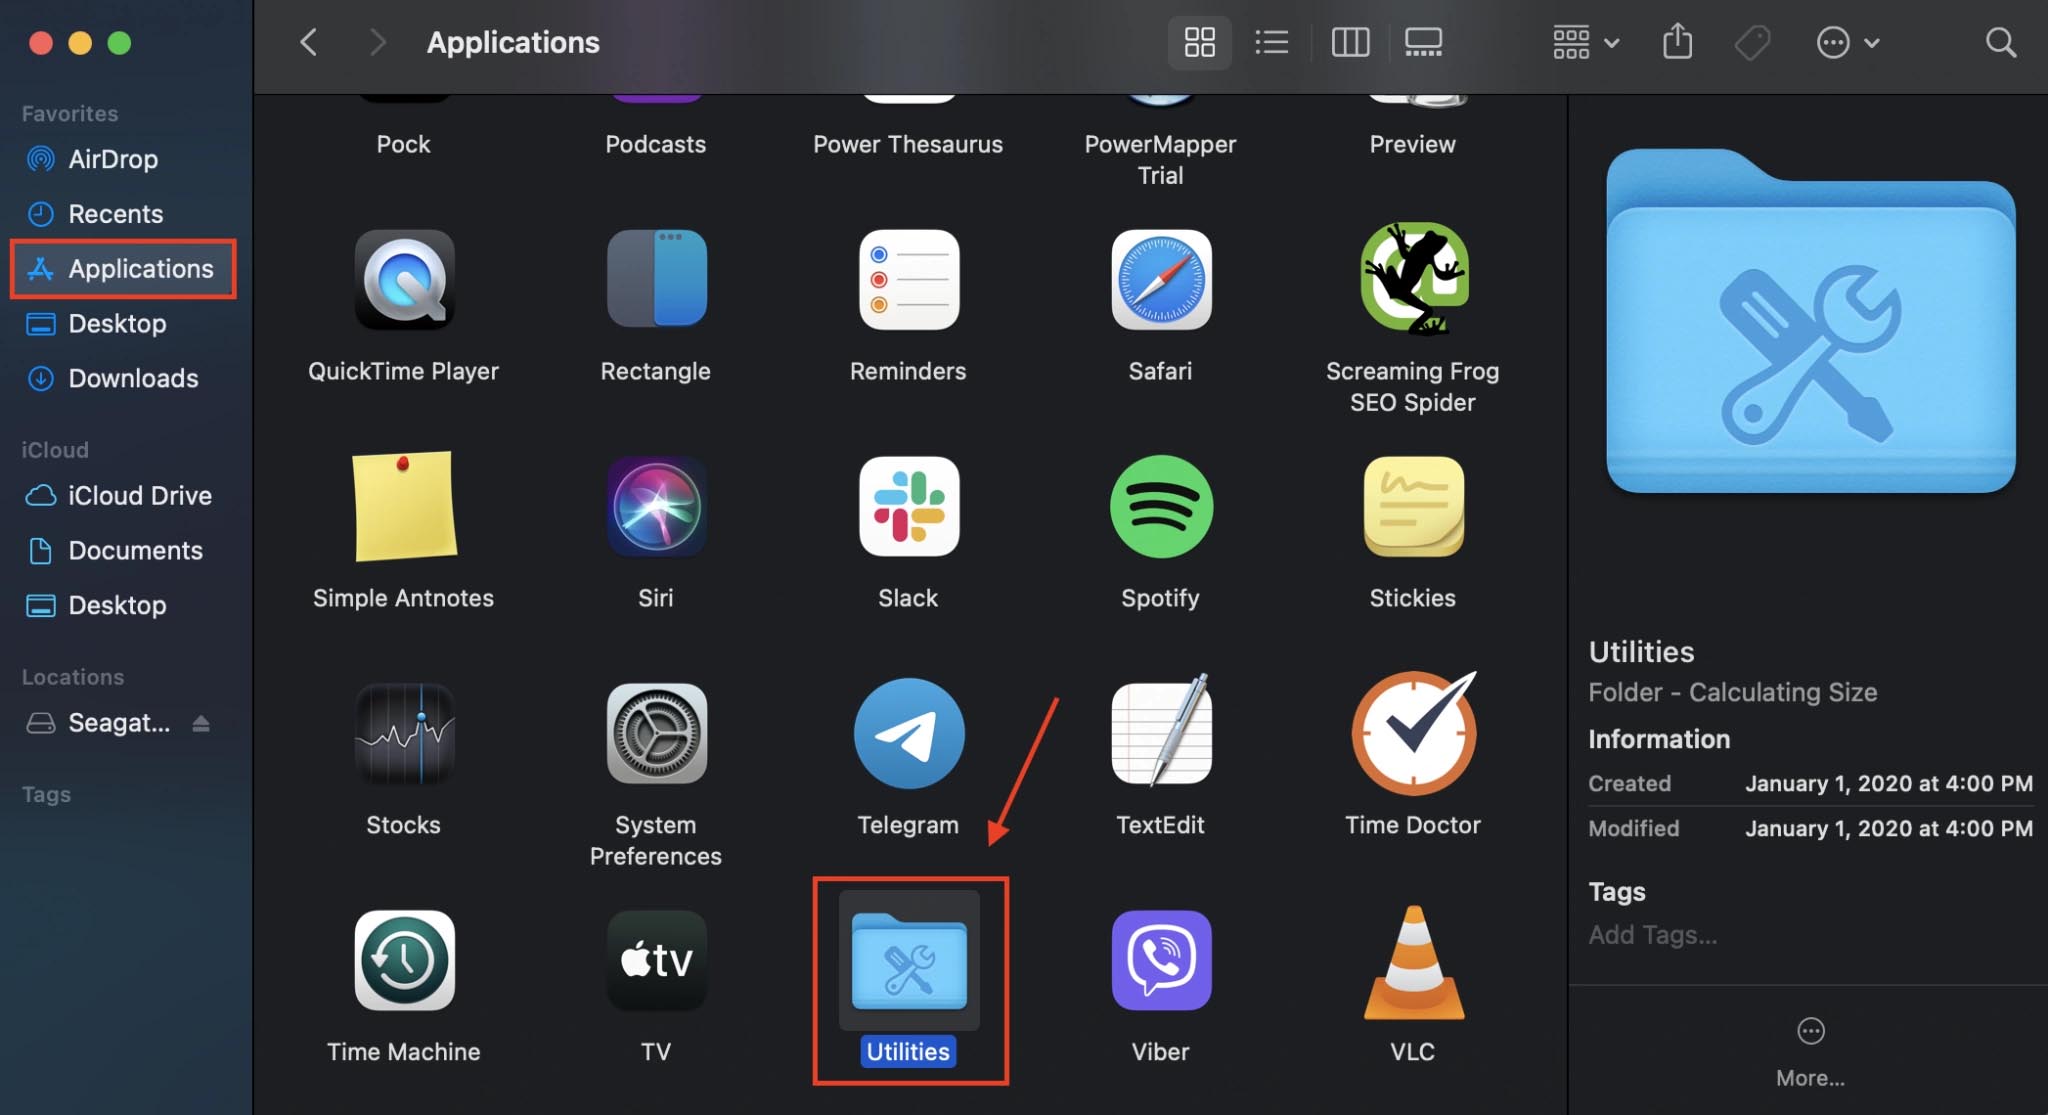
- Open the Utilities folder and locate Disk Utility.
- Select the drive where you will restore a volume to one the left sidebar, then click the “Restore” button in the menu bar.

- Select which volume you want to restore from the dropdown menu and click “Restore.”


FAQ
Even if your Mac can’t find your external hard drive, premium data recovery software like Disk Drill can actually detect it and engage with it.
To recover files from an external hard drive that won’t boot, do the following:
- Open Disk Drill by using Spotlight Search (CMD + Space) or by going to Finder > Applications > Disk Drill.
- Select the external hard drive that you want to recover. You should see it greyed out, but you can still click on it.
- Check the right sidebar to make sure that “All Recovery Methods” is selected.
- Click “Search for lost data.”
- Once Disk Drill completes the scan, you can look through recoverable files by file type.
- If you want to recover all of your files, click “the Recover All” button at the bottom of the window. If you only want to recover specific files, mark the checkboxes beside those files and click the “Recover” button at the bottom of the window.
- On the window that pops up, select the location where you want to restore your newly recovered files.
Before attempting to repair your drive, recover and back up your data first. Please refer to FAQ #1.
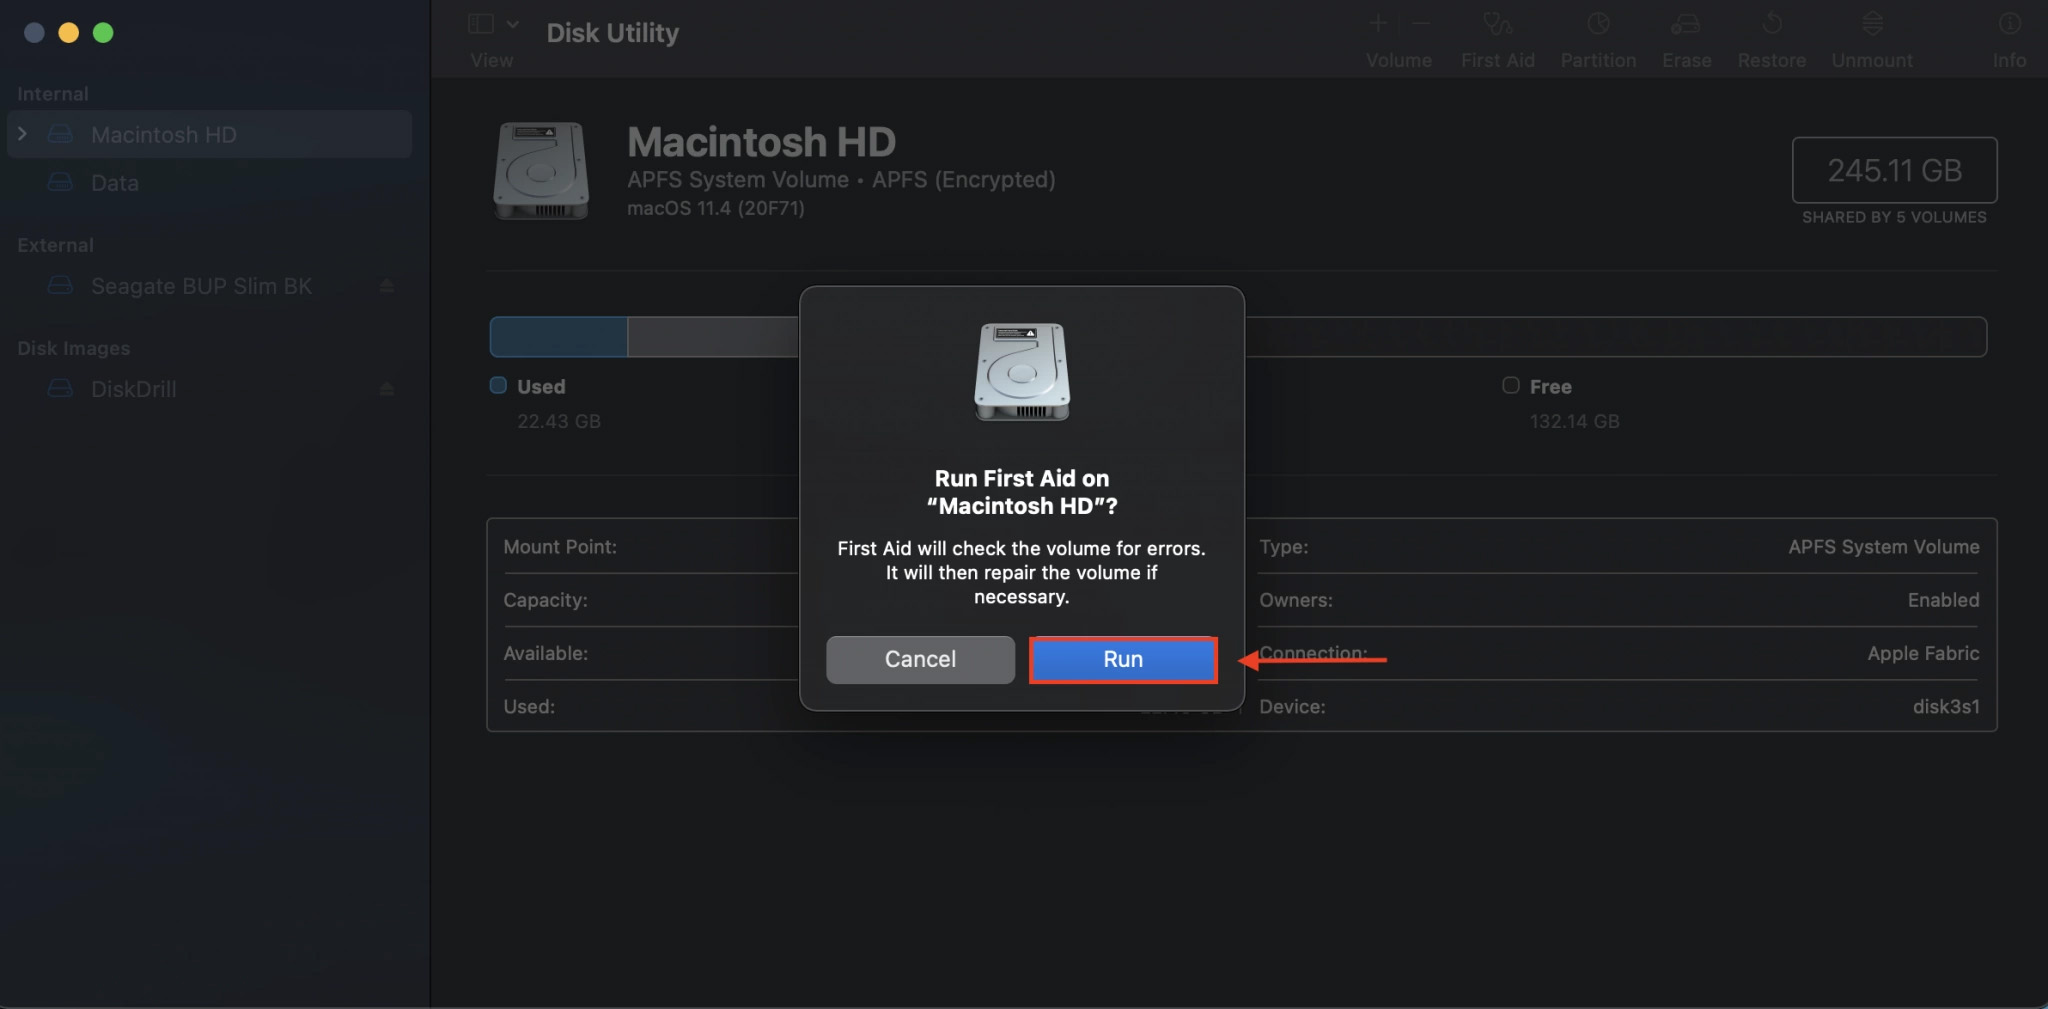
Option 1: Use Disk Utility’s First Aid Feature
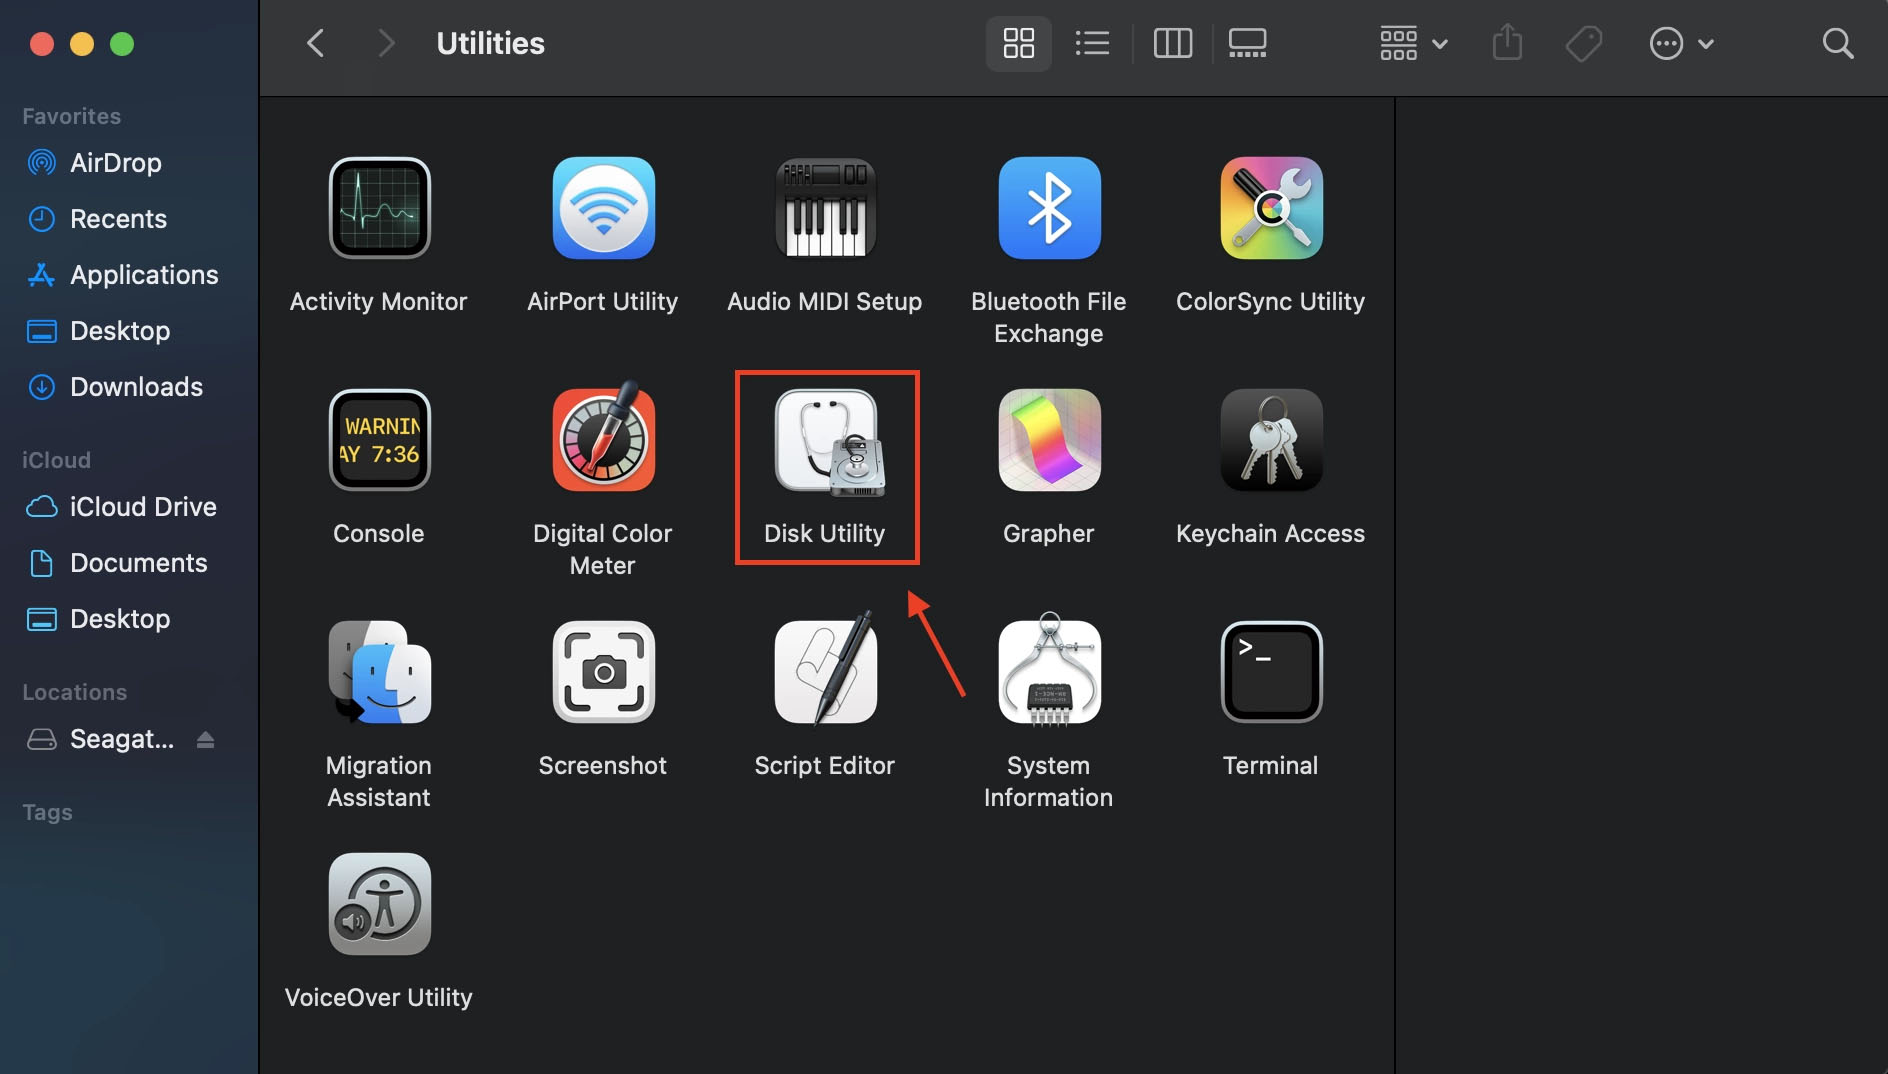
- Open Disk Utility by using Spotlight Search (CMD + Space) or by going to Finder > Applications (left sidebar) > Utilities Folder > Disk Utility app
- Select the drive you want to attempt repair on.
- Click “First Aid” at the top right corner of the Disk Utility window.
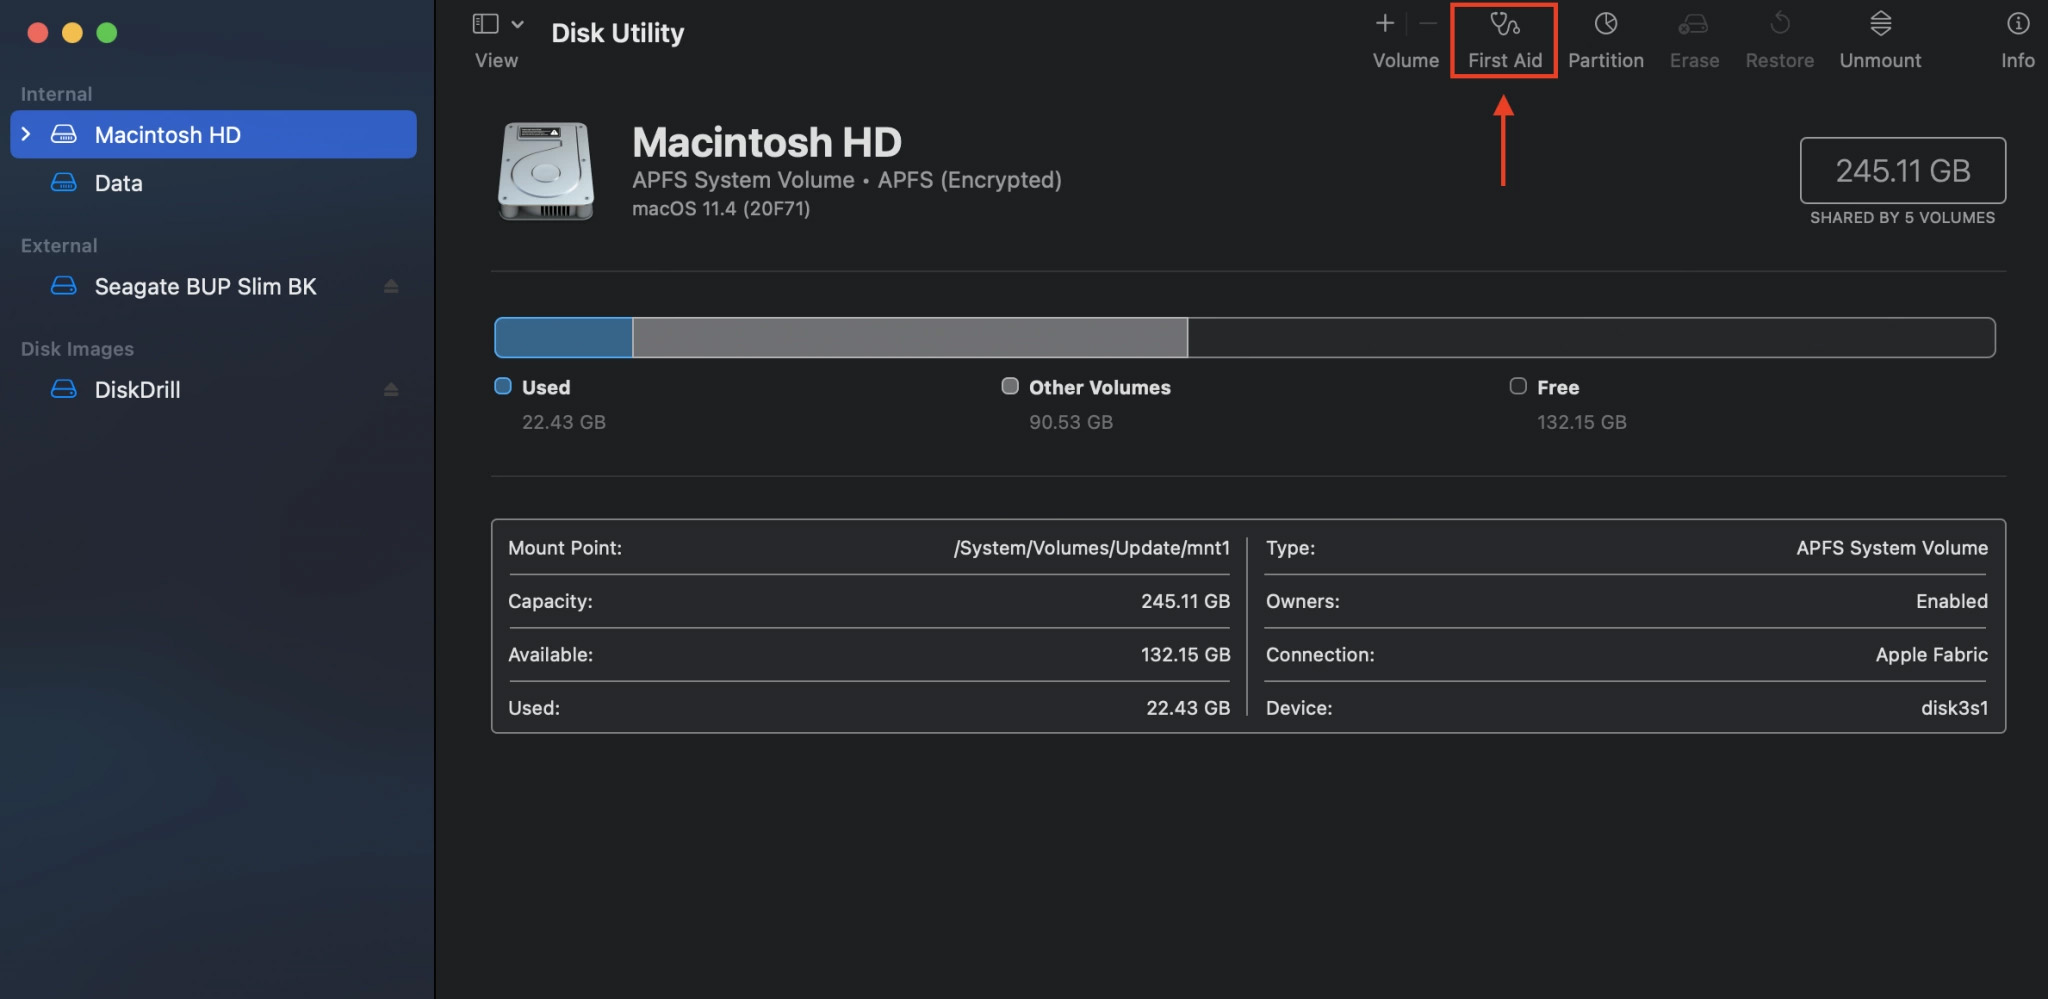
- Click “Run” on the confirmation window that pops up.


Option 2: Use the terminal
- Open Finder by clicking its icon on your Dock or typing it in Spotlight Search (CMD + Space).
- Open the Applications folder.
- Locate the Utilities folder and open it.
- Locate the Terminal app and open it.

- Type this command and hit Return:
diskutil repairVolume /Volumes/[Drive Name]
For example:
diskutil repairVolume /Volumes/Seagate BUP Slim BK

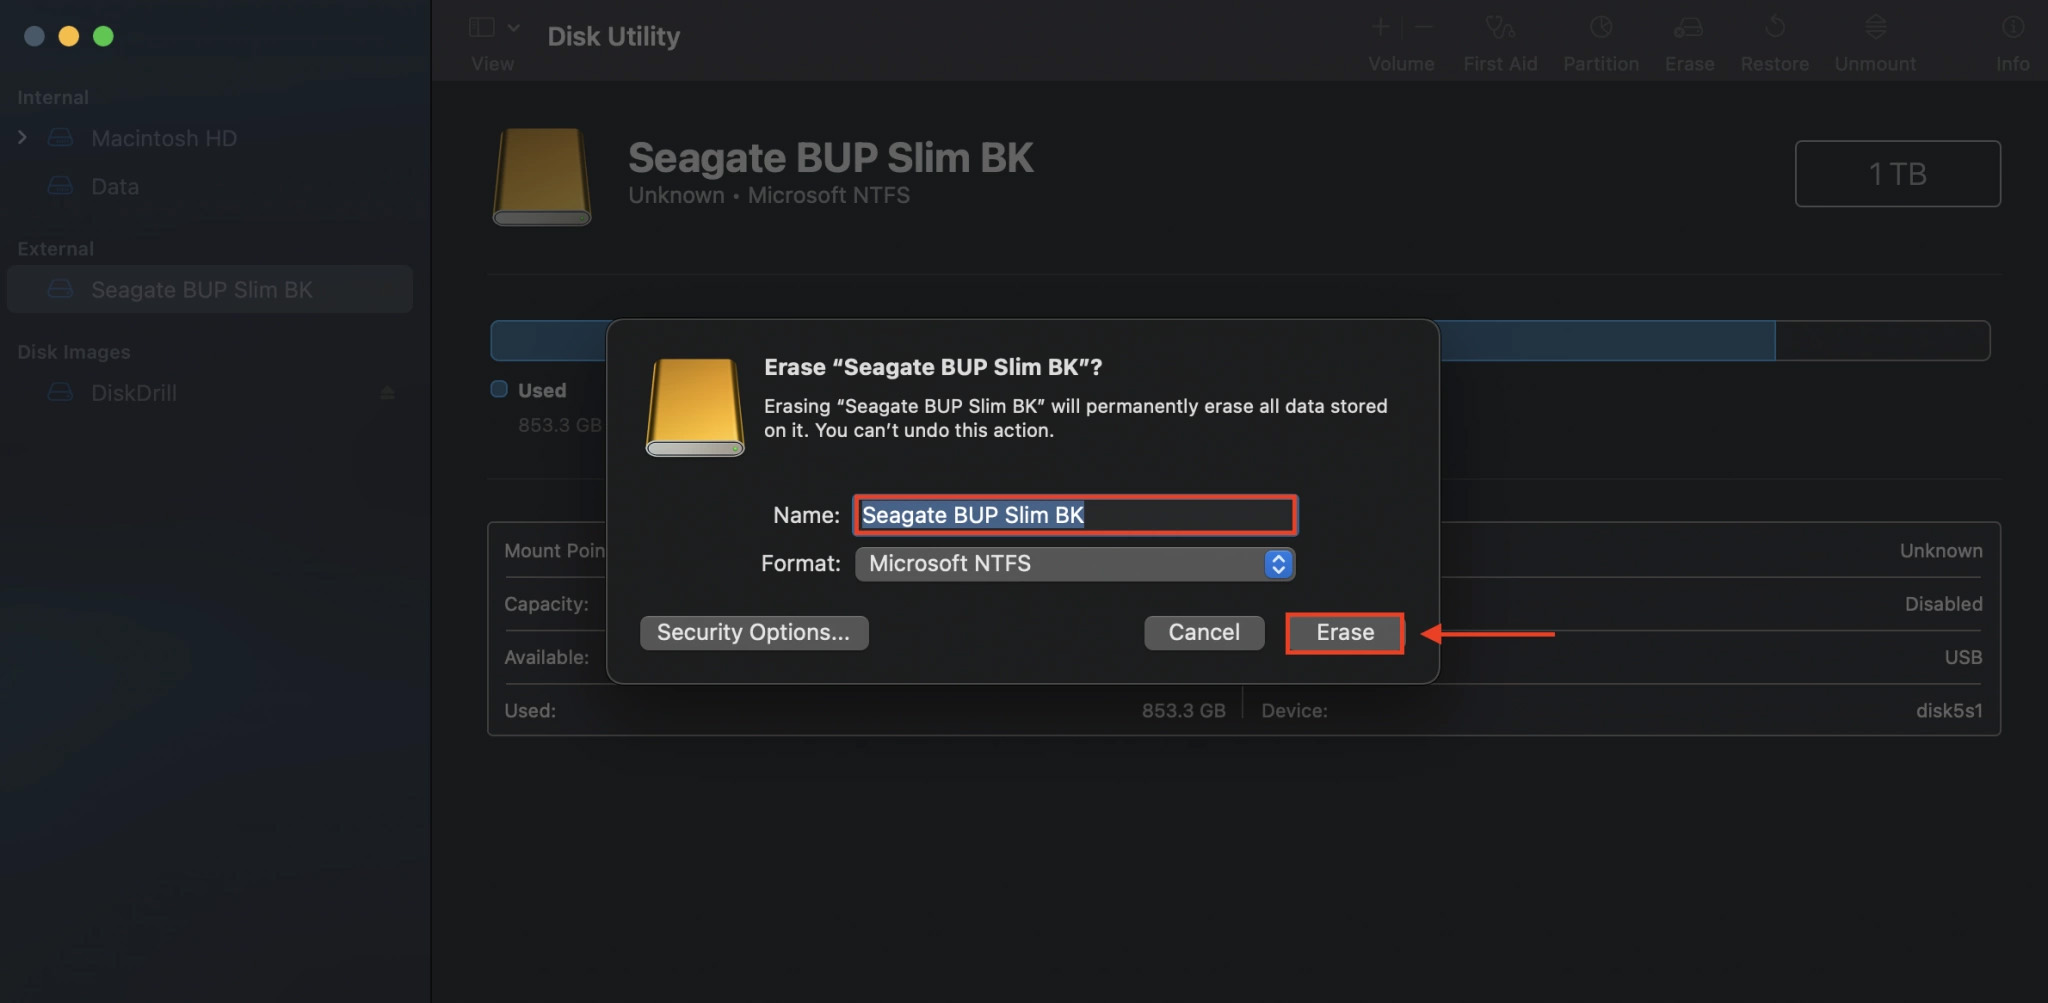
Option 3: Format your external hard drive using Disk Utility
Sometimes, a disk format is all you can do to repair your external hard drive. Before you do this, remember that you can recover and backup your data – even if your Mac can’t detect your drive. Please refer to FAQ #1.
- Open Disk Utility by using Spotlight Search (CMD + Space) or by going to Finder > Applications (left sidebar) > Utilities Folder > Disk Utility app.
- Select the drive you want to format.
- Click the “Erase” button at the top right corner of the Disk Utility window.

- Name your external hard drive and click “Erase.”


Time Machine and Disk Utility are free native apps for the Mac. So if you’re lucky, it won’t cost you a dime. That said, Disk Drill is $89 and a one-time purchase – and for an additional $29, you can get Lifetime Upgrades. It’s affordable insurance for when the moment inevitably comes that you need a quick and reliable way to recover data.
On that note, Disk Drill Basic is 100% FREE, which means that you can first make sure that your files are recoverable before deciding to buy.
To recover files from an external hard drive that won’t boot on your Mac, try the following solutions:
- Restore a Time Machine backup of your drive (if you created one)
- Use data recovery software to restore your files (in case of accidental deletion, corruption, and other logical damage)
- Hire a professional data recovery service (in case of physical or mechanical damage)
Conclusion
Fortunately, there are multiple ways to recover data whether your files have been accidentally deleted, corrupted, infected by malware, or even if your hard drive has been completely submerged in water.
But better yet – always back up your files. Premium recovery software like Disk Drill have backup features that are just as good (if not better) than native apps like Time Machine and Disk Utility, but those still work really well.
After all, prevention is always better than cure.