
Table of Contents
Few things are quite as alarming as prematurely deleting or completely losing a partition on your Mac, especially if it’s filled with important work data or treasured personal files. The good news is that there are various methods you can leverage to retrieve those missing partitions, along with the files stored within them.
But before we jump into these techniques, it’s important to be aware of the different complexities that factor into data recovery in general. In this guide, we’re aiming to give you a better understanding of the partitions utilized by macOS, in addition to providing you with in-depth walkthroughs of the common methods for recovering Mac partitions that have been corrupted, deleted, or lost.
Understanding macOS Partitions
Partitions are logically separated storage systems within an individual disk. Think of partitioning like splitting up your current hard drive (or an external drive) into two independent containers. Effectively, you’re creating two different drives you can run and organize as you wish.
There are a few benefits to partitioning your hard drives. You can:
- Run multiple operating systems (e.g., macOS and Windows) on the same hardware.
- Test a new OS without compromising your current one.
- Simplify your backups by isolating key files from OS files and applications.
The “why” behind partitioning is usually to achieve a set goal rather than doing so on a whim. That’s because there are real disadvantages to partitioning drives. Namely, it reduces the storage space of the partitions as the drive is split.
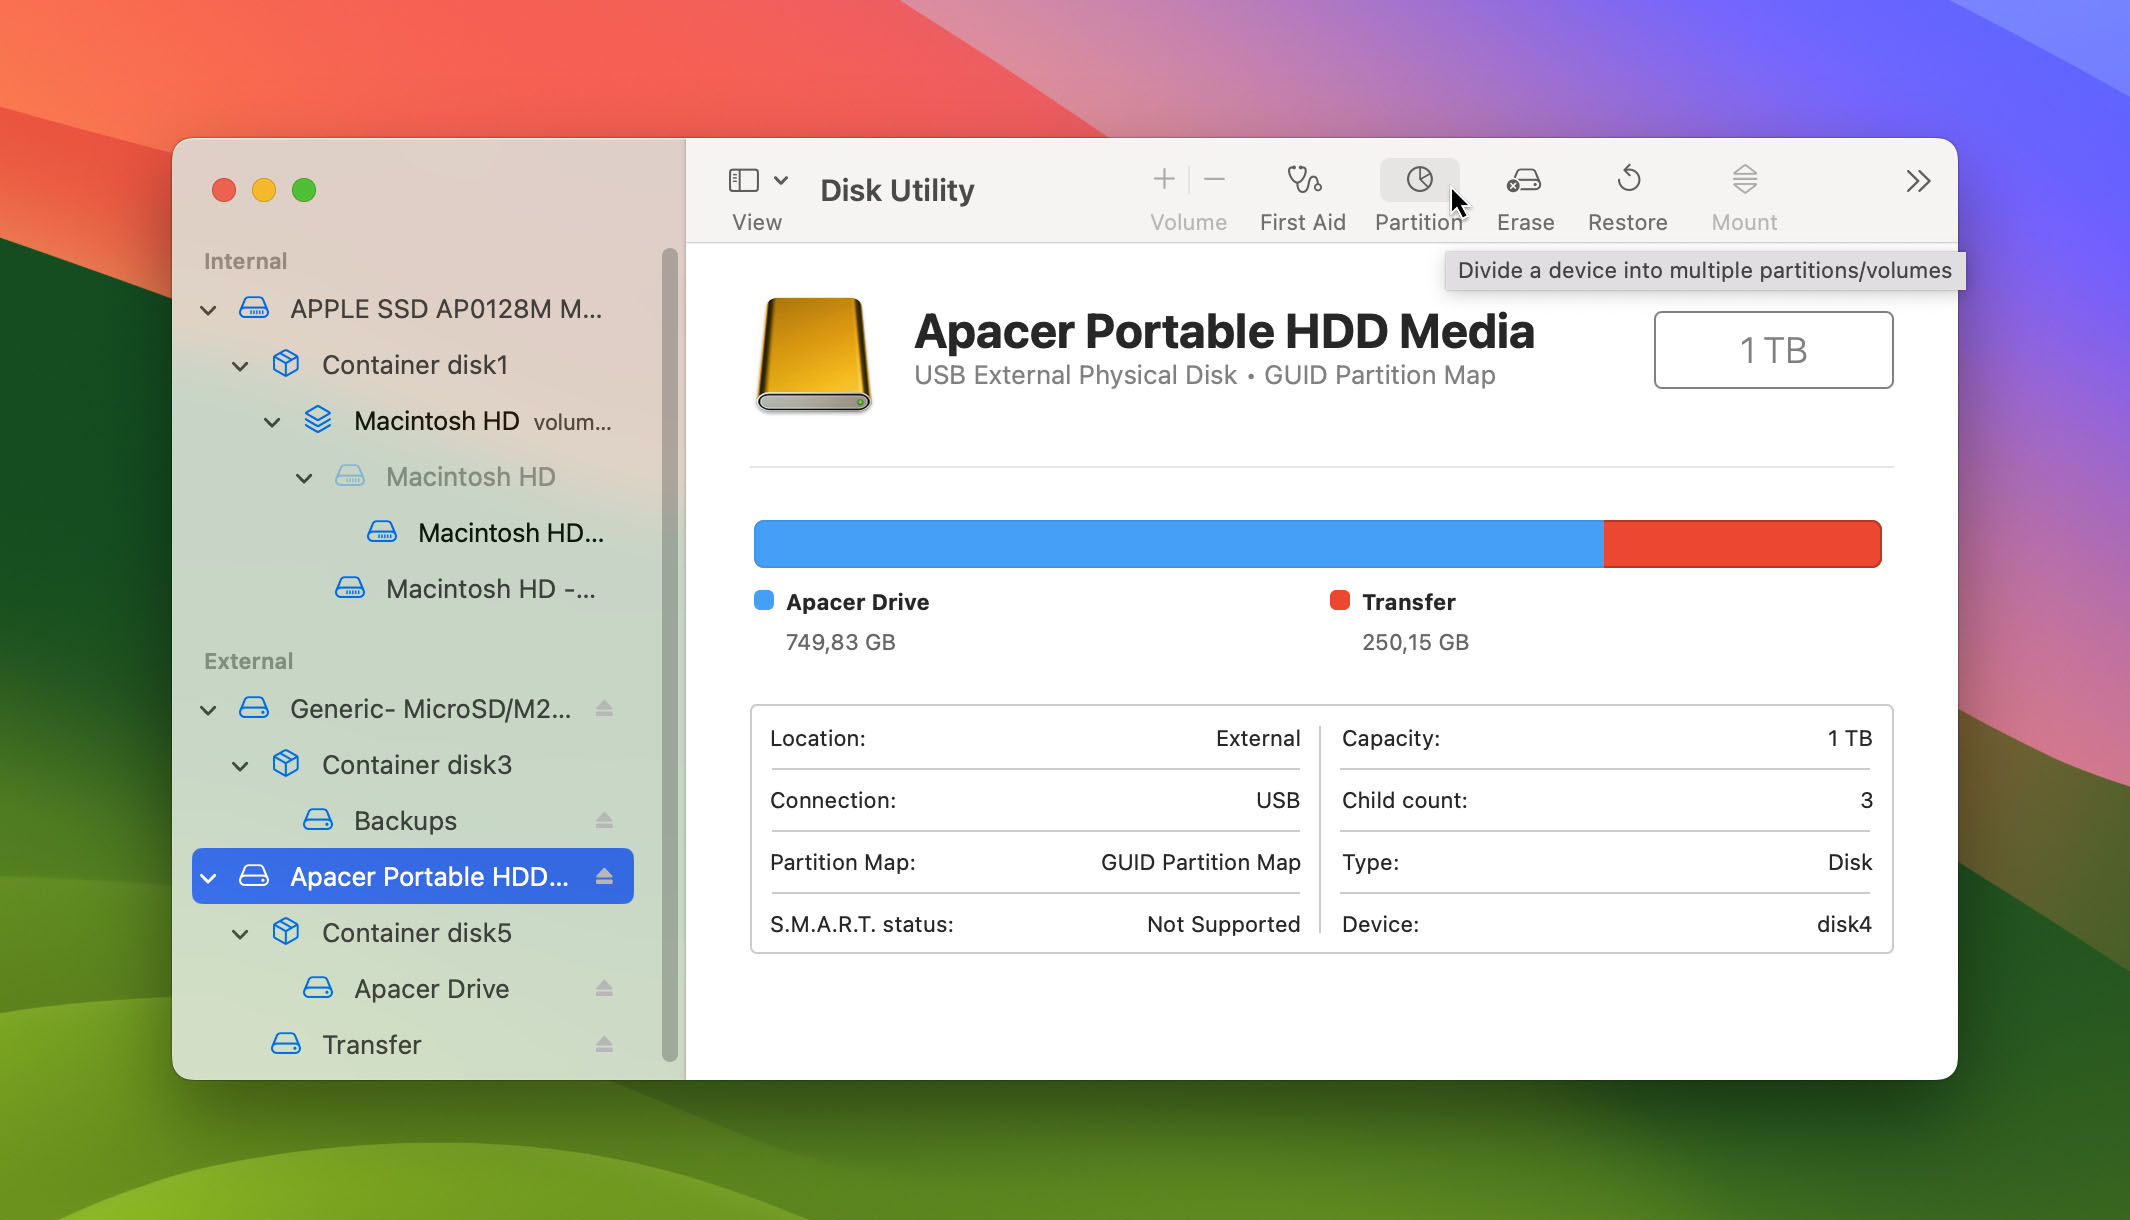
Disk Utility makes it incredibly easy to create partitions and volumes on your Mac.
*We’re using macOS Big Sur Version 11.6. The process may vary a bit for other versions.
To add partitions or volumes to your Mac:
- Enter “disk utility” into the Spotlight search bar and select the first result that appears.
- Next, select the disk/volume you want to partition and click the “Partition” button near the top of the window.
- After that, click the + sign under the pie chart and a pop-up will appear. Choose the “Add Partition” option.
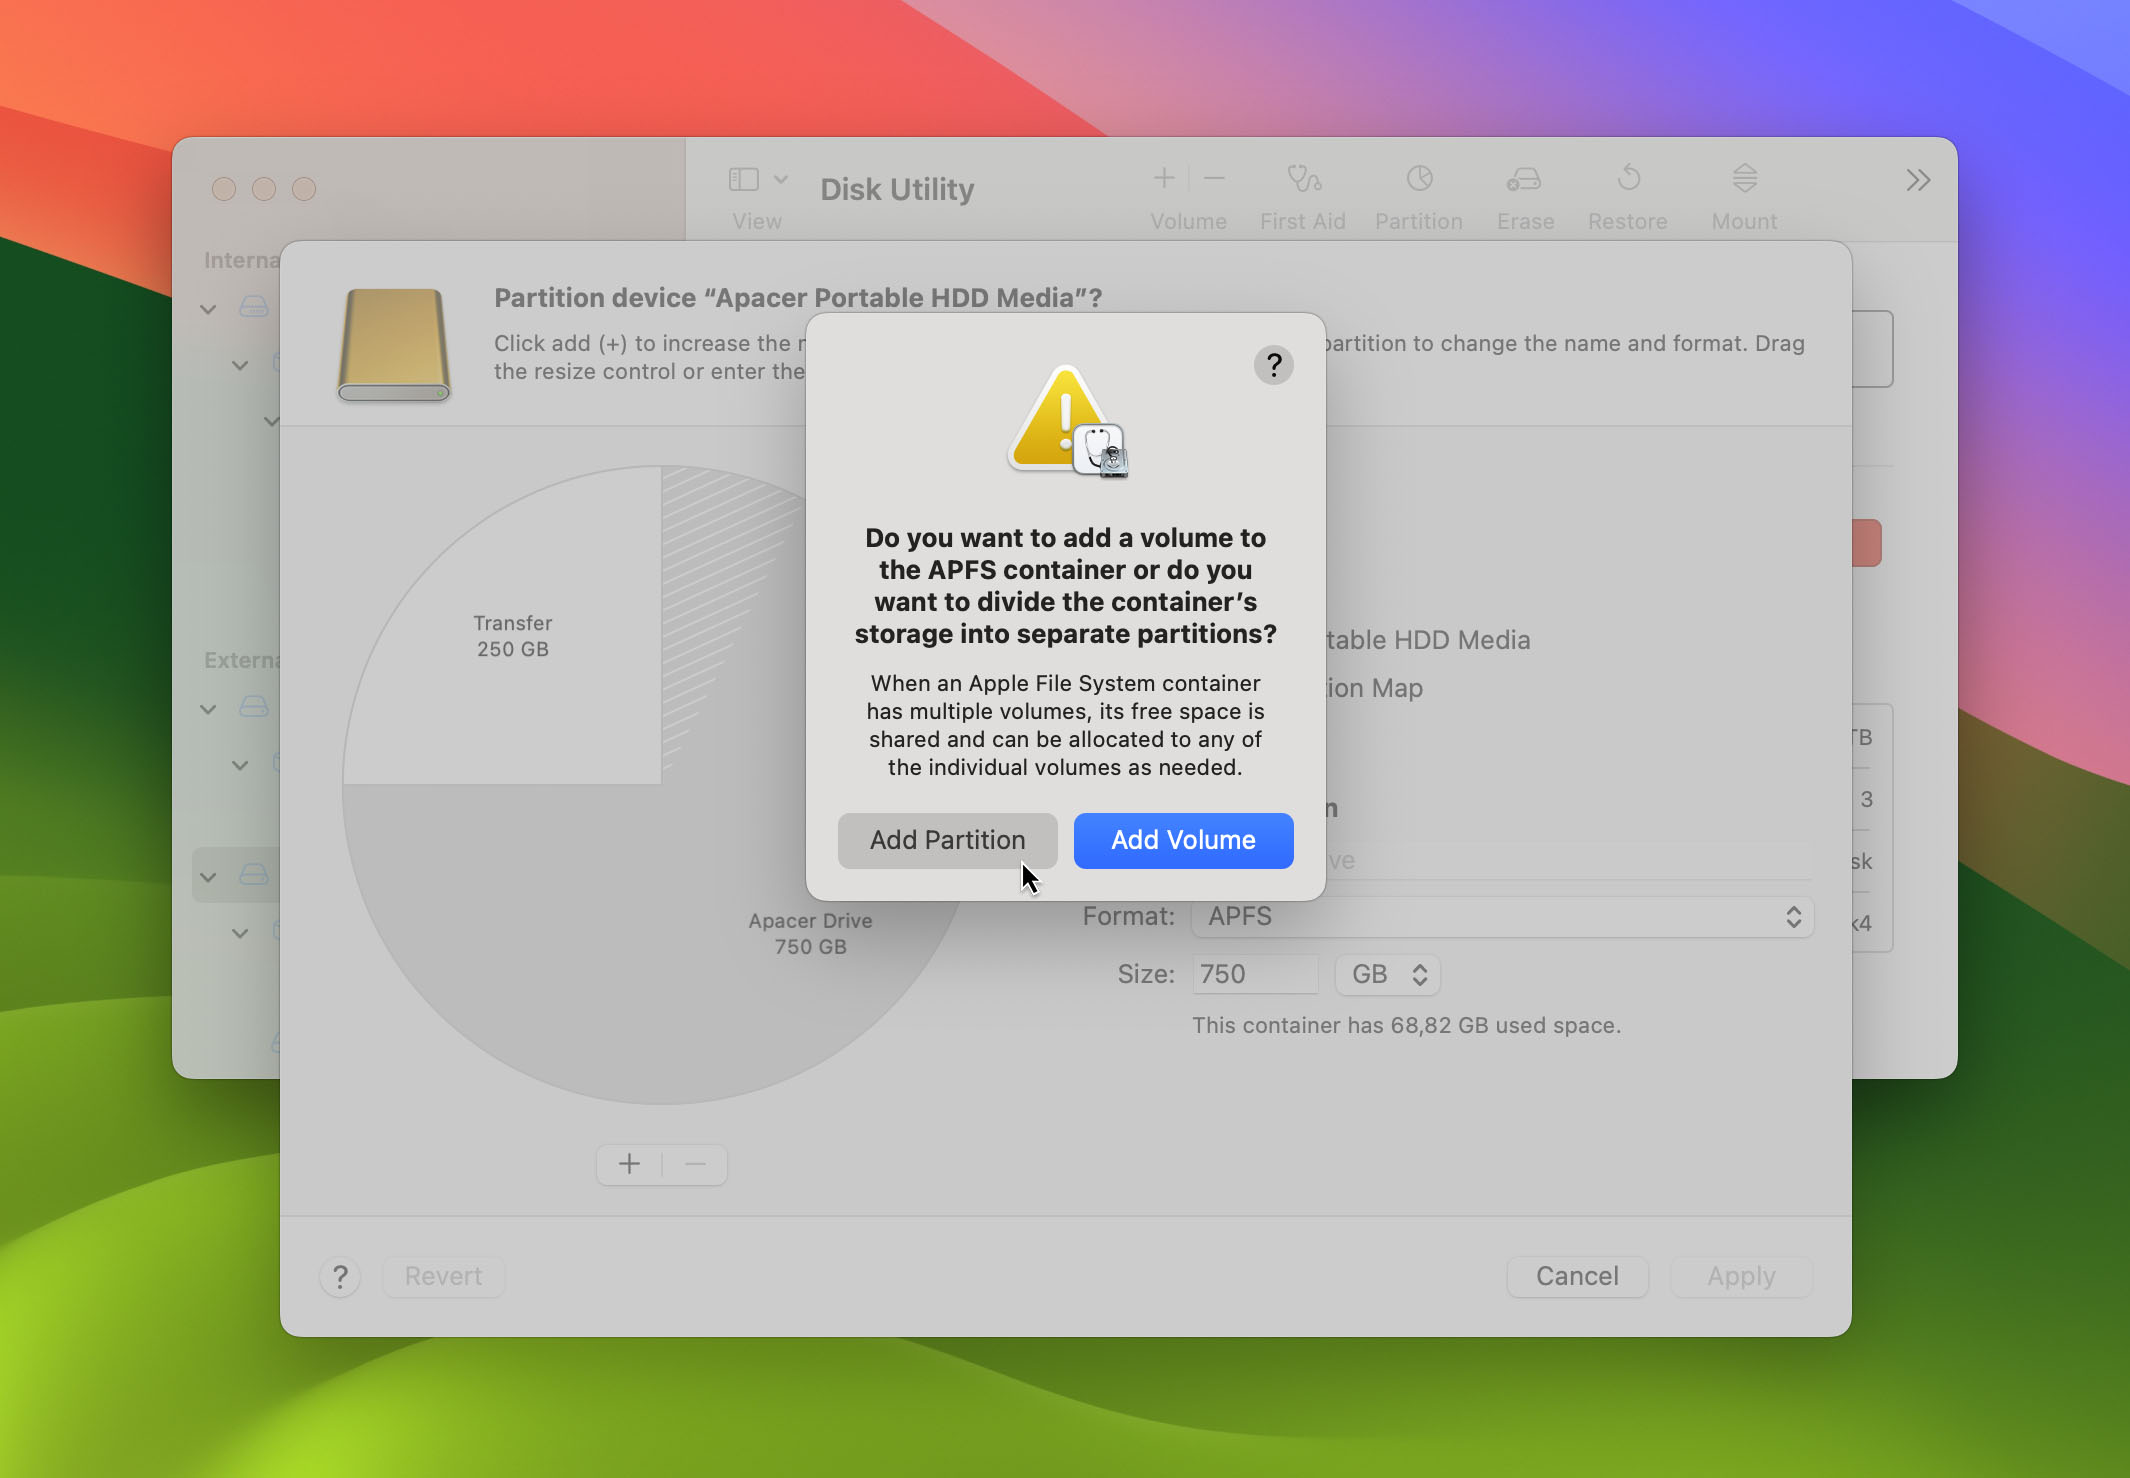
- Configure the name, format, and size of your partition under “Partition Information” and click the “Apply” button. From there, confirm the succeeding prompts and your new partition should be ready.


Types of File System Formats
Similar to Windows and Linux operating systems, macOS versions were developed to function with specific file system formats, each with its own set of features and specifications.
Below is an informative table showcasing the technical specifications of the three file systems used by Mac operating systems, along with a comparative analysis to illustrate some of their strengths, weaknesses, and when they’re best used. We’ve also included some notes on how each file system format came to be.
| Aspect | Apple File System (APFS) | Mac OS Extended (HFS+) | MS-DOS (FAT) & exFAT |
| Comparative Analysis |
|
|
|
| Technical Specifications |
|
|
|
| Evolution and Context |
|
|
|
Common Reasons for Partition Loss or Deletion
There are several scenarios that may lead to data loss, including user error, hardware failure, operating system trouble, and more. To help you get acquainted with the different situations, we’ve come up with the following list:
| Reason | Scenario |
| Accidental deletion |
|
| Disk Utility errors |
|
| File system corruption |
|
| Operating System (OS) failures |
|
| Hardware failures |
|
| Software conflicts or errors |
|
| Human error in command line usage |
|
How to Recover Deleted Partition Data on Mac
There are two tried-and-tested ways for recovering deleted files on a Mac. You can use the Mac’s built-in Time Machine backup feature, or you can seek the help of a data recovery solution.
Having a backup is always ideal when data loss is concerned since that would make the file retrieval process a whole lot simpler while minimizing the risks in the process. All you’d have to do is restore the backup, and you’re all set. But we understand that that’s not always the case.
With the absence of a backup, your best bet in retrieving deleted or lost data on your Mac is to utilize an effective data recovery program. We’ve picked out and thoroughly tested two different recovery tools that yielded stellar results in rescuing deleted partitions on Mac. Each of them has its own merits and drawbacks, which we’ve laid out in the following table:
| Criteria | Disk Drill | PhotoRec |
| User-Friendliness | Graphical user interface (GUI) that is intuitive and easy to navigate. | Command-line interface (CLI), which can be less intuitive for users unfamiliar with terminal commands. |
| File recovery efficiency | Recovers a wide range of file types, including specific formats of documents, photos, videos, and more. | Recovers a wide range of file types, including documents, photos, videos, and more. |
| Deep Scan Capabilities | Can recover a variety of file types and formats, including partitions. Offers deep scan and quick scan options. | Capable in file recovery however it is worth noting that PhotoRec utilizes signature scanning and is not capable of recovering original file names. |
| Supported File Systems | Supports various file systems including APFS, HFS+, NTFS, ExFAT, FAT32, and more. | Can recover data from a wide range of file systems, including NTFS, exFAT, FAT, EXT, HFS, and more. |
| Scanning Speed | Fast scanning speeds. Performance varies based on the size and condition of the disk. | Can be slower, especially on larger drives, but thorough in searching for recoverable files. |
| Cost | Offers the ability to scan hard drives for free and preview recoverable files. Recovery requires obtaining the license. | Completely free and open-source software. |
Method 1: Using Disk Drill
Disk Drill is an exceedingly popular data recovery solution that boasts top-notch recovery rates, an accessible user interface, and speedy scans. Not only is it compatible with pretty much any file type around, but it also supports all file systems utilized by macOS.
On top of that, it’s also known to detect corrupted storage devices that are no longer accessible by Finder, making it a great choice for restoring corrupted partitions.
If you’re interested in trying it out, Disk Drill has a trial version that includes all of the program’s bells and whistles, though it only gets as far as showing you potentially retrievable files. From there, you’ll need to purchase a license to complete the recovery process.
Here’s an easy step-by-step guide on how you can use Disk Drill to retrieve files from a lost or deleted partition:
- Begin by heading to the Cleverfiles website to download the latest version of Disk Drill, then install it on your Mac.
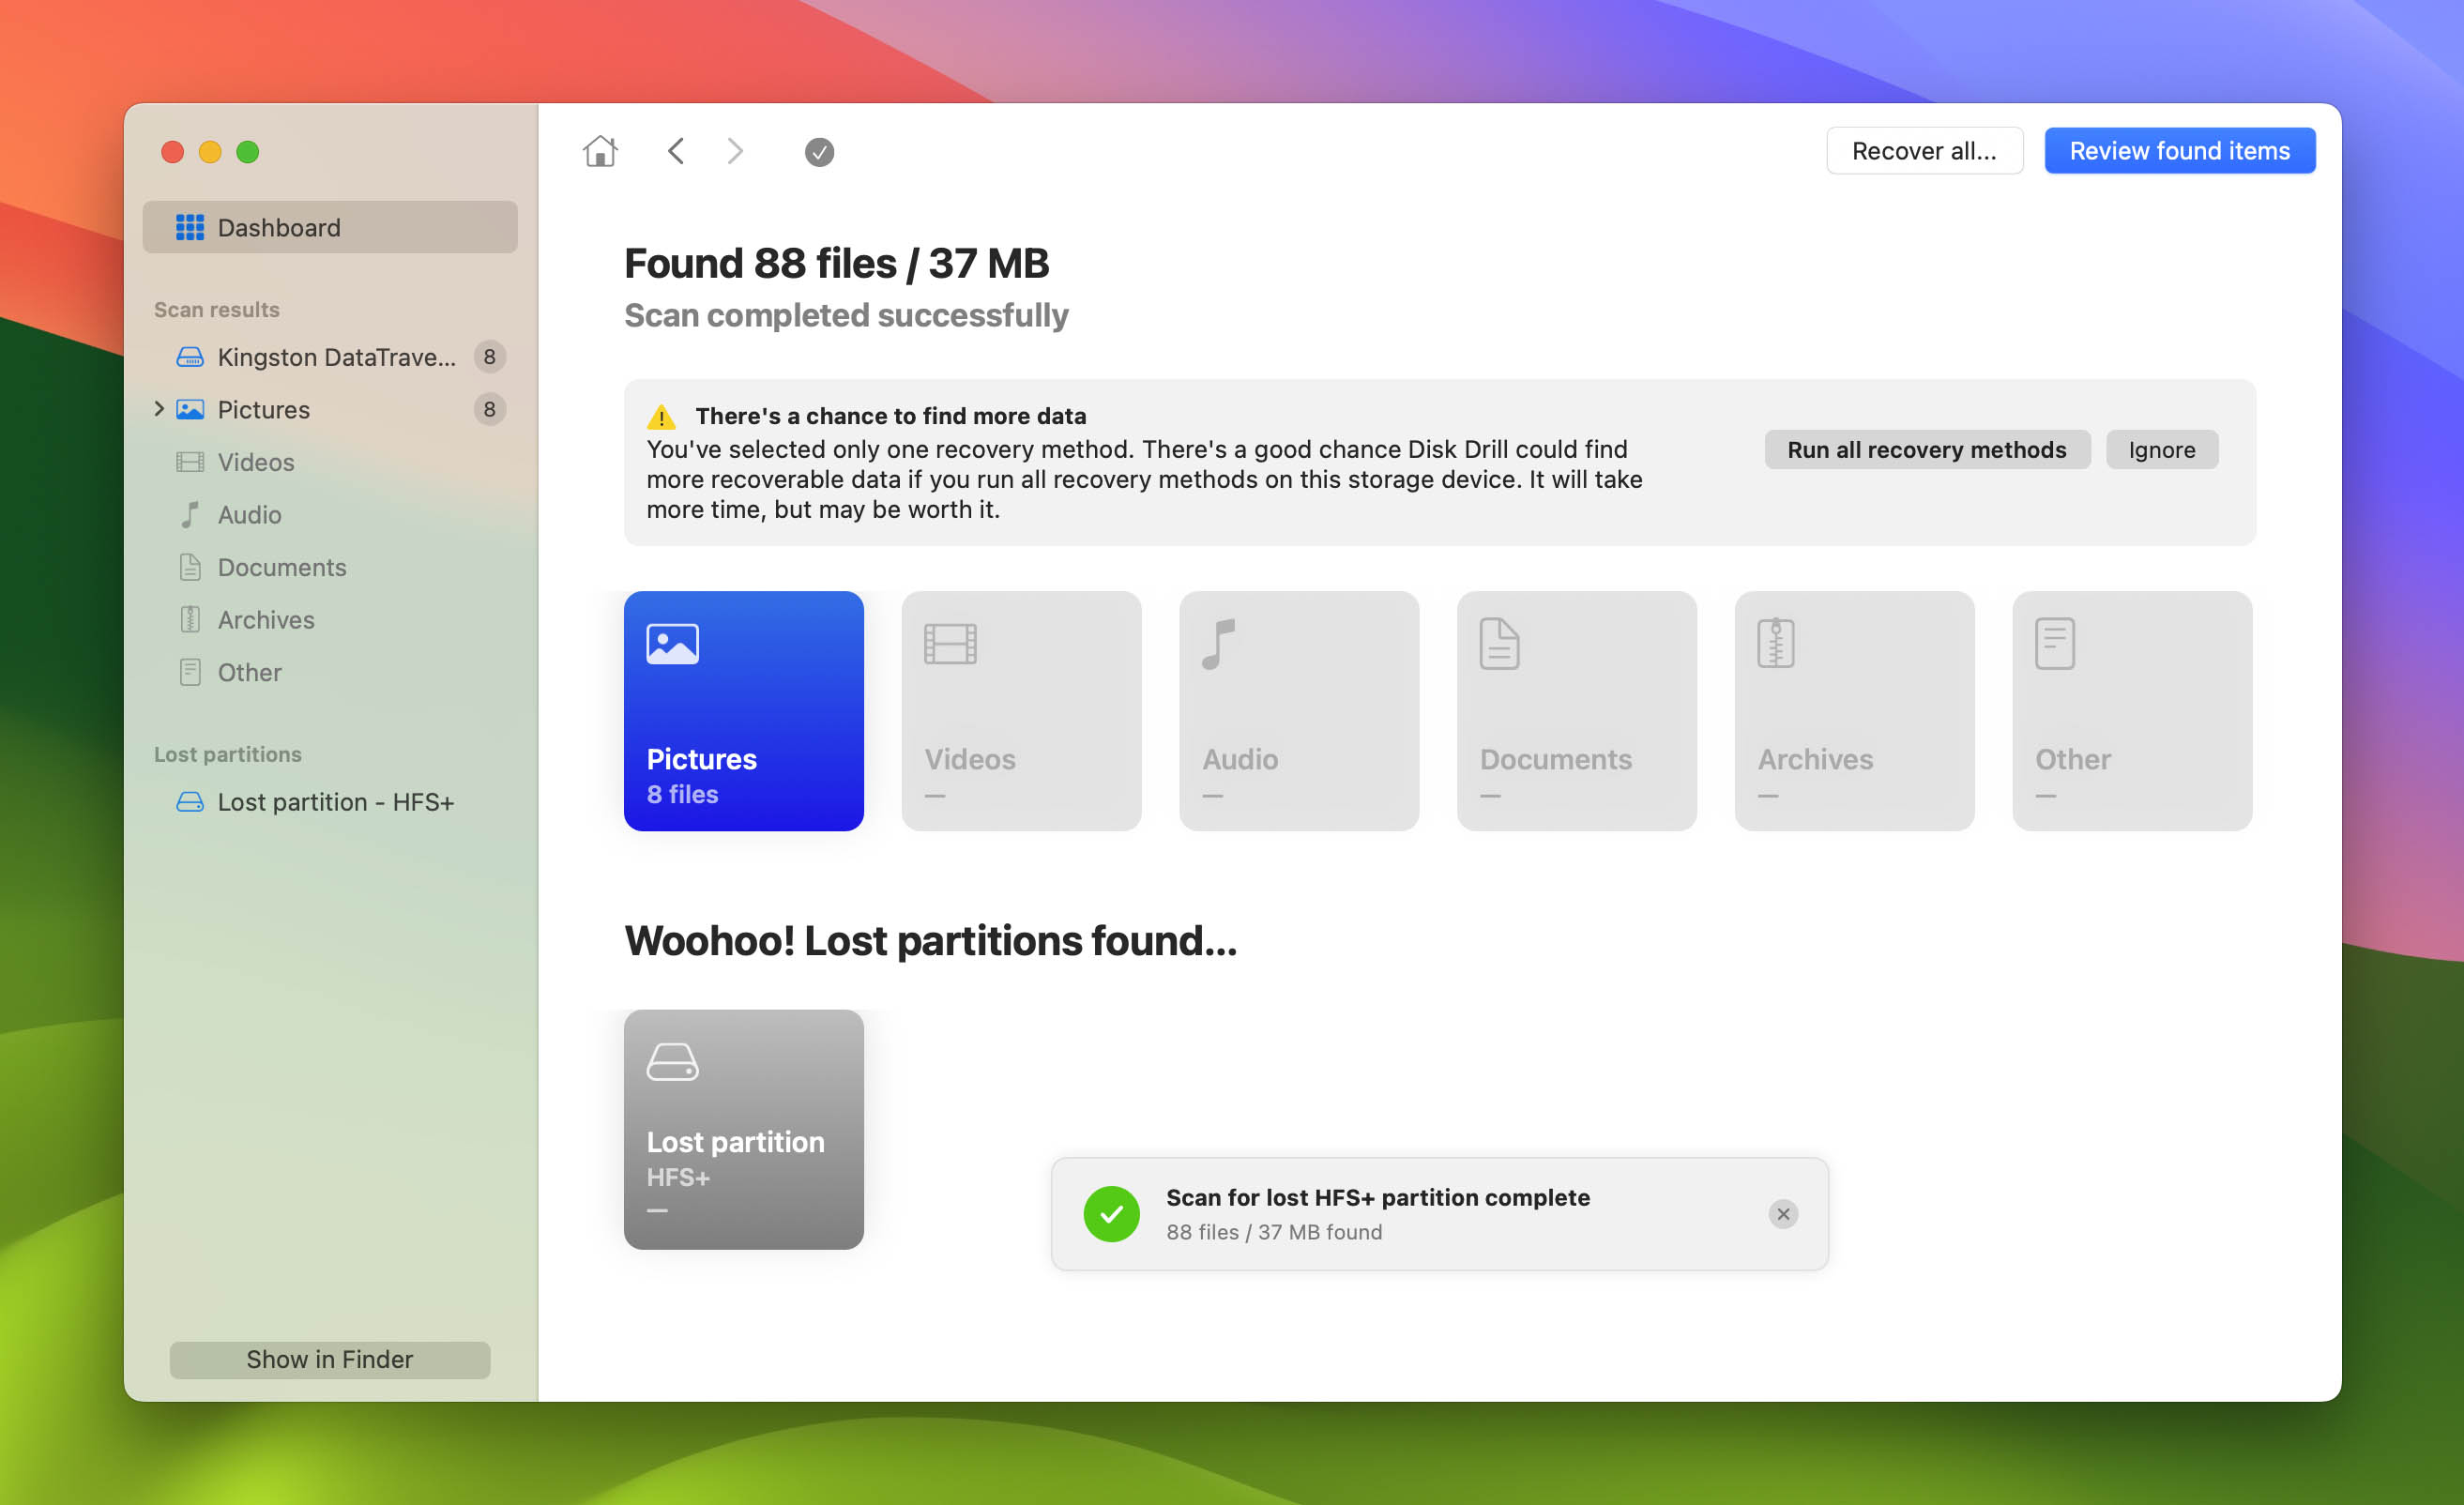
- Launch the app and turn your attention to the storage device that contains your lost partition. Since the missing partition is unlikely to appear on the app but may be detected as unallocated space, it’s best to scan the entire disk. Click the “Search for lost data” button to proceed.

- After that, Disk Drill will start scanning the disk for all retrievable files. There’s also a chance that the app locates the entire missing partition depending on the data loss scenario and how long it’s been since the partition was lost. This process could take a while depending on your storage device’s overall capacity, as well as the connection method, the number of file systems on the device, the presence of bad blocks, and how fragmented the disk is. Once the scan is completed, click the “Review found items” button at the window’s top-right corner.

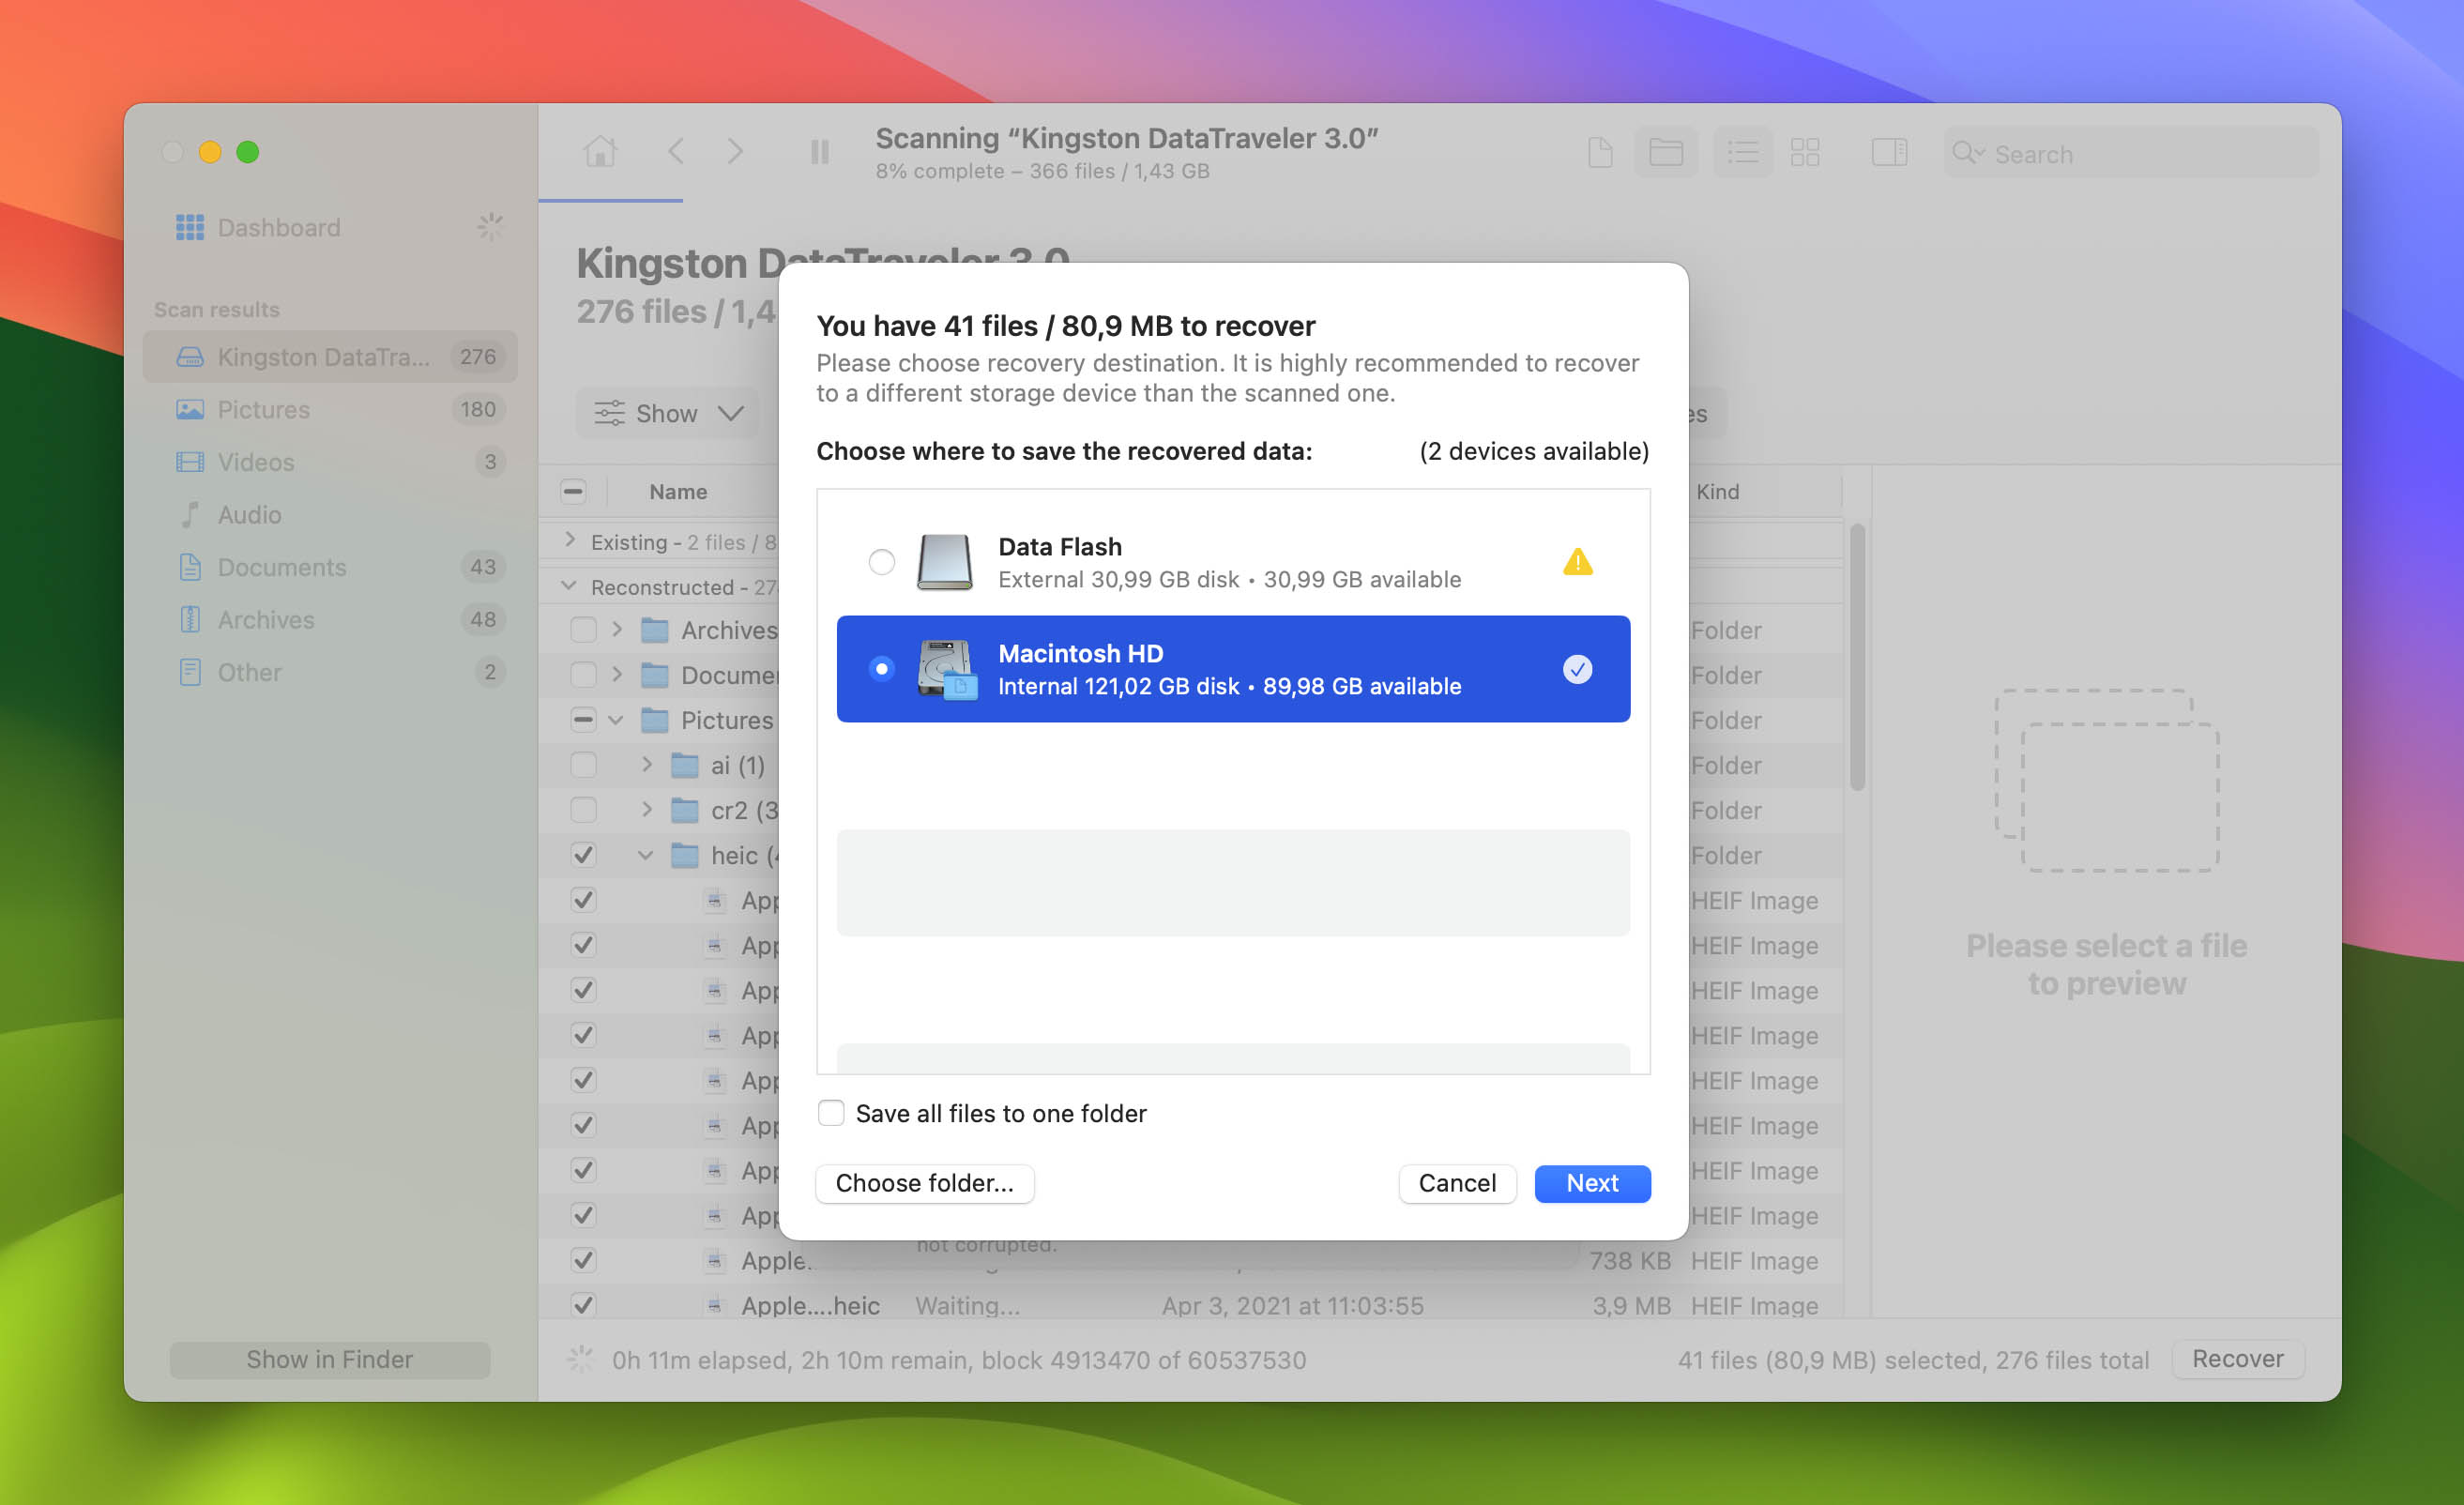
- Once you get to the results screen, you’ll likely be faced with a daunting amount of results. To narrow down the list, you can use the categories on the left side of the window, as well as the search bar in the top-right corner. Keep in mind that the search accepts both file names and file extensions. Tick the checkbox right beside the file or folder name to select it, then click “Recover” to continue.

- Upon clicking, you’ll see a small pop-up appear asking you to decide on a location to save your recovered files. To avoid issues, you should choose a storage device different from the one that contains the partition you’re trying to restore. Hit “Next” to proceed.
- Disk Drill will now attempt to recover the selected files from the lost partition. If successful, you’ll see a completion screen and a button you can click to open the folder where your rescued files are located.


Method 2: Using PhotoRec
PhotoRec is an open-source alternative that’s totally free and considered by many as the best choice for those who aren’t willing to shell out cash for a data recovery solution. The app offers a commendable range of file type support and file system compatibility, along with thorough scanning capabilities that do a solid job of unearthing recoverable files.
However, computer novices may by put off by the fact that PhotoRec on Mac is purely command-line based, making it a bit too technical for those who are unfamiliar with the terminal tool. It also doesn’t allow you to retrieve individual files, but that shouldn’t be too much of an issue if you’re trying to recover all possible files from the lost partition.
If you don’t mind the lack of a graphical interface, this app is a good way to recover lost files while saving a buck. To get started, simply follow the steps below to recover lost partitions using PhotoRec:
- Make your way to the CGSecurity website, then download the latest version of PhotoRecand and extract it on your Mac.
- Once you run Photorec, select the device that contains your lost partition and hit the Enter key.

- Next, highlight your lost partition and press the Enter key.

- Choose the appropriate file system for the partition and hit Enter.

- After that, decide on the location where your retrieved files should be saved and tap the “c” key to finalize the process.

- The app will now start scanning the partition for any recoverable files and automatically restore them to the designated folder.


Method 3: Using Time Machine
As we mentioned at the beginning of this section, while data recovery programs certainly are handy, nothing beats having a backup ready when it comes to recovering lost partitions.
The next method we’ll go through utilizes Mac’s built-in Time Machine feature and can be a reliable way to rescue files, provided you have a backup created prior to your partition being lost.
The major limitation here is that the recovered files will not include any changes made after the backup was created, so you may have to deal with doing some extra work to get them up to date. That being said, here’s how you can easily use Time Machine to get back files from a lost partition:
- First, make sure the storage device used by Time Machine for backups is connected to your Mac. From there, enter the term “time machine” into the Spotlight search bar and select the first result that appears.
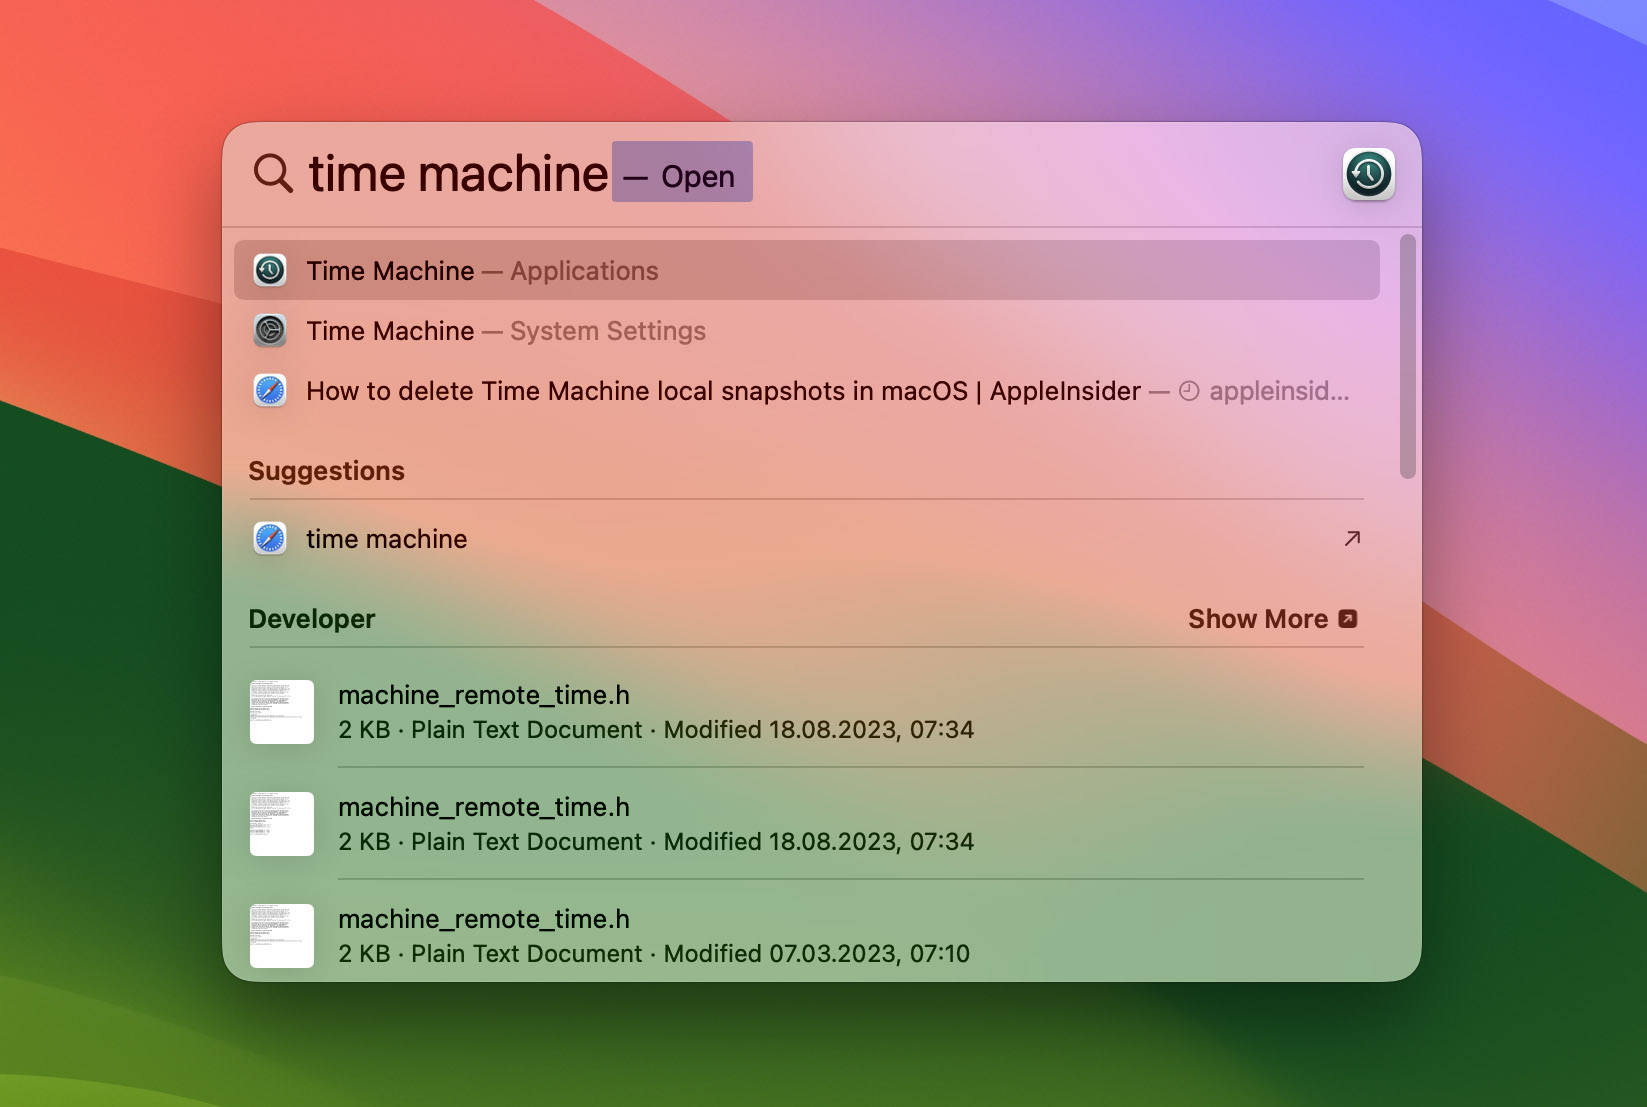
- Use the Time Machine interface to navigate your available backups and find the lost files you’re looking to recover.
- Next, highlight the files/folders you want to retrieve and hit the “Restore” button to return them to their original location.


Although Time Machine primarily uses an additional disk to store backups, it’s also capable of creating local snapshots in case the backup disk is not within reach.
Should you want to recover from a local snapshot, all you have to do is make sure the backup disk is not connected to your Mac and then go through Time Machine file restoration as usual.
How to Recover a Lost Partition Table on Mac
While data recovery software is often rich in features and functionality, it cannot fully recover a lost partition on a Mac. However, that doesn’t mean you are out of options.
If you find yourself needing to recover an entire partition, you can use a free tool called TestDisk. TestDisk is open-source software that fixes partition tables, recovers entire deleted partitions, and makes non-booting disks bootable again. It’s also completely free to use and installable using Homebrew.
All that said, it isn’t exactly user-friendly since it doesn’t have a graphical interface. As such, it needs to be run through macOS’s Terminal. But don’t let that scare you off. It’s quite easy to use, provided you have the proper roadmap.
Follow the steps below to use TestDisk to recover lost or deleted partitions on your Mac.
To recover full partitions using TestDisk:
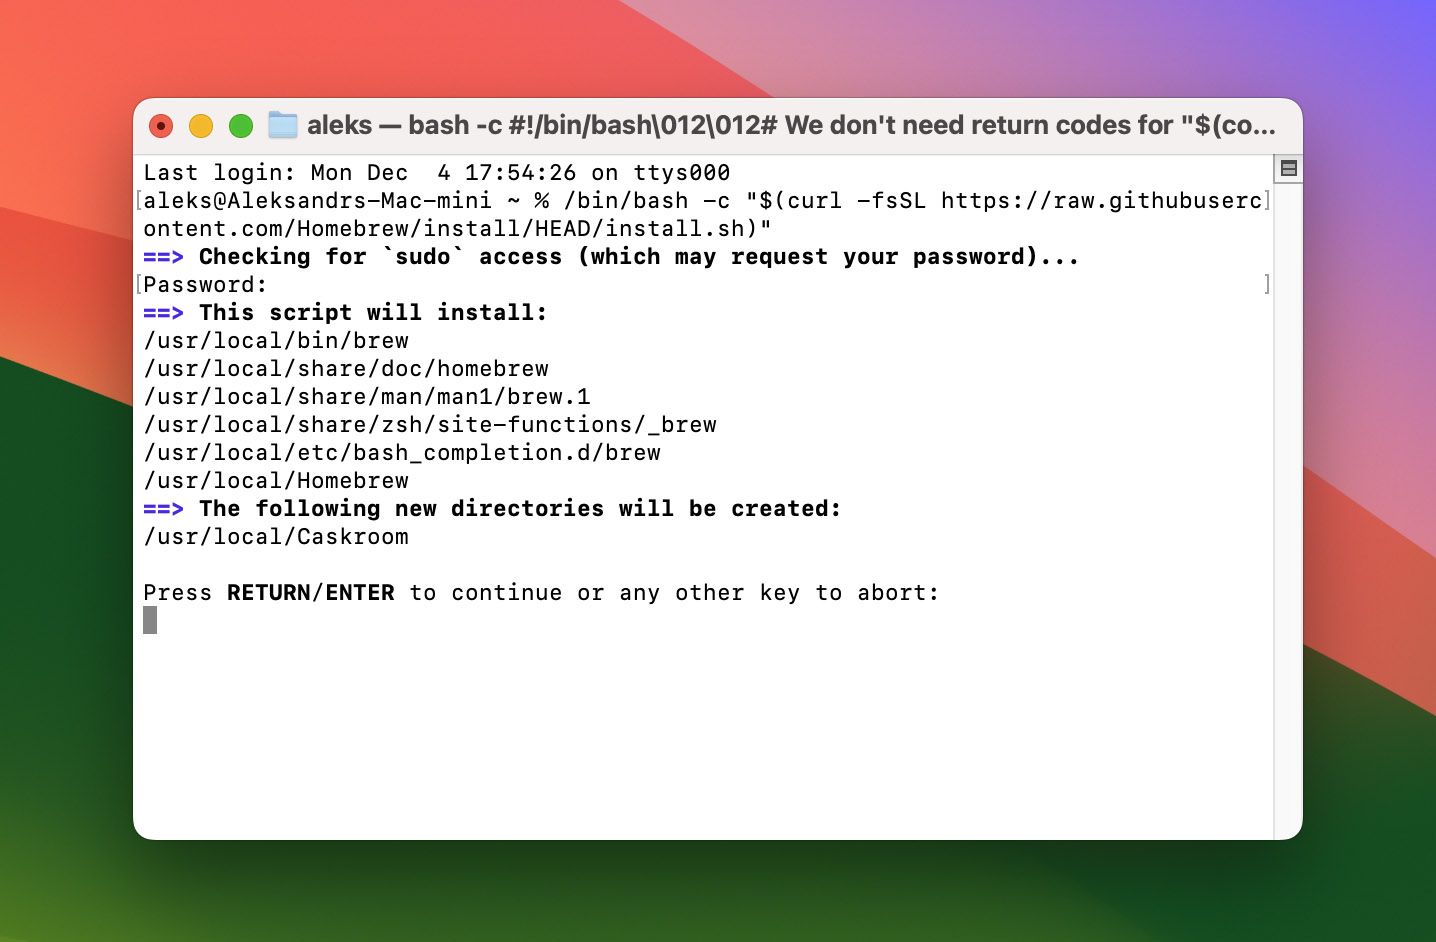
- Install TestDisk by first opening up Terminal. You can do that by pressing Command + Space, typing Terminal, and pressing Enter.
- Input the following command to install Homebrew:
/bin/bash -c "$(curl -fsSL https://raw.githubusercontent.com/Homebrew/install/HEAD/install.sh)"
You may be prompted to enter your Mac user password (shown below). Type in your password like normal and hit Enter. The window will not show your password characters filling in as a security precaution.
- Wait for the command to finish and hit Enter again after the review screen below.
- Wait for Homebrew to install (it may take a minute or two).
- After the Homebrew installation is complete, install TestDisk using the command below.
brew install testdisk
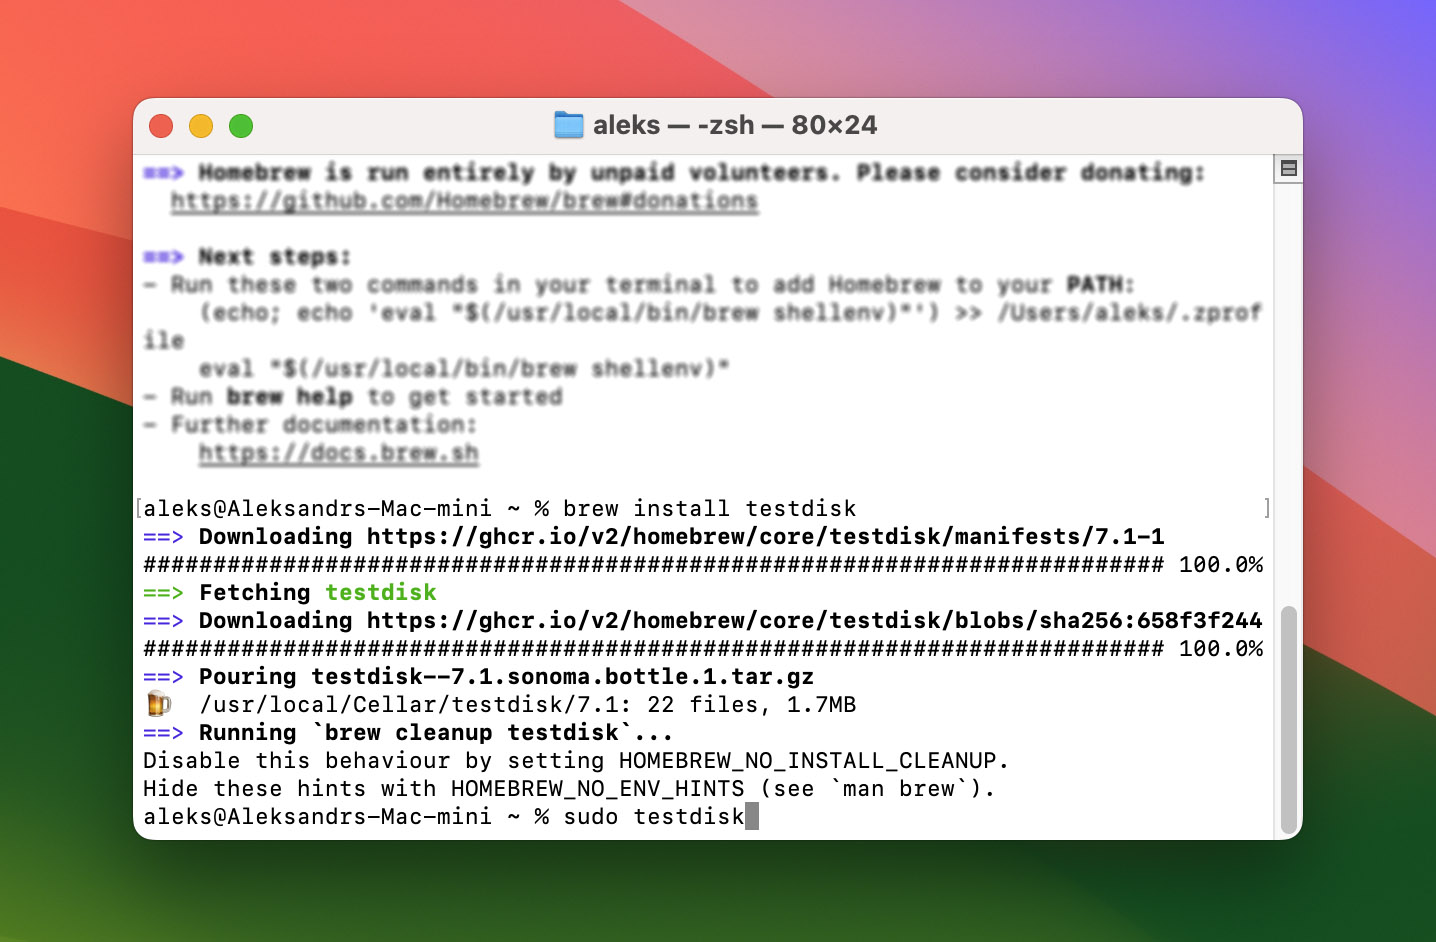
- Run TestDisk by entering the command below.
sudo testdisk
Once TestDisk is up and running, you’ll be prompted to decide whether to create a log (recommended) or not.

- Select the drive you want to scan as well as the partition table type. Then choose to analyze the current partition structure, search for any lost partitions, and press enter to start the Quick Search.
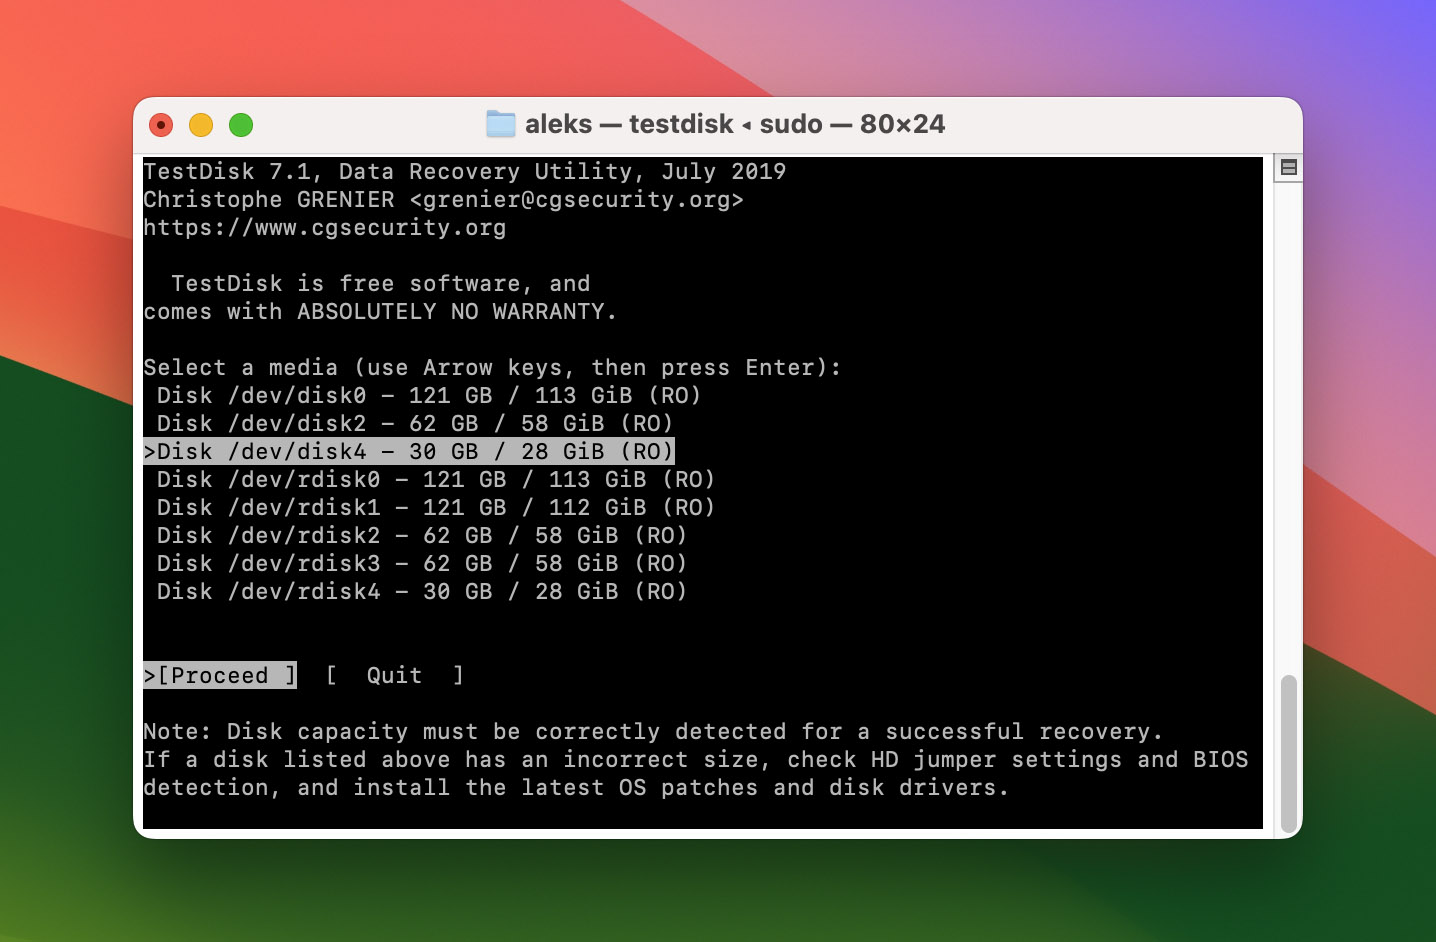
- Check to see if your missing partition is listed in the available options after Quick Search is complete. If it is, highlight it and select the Write option to save it. If not, you can choose the Deeper Search option for a more in-depth scan.


How to Repair Damaged Partition on Mac
If your Mac partition is damaged rather than deleted or lost, you can use a built-in Mac tool called Disk Utility to help you repair the compromised partition.
To repair your damaged Mac partition:
- Open up Disk Utility. You can do so by locating it in Finder > Applications > Utilities. And of course, you can also simply search for it on Spotlight via the menu bar or by pressing Command + Space. If your damaged partition is on your startup disk, you’ll first want to restart your computer in macOS Recovery mode.
- Choose your damaged partition and click First Aid. If your partition contains multiple volumes, you’ll want to repair the volumes one by one first using this same process. After the volumes are repaired, then attempt to repair the partition as a whole.

- Confirm in the popup window and then follow the onscreen instructions.
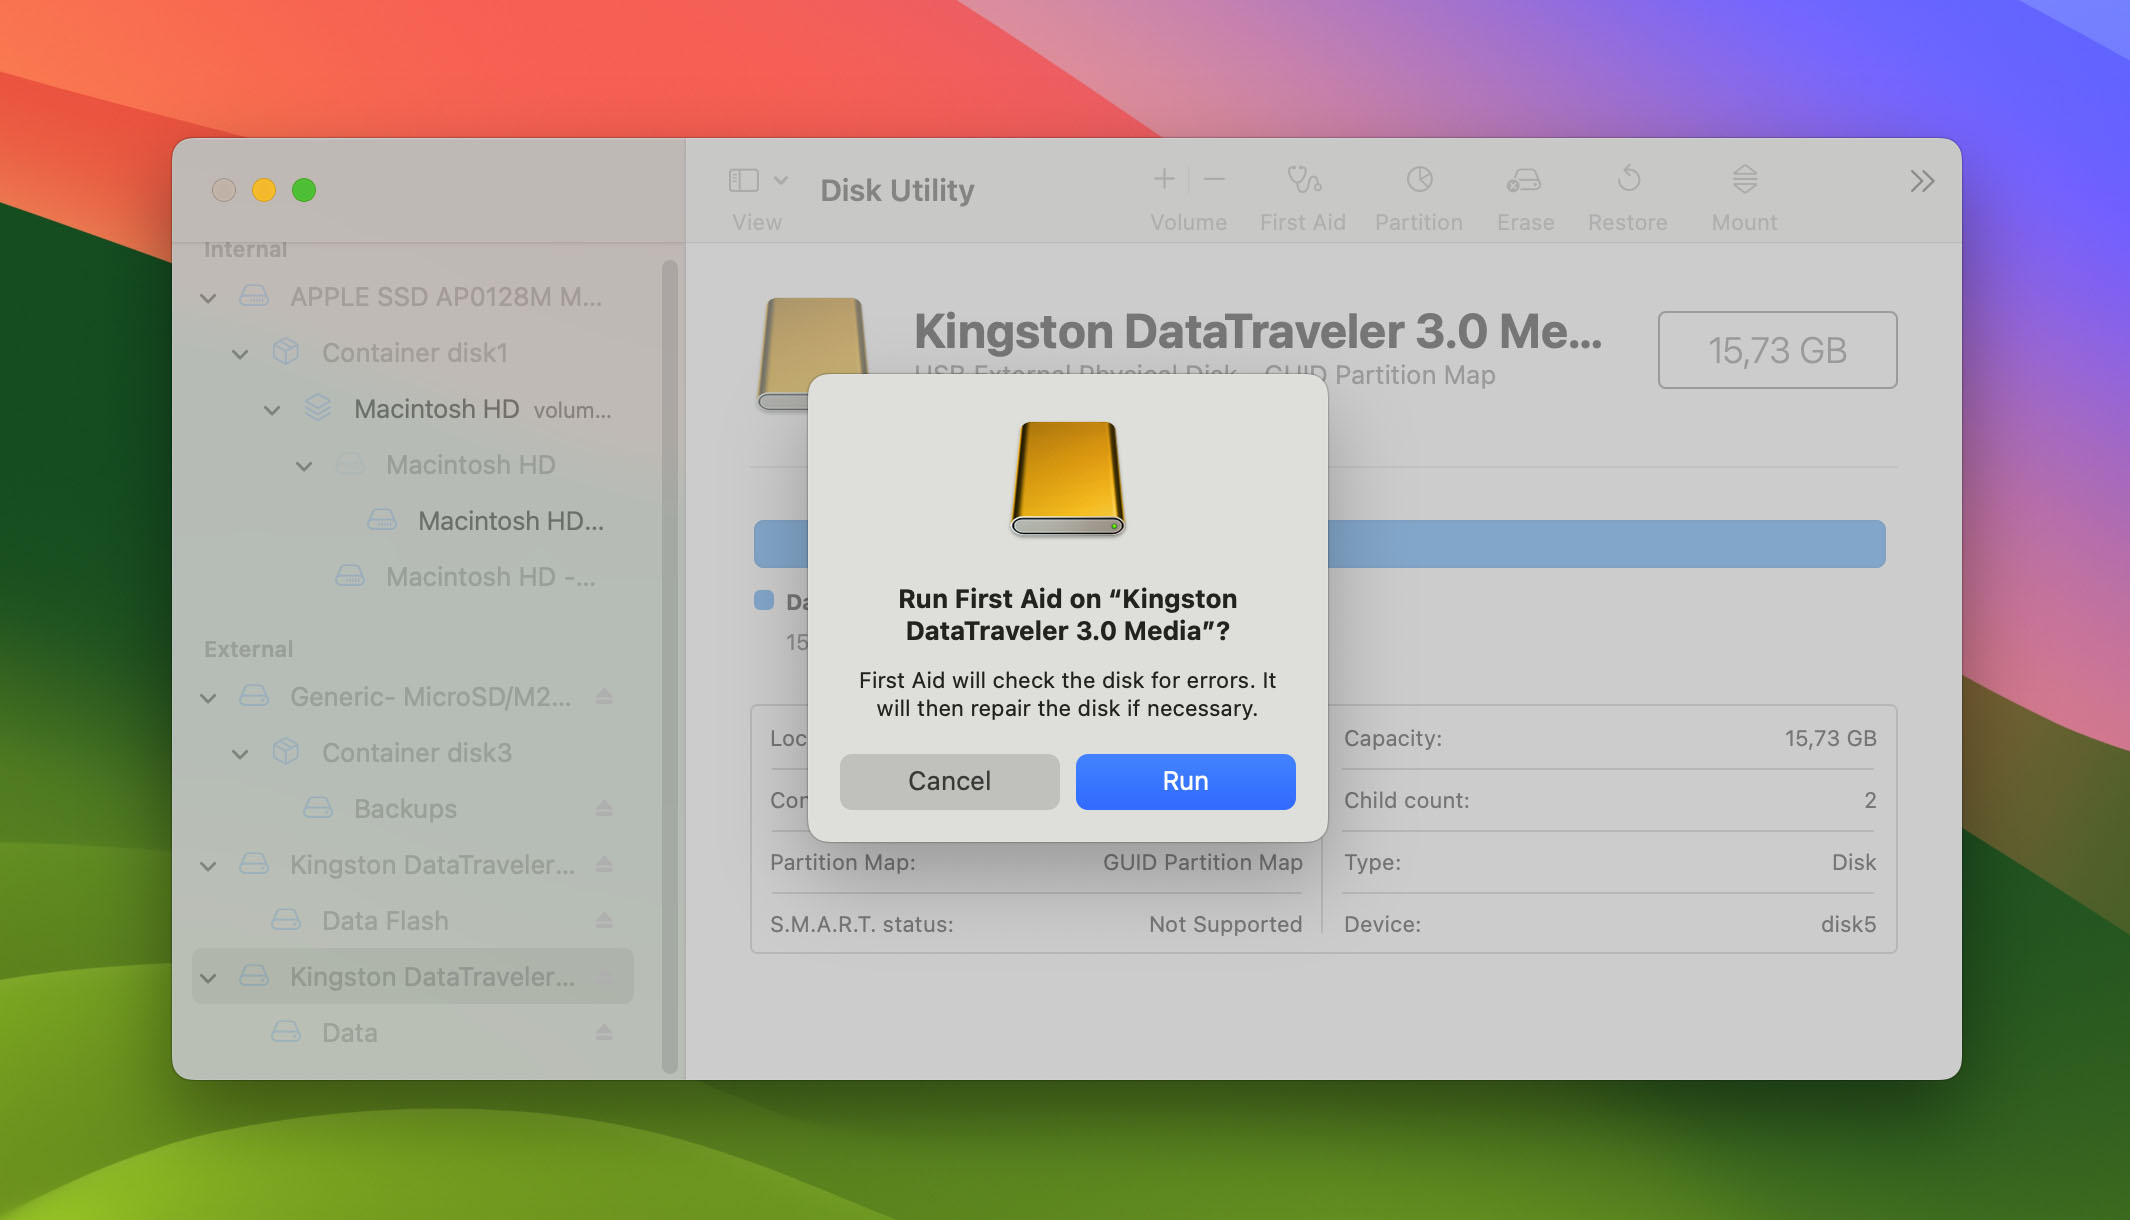
- Once the process is finished, click Done. That’s it!


Bonus: Rebuild a Corrupted HFS+ Catalog Directory
Unfortunately, Disk Utility won’t be able to solve every problem related to your disk. For many, that might mean they’re stuck with an HFS+ catalog directory that’s still corrupted after following the above steps for partition recovery on macOS.
If you find yourself in this situation, it’s time to look to a third-party app. And once again, Disk Drill is a great choice here. This free software has a feature specifically for this situation that allows you to scan for and potentially rebuild the HFS+ Catalog File.
Using Disk Drill’s Rebuild HFS+ Catalog File function is easy too.
To rebuild a corrupted HFS+ Catalog Directory:
- Launch Disk Drill, then right-click the storage device with the corrupted HFS+ catalog directory and select “Scan for lost HFS+ partition”.

- The program will begin scanning the device for the affected HFS+ partition and attempt to rebuild the catalog file if possible. Any lost partitions that are found will be mounted as a virtual disk which you can then scan for recoverable files.


FAQ
Generally, most users won’t have a need for partitioning their Mac hard drive. But there are some circumstances where partitioning your hard drive can come in handy.
- If you want to run multiple operating systems on the same machine.
- If you want to streamline your backup plan by separating key personal files from system files.
- If you want to test out a new OS without having to uninstall your original.
However, it’s worth mentioning here that for users with an APFS file format (default for macOS 10.13 and above), you shouldn’t partition your drive in most cases. Instead, you can create volumes that achieve the same effect but also offer flexible space management.
If you cannot partition your hard drive (e.g., greyed out confirm option), you’ve likely run into one of two problems.
- You Don’t Have Enough Space – The amount of free space required to partition your hard drive must be enough to host a secondary operating system. If this is the problem, you’ll likely see an error message like the one below. To fix it, free up more space on your drive (aim for 50GB free if you can).
- Your External Drive Partition Format Is Not macOS Compatible – Your Mac is likely compatible with APFS, HFS+, and MS-DOS (FAT)/exFAT file types. If your external drive uses another format type, it can’t be partitioned or even read on your Mac. Reformat the drive in the appropriate format to fix this problem.
You certainly can. All it takes is:
- Locating Disk Utility in Finder > Applications > Utilities. You can also search for it on Spotlight via the menu bar or by pressing Command + Space heading to Disk Utility.
- Clicking Partition.
- Selecting the partition you want to delete from the pie chart and clicking the delete button (–).
- Clicking Apply and then clicking Partition.
Always back up your data before you begin, as all data on that partition will be erased.
Conclusion
A corrupted, deleted, or lost partition may feel like the end of the world at first.
But there are a few tools and tactics like the ones outlined above that you can use to recover your data and avert total disaster. And when used in conjunction with a multifaceted backup recovery strategy, you can rest easy knowing you and your data are protected.