

Table of Contents
When a Mac internal or external hard drive starts to experience problems, you may not have much time before you’re hit with data loss. In this article, we are going to show you how to repair a corrupted hard drive on a Mac and try to recover its data to a safe storage location. We will look at native macOS techniques as well as repair and recovery methods that use third-party software. We have analyzed the proposed approaches and proven their effectiveness Hopefully, one of our methods will fix your Mac’s hard drive and let you get back to work!
Signs of a Corrupted Hard Drive
A hard drive that has been corrupted will exhibit multiple signs that things are not quite right. You will start to notice some strange behavior that affects your ability to use the device. At first, it might be hard to isolate the problem and the issues may only occasionally be noticeable.
As time goes on, you can expect to see an increase in the number of unexplained occurrences that may be caused by a corrupt hard drive. The following symptoms are some of the most common signs that you are dealing with a corrupted hard drive.
We analyzed information provided by Mac users on various forums and websites, such as Quora, Reddit, and the official Apple support community. Below, we’ll list the common signs of hard drive corruption, sectioned into those that affect general hard drives and those related specifically to Macs.
Signs Typical for Macs and MacBooks
- ▶️ You may have problems starting your Mac if the startup disk becomes corrupted.
- 📛 Programs and applications using the device might quit unexpectedly or experience performance problems.
- ❔ A gray screen or a question mark folder appears when you start up your Mac. Both can be signals of a faulty boot file on the hard drive.
- 🛑 Errors when you attempt to fix a hard drive from your Mac’s Disk Utility tool.
- 🚫 If you cannot mount an external hard drive to your Mac.
Common Signs For All Hard Drives
- 🔄️ A corrupted drive may cause your computer to crash or hang and force you to reboot it.
- 🏷️ Missing or misnamed files may start showing up if the external hard drive is corrupted.
- 🚫 You may not be able to efficiently work with files and have issues trying to save, move, create, or rename them.
- 🐌 A corrupted hard drive may cause your computer to randomly freeze and stop accepting input.
Reasons Behind Mac HDD Corruption
Hard drive corruption is usually caused by a confluence of factors. There’s no single common reason to point at that causes it. However, various studies and data recovery professionals have identified the most common factors that cause hard drive corruption, and they include:
- ⚠️ Unexpected power failures or spikes can cause hardware damage and result in external and internal hard drive corruption. Using a reliable surge protector and ensuring you have enough battery capacity can help minimize this type of corruption.
- ⚙️ The mechanical components of an HDD can wear out over time, making it necessary to fix a Mac hard drive. As the components degrade, signs of corruption may start to appear along with strange noises or clicking sounds. We suggest taking a byte-level backup as soon as possible to protect your data if this happens. The next section of this article describes how to create a backup using a third-party tool.
- 👾 Infection with malware can result in a hard drive showing signs of corruption. The best way to avoid this problem is to keep your hard disk free of unwanted and potentially malicious software. This means running antivirus and malware detection software on your machines and being careful when connecting the device to other computers.
- 🥵 Hard drives can overheat because of dust buildups that block airflow or high temperatures in your environment. Overheating can cause hard drives to get physically corrupted.
How to Fix a Corrupted Hard Drive on a Mac
We have analyzed and evaluated many approaches to fix a corrupted hard drive on a Mac. We narrowed our analysis to the most effective methods, which we’ll explain below.
Some of these methods describe ways to improve or establish connectivity with an external hard drive. You should use them when your Mac does not recognize the external drive. Other techniques can be used to save or retrieve the device’s data.
Find the method that is most appropriate for your situation. We recommend users consider the following tip in virtually all instances where external hard drive corruption is suspected.
This backup serves two equally important purposes. If the drive fails, you have a copy of the data stored on the device. A byte-level backup can also be used by specialized software to recover files that have been lost or deleted due to corruption.
Method 1: Use Data Recovery Software
We have tested different data recovery software for Mac and selected the 10 best choices. Of these choices, Disk Drill is the most effective data recovery tool. It can scan hard drives with corrupted file systems and recover as many files as possible. It can bypass system errors preventing you from accessing a hard drive and create byte-to-byte backups of hard drives to prevent data loss.
Back up with Disk Drill
When working with corrupted hard drives, the potential always exists for the drive to completely fail. If this happens, your only chance of getting the data back may be to engage a data recovery service. This can be an expensive and time-consuming exercise that can be avoided if you take the right precautions.
Use the following steps to create a byte-to-byte backup of a hard drive. This backup can be used simply to store the data or as the basis for a recovery of the drive’s deleted and missing files. Make sure you get a clean backup of the device before it fails.
Perform this operation as soon as you suspect the external HDD is corrupted. Create the backup before scanning or putting the device through any other activities that may cause stress.
- Download and install Disk Drill for Mac on a hard drive that is not showing signs of possible corruption. The software’s free trial version provides the byte-level backup tool.

- Connect a storage device to store the backups and the affected external hard drive if necessary. Just in case there is malware associated with the corruption, it’s best not to create the backup in your main drive, even if you have available storage space.
- Launch the program and select Byte-to-byte Backup from the panel on the left.

- Select the drive or partition to be backed up and click the Create backup button.

- Choose the location and name for the backup file and click the Save button.


Store the backup securely as you may be using it to recover the external drive if it fails.
Scan with Disk Drill
The byte-level backup you just created can be used to scan for lost and deleted data on the corrupted drive. Using this backup eliminates the need to subject the affected drive to additional usage as Disk Drill performs its extensive scanning. Every time you use the drive you risk further corruption or device failure.
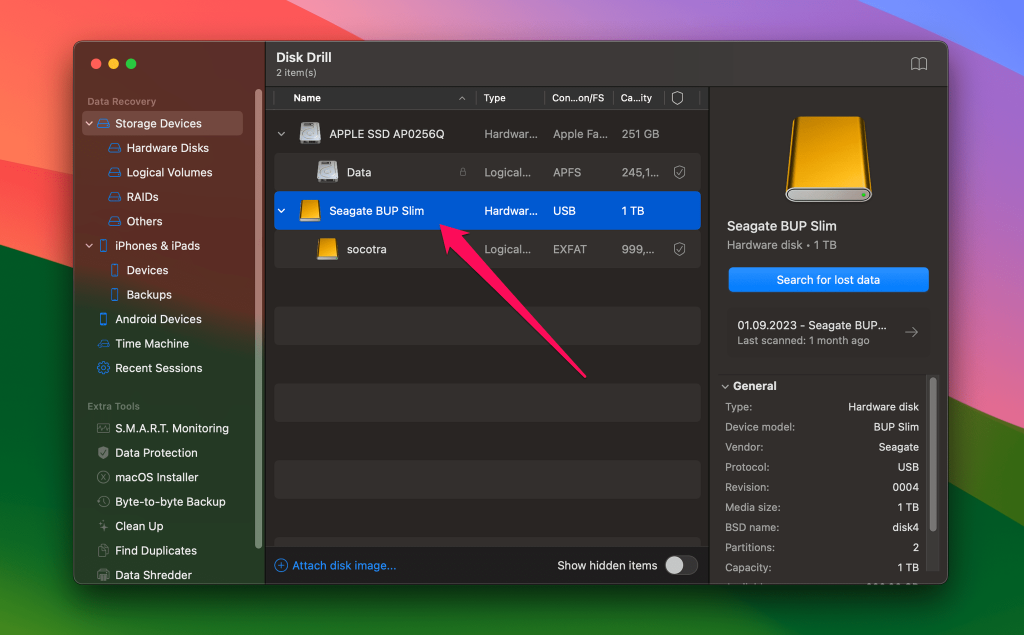
- Connect the device or the byte-level backup of the hard disk to your Mac.
- Launch Disk Drill. The software’s free trial version can be used to scan your external drive.
- Select the HDD or byte-level backup from the list of available disks.
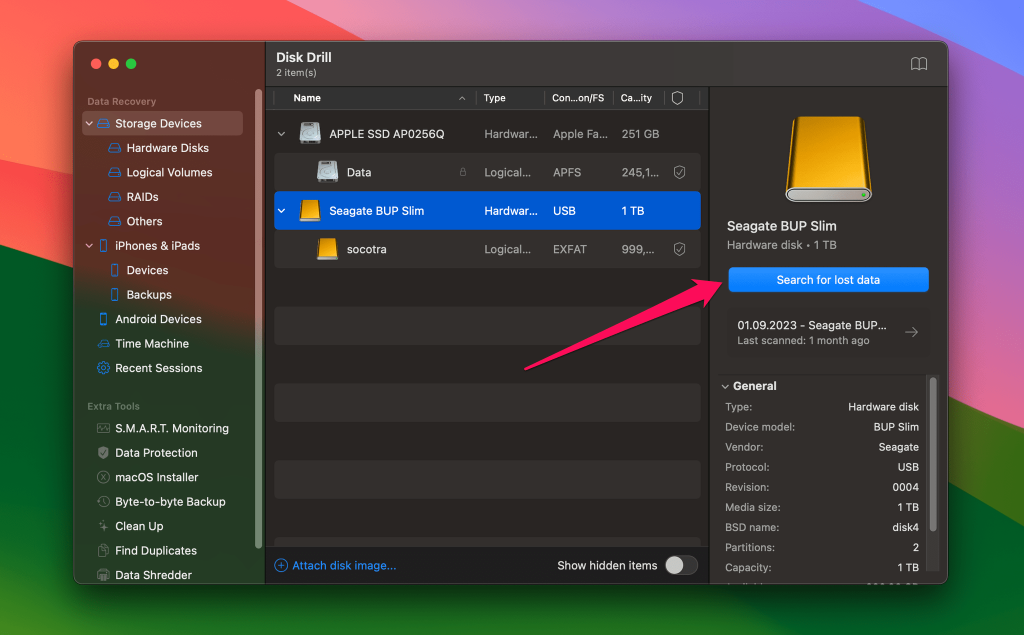
- Click the Search for lost data button to initiate the scanning algorithms. Disk Drill scans the device on a sector-by-sector level to find lost and deleted data. This can involve a lot of disk activity which is why we suggest using the backup if possible to reduce the chance that the drive will be further damaged by the scan.
- As soon as the search is finished, click Review found items.

- Preview the recoverable files found by Disk Drill. At this point, if you want to use the tool to recover the lost data, you need to upgrade to the Pro version.

- Select the files to be recovered and click the Recover button.

- Provide a safe storage location for the recovered data that is not on the affected disk and click Next.
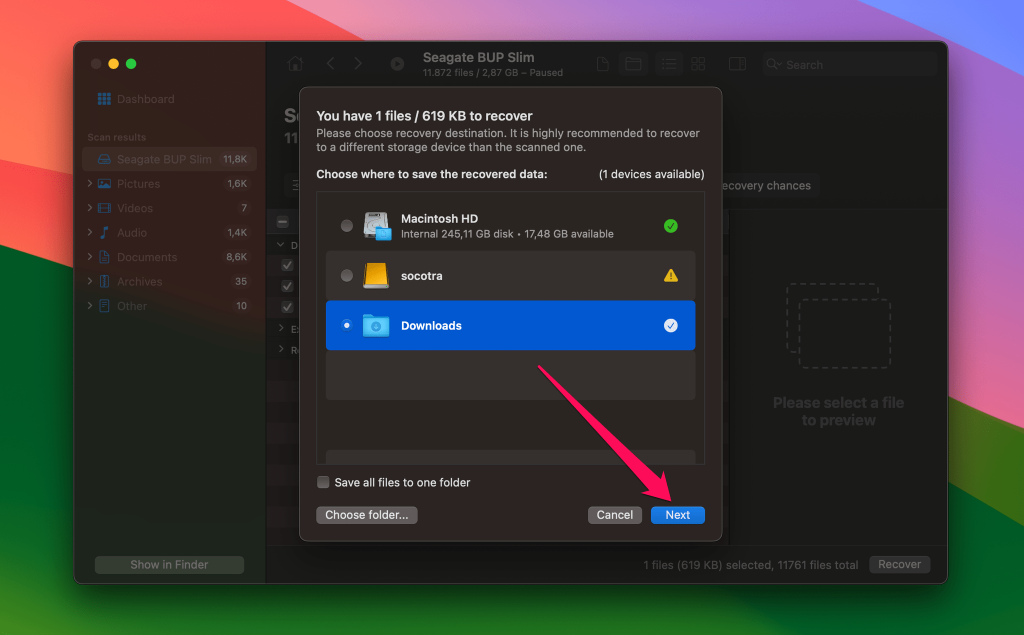
- Click OK to complete the procedure. It may take some time for your files to be recovered based on the number and size of the items.


Method 2: Inspect External Hard Drive Visibility
You may need to make a simple macOS setting modification if you don’t see an external hard drive on your Mac. Try these steps:
- Open Finder > Settings.
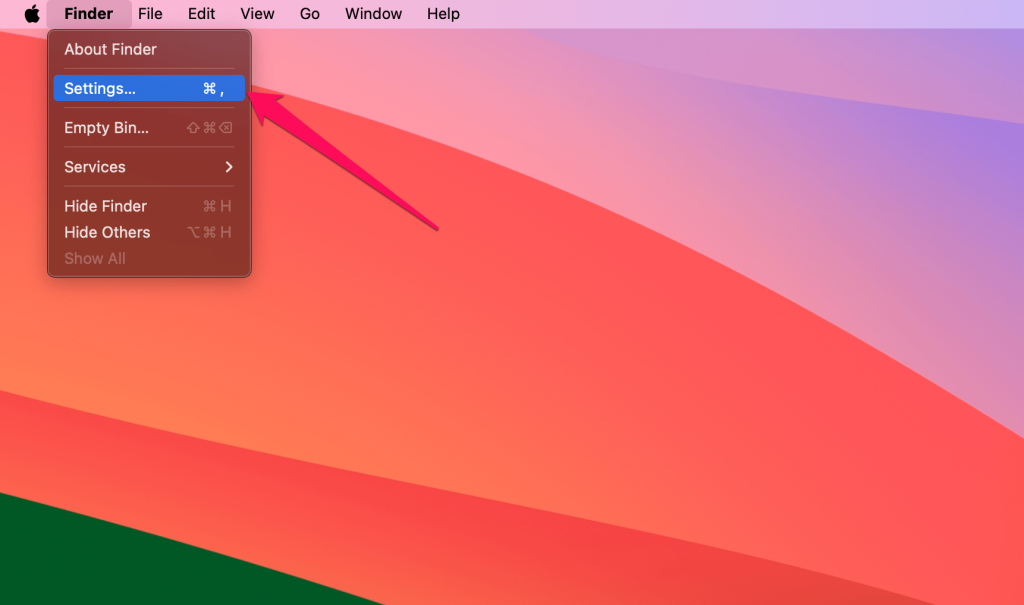
- In the General tab, make sure the box next to external disks is checked.


Method 3: Diagnose External Hard Drive Connectivity
These general suggestions offer simple methods of checking device connectivity and may be the reason your external drive is misbehaving. We suggest trying these techniques if you can’t see an external drive or if it is showing signs of corruption:
- Connect the device to another port;
- Use a different USB cable to connect the device to your Mac;
- Make sure the device is fully powered;
- If using a USB hub, try connecting the device directly to the computer’s USB port;
- Try what is known as a “Slow Jam”. In some cases, inserting the device into the USB port very slowly and gently seems to improve connectivity.
Method 4: Force Mount the External Drive
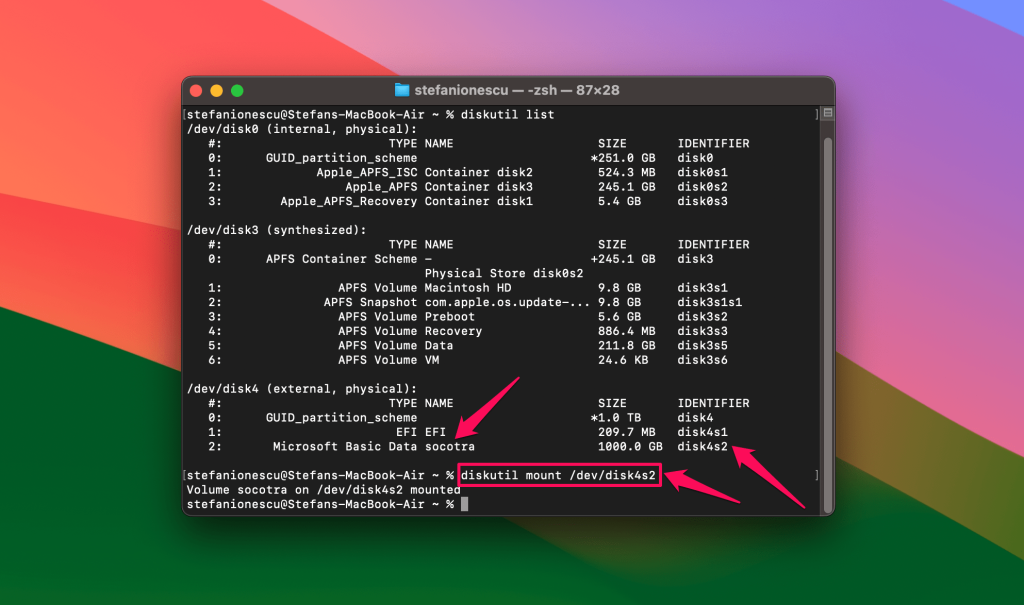
If you can see the device on your Mac but can’t access its data, you might need to mount the external drive. The easiest way to do this is with the Mount button inside the Disk Utility application.
You can also use the following Terminal commands to force the system to mount the device.
- Type diskutil list and press Enter to find the name/identifier of your drive.

- Now type diskutil mount /dev//[diskname] to force mount your drive.


Method 5: Check for Installed Smart Drives
Problems with an SAT Smart drive driver may impact your ability to mount Smart drives like Drobo or Lacie devices. Removing the driver may be necessary to successfully mount your external hard drive.
Method 6: Reset the NVRAM and SMC
Resetting the NVRAM and SMC can help alleviate the signs of drive corruption. Many software-related problems with your Mac can be resolved by this type of reset.
Resetting the NVRAM
- Shut down the computer.
- Start it up by pressing the power button.
- Press the Cmd, Option, P, and R keys at the same time before the gray screen appears.
- Hold the keys until your computer restarts and you hear the startup sound a second time. On Macs with the T2 Security Chip, hold the keys until the Apple logo appears and disappears twice.
- Release the keys.


Resetting the SMC
The procedures for resetting the SMC for various Mac and MacBook models are available on this Apple support page. Following is an example of how to reset the SMC on a Mac desktop machine equipped with a T2 chip.
- Shut down your Mac, then unplug the power cord.
- Wait 15 seconds, then plug the power cord back in.
- Wait 5 seconds, then press the power button to turn on your Mac.
Method 7: Fix Hard Drive Errors Using First Aid
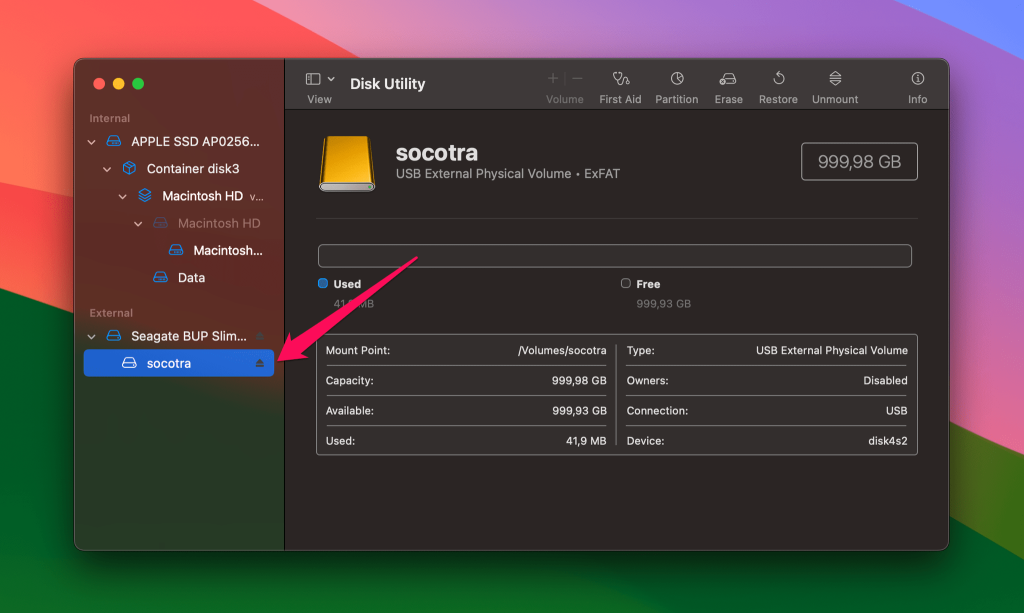
Disk Utility is a macOS system application that can be used to perform many disk-related activities. In some cases, the First Aid feature can fix issues with an external hard drive. Use the following steps with First Aid to repair an external HDD.
- Open Disk Utility.
- Select the drive from the list of available devices.
- Click First Aid from the top of the window.

- Click Run to attempt a repair on the device.


Method 8: Try booting in safe mode
Rebooting your Mac in safe mode may enable you to access the drive so you can use it for normal operation or to back it up before conducting a recovery. Very often, rebooting in safe mode can clear up difficult to isolate software issues that might be plaguing your external drive.
Different procedures are used for rebooting to safe mode using machines with Intel chips or Apple silicon. Check out this Apple support page for the appropriate steps for your computer.
Method 9: Use the macOS Console for Diagnosis
The macOS Console application lets users monitor system messages and review log reports. The tool provides a method of seeing what’s going on inside your Mac.
To open the console, go to: Applications > Utilities > Console.

You can look at various types of reports that furnish details about apps and events. You may be able to determine what’s going on with your external HDD by reviewing the report logs. Detailed instructions on using Console are available on this Apple support page.
Method 10: Rebuild the HFS tree
The Hierarchical File System (HFS) that controls access to data on the device may be damaged. You can rebuild the HFS tree. You should restart your Mac and log in as an administrator. When the machine restarts, open Terminal and execute the following command:
sudo fsck_hfs -f /dev/[diskname]

After the tree is rebuilt, try disconnecting and reconnecting the drive to see if the issue has been resolved. With any luck, you will now be able to access all of the files on the device.
Method 11: Format the Hard Drive
You might need to format a corrupted external drive so it can be recognized by your Mac. Formatting removes the drive’s logical links to its data but does not physically remove the files. After formatting the drive, its files can be recovered with data recovery software. Use the following procedure to format an external hard drive on your Mac.
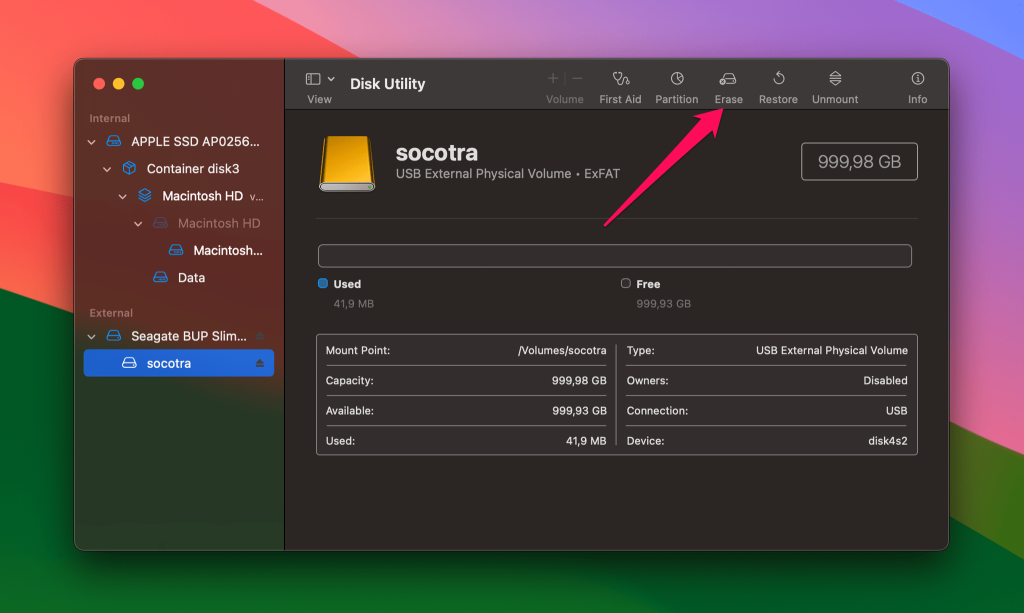
- Connect the external drive to your Mac.
- Start the Disk Utility app.
- Select the drive from the panel on the left.
- Select Erase. If you want to recover data from the device after the format is complete, don’t select any extra security options.
- Name the device and select your desired file format.

- Click the Erase button.

- Click Done when the process completes.


Note: It will not be superfluous to use Disk Utility’s First Aid for all partitions and the entire disk in general before thinking of formatting.
How to Minimize Mac Hard Drive Corruption and Data Loss
It’s better to prevent hard drive corruption in the first place than go through the stress of fixing it later. You can minimize the risks of hard drive corruption and data losses by following the below steps:
- Use UPS or surge protectors to limit sudden spikes in electrical current that could overload and damage your Mac.
- Avoid forceful shutdowns because they can corrupt your hard drive data.
- Utilize Time Machine or other backup solutions to create frequent backups of your hard drives, so that you can restore them if you run into any issues.
- Use Reliable Antivirus Software to prevent viruses from getting into your Mac and corrupting your hard drive.
- Handle your HDD and Mac properly to reduce the risks of physical damage.
- Periodically monitor your Mac’s Health so that you can spot any error early and fix it before it causes further damage.
FAQ
If your Macintosh HD is not showing up in Disk Utility, it may be that it just needs to be mounted. Since you can’t access it in Disk Utility, use the following commands in Terminal, using the appropriate device name for your environment. instead of disk1.
- mount -t /dev/disk1
- mount force -t /dev/disk1
- diskutil verifyDisk /dev/disk1
- diskutil repairDisk /dev/disk1
- diskutil repairDisk /dev/disk1
Conclusion
The methods and techniques outlined above should be able to resolve most of your issues with a corrupted internal or external hard drive. You might find that the issues you thought were being caused by corruption were due to a bad cable or connection. In other cases, you may need to reformat the device and use data recovery software to retrieve its data.
You should always err on the side of caution when dealing with potential hard drive corruption. We suggest that the first thing to do if you suspect drive corruption is to create a byte-level backup to protect your data and provide a potential platform for a data recovery exercise.