Table of Contents
USB flash drives are widely used in the computing community as a means of adding storage capacity to their computers or sharing files and media with friends and colleagues. Realizing you have accidentally deleted important files from a USB flash drive can be devastating and lead to a lot of unnecessary stress.
In this article, we are going to show you how to recover deleted files from a USB flash drive on a Mac. You can either use a specialized data recovery tool to bring back those files or try other options that don’t involve using the software. We will cover both since a software-free data recovery method is not always the best option. Read on to learn more.
How Data Recovery Software Works
Data recovery software retrieves deleted data by taking advantage of the way modern operating systems perform file deletions. When a file is deleted by macOS, the physical data is not immediately removed from its storage device. Instead, the operating system deletes the logical links to the data that makes it accessible to your applications. The space used by the deleted item is marked as available for use by the operating system.
As long as the data is still physically present on the storage device, it can be recovered by repairing the deleted logical links which make the files accessible again. Eventually, when the space is needed for saving new information by the operating system, the original files will be overwritten. Once this happens, recovery software will not be able to retrieve your lost files.
For this reason, it is very important to follow our advice and stop using the device as soon as you think you may have lost some data. Don’t write any new information to the USB drive until you have completed the recovery. Once your precious data is overwritten, it’s most likely gone for good unless you have backed it up.
Preliminary Recovery Steps
Before proceeding with a USB data recovery on your Mac using software, you should make sure that the files you want are not still available in the macOS Trash. The Trash is a special folder that holds recently deleted files until it’s automatically or manually emptied. If the files you need are in the Trash, a simple one-click procedure will get them back.

In addition to the main Trash folder on your Mac’s main disk, each external storage device has an individual Trash folder. While you can access the external Trash folder directly, the easiest way to check the Trash is to connect the USB flash drive to your Mac. Now, when you click on the Trash icon to open the folder, all files in the Trash on any connected device will be displayed.

Perhaps the files are here and you can simply right-click on them and execute the Put Back option to return them to their original location. If your files are not in the Trash, your next step is to try using software to recover data from a flash drive on your Mac.

Using Data Recovery Software to Recover Files From a USB on a Mac
Now we are going to look at the most effective way to recover deleted files from a USB on a Mac. While we are focusing on two software solutions, many others exist that may fit your recovery needs. Keep in mind our tip to not use the USB device until you have finished recovering your deleted data and do not download and install the data recovery software on it. Use your Mac’s main drive to install the software.
We chose these two products to illustrate the differences between a tool designed to be user-friendly and one that requires an individual to be comfortable entering complex commands to perform the recovery. While both methods can recover your lost data, we think you will find one a far superior solution.
After analyzing Disk Drill and PhotoRec and comparing their pros and cons, we’ve compiled a table that can help you understand exactly what each of these data recovery tools has to offer. You can find all of this information below.
| Criteria | Disk Drill | PhotoRec |
| 🤗 User-Friendliness | Simple, user-friendly interface | Requires familiarity with CLI |
| 📄 Supported File Types | Supports a wide range of file types | Supports many file types but not as extensive |
| 🗃️ File System Compatibility | Supports both Mac and Windows file systems | Recover files by file signatures only, so original file names can’t be restored |
| 🔄️ Update Frequency | Regularly updated | Less frequent updates |
| 🚀 Scanning Speed | Faster scanning process | Slower scanning process |
| 🖼️ Preview Functionality | Offers file preview before recovery | Limited file preview |
| 👨💻 Technical Knowledge Required | Minimal | Advanced |
| ☎️ Customer Support | Provides customer support and documentation | Support is provided only on the official forum by volunteers |
| 💲 Cost | Paid software with a free trial | Free (open-source) |
Option #1: Disk Drill
Disk Drill is a comprehensive, commercial data recovery tool that can easily recover a USB drive on your Mac and get your files back safely. It supports the recovery of hundreds of different file types on virtually any type of disk-based storage device.
Use the following steps to recover lost data on a USB flash drive using Disk Drill.
- Download and install Disk Drill for Mac on your computer’s main drive.

- Connect the USB flash drive to your Mac or MacBook.
- Launch Disk Drill and select the USB drive from the list of available devices.
- Click the Search for lost data button to start scanning the device for recoverable files.
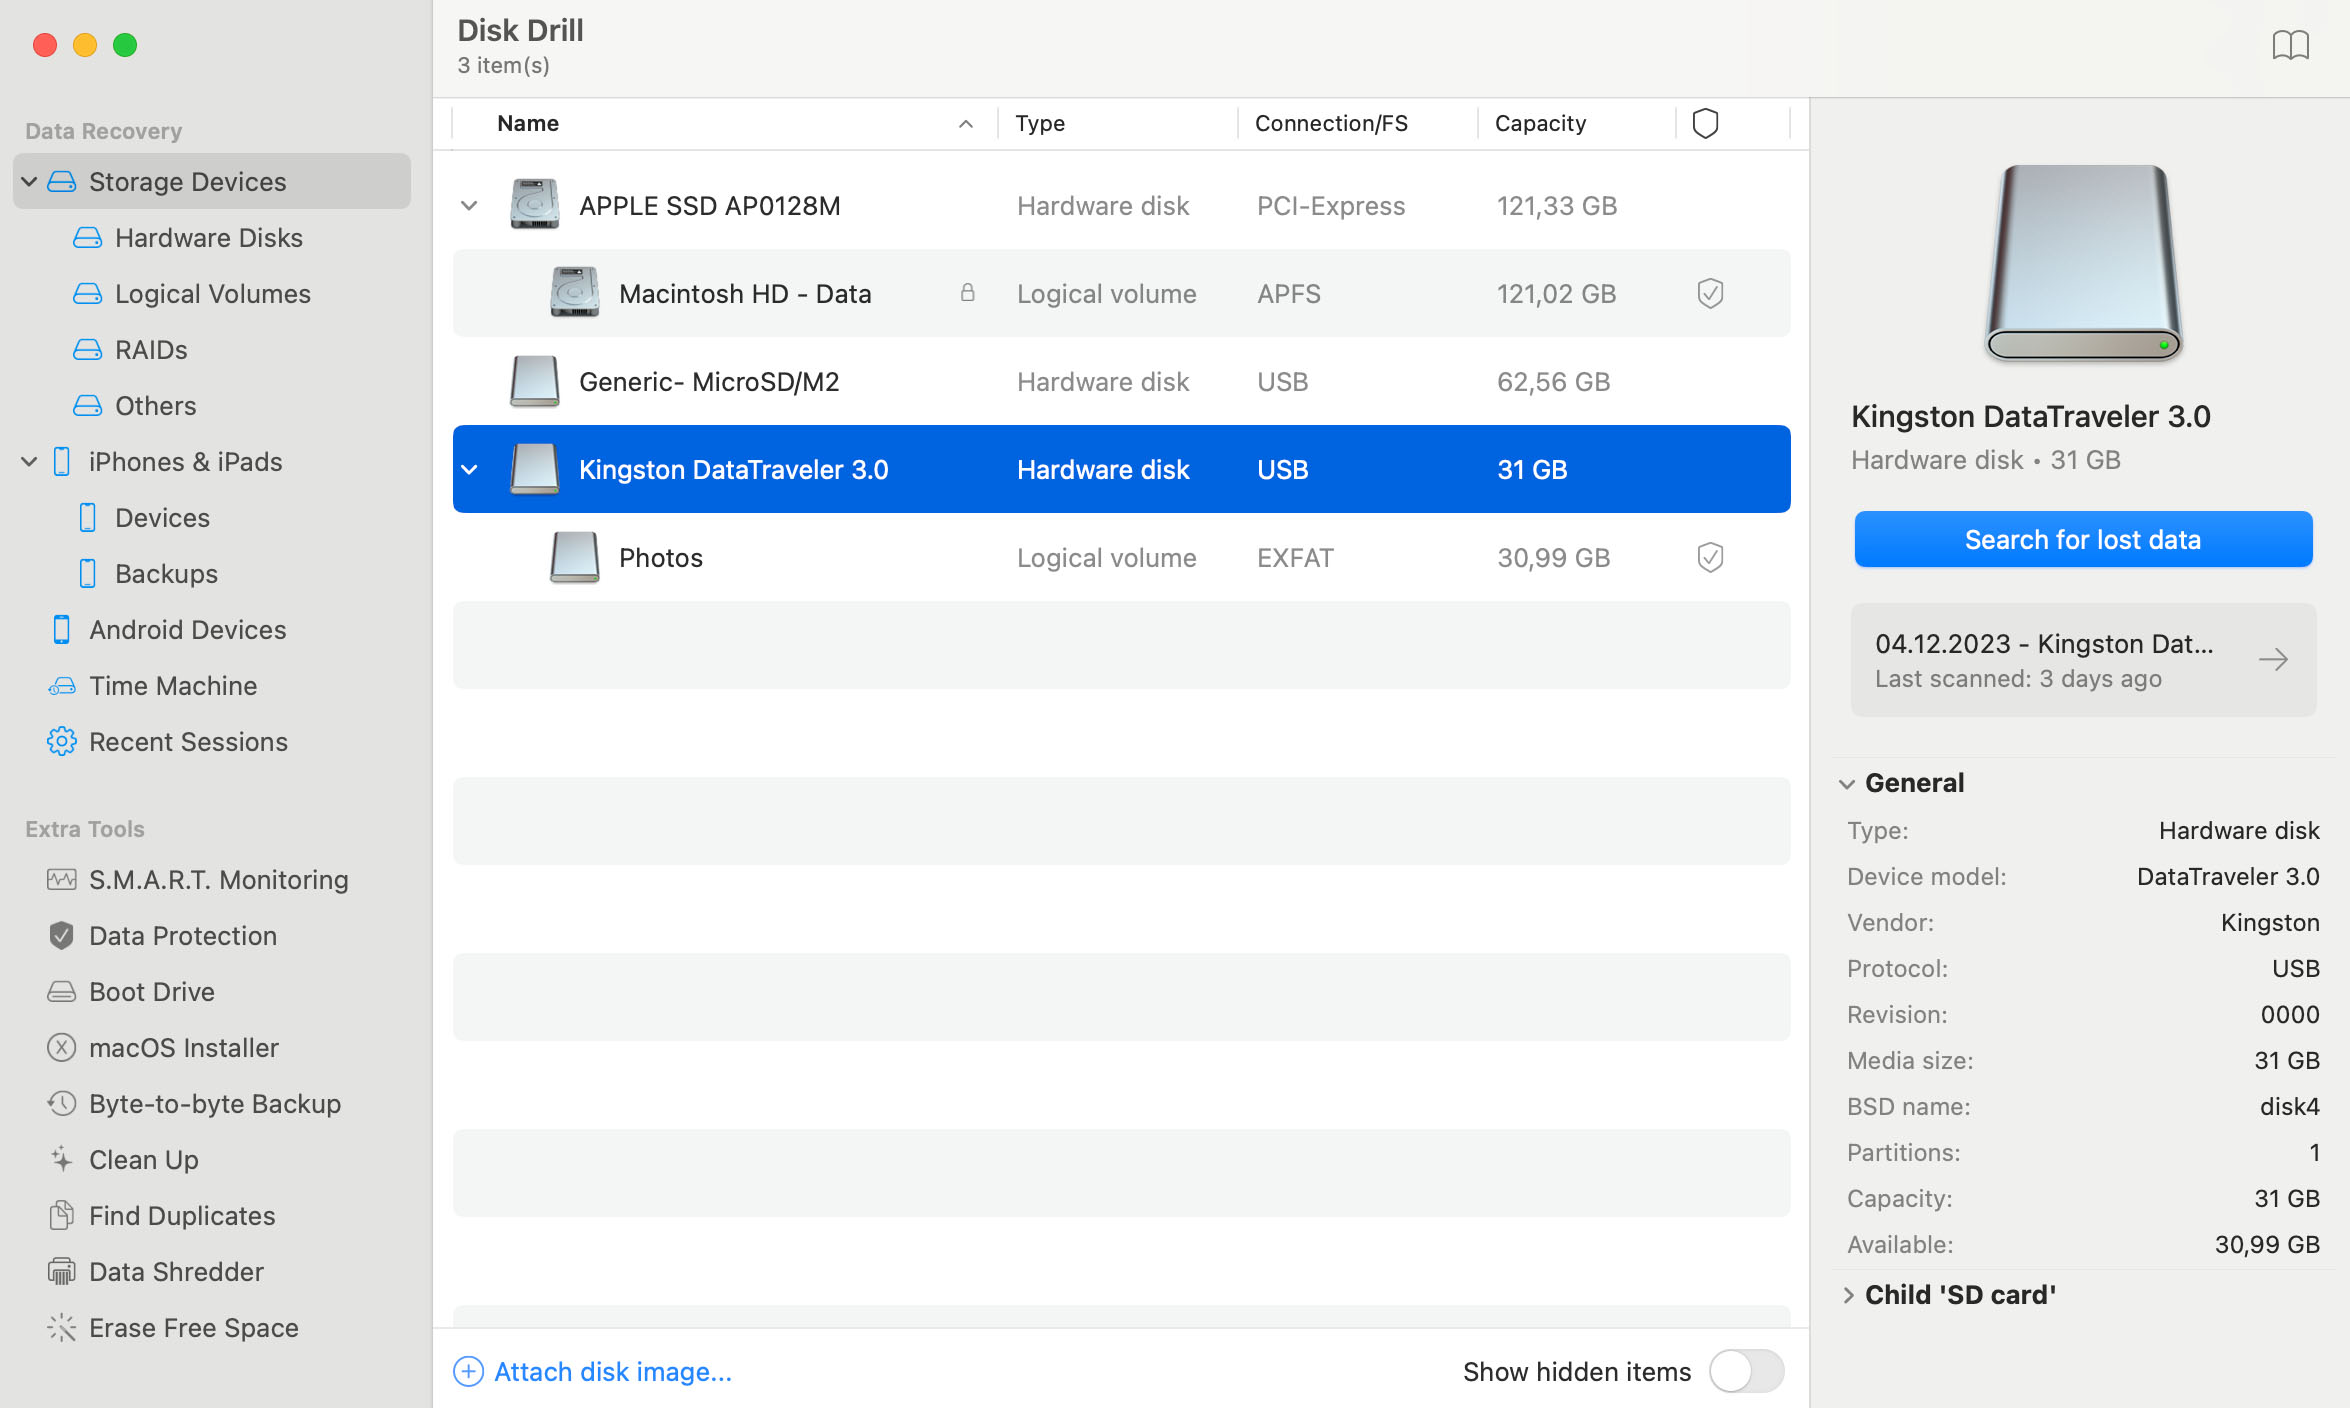
- Preview the found files and select those you want to recover. In most cases, files will be recovered with descriptive file names to help you identify them.

- Click the Recover button. You will be prompted to select a safe storage location for the recovered data that is not on the affected USB drive.
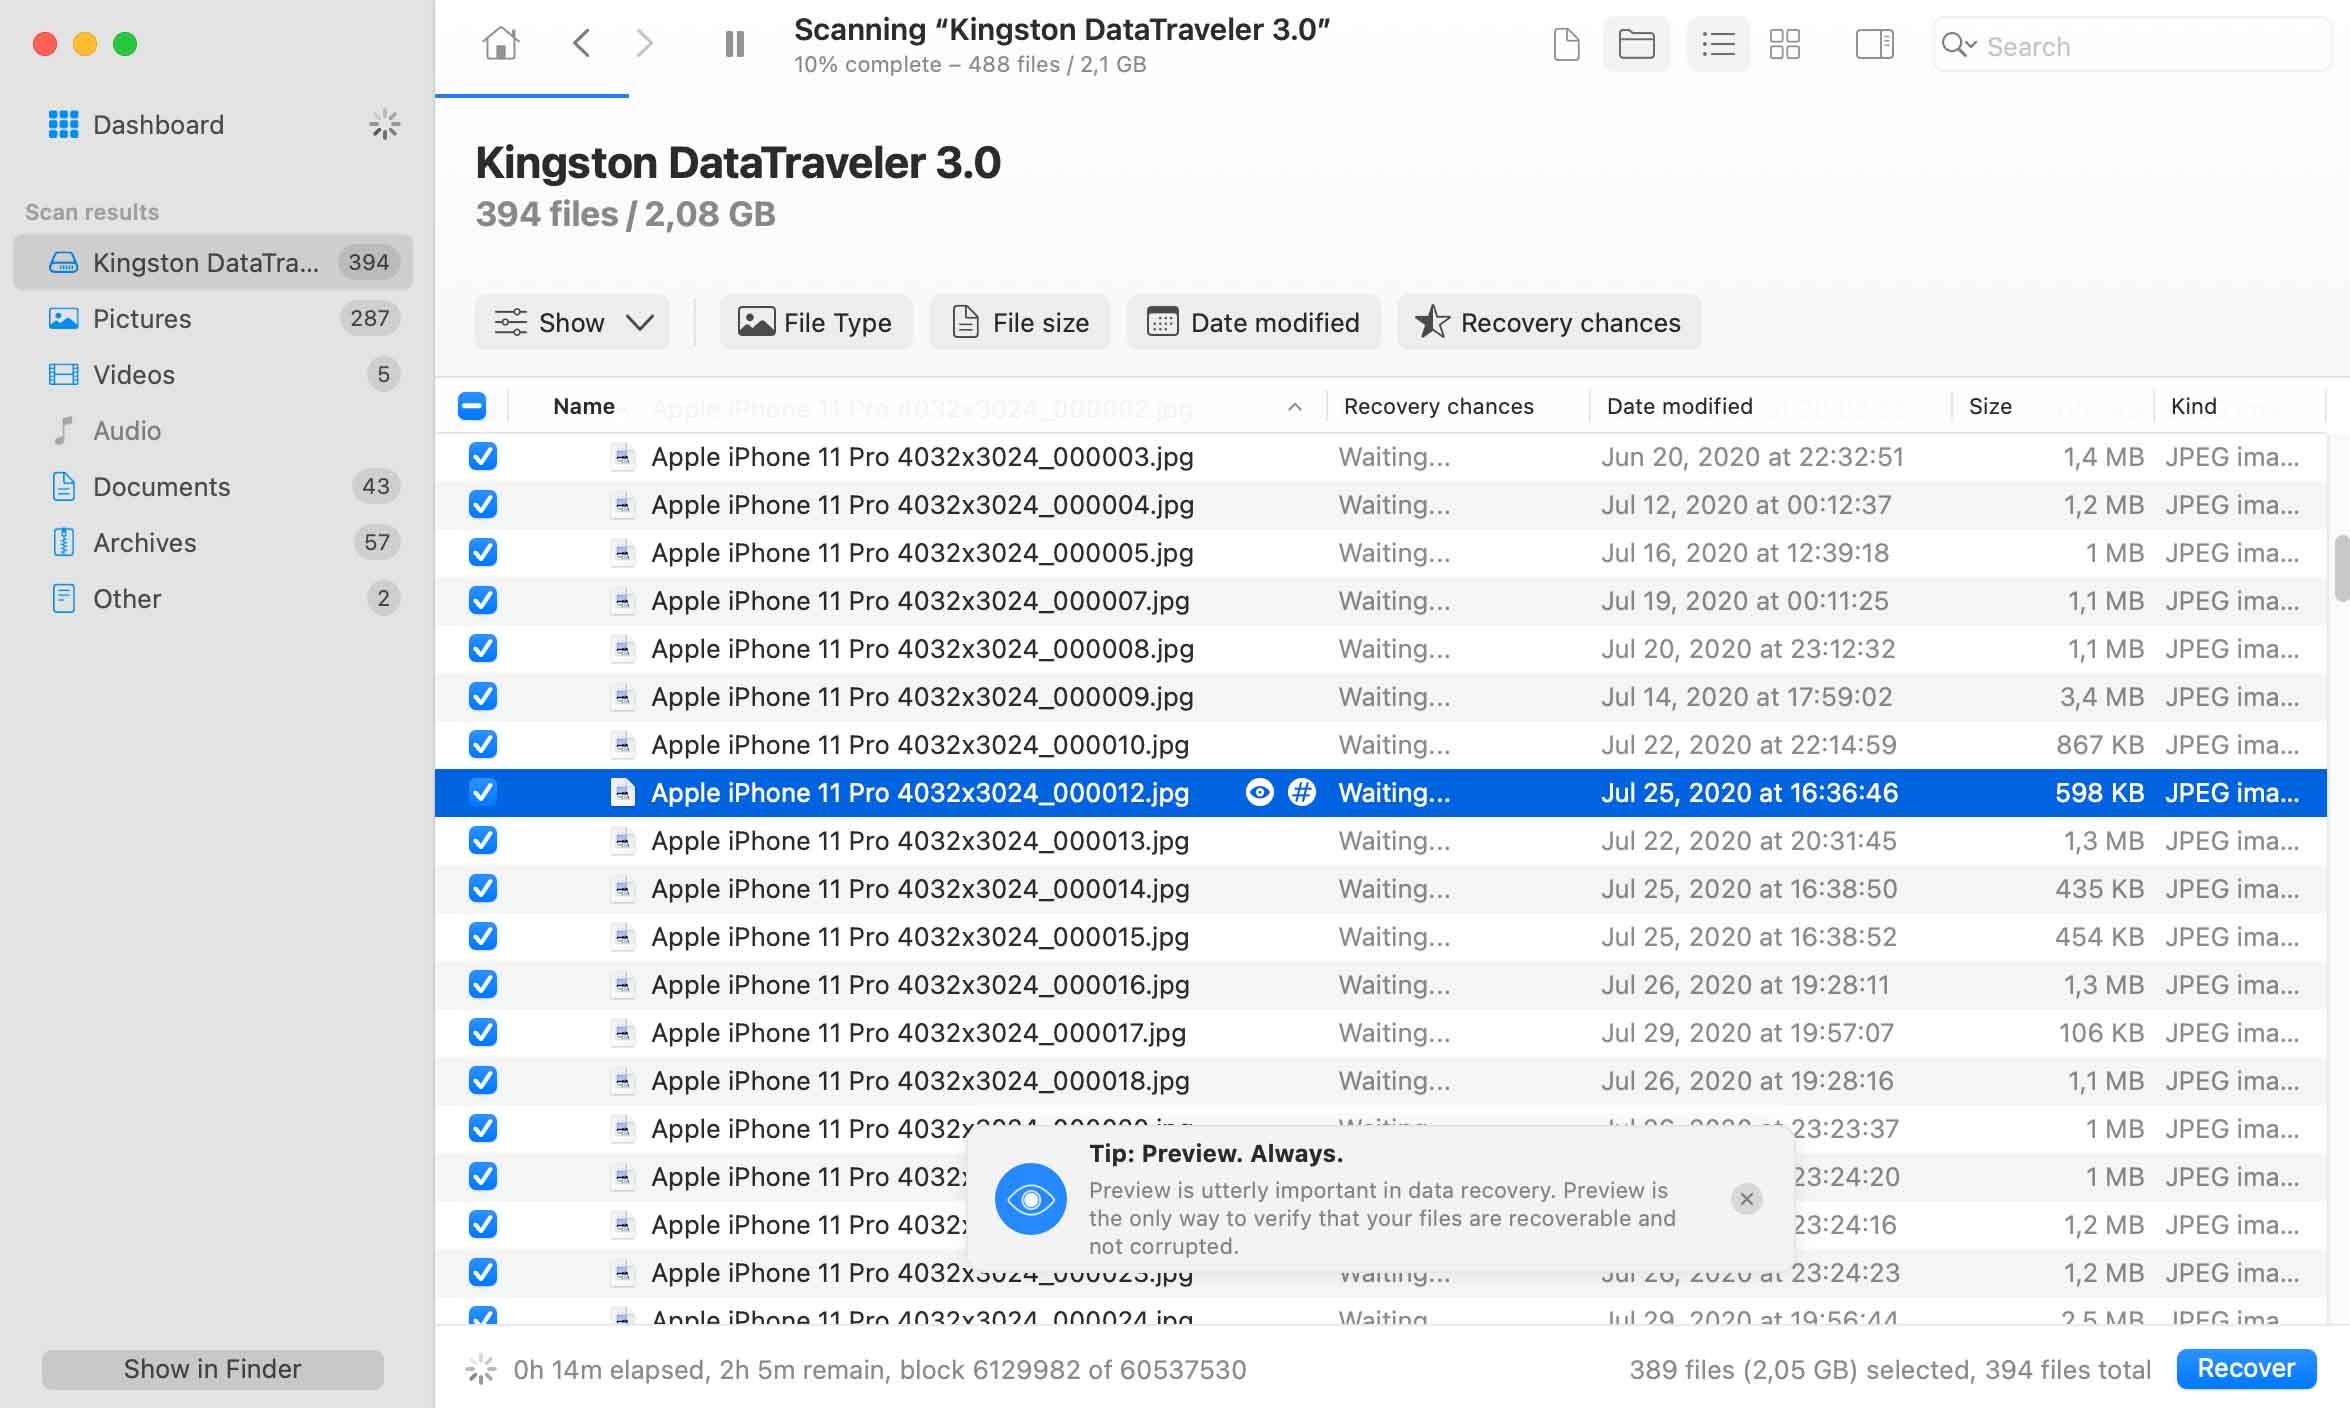
- Click OK after choosing the recovery location. Your selected files will be recovered to the designated storage area.
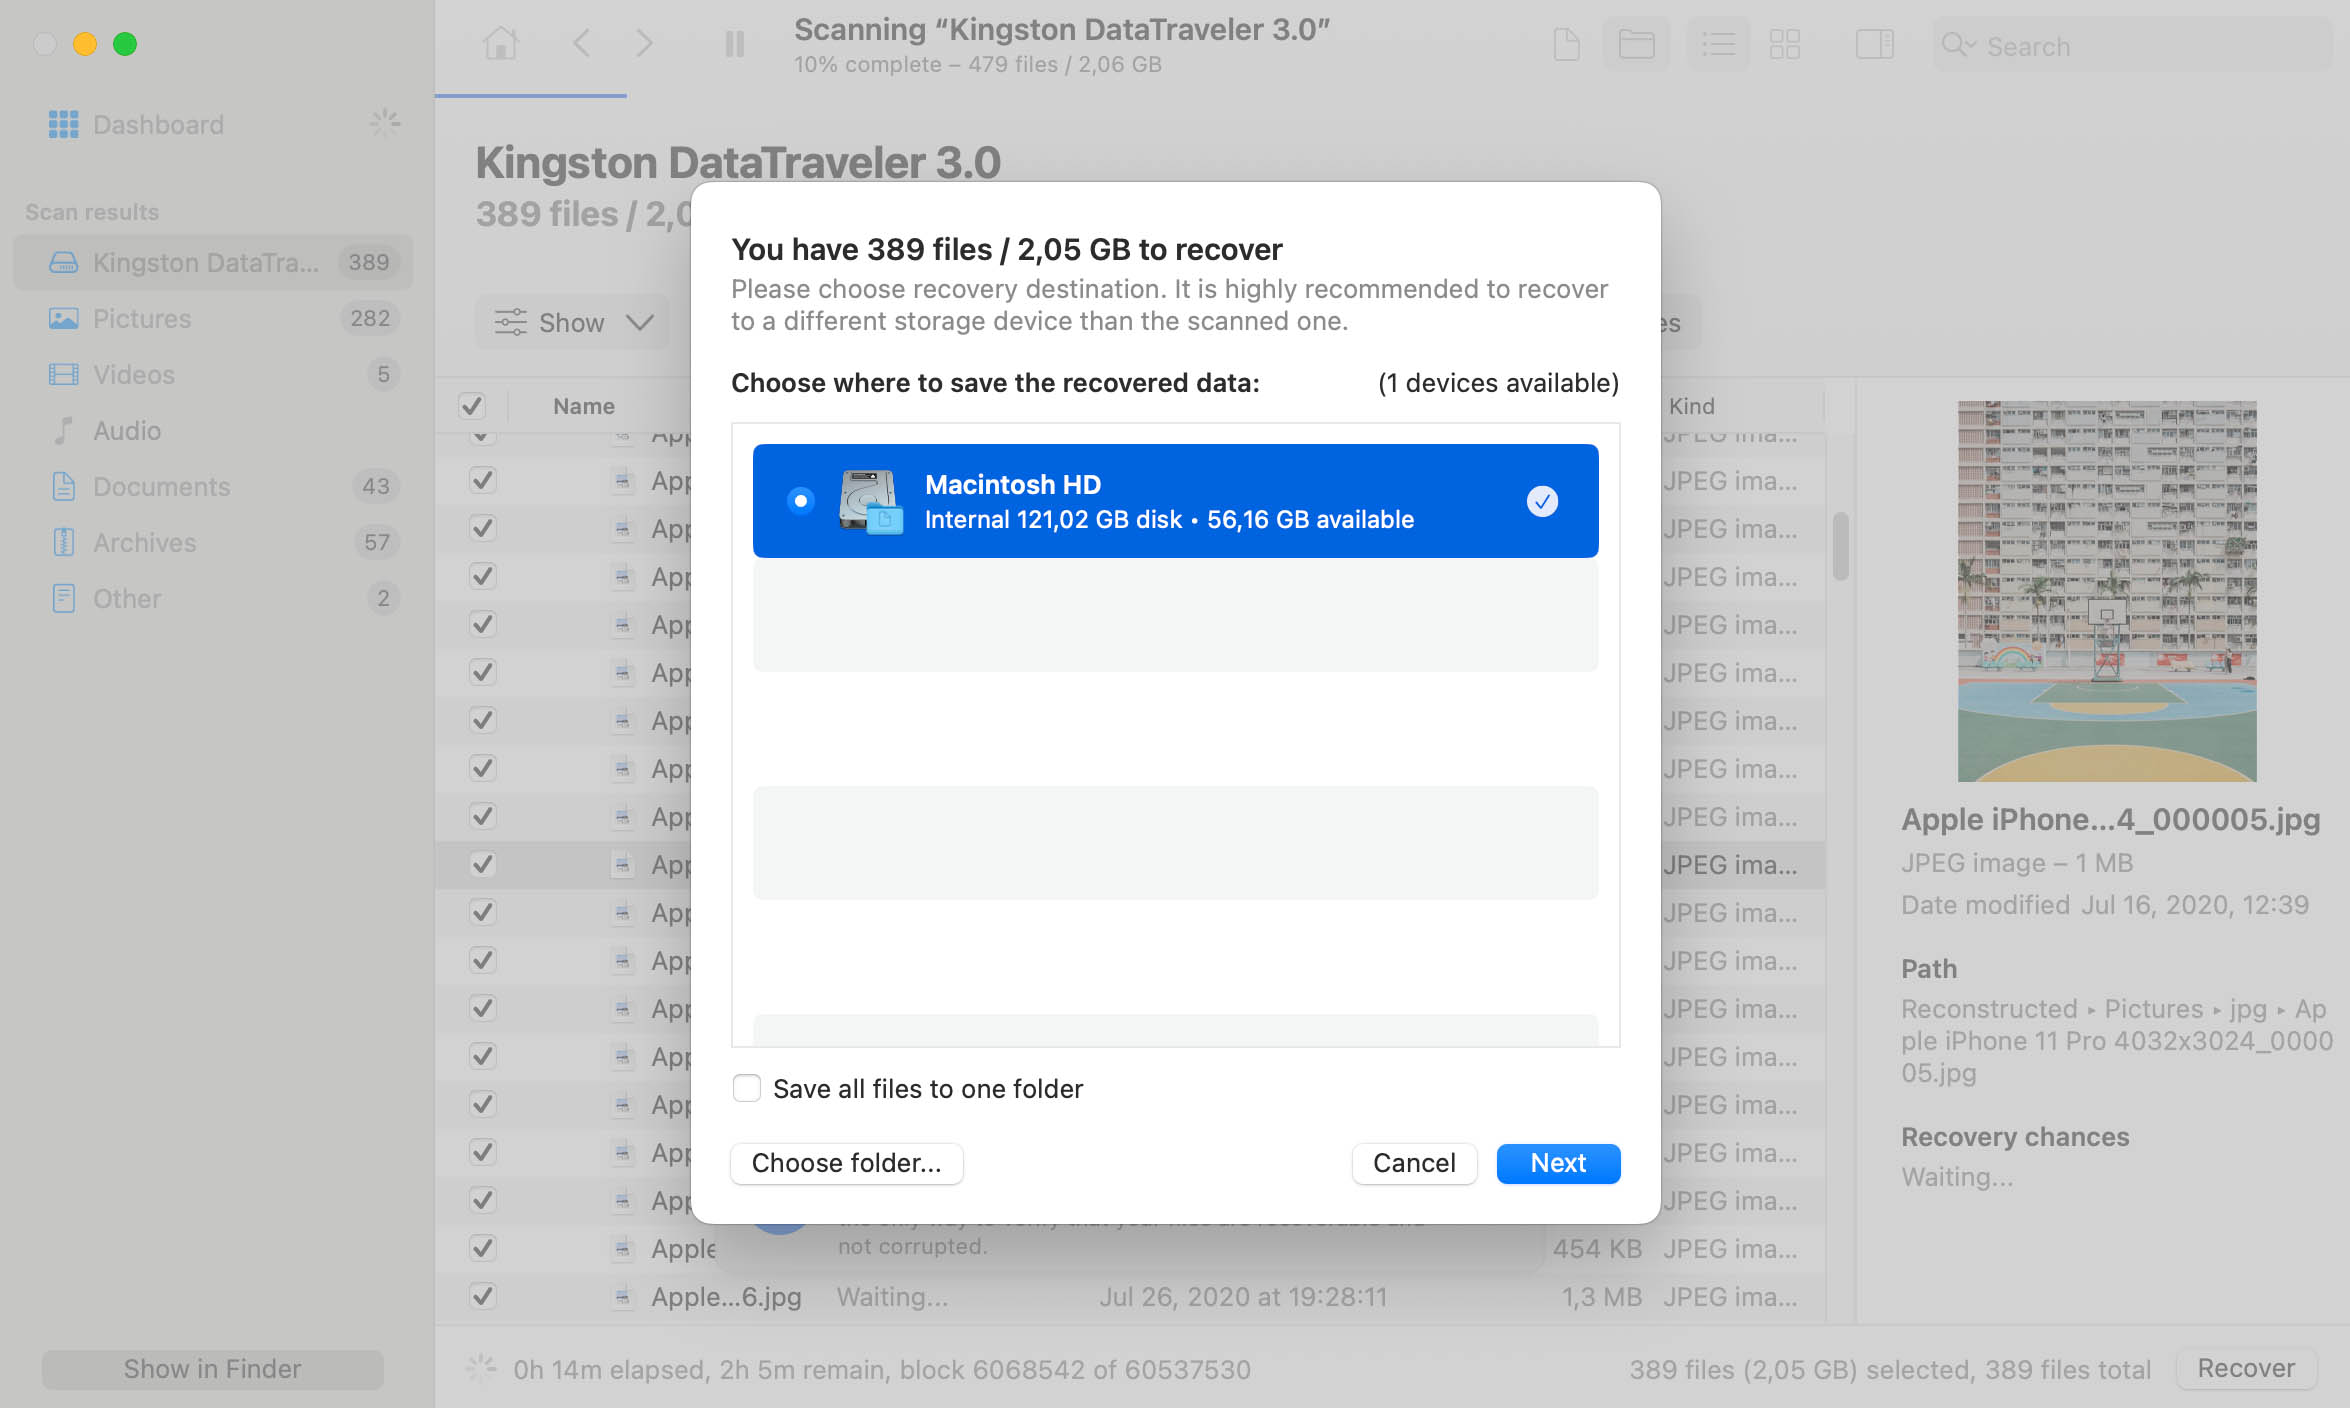
Disk Drill is loaded with extra features that help users protect themselves from data loss and manage their storage devices. Check out a full review of Disk Drill data recovery software.
Option #2: PhotoRec
PhotoRec is a freeware data recovery product that employs a command-line interface. While the tool is free and supports many operating systems, it has not been updated recently. This means it may not provide all the recovery capabilities of a commercial product.
Use the following procedure to recover deleted files from a USB drive with PhotoRec. Many of the steps make use of a command-line-driven menu from which options can be selected by the user.
- Download PhotoRec and extract the files to a directory on your main disk.
- Open the Terminal app and enter this command to start the program: sudo /[path to testdisk folder]/photorec.

- Select the disk that will be recovered by entering its name such as /dev/disk1. You need to know the disk name before performing this step.
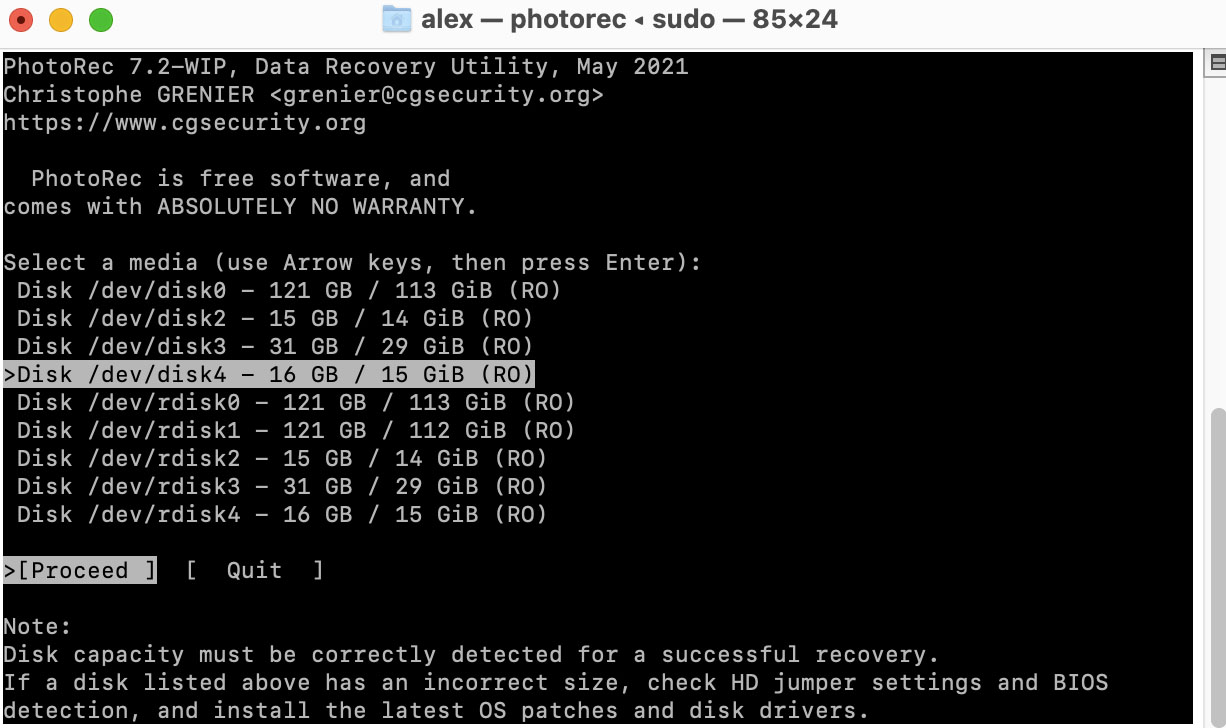
- Select the partition using the command-line menu.

- Enable the parameters you wish to enforce during the recovery process.

- Select the types of files to recover.

- Select the type of filesystem in use.

- Choose whether to carve a partition or use unallocated space.

- Select where recovered files will be written.

- The recovery process will now proceed and return a summary of its success.
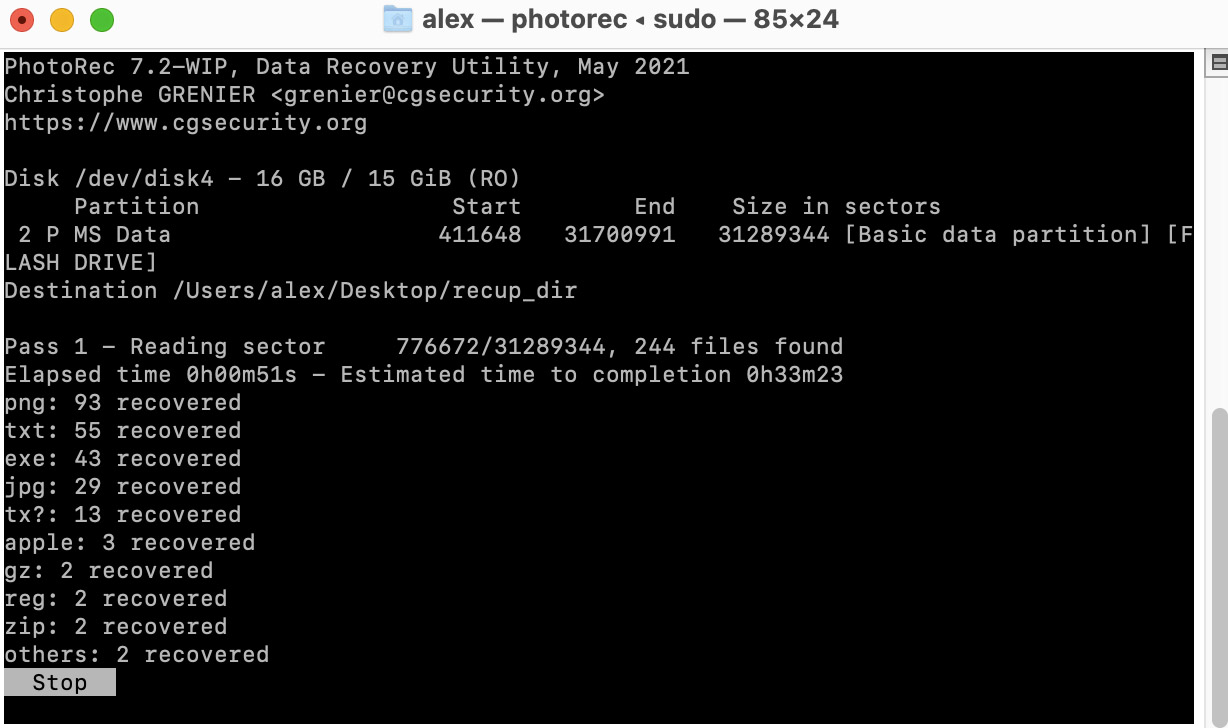
- Files are restored with generic names and will need to be reviewed to find the ones you want to keep. You can then rename them to their original name.

As you can see, this recovery method is more complex than that of Disk Drill. It requires information such as the disk name known to the operating system that may not be easily obtained by a user with general computer skills. PhotoRec can get your files back, but it’s not an easy process. Read more about PhotoRec here.
Is It Possible to Recover Deleted Files from USB Without Software on Mac?
If you’ve never used a data recovery app before, it’s understandable that you might be afraid to trust it for various reasons. Even though there are safe and effective tools on the market, many users still have security concerns and doubts about whether it will actually recover the missing files, and might worry about whether they’ll be able to navigate it.
Despite the fact that our team has personally tested the data recovery tools described in this article and therefore proved that they can be trusted, we have also compiled a list of alternative solutions that can help you to recover deleted files from a USB drive without any additional software.
Here are a few software-free data recovery solutions that you can use to restore deleted files from your USB drive on a Mac:
- 💽 Checking your Time Machine backups: If you’ve previously properly set up your Time Machine, it should be creating regular backups of your external devices. So, it’s a good idea to check your backups to see whether that deleted file is there.
- 💻 Checking other devices: Even though this rarely is of any help, it’s still worth a try. If you remember that you’ve previously shared the USB with another computer, the deleted files may still exist on that device if it had a copy of the files.
- ☁️ iCloud Drive: If you are using iCloud to store your files, there is a possibility that the needed file is stored there.
FAQ
Multiple reasons might be behind your USB device not showing up on your Mac including:
- Using a bad USB port. Try another one if it is available or attempt to read the USB drive on another Mac.
- Your Mac may need to be restarted. Sometimes this is all it takes to fix this type of connectivity issue.
- The drive may be formatted with a file system that cannot be read by your Mac. Reformatting may help resolve this problem.
Conclusion
Recovering deleted files from a USB flash drive on your Mac is possible with data recovery software. You need to stop using the device as soon as you notice data loss to preserve whatever information is left on the drive so it can be recovered. We suggest that a software tool with an intuitive recovery process like Disk Drill will give you the best results with the least amount of stress. As long as you have not overwritten the data, recovery software will get it back for you. Good luck with your USB flash drive recovery!


