

Table of Contents
There are a dozen reasons why you might’ve lost a valuable video on your Mac: corrupt drive, excess heat, physical damage, and accidental deletion are only a few of them. If you’ve realized that you suddenly can’t locate a specific video on your device, don’t panic just yet. Luckily, it’s possible to bring back the missing videos, and we’ll show you how to do it.
How to Recover Permanently Deleted Videos on a Mac
We have found that one of the best solutions for accidental video deletion or similar instances of data loss is to use data recovery software. This is especially true if you didn’t have any file backups before losing your videos. You can explore various data recovery software options available for macOS-based computers that can successfully restore deleted files. However, Disk Drill and PhotoRec offer a quick and reliable way to restore deleted videos on a Mac.
Disk Drill is an easy-to-use data recovery tool suitable for beginners and professionals. Meanwhile, PhotoRec is a more complex option and a good alternative to paid software.
In this section, we’ll use both Disk Drill and PhotoRec, breaking down each of their advantages over other apps.
Option A: Disk Drill
- Download Disk Drill and follow the onscreen instructions to install the application on your computer.

- Connect the device that used to store the deleted video (if it was located on your Mac’s main drive, skip this step).
- Launch Disk Drill and select the needed drive from the list of available storage devices. Then click Search for lost data to initiate a scan.

- Once the scan is finished, click Review found items.

- If you remember the name of the deleted video, type it in the search field in the top-right corner of the screen. Or instead, you can enter the needed file format (for example, .mov) to view only files with such an extension. Otherwise, select the Video tab on the sidebar on the left to narrow down your search to video files only.
- Click the eye icon near a video to preview it (if a file can be previewed, it means that the application is capable of recovering it).

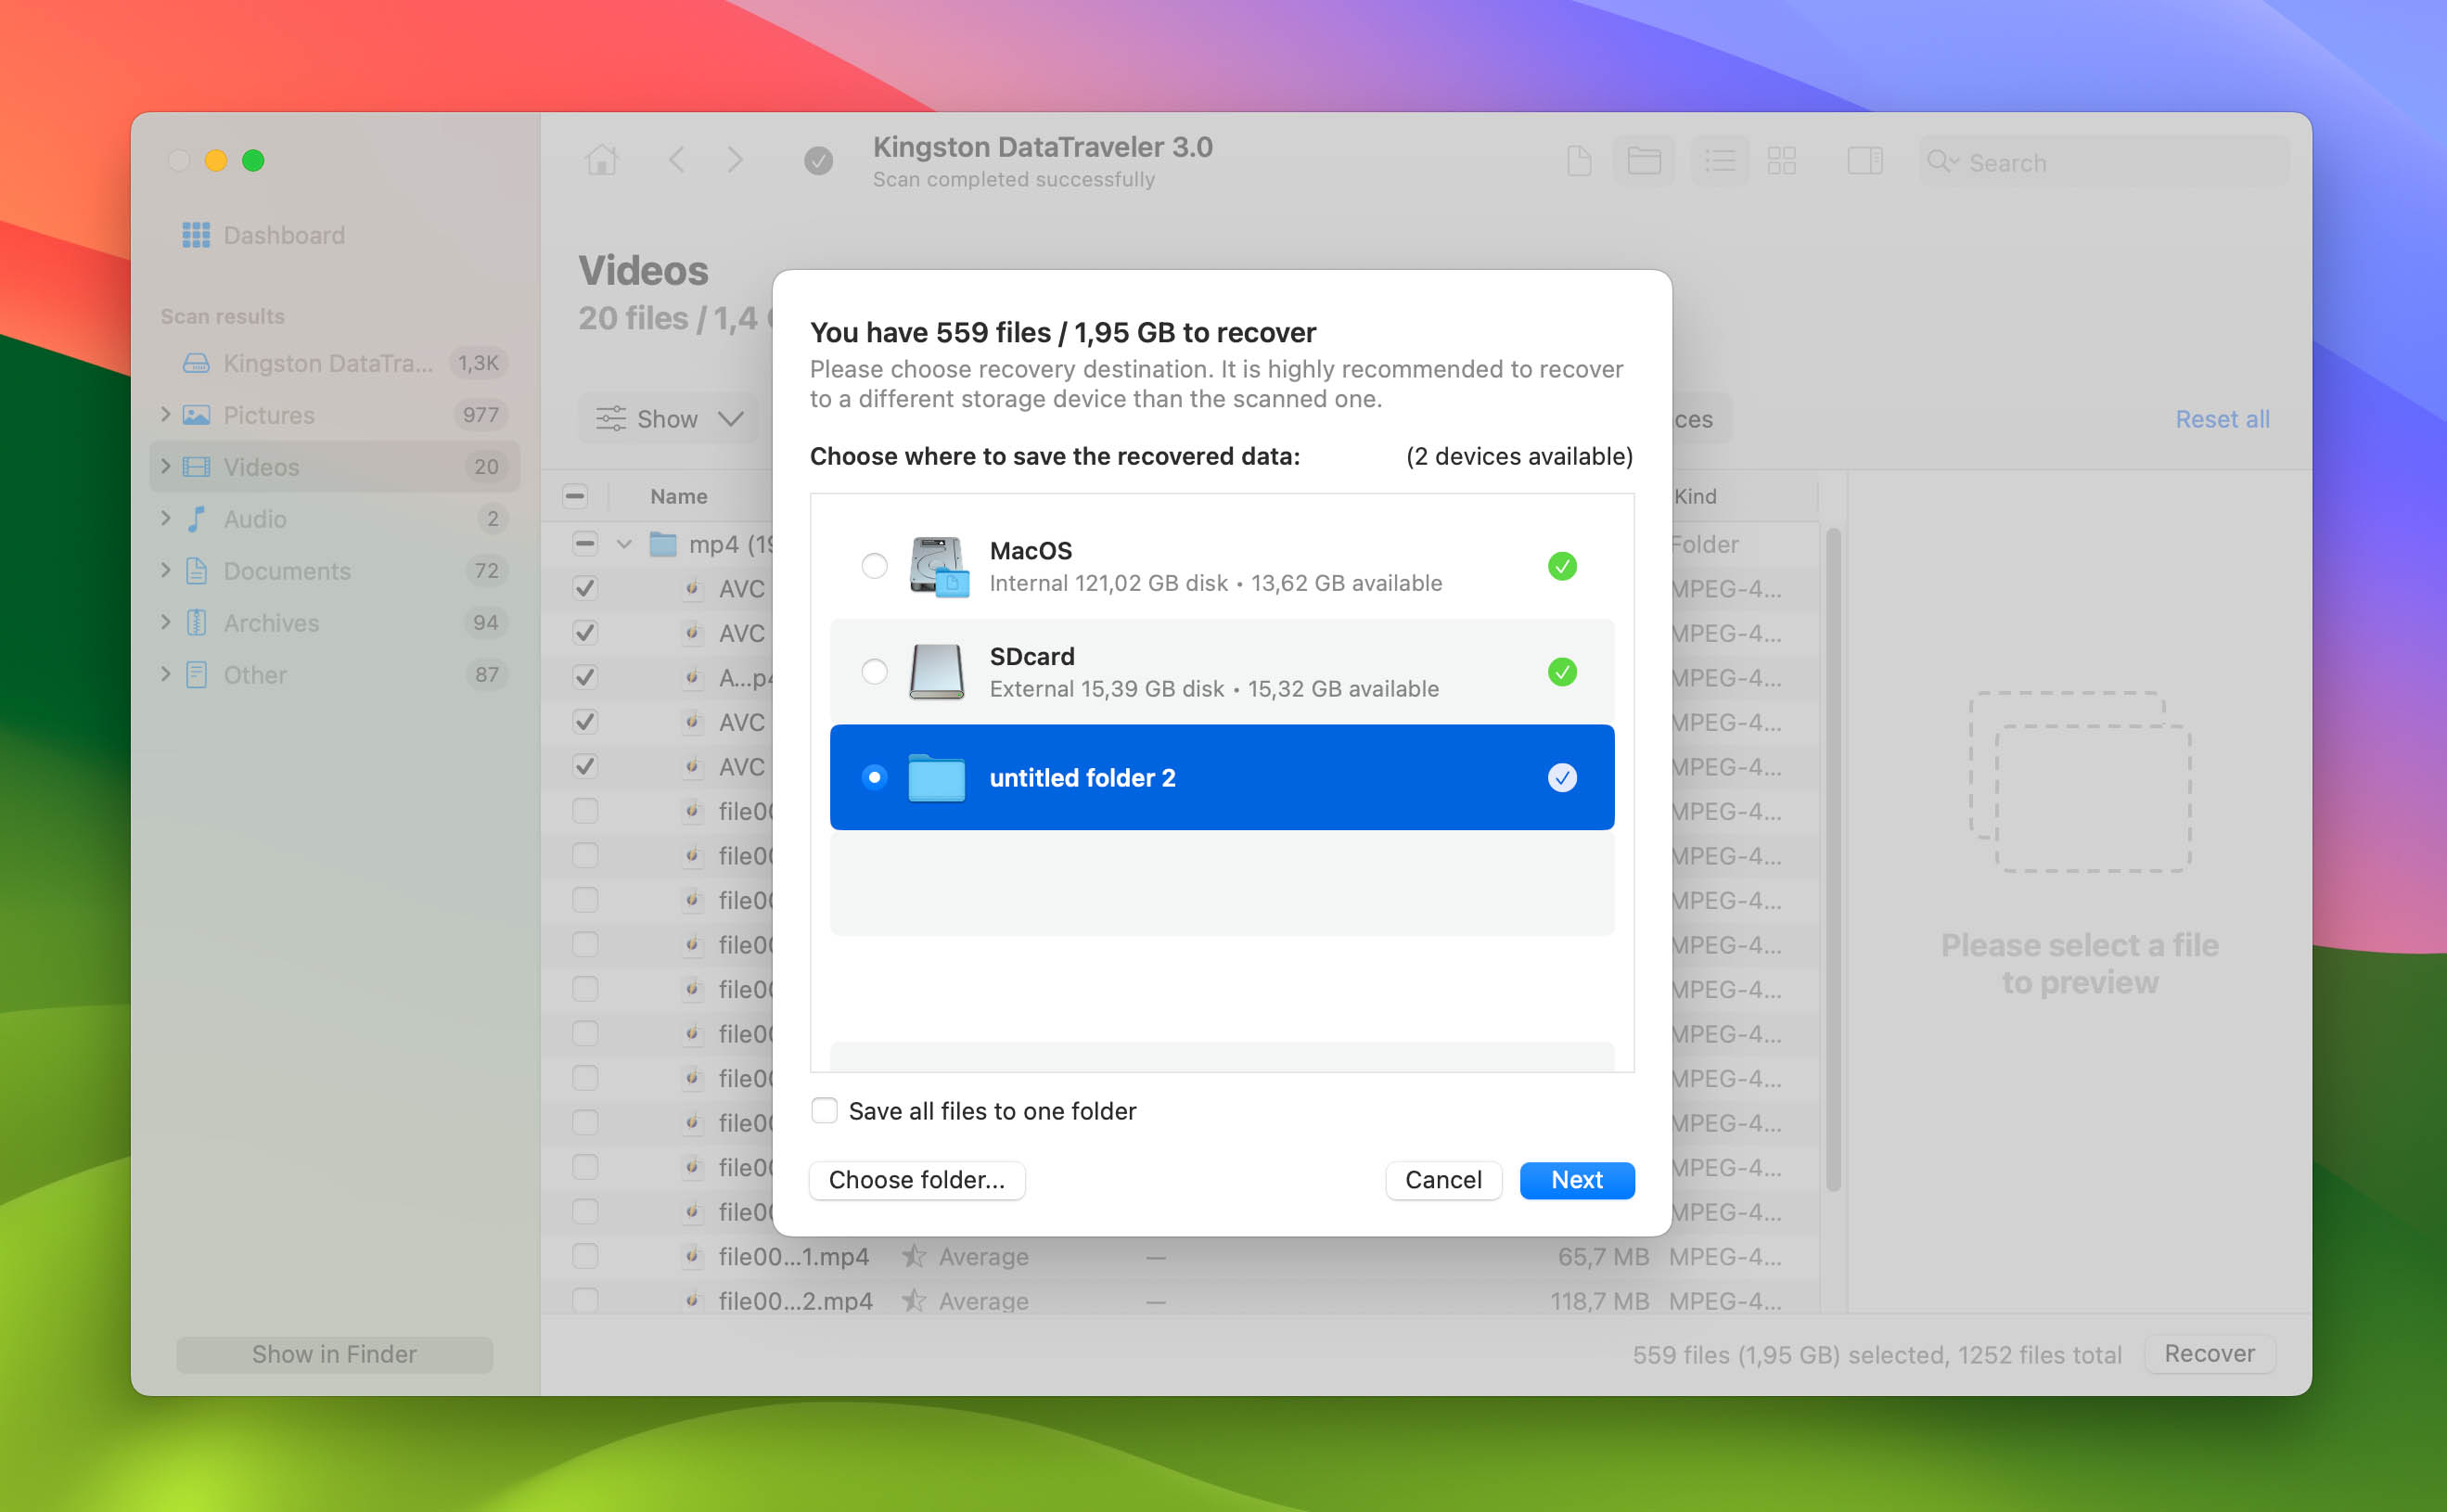
- Choose the videos that you want to restore and click the Recover button.

- Select a preferred destination for the recovered video files and click OK to confirm (to avoid data overwriting, it’s best to choose a folder on a device that’s different from the one where the recovered video was previously located).


Option B: PhotoRec
PhotoRec is our next data recovery tool suggestion, especially if you want a completely free data recovery software to get your videos back. This app doesn’t lack versatile features for recovering videos from different storage devices. You also don’t need to install the app. Just download the TestDisk zip file bundle from CGSecurity, extract its contents, and open the software.
Being a free app, PhotoRec is limited to data recovery and doesn’t have any advanced storage device monitoring features. It also has a command line-based user interface, which may make it slightly more challenging to interact with. Therefore, we don’t recommend it if you don’t prefer this interface.
Here’s a simple guide on how you can recover videos on your Mac with PhotoRec:
- To get started, download the TestDisk and PhotoRec bundle.
- Extract the zip file and open the photorec file to launch PhotoRec.

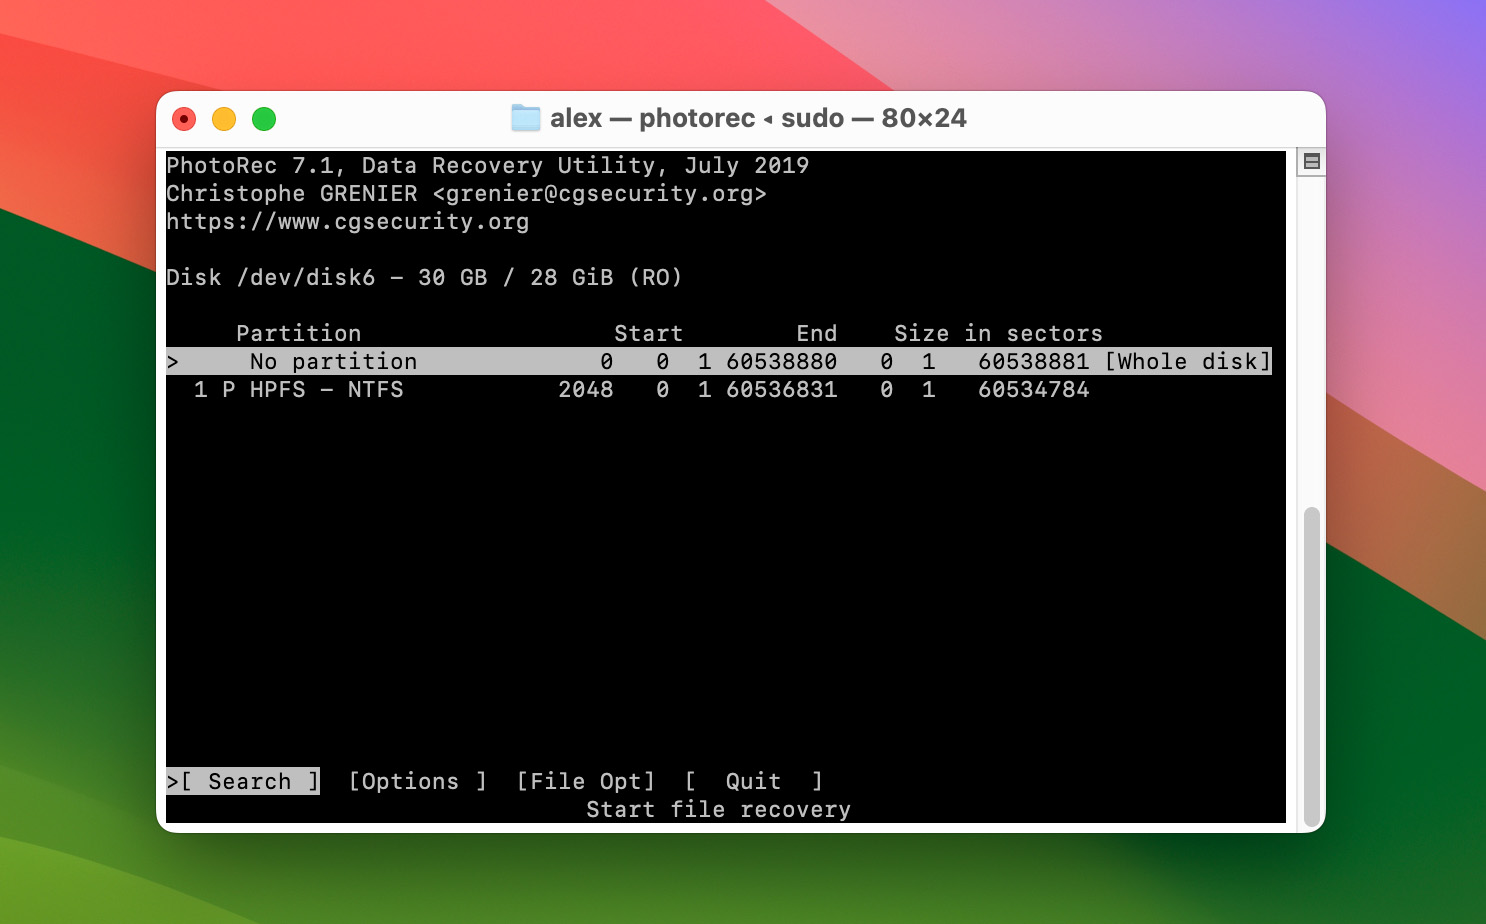
- Next, select the storage device that contains your lost videos. Use the up and down arrow keys to select an option and press Enter to proceed. You need to look for the storage size and other characteristics that match those of your storage device since PhotoRec doesn’t show the drive names. After selecting your drive, press Enter.

- Select the partition you want PhotoRec to scan.
- After that, choose the file system of your storage device and press Enter.

- Decide whether PhotoRec should scan your storage device’s free space or the whole device, then press Enter.
- Next, select the destination folder for your recovered files and press ‘C’. The scan should then begin. It should display all the different file types it has recovered so far.
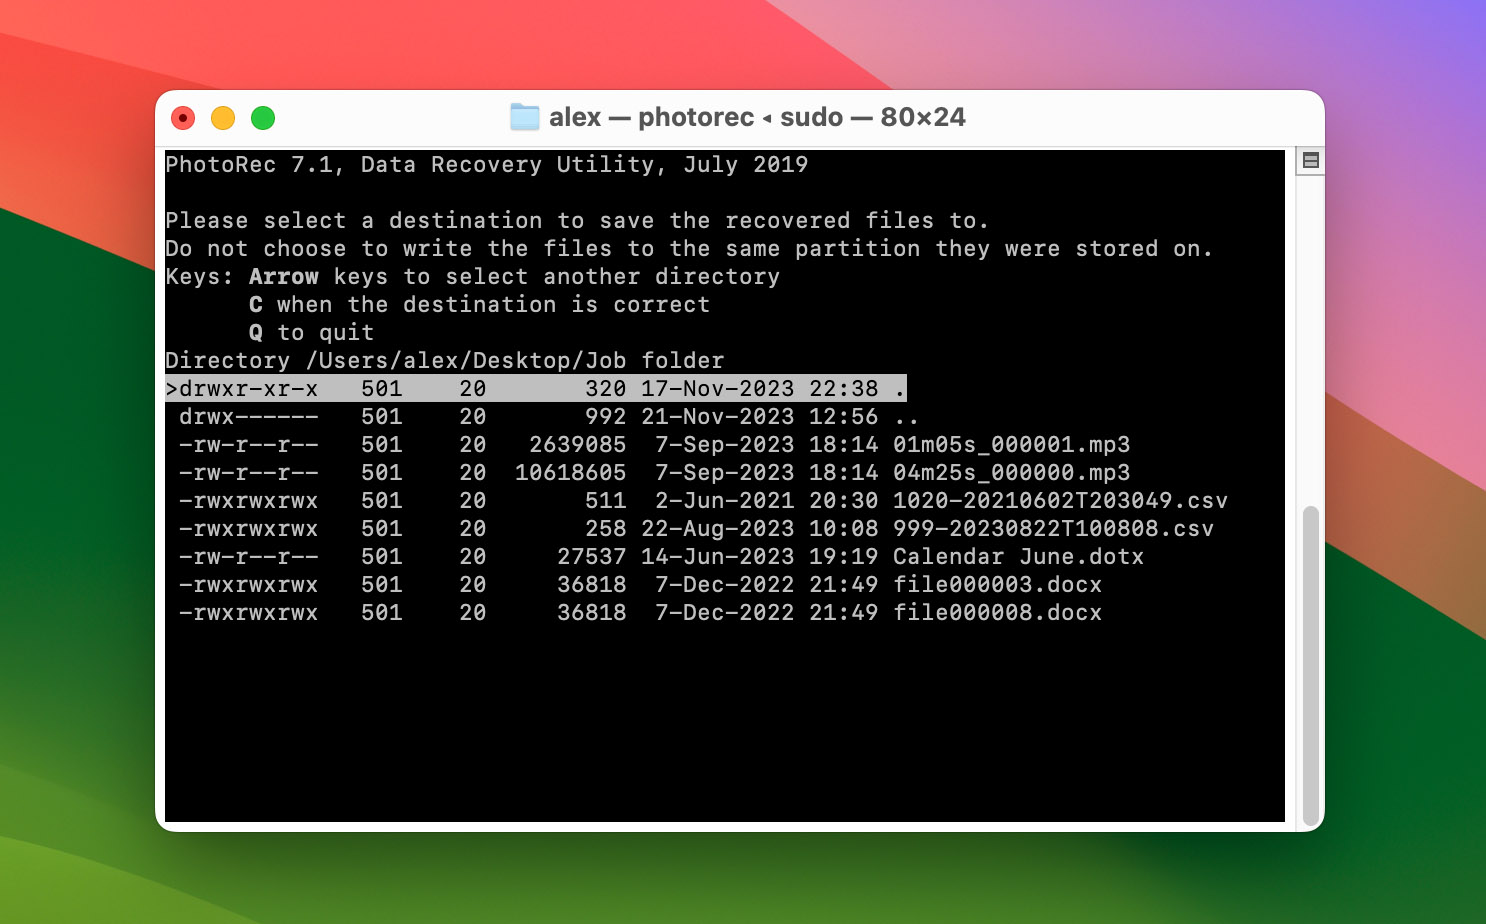
- After the scan, you should see how many files were recovered and placed in your destination folder. You should also see a message saying, “Recovery completed”. Select [Quit] and press Enter to finish data recovery.


Since PhotoRec doesn’t have file type filters, it recovers all the file types it can and places them all in your destination folder. To select your videos, browse the folder where your recovered files are and manually look for your videos among them.
Best 5 Alternative Methods to Recover Deleted Videos on a Mac
If for some reason the previous method didn’t work, there are some other data recovery solutions that can help. You can either try these methods one by one or choose one that’s most suitable for your specific video recovery situation.
Method 1: Search for Deleted Videos on Your Mac
Maybe the video that you’re looking for isn’t actually gone from your Mac? It’s always a good idea to double-check your computer before moving forward with a more complex data recovery solution.
There are two ways you can search for a video file on a Mac: via Finder (the first app on the Dock) or Spotlight (to launch it, press Command + SpaceBar). All you need to do is open either of the applications and type in kind: movie in the search field. This way, you’ll be able to view all of the video files that are located on your computer.

If you’re pretty sure that the video that you’re looking for was deleted, then you should check the Trash folder on your Mac. If you’re lucky enough and the video is still there, you’ll be able to easily recover it.
Here’s what you should do:
- Open the Trash folder (click the trash bin icon on the Dock).

- Look through the files to find the deleted video.
- Once you’ve found it, right-click the file and choose Put Back from the drop-down menu (the file will be saved into its original location).


Method 2: Recover Deleted Videos from Photos App on Mac
Another option that you can try is to recover the deleted video from the Mac video library (a.k.a. the Recently Deleted folder in the Photos app). This method should work only if you’ve imported the video to this application and it was stored specifically in Photos.
Follow these steps to retrieve a deleted video from the Photos app on your Mac:
- Launch Photos (go to Launchpad and type Photos in the search bar at the top).
- Click the Recently Deleted tab in the sidebar on the left.
- Look through the deleted files and click the one you wish to restore.
- Click the Recover button at the top-left of the screen (the video will be returned to its original location).


Method 3: Recover Lost Videos from iCloud
Have you been using iCloud to store or synchronize your files? If your answer is yes, then there is a possibility that the deleted video is still in the cloud, and you’ll be able to recover it from your account.
Follow these steps to recover lost or deleted videos from iCloud on your Mac:
- Using a preferred browser, go to icloud.com and log into your account.
- Click Photos.

- To view all of your videos that are stored in the cloud, click Media Types on the sidebar and choose Videos.
- If the video file that you’re looking for is not there, click the Recently Deleted tab.
- To restore a video, choose it and then click the Recover button in the top-right of the window.


Method 4: Restore Deleted Videos on Mac with Time Machine
Time Machine is a built-in data backup and recovery tool that comes with all MacBooks. If you’ve been using it to back up the files on your computer, you should be able to recover the deleted video from one of those backup versions.
Follow these steps to recover a deleted video from your Mac via Time Machine:
- Connect the drive containing the Time Machine backups (if you used an internal drive to back up your Mac, skip this step).
- Launch Time Machine (click the Time Machine icon on the menu bar at the top of the screen and choose Browse Time Machine Backups from the drop-down menu).

- Use the sidebar on the left to go to the folder where the deleted video used to be located.
- Once you’ve opened the folder, use the arrows or timeline on the right to choose the needed backup version.
- Choose the video that you want to recover and click the Restore button.


The recovered video will be automatically placed back into its previous location. So to open it, quit Time Machine and simply go to the folder where the file was stored before deletion.
Method 5: Try to Visit Data Recovery Service Near to You
If the data recovery methods mentioned above didn’t bring you any results, you have one more option left — get help from a professional.
Specialized data recovery centers can recover missing or deleted files from Macs even when you might think it’s impossible to accomplish. For example, when your computer suffered from data loss because of some kind of physical damage (either from excess heat, water, or other mishaps).
Not sure which data recovery service to choose? Our recommendation is the CleverFiles Data Recovery Center since it has a proven record of successfully recovering deleted video files from various external and internal drives and devices. Also, this company has a no data – no charge policy, meaning customers have to pay only if the professionals manage to restore the files.
Here’s what you should do to recover your deleted video with the help of a data recovery service:
- Contact the chosen data recovery center and tell them about your problem.
- Package and ship the device which suffered from data loss to the lab.
- Receive a price quote from the company.
- If you agree with the price, the professionals will start the recovery process as soon as possible.
- Once the deleted data is recovered, the company will ship your device and the restored data on a separate drive back to you.
FAQ
If you don’t have a backup available with the deleted video, and your Trash appeared to be empty, the easiest way to recover it would be with the help of data recovery software.
Depending on your specific situation, there are a few data recovery solutions that you can try to recover a deleted video on your Mac:
- Check the Trash folder
- Use a specialized data recovery application
- Recover from a backup
- Check the Recently Deleted folder in Photos
- Get help from a data recovery professional
Final Words
Nobody is fully protected from data loss, and for some reason, it mostly happens when you least expect it. So it’s a good idea to be prepared for the worst by regularly backing up your Mac. Regardless of whether you use Time Machine, iCloud, or any other tool, the fact that you always have a backup ready can protect you from unnecessary stress in the future.
And even if you weren’t prepared for the data loss to happen, luckily you still can recover even permanently deleted video files on a Mac thanks to data recovery software.