Table of Contents
Many have felt the instant regret of accidentally deleting a Keynote presentation – or the sheer terror of watching your computer flicker off during a power surge in the middle of working. Here’s the good news: you can restore deleted Keynote files on Mac.
But you have to immediately stop saving any new data to your computer until you’ve followed the instructions in this article (to avoid overwriting anything). In the sections below, we’ll teach you how to recover your lost Keynote presentation using Keynote’s own native tools as well as reliable third-party apps. Read on!
Common Causes of Unsaved or Deleted Keynote Files
Before we proceed with recovery, let’s identify the common reasons for lost Keynote files. Once we identify the exact cause, we’ll have an easier time figuring out the correct solution.
- ⚡ Power outage or system crash – When your Mac suddenly shuts down, you may not have recently saved your presentation and Keynote’s autosave system may not have initiated in time.
- 😲 Accidental deletion – Human error is a common reason for data loss – you may have accidentally deleted your presentation or formatted the drive containing the file.
- 📛 Software malfunction – Your files may be corrupted or deleted by faulty software or due to issues with Keynote itself.
- 💾 Failure to save the document – If you simply closed the Keynote app without saving your presentation (and Keynote’s autosave feature didn’t initiate in time), your file will be lost.
- 👾 Virus infection – Viruses can hold your data hostage or outright delete your files (among other malicious actions).
Recover Deleted Keynote Files Using Disk Drill
If your Keynote file has been “permanently deleted” (it’s no longer in the Trash folder), the best way to recover it is by using data recovery software. This is a special tool that can extract and rebuild the data and data fragments of the accidentally deleted Keynote in your drive’s file system.
We’ll demonstrate how to recover deleted Keynote presentations using a tool called Disk Drill. It’s fully optimized for the latest macOS and it supports both HFS+ and APFS file systems. Disk Drill also recognizes over 300 data types (including .KEY), making it one of the best software for recovering files (even those that were “permanently deleted”).
To restore deleted Keynote files on Mac using Disk Drill:
- Download and install Disk Drill.
- Launch Disk Drill (Finder > Applications).

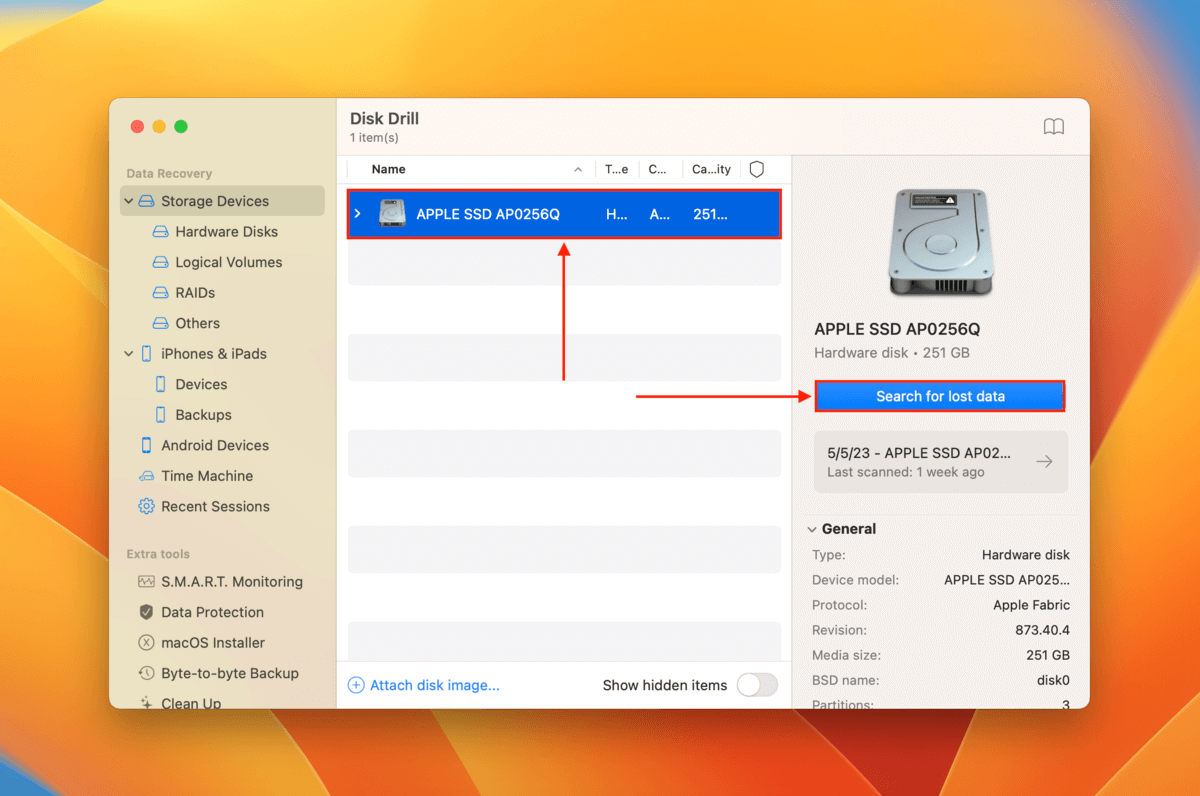
- Select the drive that contains your Keynote presentation. Then, click Search for lost data.

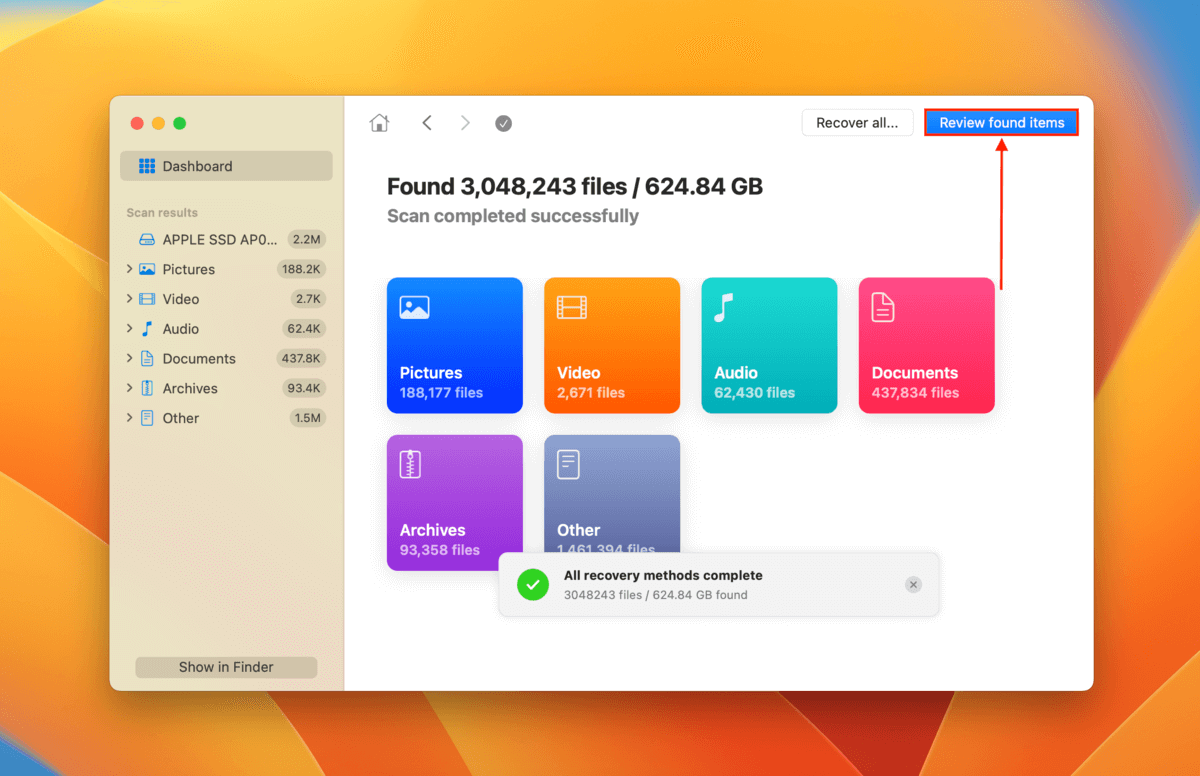
- Wait for Disk Drill to finish scanning your drive. Then, click Review found items.

- Select Documents from the left sidebar and type .KEY in the search tool to filter the scan results. Then, expand the Deleted or lost tab to browse deleted files. You can hover your mouse beside any file and click the eye button to preview it.

- Choose the files you want to restore by selecting the boxes beside them in the leftmost column. Then, click Recover.

- Select a location where Disk Drill will save the recovered Keynote file. Make sure you choose a different drive from the file’s original save location (to avoid overwriting). Then, click Next.

Restore Unsaved Keynote Presentations from AutoSave Folder
macOS has a built-in autosave feature that acts as a safety net for users who accidentally quit their apps without saving the file they’re working on. It’s enabled by default. The autosave feature runs quietly in the background and incrementally saves your file in its current state.
The saved data is stored in an autosave folder on your Mac, where it continues to overwrite its most recent save to keep the file updated. With this method, we will attempt to recover the unsaved Keynote presentation by restoring its autosave copy.
To restore unsaved files from Keynote:
- Open Finder. Then, click Go > Go To Folder…

- Type the following path in the field:
~/library/containers/com.apple.iwork.keynote/data/library/autosave information

- Check the files stored in the autosave folder. If you find your Keynote presentation, you can open it directly from the folder and save the file to a new location.
Recover Unsaved .KEY Files from Temporary Files
The Temporary or “temp” folder is another (indirect) safety net for users who are unable to save their document files. The temp folder acts like the autosave folder – it saves your Keynote data incrementally in the background. However, it does so for a different purpose.
Instead of saving data for the sake of the user, the temp folder stores information temporarily to give way to the application’s processes. This includes logs, temporary caches, and copies of your data. This is intended to make the app perform more efficiently because it doesn’t need to load these files again.
To recover your unsaved .KEY file from the temp folder:
- Open the Terminal app (Finder > Applications > Utilities).

- Type the following command and hit Return:
open $TMPDIR

- Locate your Keynote data (try the TemporaryItems folder). Then, open it in the Keynote app, and save it as a new file in a secure location.
Use Time Machine to Recover Previous Versions of Keynote Files
Time Machine is a great way to recover deleted and previous versions of your keynote files. Time Machine creates incremental backups of your data – in other words, it updates its backup data to reflect the current version of your files.
In this way, you can use Time Machine to either: (1) recover a deleted Keynote file by restoring an older version of the folder that once stored it or (2) recover the previous backups of your Keynote file. If you regularly use Time Machine to back up your Mac data, you may have saved a copy of your Keynote presentation.
To recover your Keynote presentation using Time Machine:
- If you have access to your Time Machine drive, connect it to your Mac. However, Time Machine also creates local snapshots of your system disk every hour (if you have enough space) and stores them for 24 hours. If it’s been under 24 hours since your Keynote file was deleted, you may proceed with the following steps without your Time Machine drive.
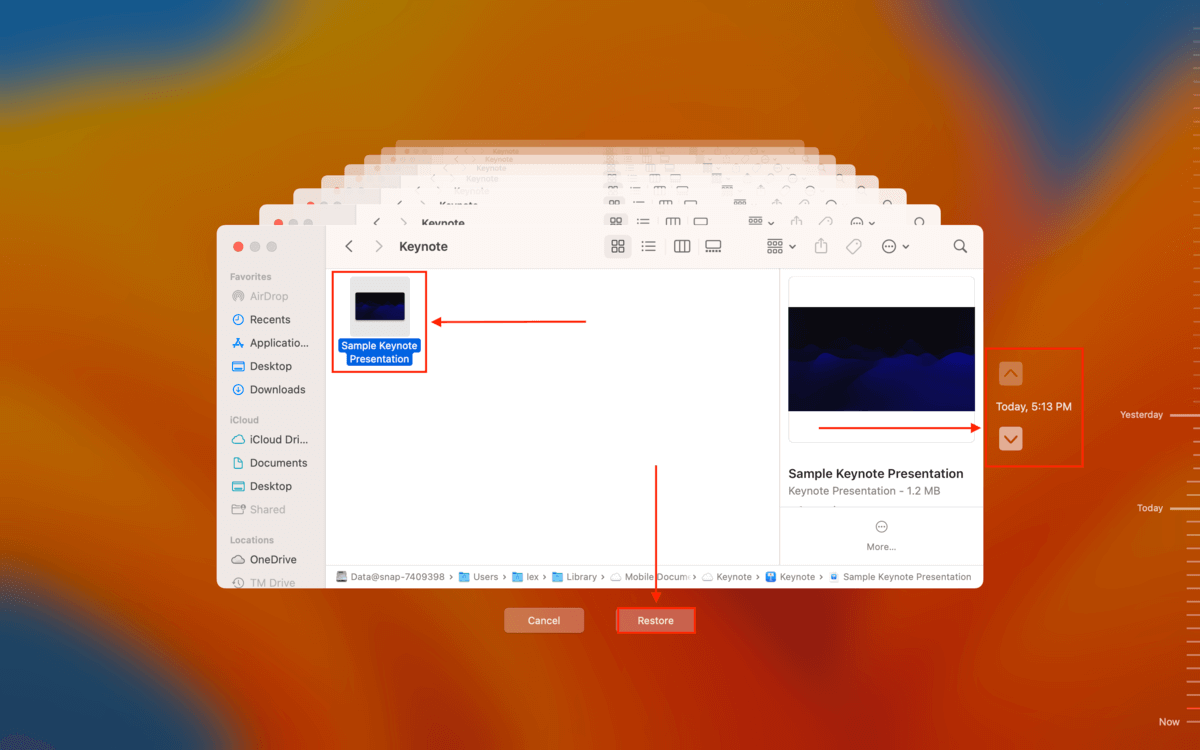
- On the Apple menu bar, click the Time Machine button > Browse Time Machine Backups.

- Navigate to the folder that stored your Keynote presentation. Then, use the arrows to browse through previous versions of the folder or of your Keynote file. Once you find the version you want to restore, select it and click Restore.

Preventing Future Loss of Keynote Presentations
While data loss is a common occurrence for all users (and not just with Keynote), there are some ways we can either prevent it from happening – or at least soften the blow. Here are 5 tips to prevent the future loss of Keynote presentations:
- 💾 Save regularly – Create a habit of saving your file every 5 minutes. It sounds like a lot, but saving your file just takes two keys (Command + S). This way, you’ll never be too behind if the worst happens.
- 🦾 Enable autosave – It’s not as reliable as manual saving, but enabling autosave should prevent you from losing too much work if something bad happens. To enable autosave, open Apple menu > Desktop & Dock > Windows & Apps > enable Ask to keep changes when closing documents.
- ⏳ Enable Time Machine – According to Apple, Time Machine creates hourly backups for the past 24 hours. Enable Time Machine while you work, so you will never be more than an hour behind if you lose your current progress. You will also be able to restore previous versions if you dislike your recent changes.
- ☁️ Use cloud storage – Cloud storage like iCloud and Google Drive often have their own Trash folder, which allows users to restore deleted files for up to 30 days (the usual default). You can access your data from any browser too.
- 🔋 Maintain your battery – This is a more indirect tip, but it helps to make sure that you lessen the occurrences of sudden shutdowns on your Mac. Aside from preventing you from saving your file, shutdowns may also corrupt your existing data.
Conclusion
Keynote files are particularly painful to lose due to the considerable amount of time we spend on a presentation. Fortunately, macOS provides users with a number of safety nets in the form of temporary or autosaved data.. There are also third-party tools like Disk Drill that are designed to restore permanently deleted files.
However, restoring your data isn’t a guaranteed success and temporary or autosaved files won’t always be the version you want to work on. To better protect your work, make sure you follow our tips in the last section.
FAQ
Yes, you can recover an unsaved Keynote presentation! There are 3 ways to do this:
- Restore an autosaved version of your Keynote presentation. Location:
~/library/containers/com.apple.iwork.keynote/data/library/autosave information - Restore a version of your Keynote presentation from your Mac’s Temporary folder (Terminal > open $TMPDIR command).
- Restore a Time Machine backup that contains your Keynote file.
To recover a deleted Keynote presentation (considering it’s not in the Trash folder), you have 2 options. (1) Use data recovery software to extract your file directly from your drive’s file system or (2) restore a Time Machine backup that contains your Keynote file.
Note that option 2 requires Time Machine to have been set up before you deleted your file.
If you have iCloud enabled, your Keynote files will be saved to the Keynote folder in your iCloud drive. If you have iCloud disabled, you may find your Keynote files in your local Documents folder.
Keynote’s temporary files can be found by using the open $TMPDIR command in the Terminal app, while autosave files are found in the following path:
~/library/containers/com.apple.iwork.keynote/data/library/autosave information


