Table of Contents
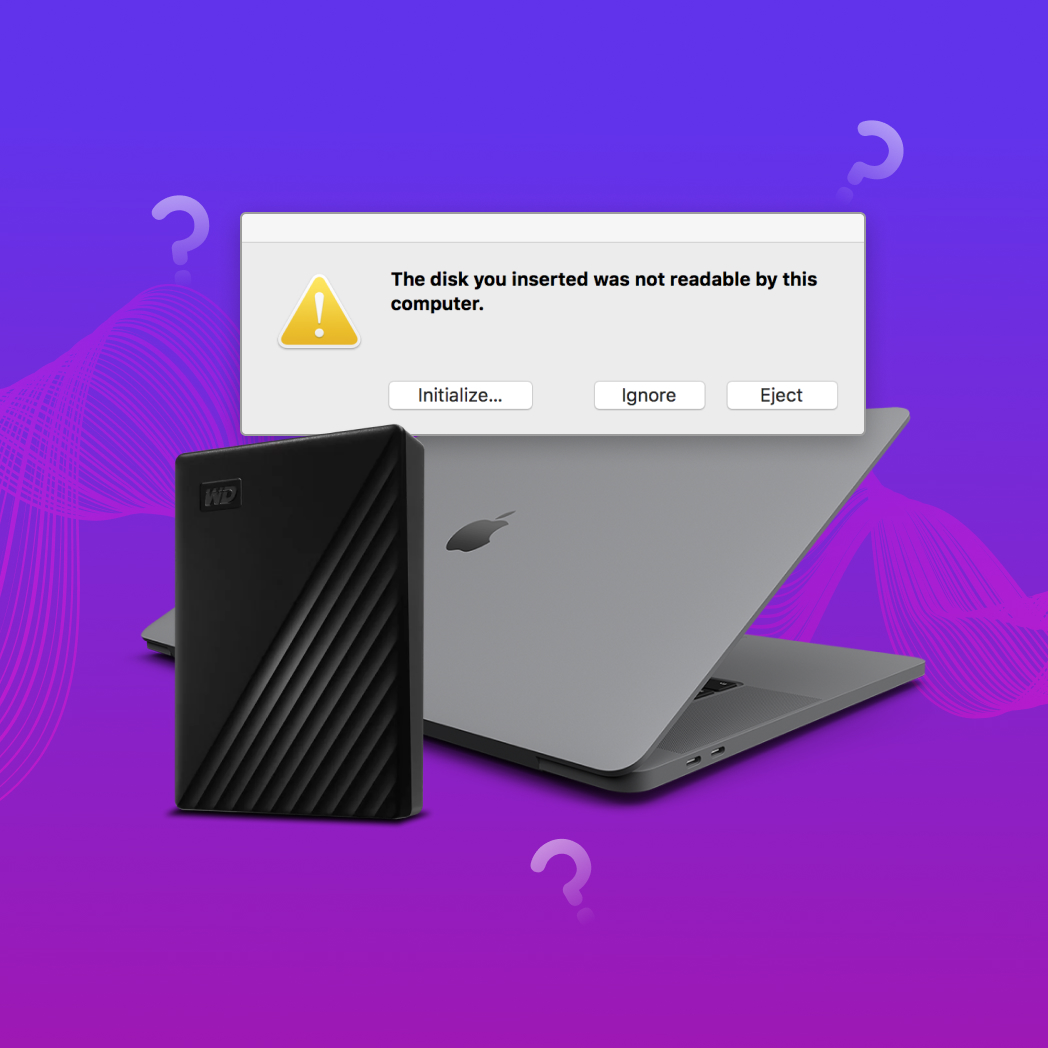
Are you faced with the dreaded issue of your external drive not showing up on Mac? This common problem can be difficult to fix because its potential causes include everything from simple physical connection issues like faulty cables to file system incompatibility to the hard drive itself being corrupted or failing.
But with the instructions and tips provided in this article, you’ll be equipped to diagnose and resolve these challenges efficiently.
Factors Causing Your External Hard Drive to Be Unrecognizable
When your Mac won’t recognize an external hard drive, it’s often due to one or more of the following factors causing your external hard drive to be unrecognizable:
- Physical connection issues: Sometimes, it’s as simple as a loose cable or a faulty USB port. A quick check of your connections can often solve the mystery with your external drive not showing up on Mac.
- Mac settings and preferences: Your Mac’s settings might be the culprit. Unfortunate tweaks in the System Settings, especially those performed using the Terminal app as administrator, can sometimes lead to your MacBook not recognizing the external hard drive.
- File system compatibility: If the file system of your external drive isn’t compatible with macOS, you’ll face the external hard drive not mounting Mac issue. For example, the NTFS file system can be natively mounted as read-only in macOS, while many Linux file systems can’t be mounted at all.
- Drive corruption or failure: A corrupted or failing drive can lead to your Mac not recognizing the external hard drive. Regularly checking a Mac’s hard drive health can alert you to potential failures.
- Recent OS updates: Updating macOS can sometimes lead to compatibility issues with external drives, as seen in discussions on Apple’s forum and another thread. This is often due to changes in how macOS handles external devices.
- Drive’s power requirements: Some external hard drives need more power than what your Mac’s USB port can provide. often leading to your MacBook not recognizing the external hard drive. This is particularly common with certain models from WD, Seagate, Toshiba, and Iomega.
In the following sections, we’ll explore solutions that can help you address each of these factors and fix the issue with your external hard drive not mounting on a Mac.
How to Fix External Hard Drive Not Showing Up on Mac
Now that we’ve pinpointed the potential culprits behind the frustrating Mac not recognizing external hard drive issue, it’s time to roll up our sleeves and tackle these problems head-on—starting wit the first method.
Method 1: Diagnose Physical Issues

Photo by thiago japyassu
Often, your Mac won’t recognize an external hard drive just because the cable isn’t connected properly or is damaged. That’s why we recommend you:
- Inspect the cable for damage: Carefully examine the cable for any visible signs of wear, fraying, or bending. Even small tears or kinks can disrupt the connection.
- Reconnect the cable: Unplug and then firmly reconnect the cable at both ends—the hard drive and the Mac. This simple step can often resolve a loose connection issue.
- Try a different cable: Swap out the current cable with another one that you know works well. This helps determine if the issue is with the cable itself.
- Check the USB port: A new cable hasn’t fixed the problem? Then try using a different USB port on your Mac. Sometimes, a specific port may not function correctly due to dirt or damage.
- Look for other physical issues: Ensure the hard drive is properly powered and check for any external damage to the drive itself.
If you notice any other physical damage besides issues with the cable or the USB port, it’s crucial to proceed with caution. Attempting DIY repairs in these scenarios can often exacerbate the problem, potentially leading to irreversible data loss or further hardware damage. In such cases, it’s best to consult with a certified data recovery technician who can safely address the issue.
Method 2: Check Mac Settings and Preferences
If your external drive doesn’t appear on the desktop or in the Finder sidebar, then it’s possible that you just need to tweak your Finder settings:
- Launch Finder.
- Open the Finder menu in the menu bar and select Settings.

- Choose to show your external disks on the desktop in the General section of the Finder Settings window.
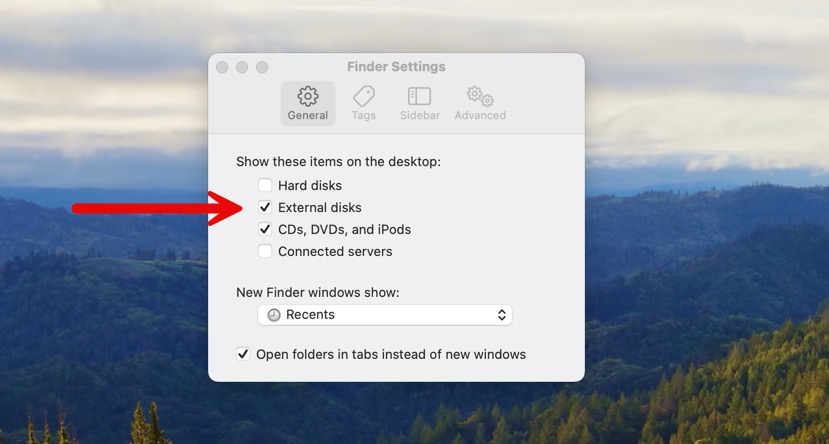
- Navigate to the Sidebar section of the Finder Settings window.
- Choose to show your external disks in the sidebar.

Keep in mind that our instructions are written for macOS Sonoma. Earlier versions of macOS use “Preferences” instead of “Settings,” so don’t get confused.
Method 3: Fix File System Compatibility

Mounty for NTFS
One of the more techy reasons your Mac might not be recognizing your external hard drive is a file system compatibility issue. Basically, Macs typically use APFS or HFS+ as the way of organizing files on a storage device, while Windows uses mainly the NTFS file system.
So, what happens when you plug an NTFS-formatted drive into your Mac? If everything goes right, you will be able to access the data stored on it. However, sometimes, things don’t go right, and nothing happens.
Fortunately, this problem can be addressed by installing third-party software that adds support for the NTFS file system. Reliable options include:
- Mounty for NTFS: Mounty for NTFS is a user-friendly tool that allows seamless read-write access for NTFS volumes on Mac. Best of all, it’s completely free.
- Microsoft NTFS for Mac by Paragon Software: This commercial software offers full read and write access to NTFS partitions, and its reputable developer updates it often.
- Microsoft NTFS for Mac by Tuxera: Tuxera provides reliable and fast NTFS file access, and you can try it free of charge for up to 14 days.
Method 4: Repair Drive Corruption
When your Mac doesn’t recognize an external hard drive, it might be down to drive corruption. This can happen for several reasons, like improper ejection of the drive or a power failure while writing data. But don’t worry, macOS has a built-in tool called First Aid that can help:
- Launch Finder and navigate to the applications folder. Go to the Utilities sub-folder and launch the Disk Utility app.
- Select the external hard drive that’s not showing in Finder and click the First Aid button in the top toolbar.
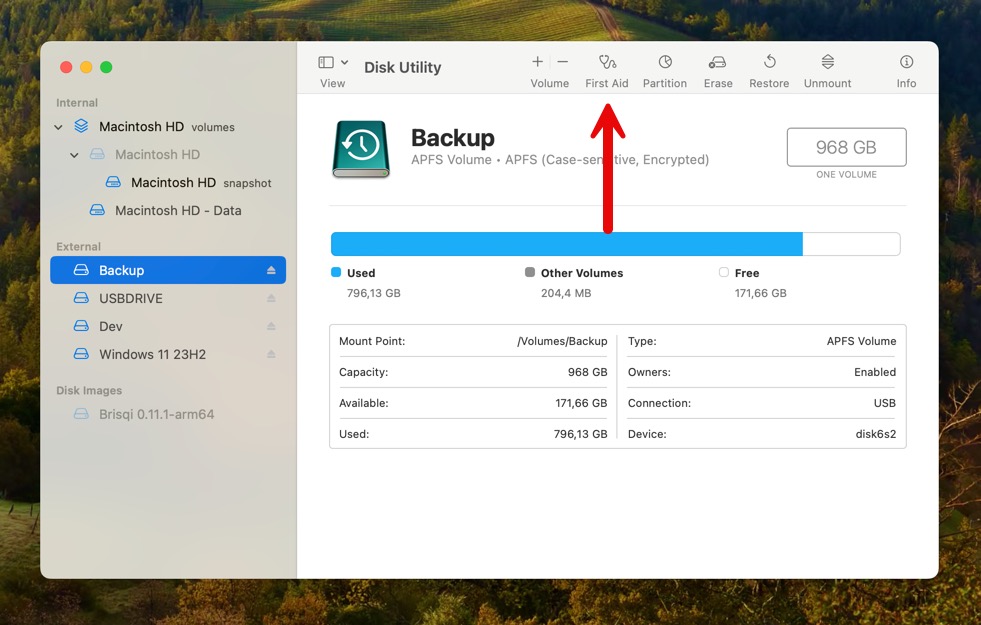
- Confirm your decision to check and, if necessary, repair the external hard drive.
Hopefully, First Aid will be able to diagnose and repair the problem. If not, then you can try some of the best Mac disk repair software from third-party developers.
Method 5: Exclude Third-party Software Conflicts
If you have a lot of apps running in the background on your Mac, then it’s possible that one of these apps is not behaving nicely, resulting in your MacBook not recognizing your external hard drive.
This problem has an obvious solution: get rid of the misbehaving app, just like this Mac user did. Unfortunately, that’s easier said than done because you first need to figure out what is causing your problem. We recommend you do the following:
- Launch the System Settings app.
- Navigate to the General section.
- Select the Login Items category.
- Go through the list of apps that are configured to open automatically and remove everything you don’t absolutely need.
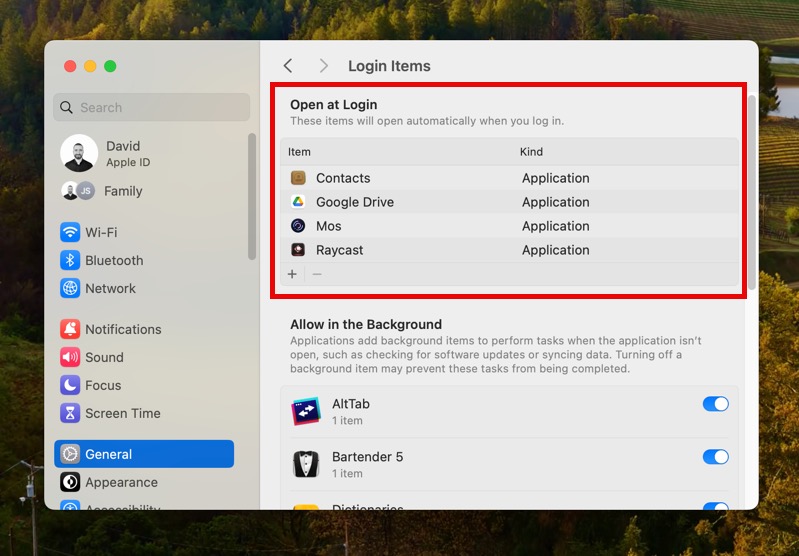
- Restart your computer and see if your Mac is still not recognizing your external hard drive.
If your drive is recognized, then you know that one of the removed apps was behind the cause of the problem. If it’s still not readable, then you can continue removing apps from the list until it’s completely empty.
Method 6: Verify Sufficient Power for the External HDD

TP-Link Powered USB Hub
In some cases, the reason your external hard drive won’t mount on your Mac is as simple as a lack of power. This is especially true for larger or older hard drives, which can be a bit more power-hungry than your Mac’s USB port can handle.
Take Raoul Duke’s situation, for example. Raoul experienced an issue with his Western Digital 3TB external USB3 hard drive. It mounted and operated perfectly on his Mac Pro (Late 2013), but wouldn’t show up on his MacBook (2017) or MacMini M1 (2020), despite all running Mac OS 11.3.
To avoid issues like that, it’s best to connect external hard drives to a powered USB hub. This ensures that the drive receives adequate power, especially when used with laptops or smaller desktops like the MacMini, which may not provide enough power through their USB ports. A powered USB hub acts as an external power source, giving your hard drive the energy it needs to operate correctly.
Method 7: Force Mount the Drive on a Mac Using Terminal
When your external hard drive won’t mount on your Mac and you can’t open your files, a little nudge using the Terminal can do the trick. This method involves using the diskutil command, a powerful tool in macOS for managing disks and storage devices.
Here’s how to force mount your external hard drive:
- Find Terminal in the Utilities folder within your Applications folder, or use Spotlight (Cmd + Space) and type Terminal.
- Type diskutil list and press Enter. This command will display all the storage devices connected to your Mac. Look for your external hard drive in the list. It’s usually labeled as “external, physical” and note down the identifier (like disk2s2).
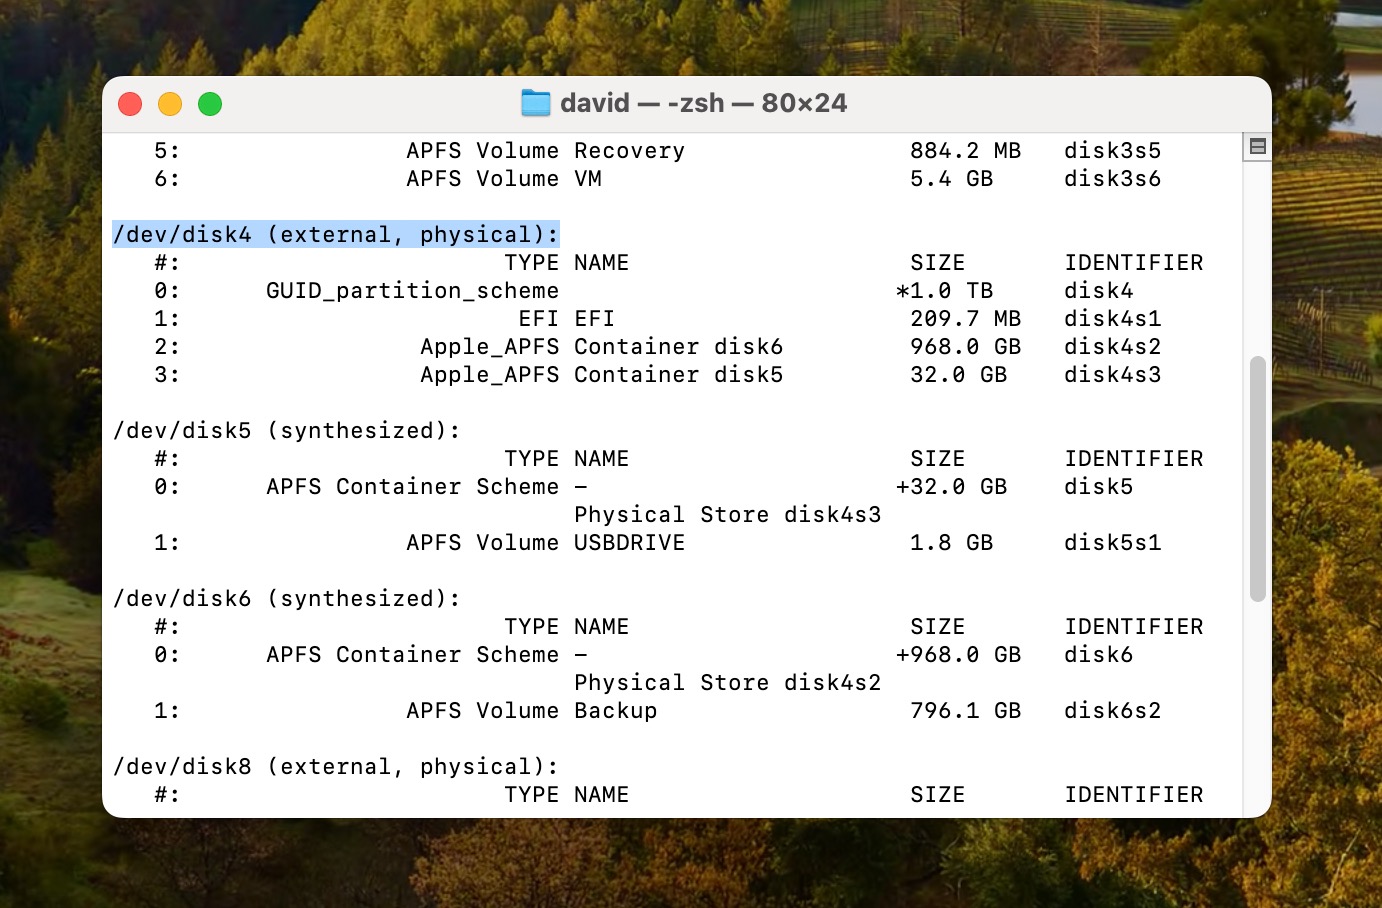
- Type diskutil mount diskXsY (replace diskXsY with your drive’s identifier) and press Enter.
If successful, the drive should appear on your desktop or in Finder. If the drive doesn’t mount, Terminal may provide an error message. This can give clues as to why the drive isn’t mounting (like format issues or corruption).
Is There a Way to Recover Data from an External Hard Drive That Is Not Showing Up?
Sometimes, even after you’ve tried everything, your Mac still won’t play nice with your external hard drive. It’s a frustrating situation, especially when you know there’s important data trapped on that drive. But here’s some good news: Just because your external drive isn’t showing up, doesn’t mean your data is lost forever. You can use the best data recovery software for Mac to retrieve it.
Using Data Recovery Software
To show you how you can use data recovery software to recover data from your external hard drive on macOS, we’ve chosen Disk Drill, a tool acclaimed for its efficiency and user-friendliness (you can read our Disk Drill review for more information about it). Here’s a step-by-step guide on how to use it:
- Visit the Disk Drill website and download the software. Ensure you get the version that’s compatible with your macOS—it should download automatically.
- Install the software by following the simple installation process. It’s as easy as dragging it into your Applications folder.

- Connect your external hard drive to your Mac. Don’t worry if it’s not showing up in Finder; Disk Drill can still detect it as long as the drive is correctly displayed in Disk Utility.
- Launch Disk Drill from your Applications folder and click the Install now button. You will be asked to enter your admin password. Don’t worry; you won’t need to do this ever again.

- Grant Disk Drill Full Disk Access so that it can scan your storage devices and recover lost data from them.

- The main interface will show all drives accessible to your Mac, including the external one, if detectable. Click on the external hard drive in Disk Drill and press the Search for lost data button. Disk Drill will begin scanning for recoverable data. This might take some time, depending on your drive’s size and type.

- Post-scan, you’ll see a list of files that can be recovered. You can preview these files. Select the ones you need to recover.
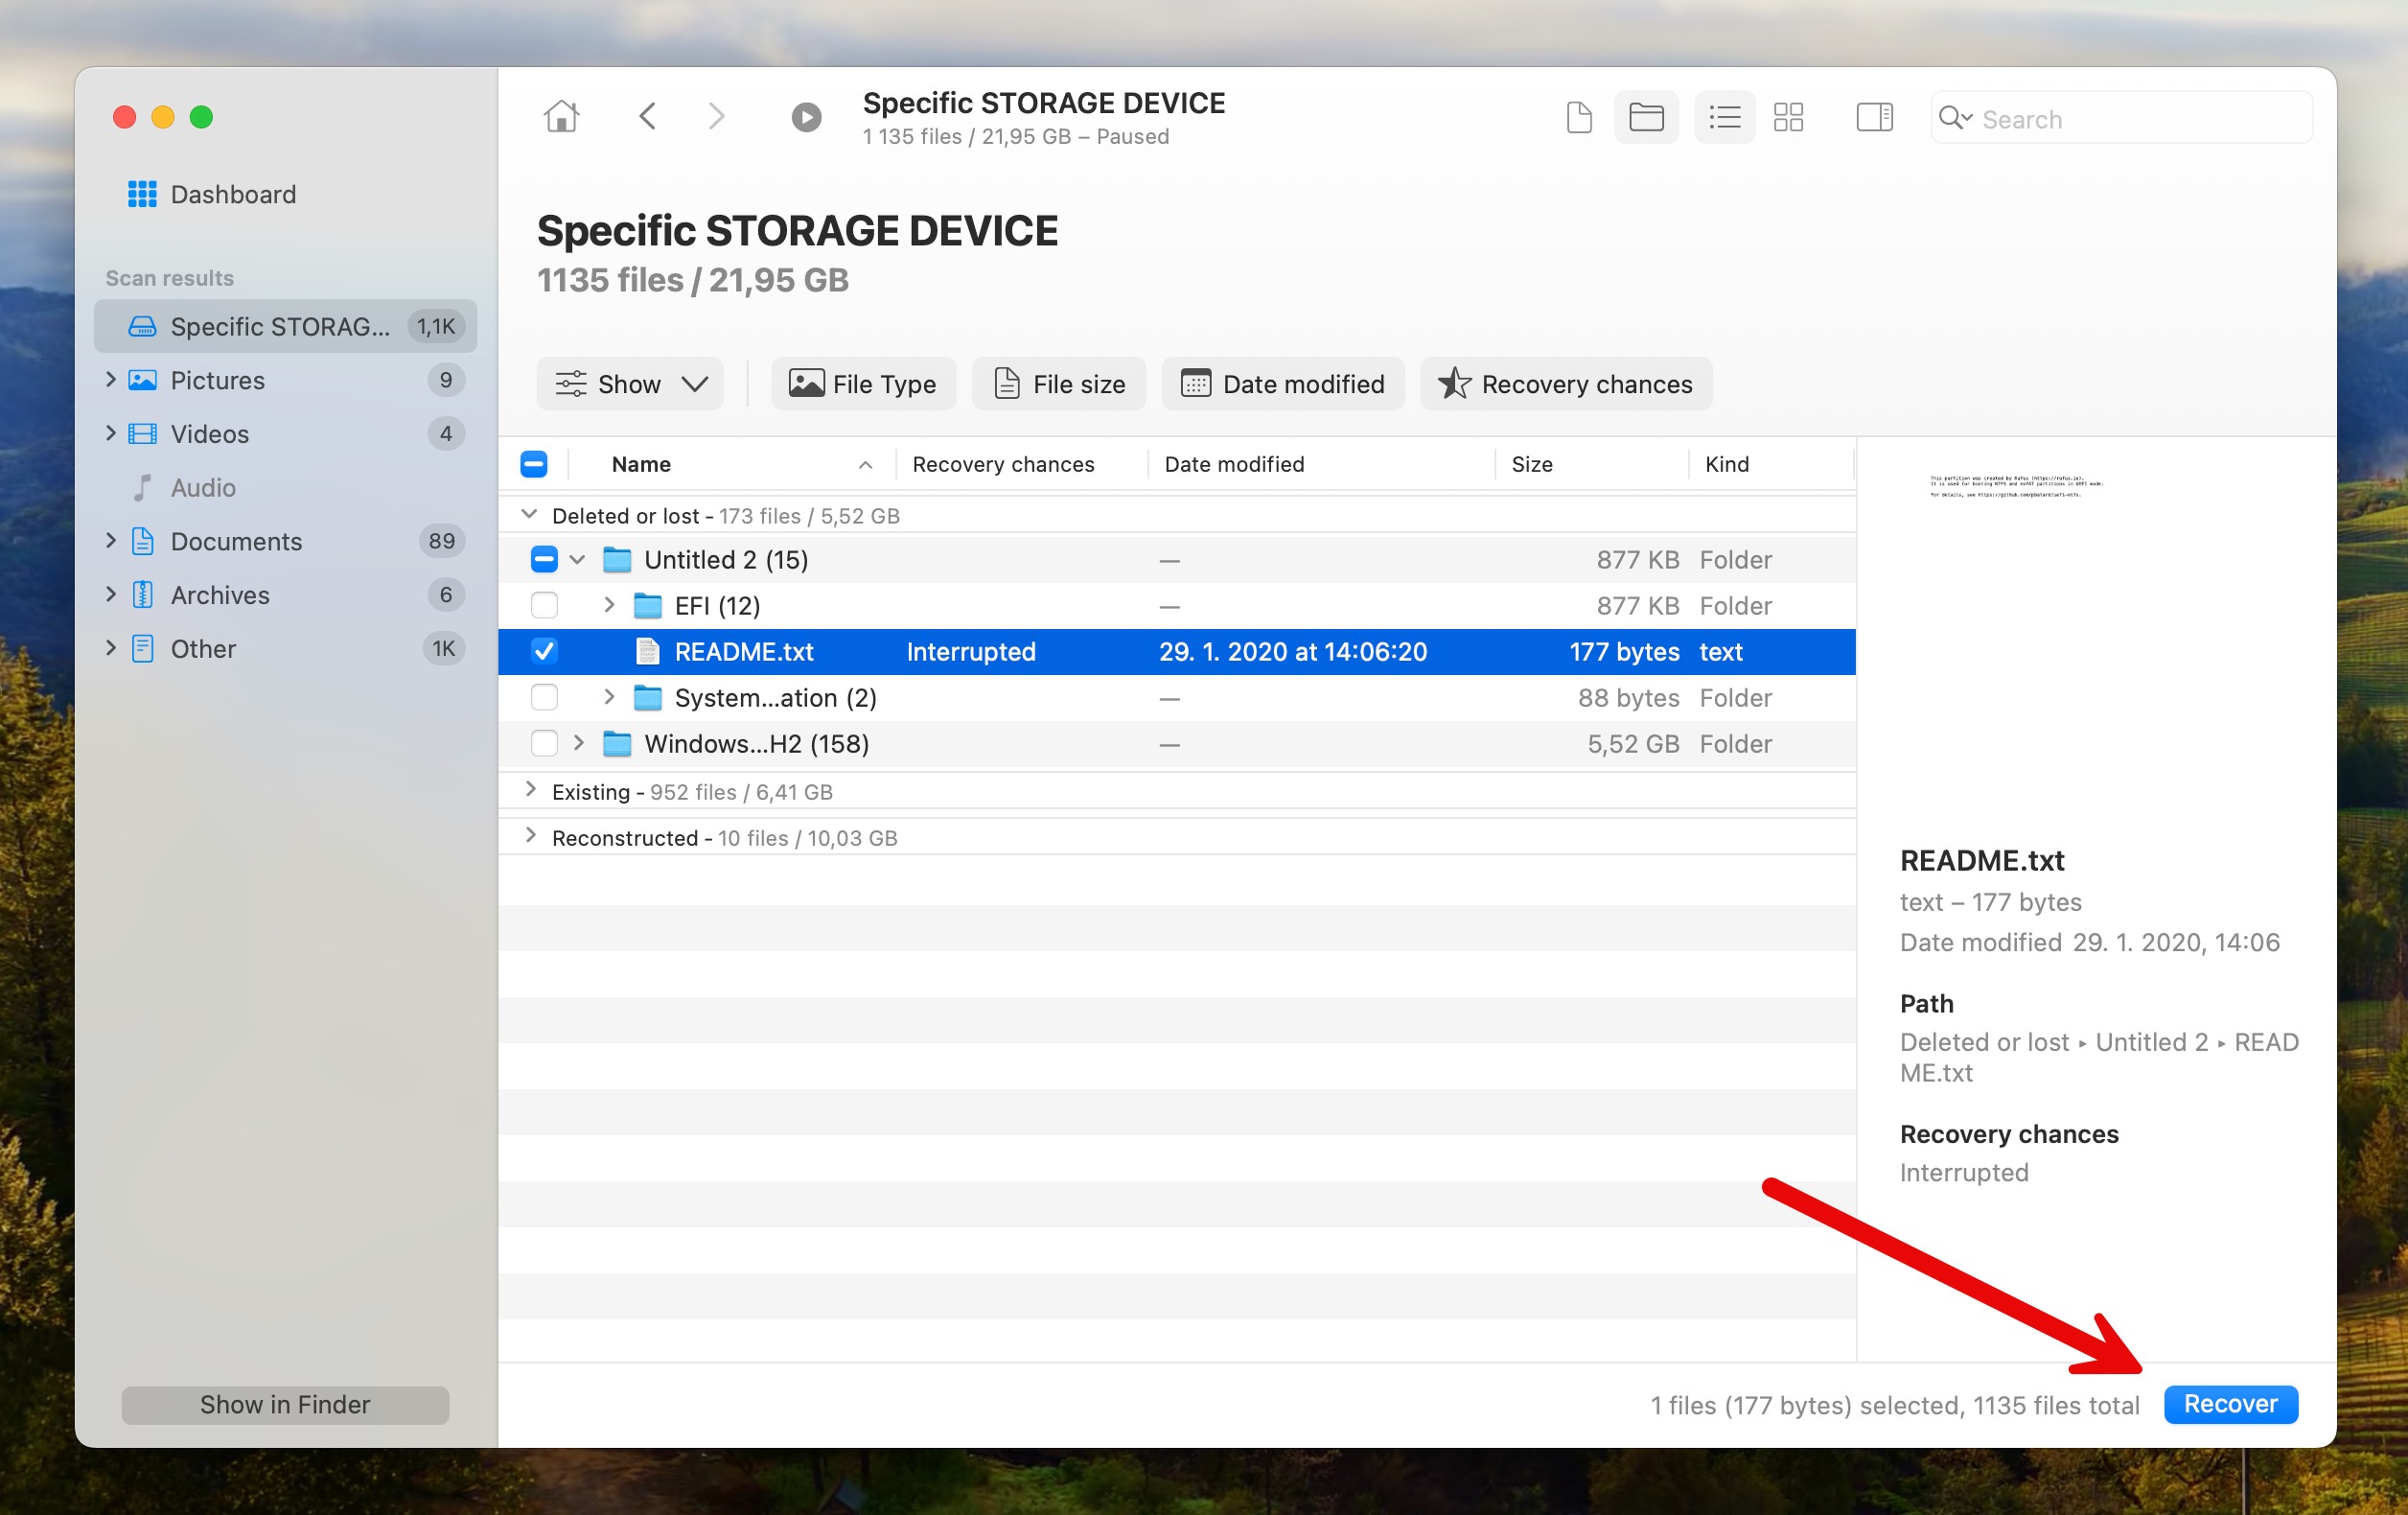
- Finally, click Recover and choose a safe location on your Mac to save the recovered files. Avoid saving them back onto the problematic external drive.

