Table of Contents
Data loss is a common problem that can happen to anyone and to any storage device. If you’re using a CompactFlash (CF) card and your photos and videos got lost or corrupted, this guide will show you the different solutions to CF card recovery on Mac.
What’s So Special About CF Memory Cards?
Although newer kinds of memory cards are being used for portable electronic devices nowadays, CompactFlash cards remain on the market due to their reliability even after prolonged use. High-end CF cards are also capable of transferring data up to 167 MB/s.
Similar to SD cards, CF cards are non-volatile storages, which means stored data is saved even if the power supply is lost or switched off. Advanced models such as the Ultra CF and CFast cards are also released for high-end photography and faster data transfer than older CF models.
Here are some advantages of using CF cards:
- Faster data transfer than most SD cards
- Larger, therefore easier to label
- Physically more durable compared to SD cards
- Capable of saving high-quality photos and videos
Is the CF card better than SD?
CF cards are known to be more high-quality than most SD cards. They possess faster data transfer speeds and a much more durable structure than SD cards. However, SD cards come at a fraction of the price of CF cards, which is more expensive.
Common Scenarios for CF (CompactFlash) Card Data Loss/Recovery
| Case | Impact on Recovery | Estimated Recovery Chances |
| I accidentally deleted data on my CF card while connected to Mac or inside the device utilizing CF card |
|
|
| My CF card is not recognized by Mac |
|
|
| My CF Card is infected by malware or virus on Mac |
|
Best CF Card Recovery Solutions for macOS
In this part of the article, we overview different ways to recover data on your CF (CompactFlash) card. We’ll also take a look at the possibility of a malfunctioning CF card and how to fix it. Let’s dive right in.
Solution 1: Scan Your CF Card With a Data Recovery Software Tool
If you’ve encountered data loss on your CF card, whether by mistake, quick formatting, or a malware attack, one effective approach is to use data recovery software tools.
For this article, we tested two different data recovery software tools. Each one has its advantages and disadvantages, but both are capable of recovering data on your CF card.
Option A: Disk Drill
✅Pros:
- Disk Drill’s simple interface is best for people with different levels of tech knowledge.
- It can work with a lot of different file types, including photos and videos that you took on your cameras.
- It can recover data when the CF card is unrecognizable in the Finder.
- It has a free preview feature, which can ensure your files are recoverable.
⛔Cons:
- The free version of Disk Drill for Mac has limited features. You need to upgrade to a paid version to actually recover your files and to get the advanced features of this software.
To recover deleted data from the CF card using Disk Drill, follow these steps:
- Download and install Disk Drill on your Mac computer.
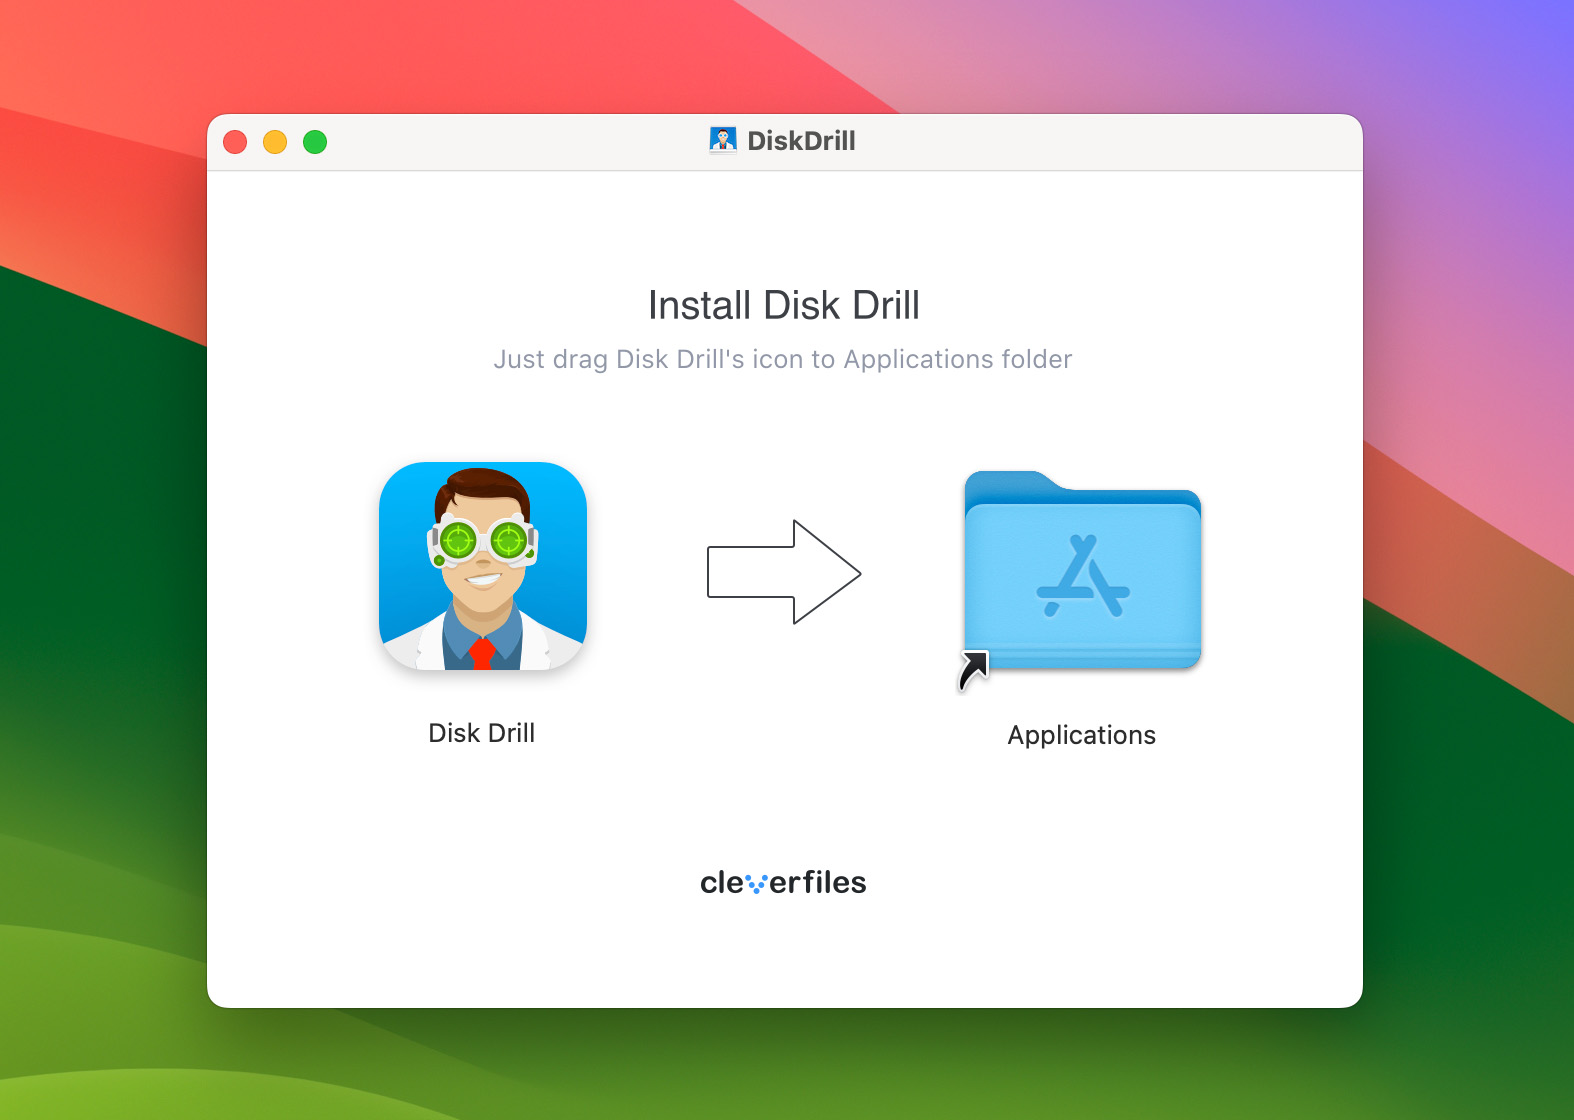
- Connect your CF card through a CF card reader.
- Go to Finder and select Applications. Then, double-click Disk Drill to open the app.
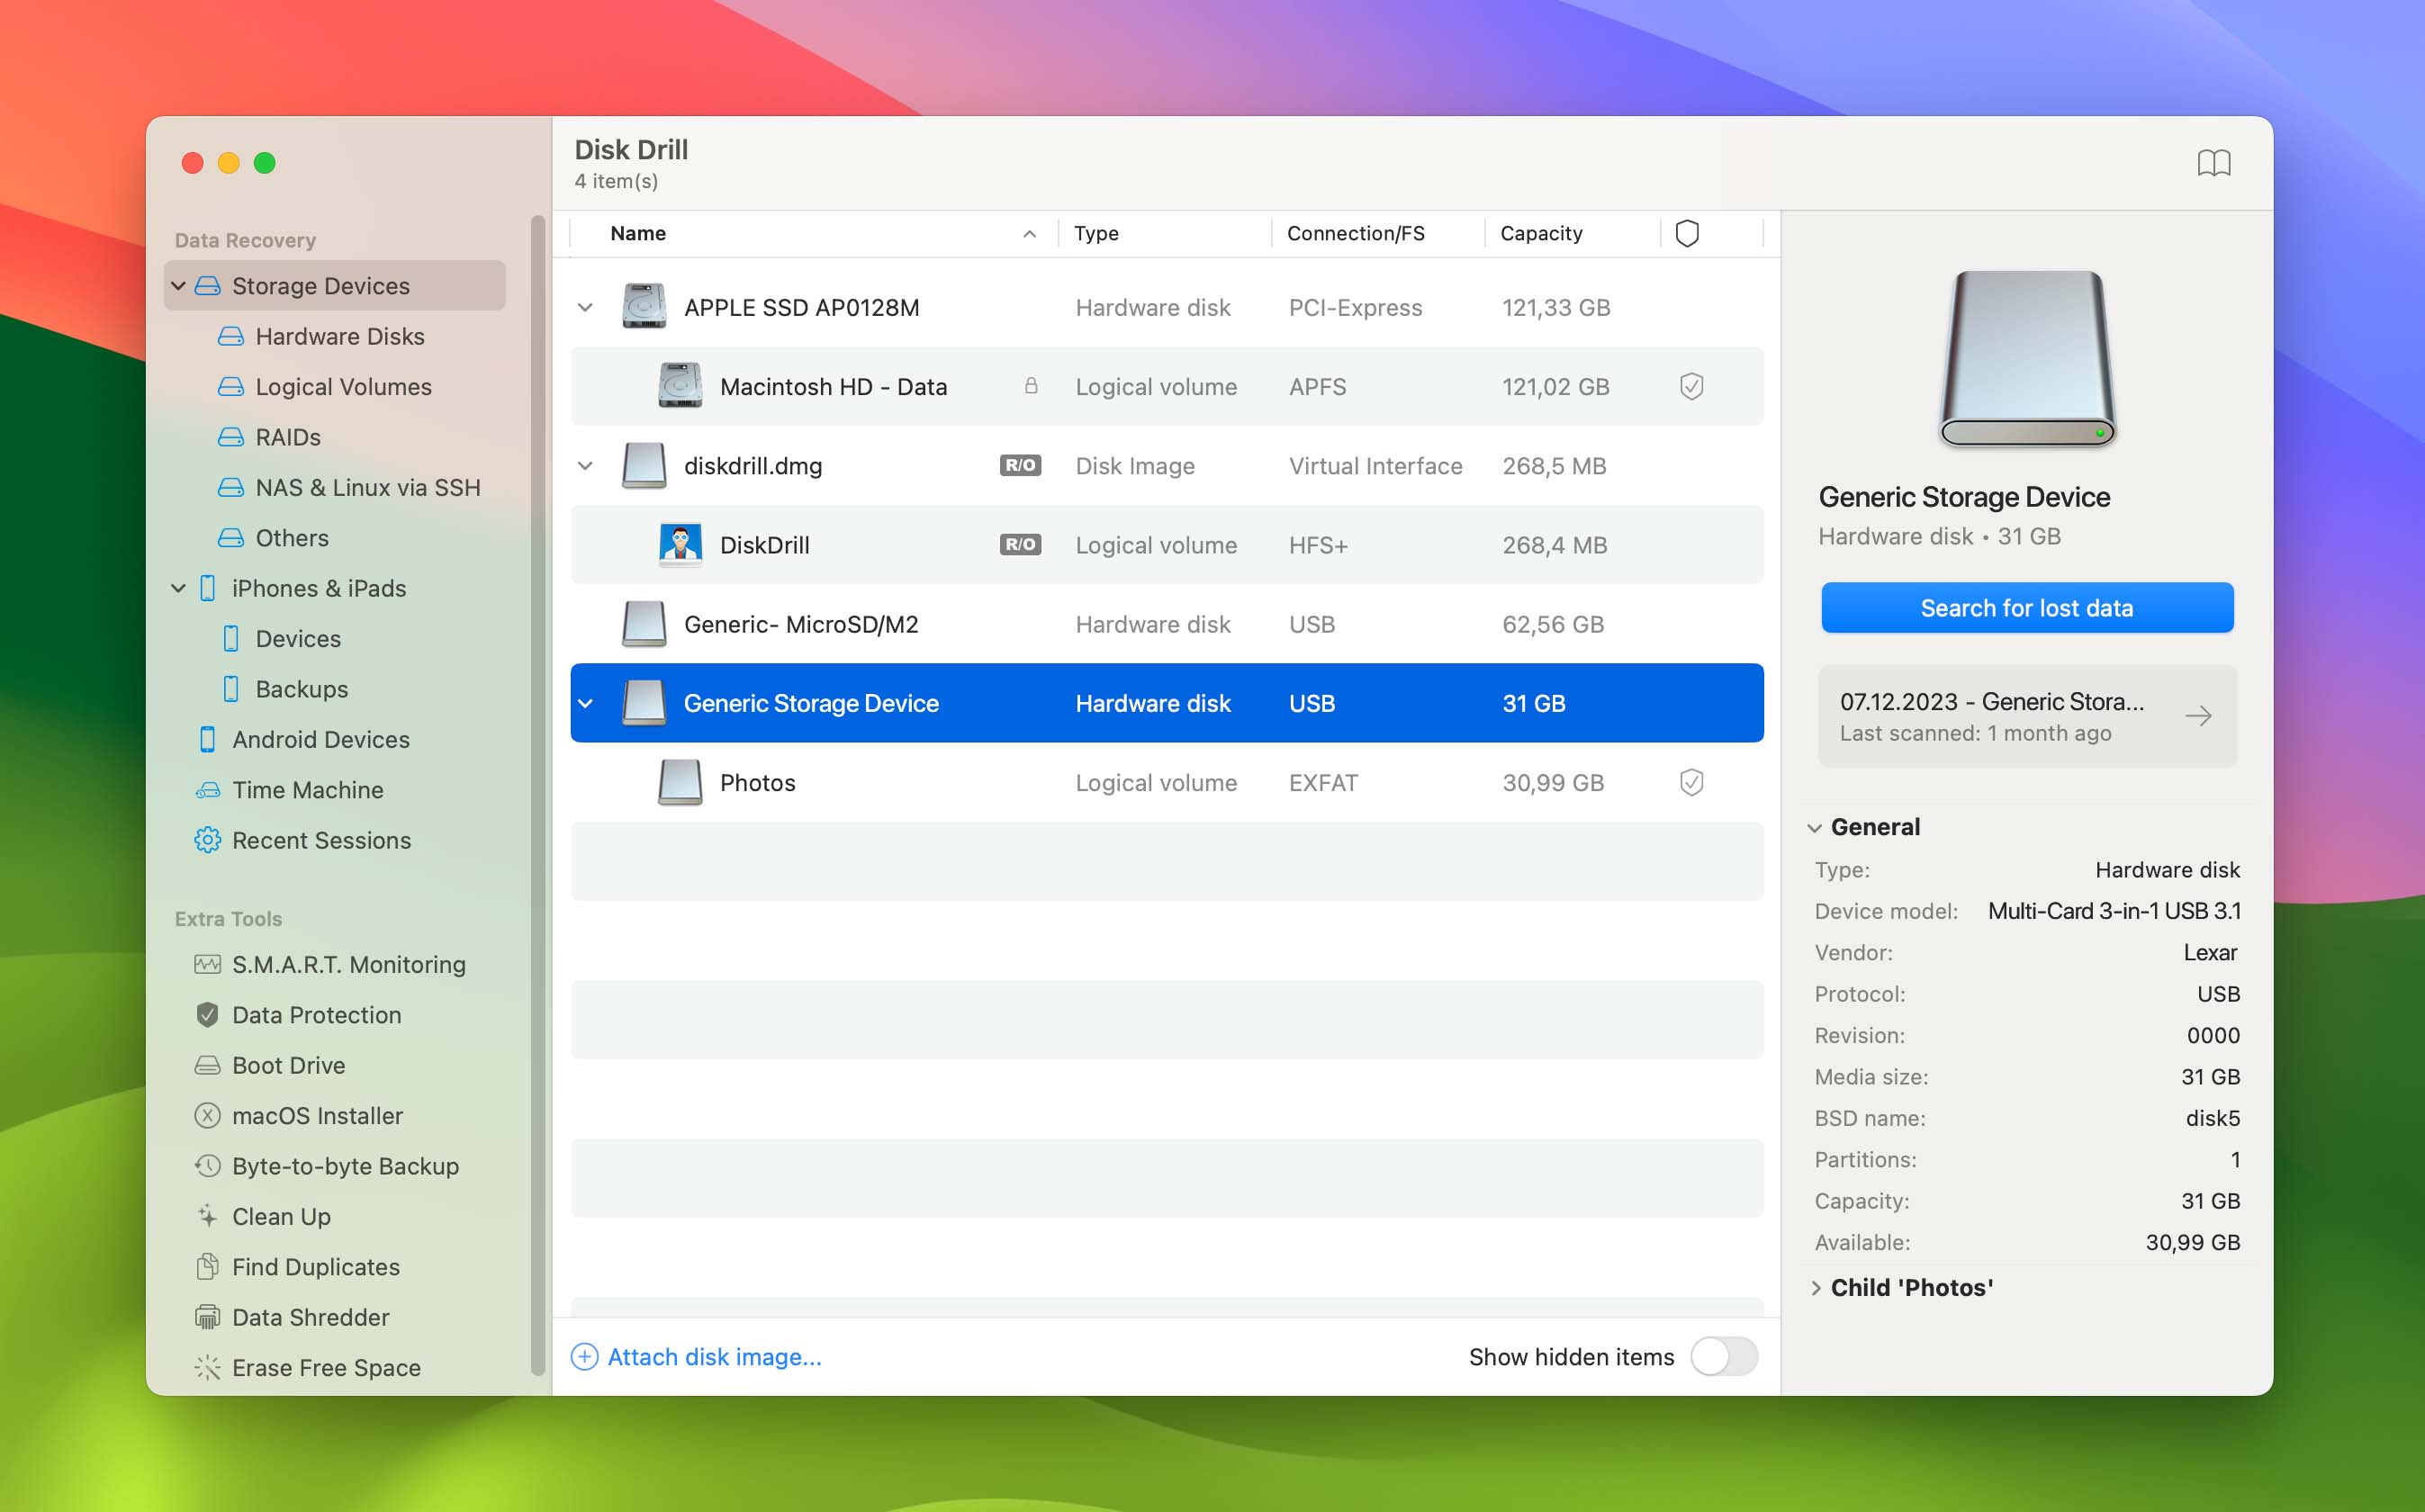
- Select the name of your CF card from the list of storage devices. Note: If you are using a USB-type card reader, it may appear as Generic Storage Data.
- Select Search for lost data. Disk Drill will now begin to scan your CF card for recoverable files.
- Wait for the recovery process to complete and click Review Found Items.
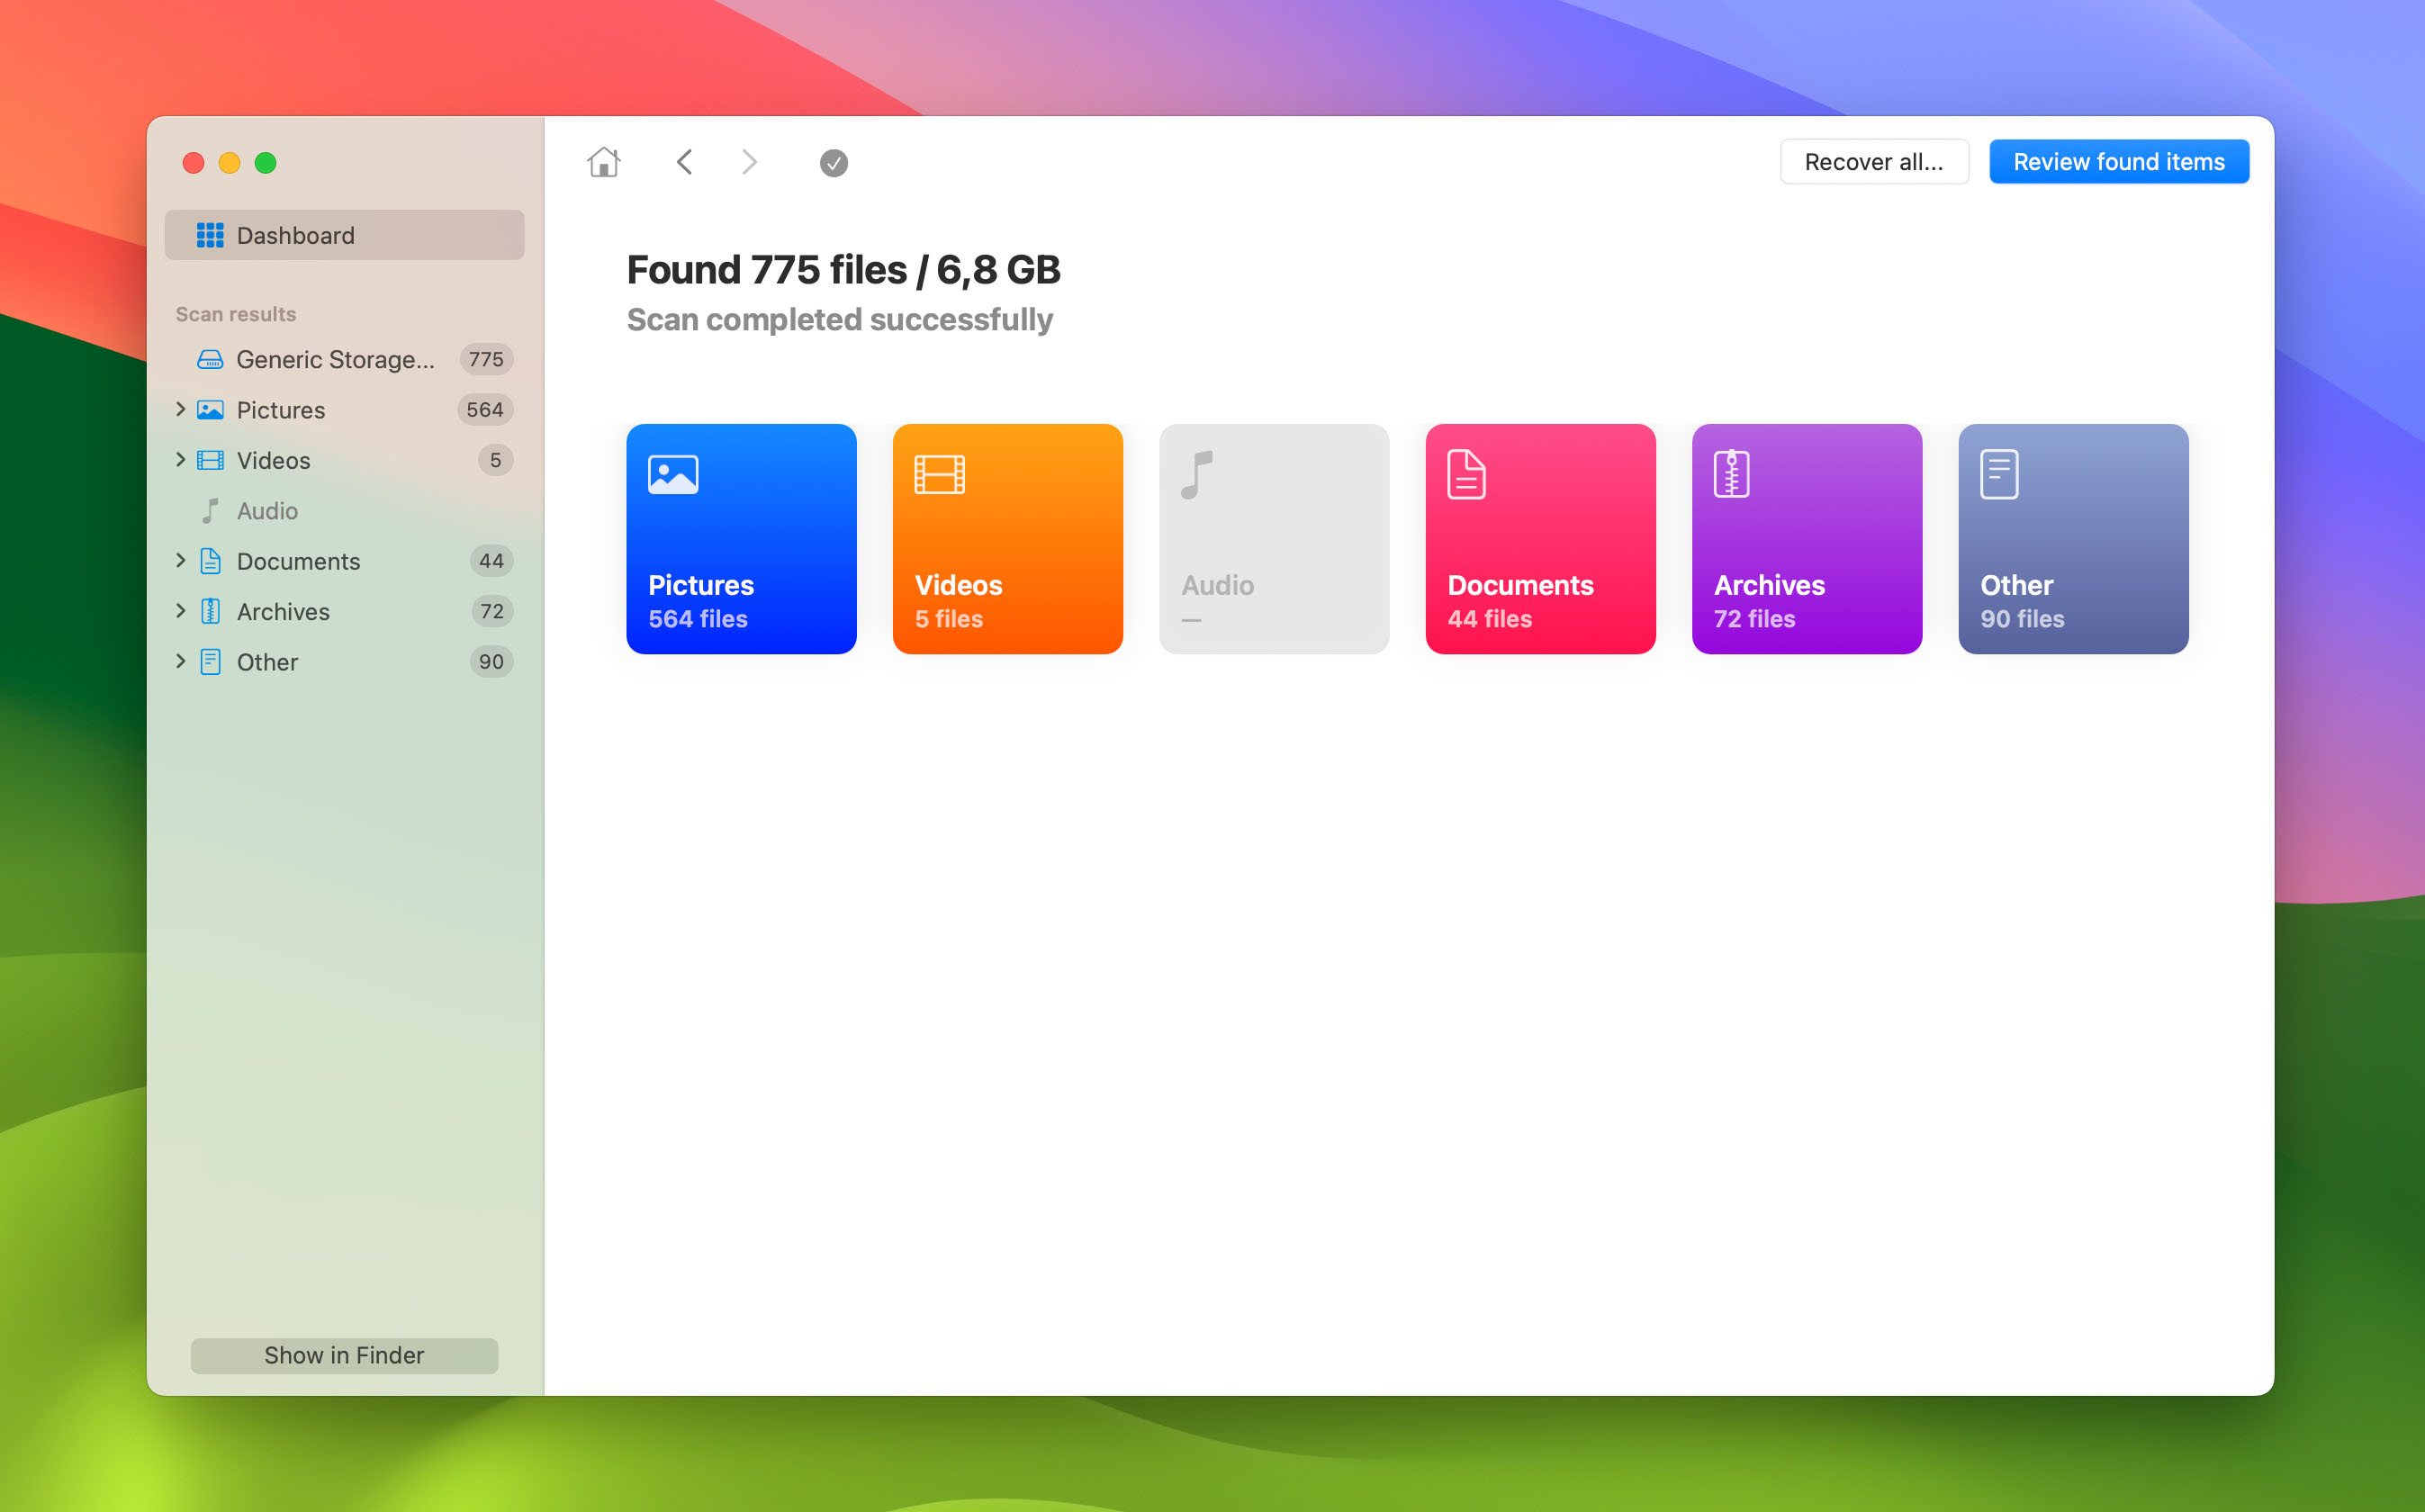
- Sort through the scanned data. They should be displayed in different categories: pictures, video, audio, documents, archives, and others.
- Choose a category. Then, further sort the files by name, date modified, size, and kind. Or, use the Search field on the top-right corner of the screen to find a specific file.
- Double-click the left mouse button or select the eye icon next to the file name to preview the file.
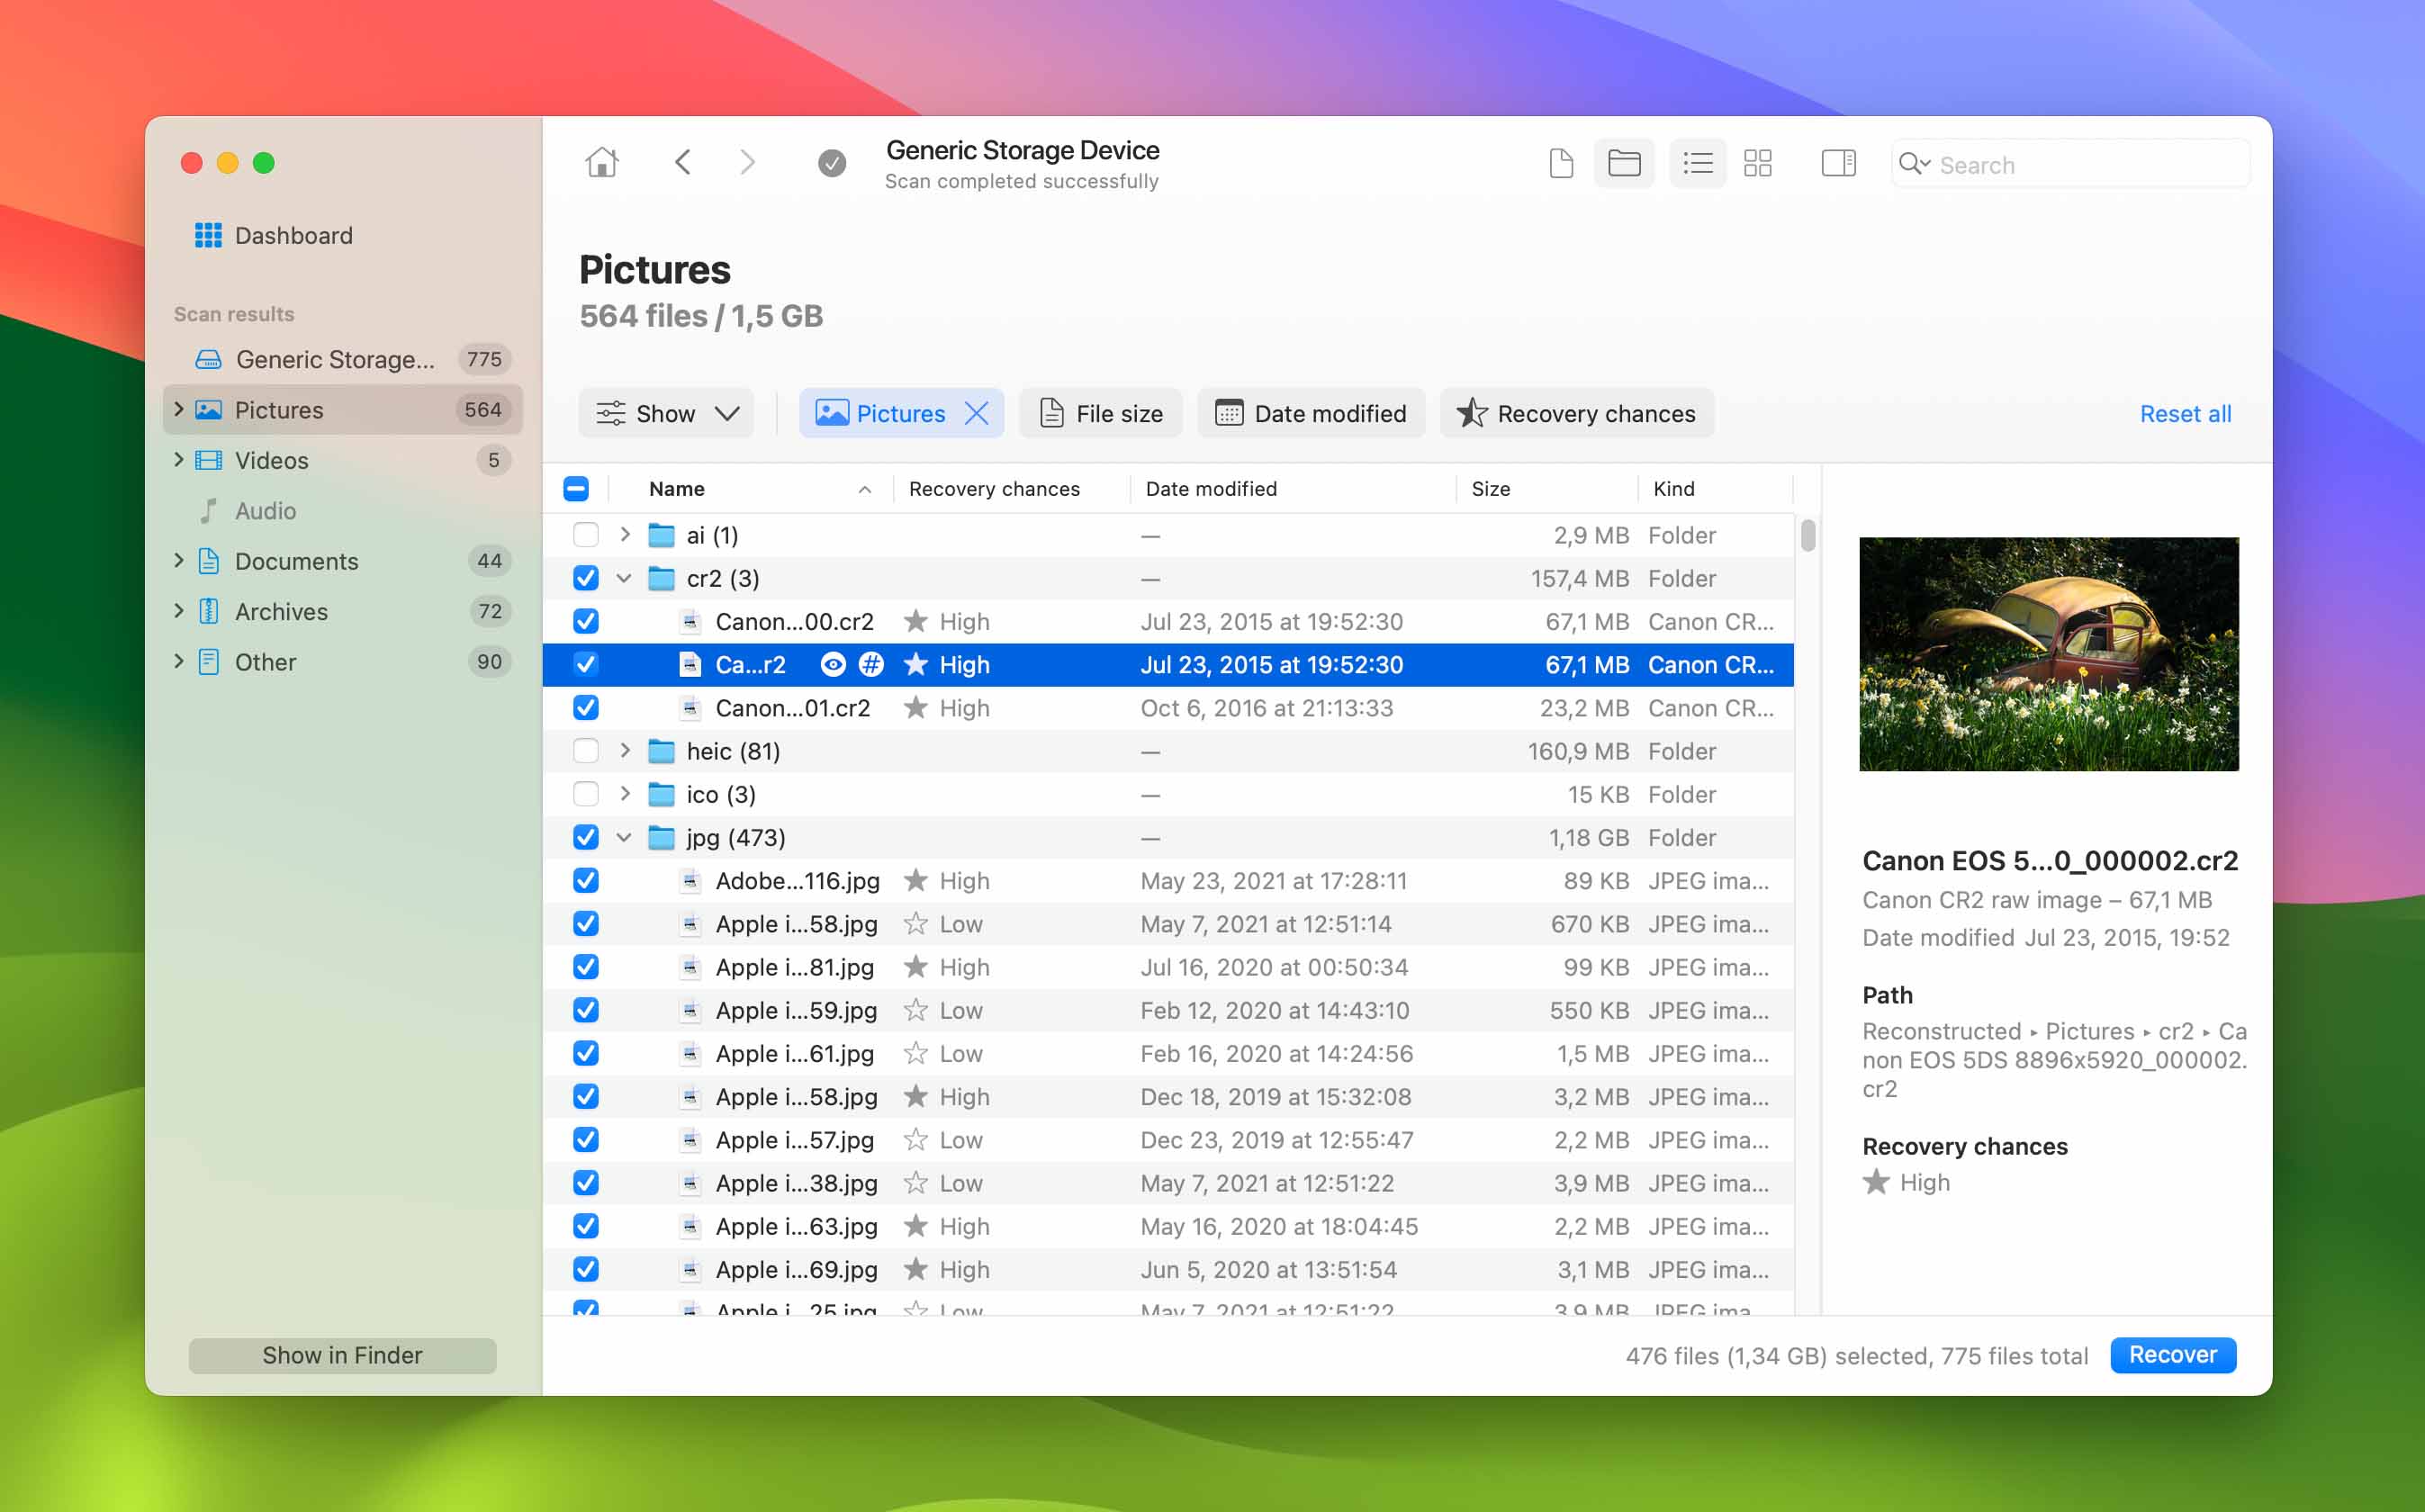
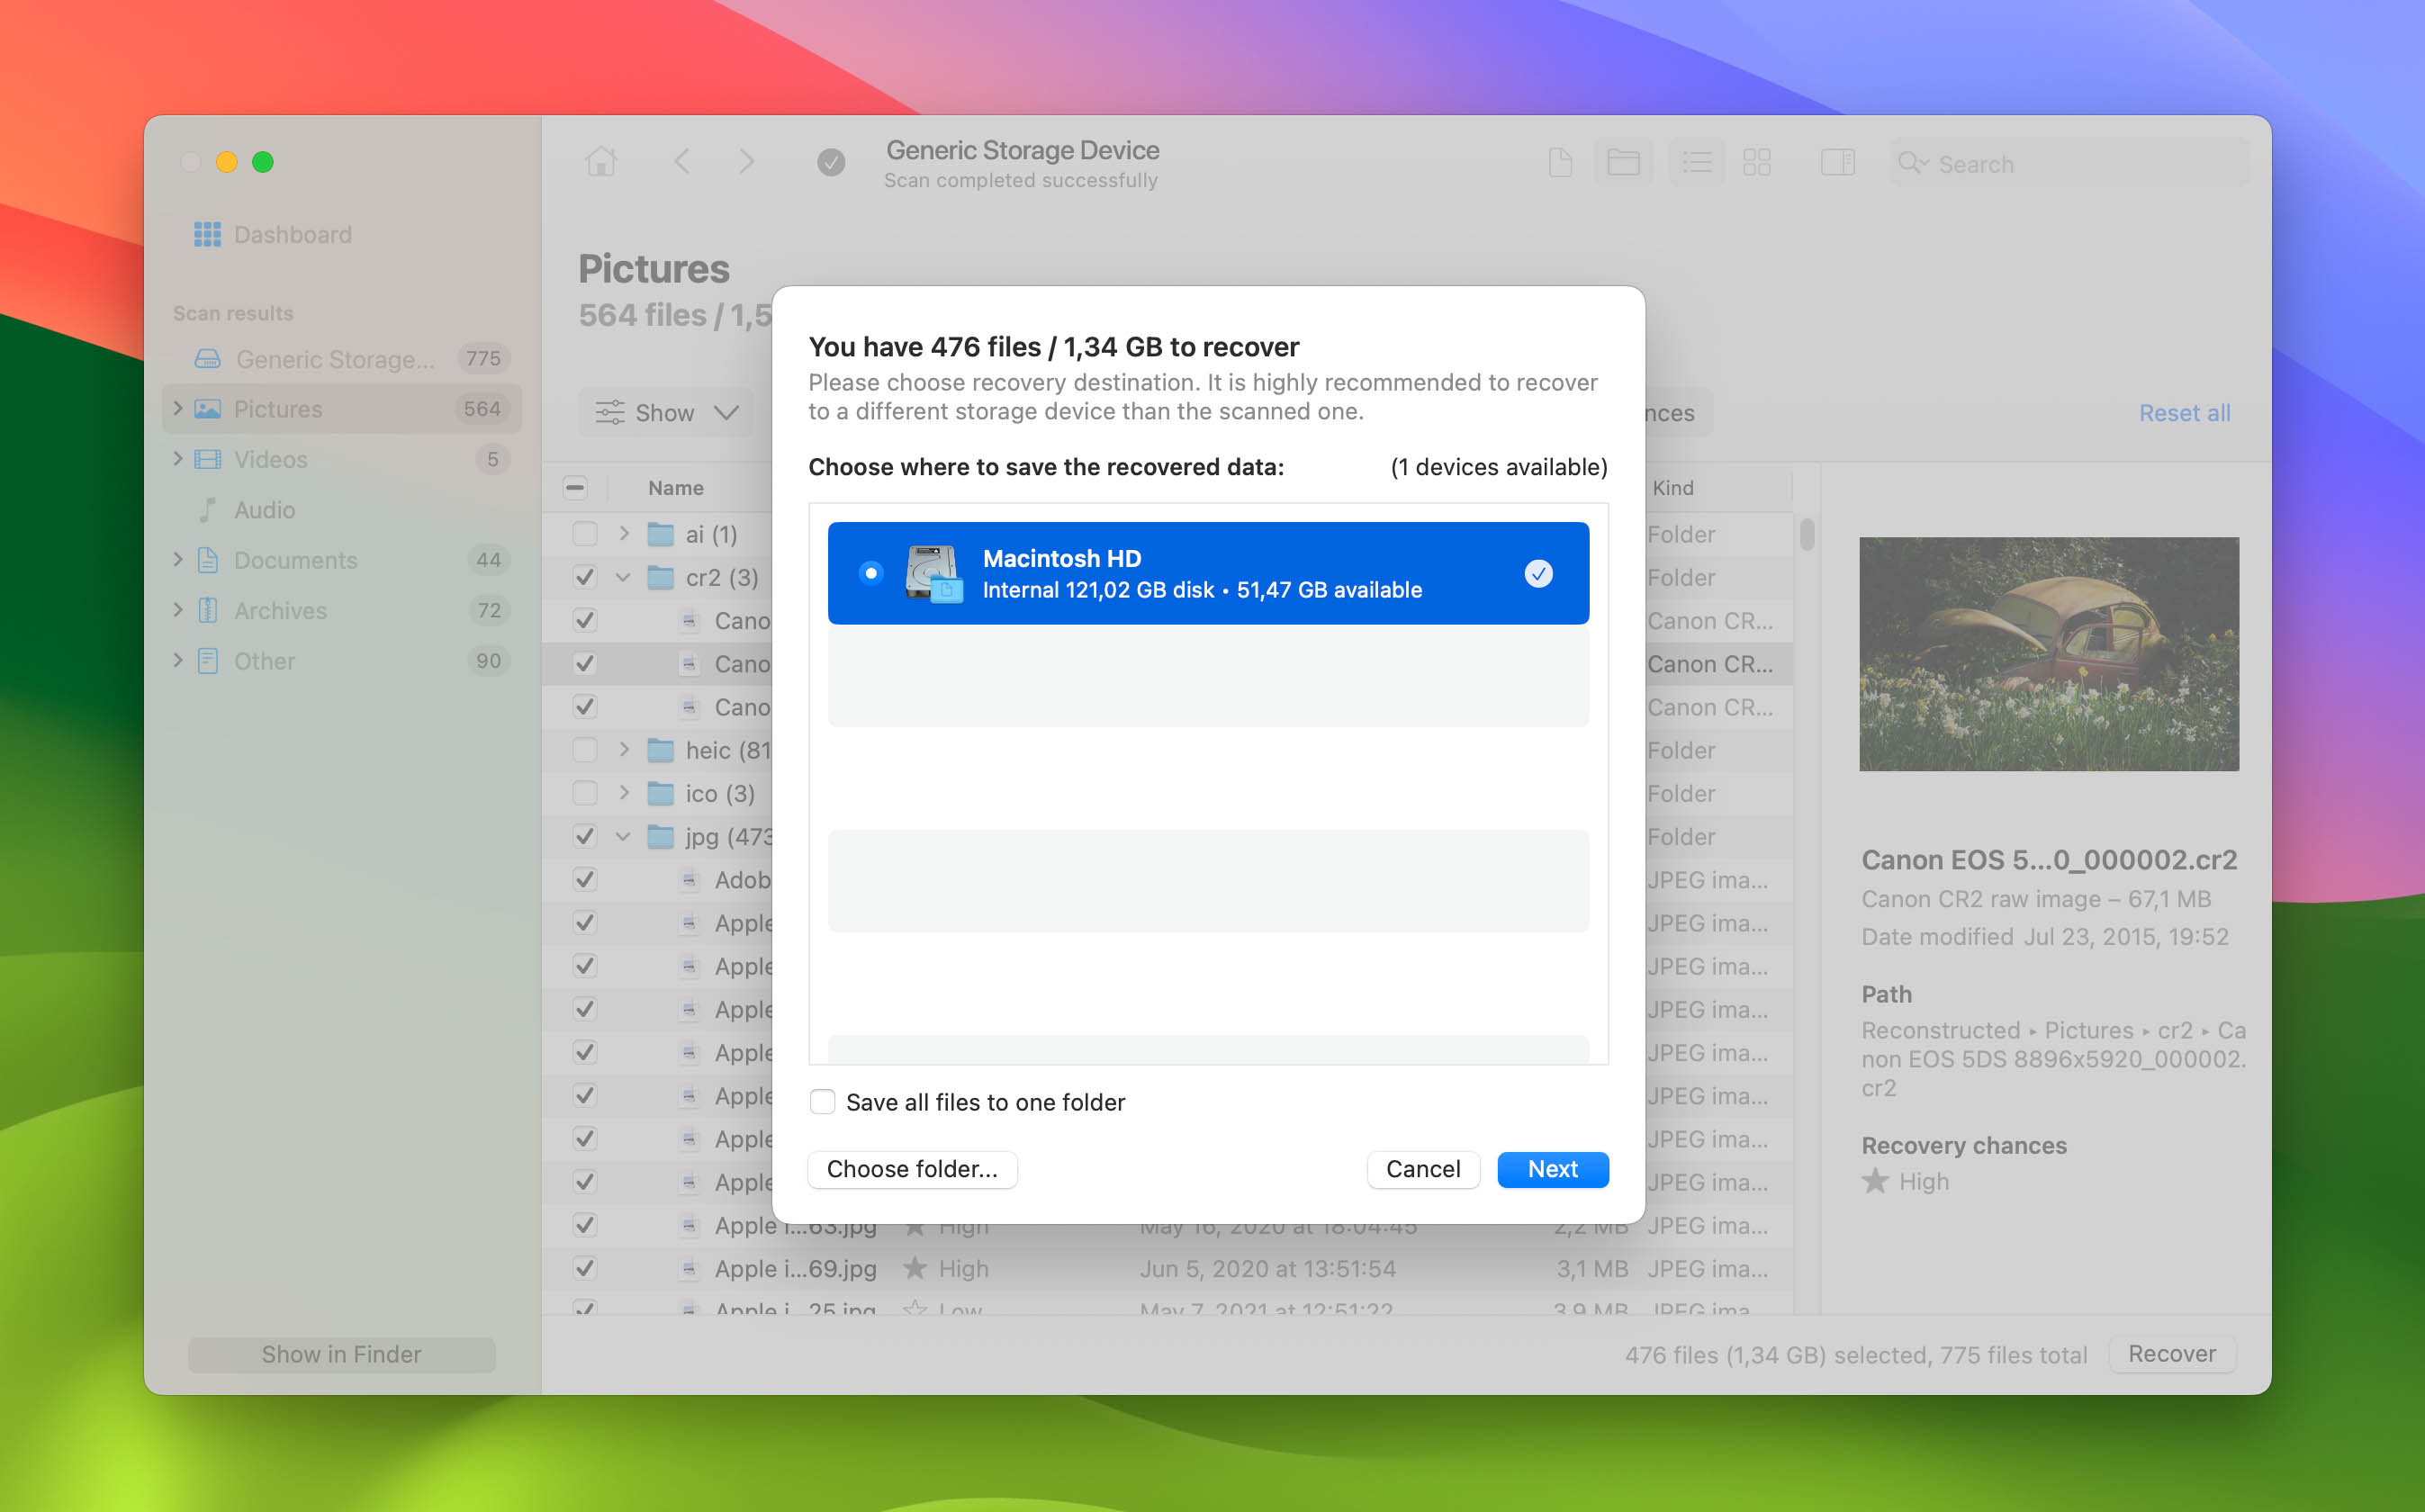
- Select all the files that you want to recover by ticking the box found in the left-most column. Then, click the Recover button.
- In the menu that opens, pick a file location where you want to save your recovered files and select the OK button to confirm.
Option B: PhotoRec
✅Pros:
- You can use PhotoRec for free because it’s open-source, which means you don’t have to pay to use its features.
- It can recover files from external storage such as CF cards.
- PhotoRec supports 480 file formats.
⛔Cons:
- PhotoRec uses a command-line interface, which might be confusing for people who aren’t used to typing commands.
- Unlike some other recovery tools, PhotoRec lacks some basic usability such as it doesn’t allow you to preview the files you can recover before you retrieve them.
- It cannot restore folder structure or file names, as it only searches using the file signature.
To recover deleted data from CF card using PhotoRec, follow these steps:
- Download and install Photorec on your Mac.
- Go to Finder. Launch the Terminal app by clicking Applications. Under Utilities, select Terminal.
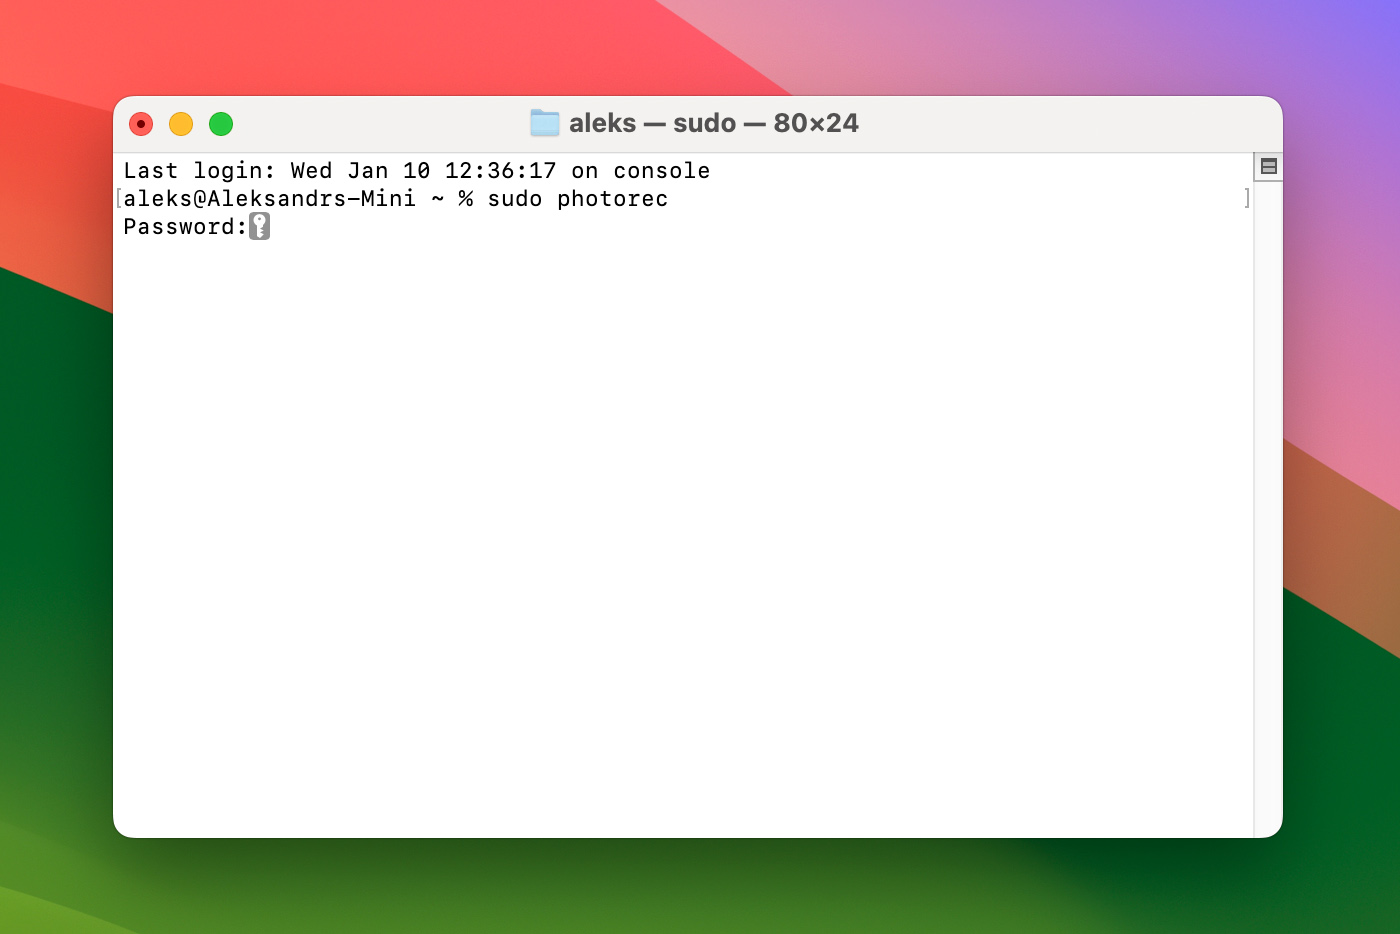
- Type the following command and hit Return
sudo photorec - Enter your password if prompted.
- Using the arrow keys, select your CF card from the list, then hit Proceed.
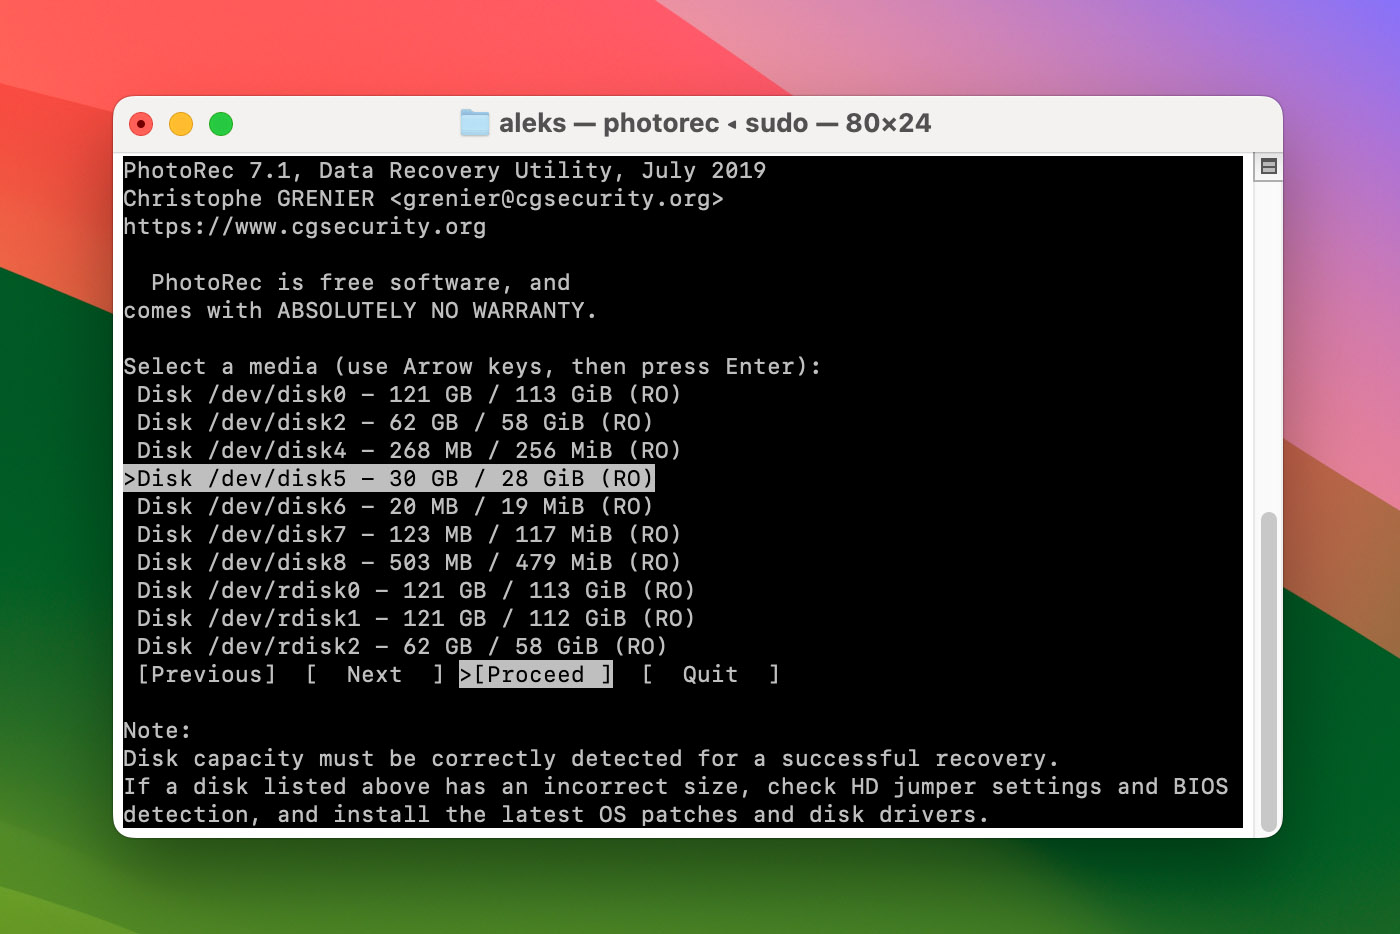
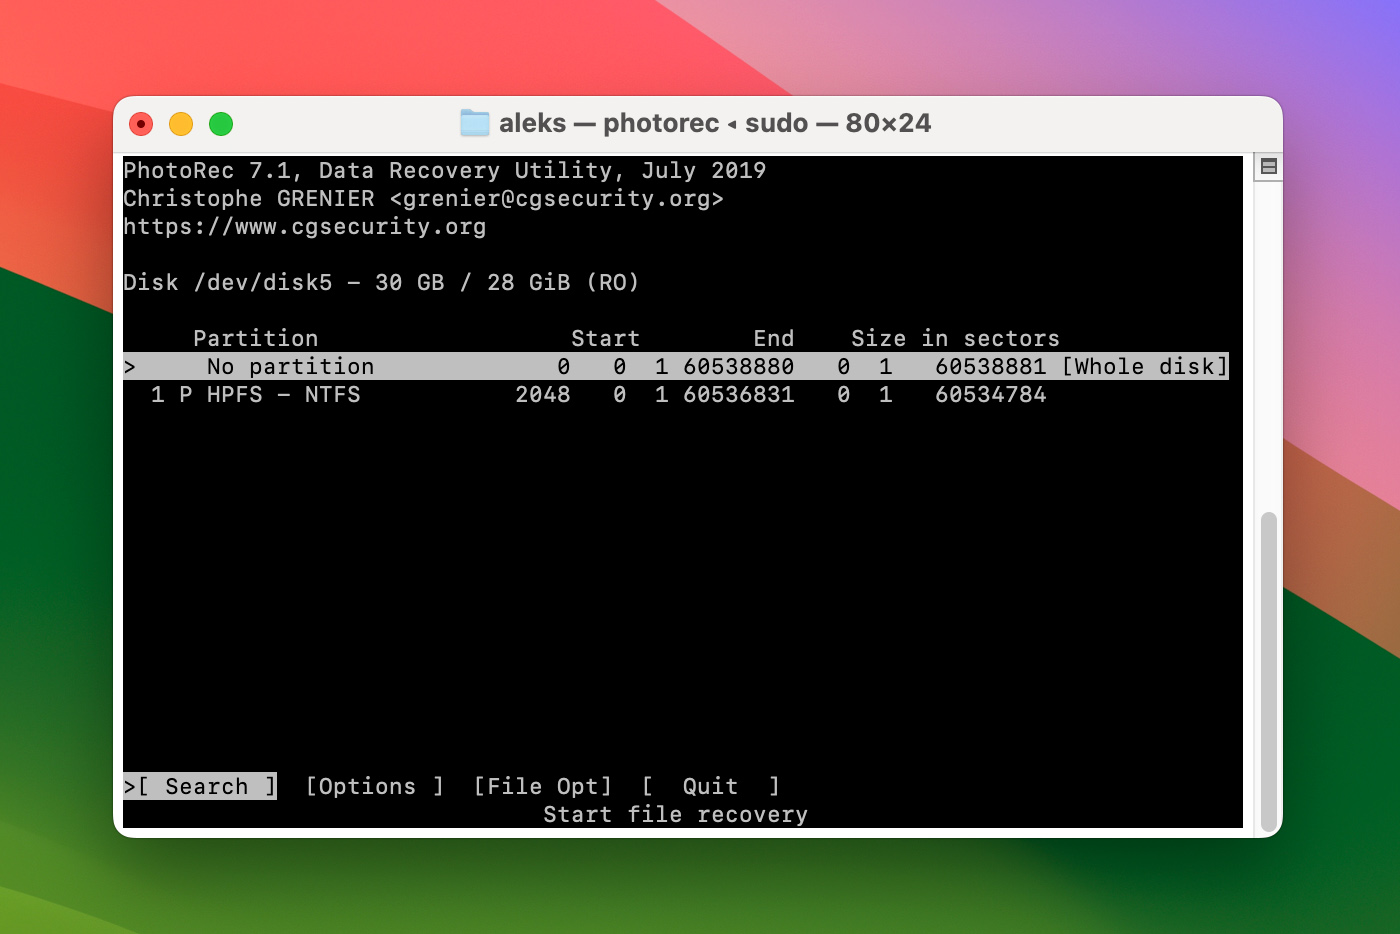
- Using the arrow keys again, highlight the partition that you want Photorec to scan, then select File Opt.
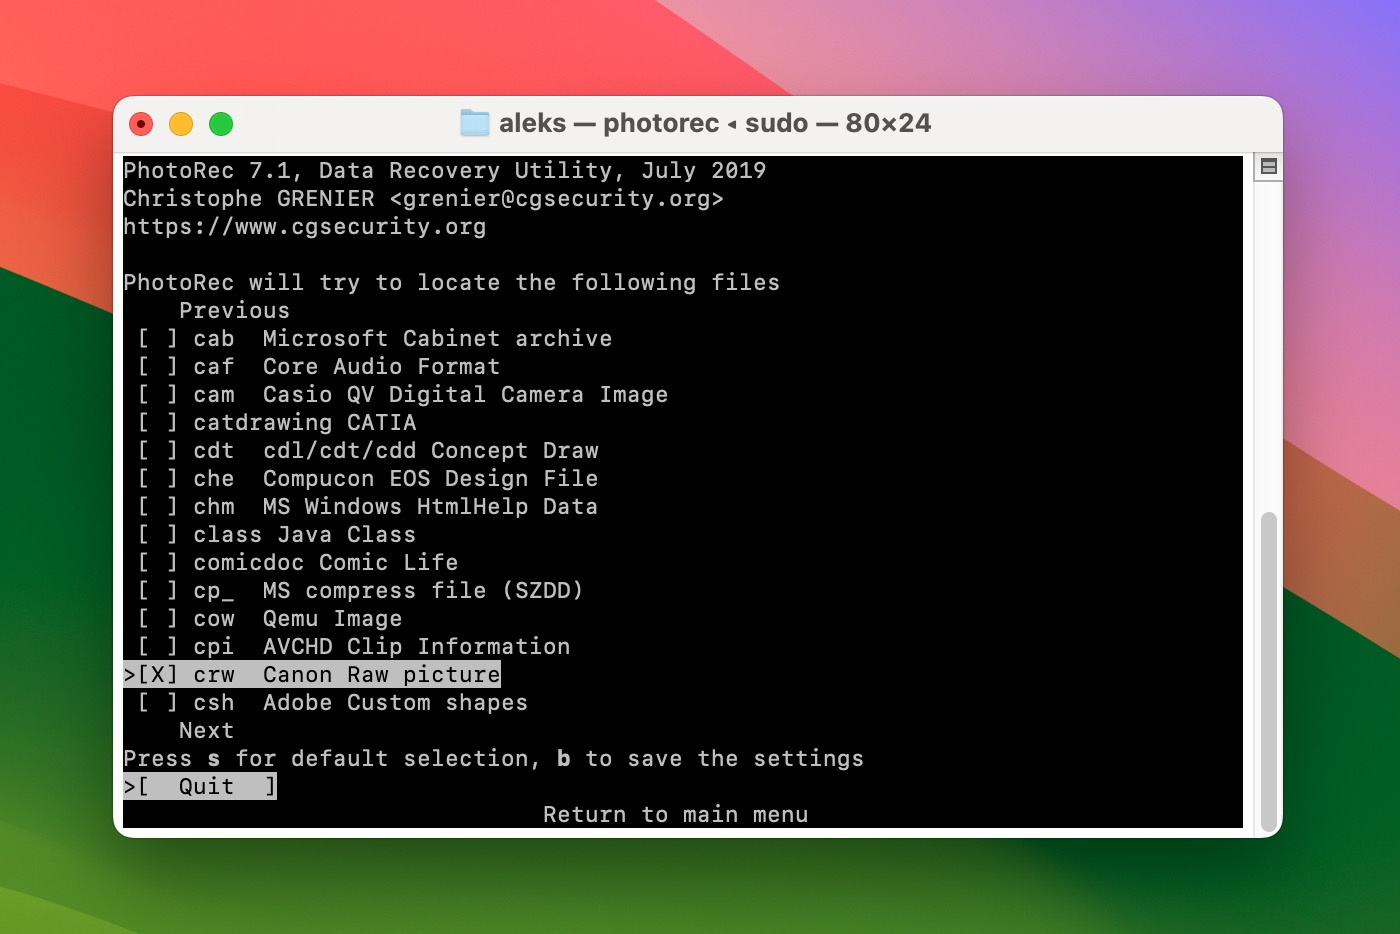
- Select the file types that you want to recover. Then, hit the return key on your keyboard to go back to the partition screen.
- In the partition screen, select Search using your arrow keys.
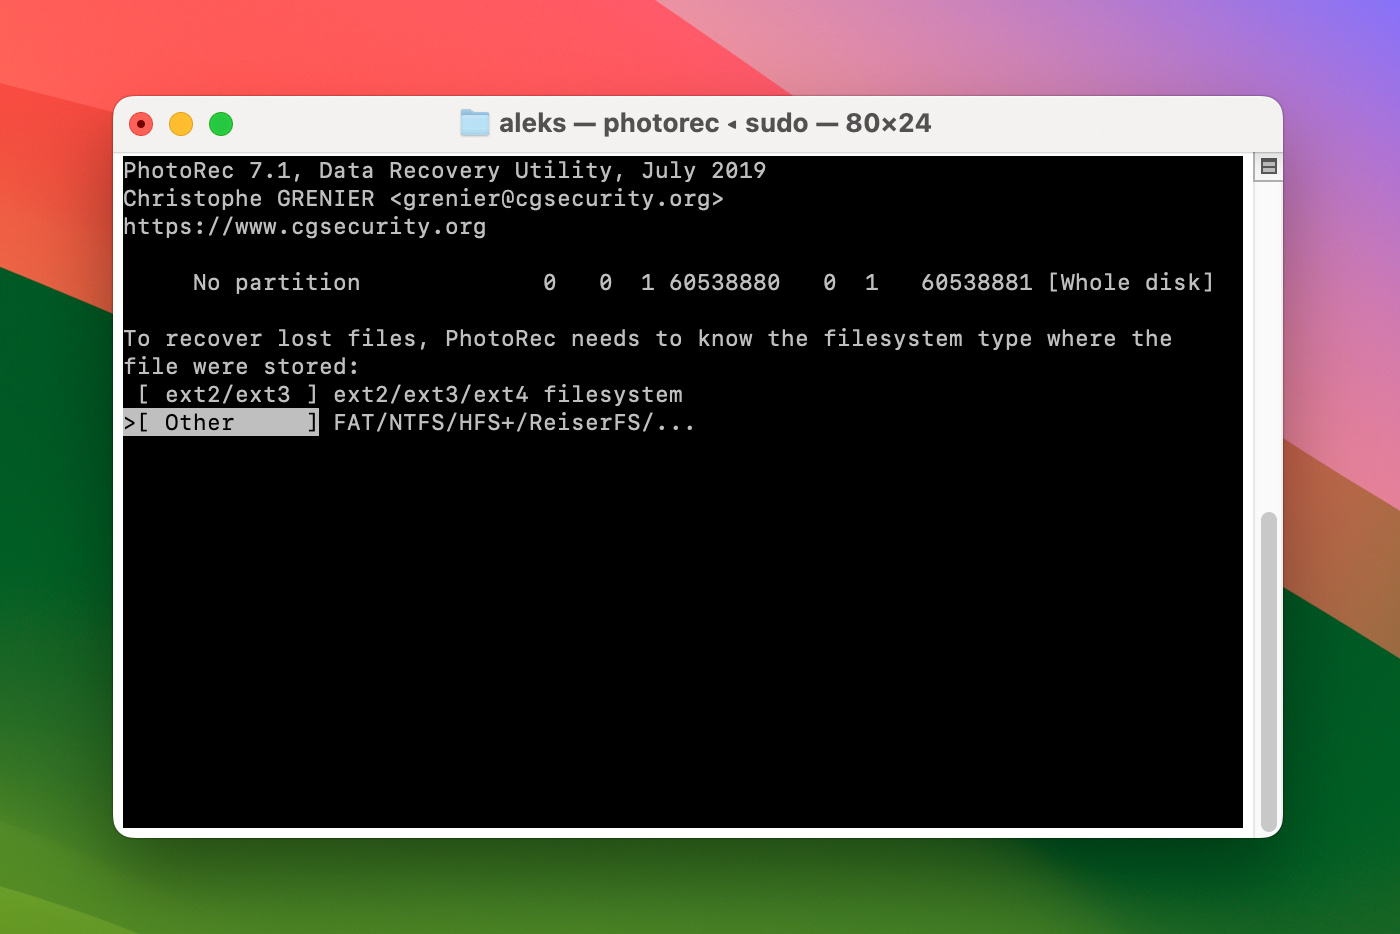
- Assuming your CF card is formatted to FAT32, select Other then hit return key.
- Using the arrow keys, select the folder on your Mac where you want Photorec to save your recovered files. Using the right and left keys, you can expand these folders.
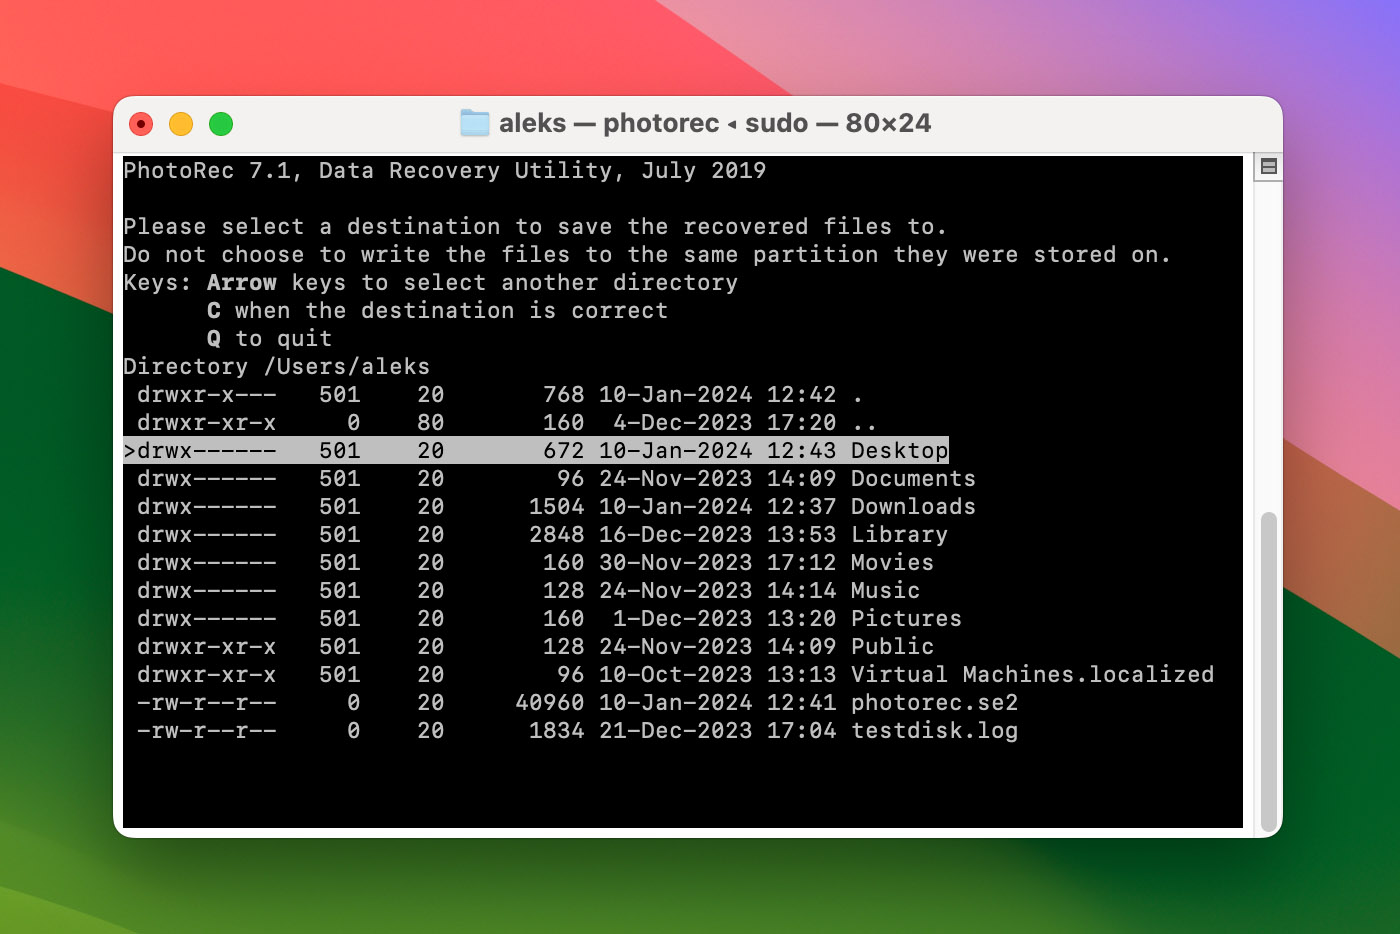
- If you have selected a folder already, hit (C) to confirm your selection.
- Wait for Photorec to complete the recovery process. Your recovered files will appear as recup_dir in the location that you selected.
In choosing between Disk Drill and PhotoRec, consider your comfort level with user interfaces, the types of files you need to recover, and any budget constraints. Both options have valuable features, so selecting the one that aligns best with your needs is essential for a successful data recovery process.
Solution 2: Run the First Aid Feature on Your Memory Card in Disk Utility
Disk Utility is a built-in utility tool on Mac that repairs damaged disks and mass storage devices. You can use it for free CF card recovery on Mac via its First Aid feature. If you’re having trouble accessing your CF card due to storage errors, you can use Disk Utility to repair it.
To use the First Aid feature on your CF card via Disk Utility, do the following:
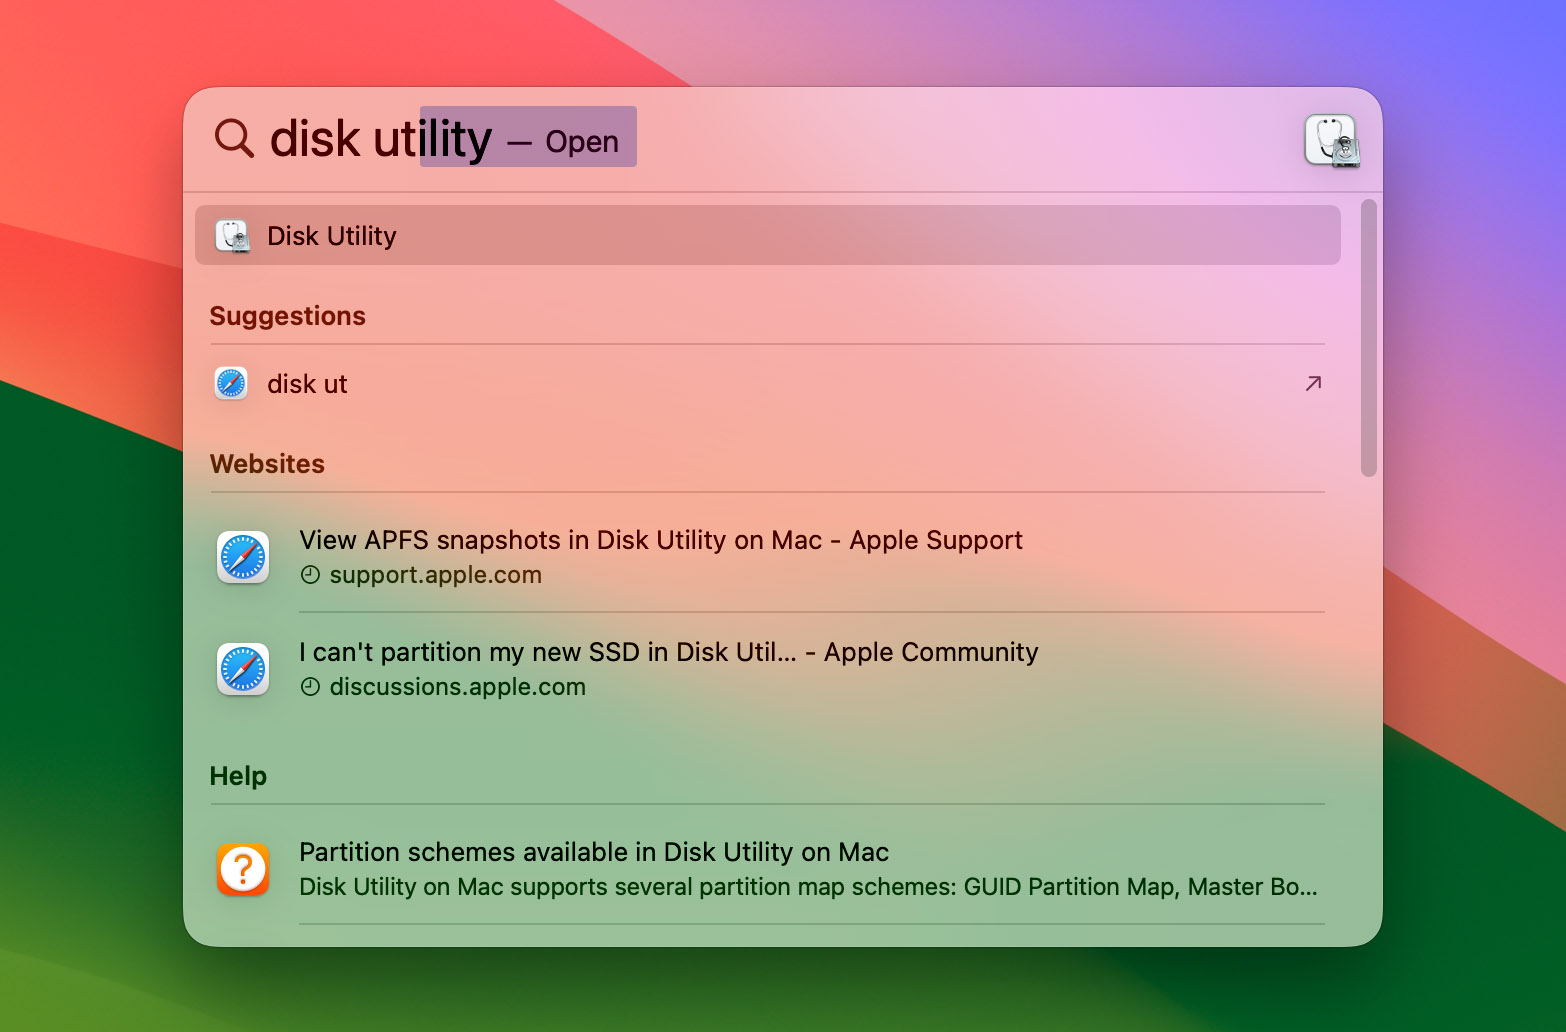
- Launch Disk Utility on your Mac. You can do this by pressing Command + Spacebar and typing in disk utility on the search bar. Select its app icon to launch.
- Choose your CF card from the list of storage devices on the left pane.
- Choose First Aid and select Run on the First Aid dialog box.
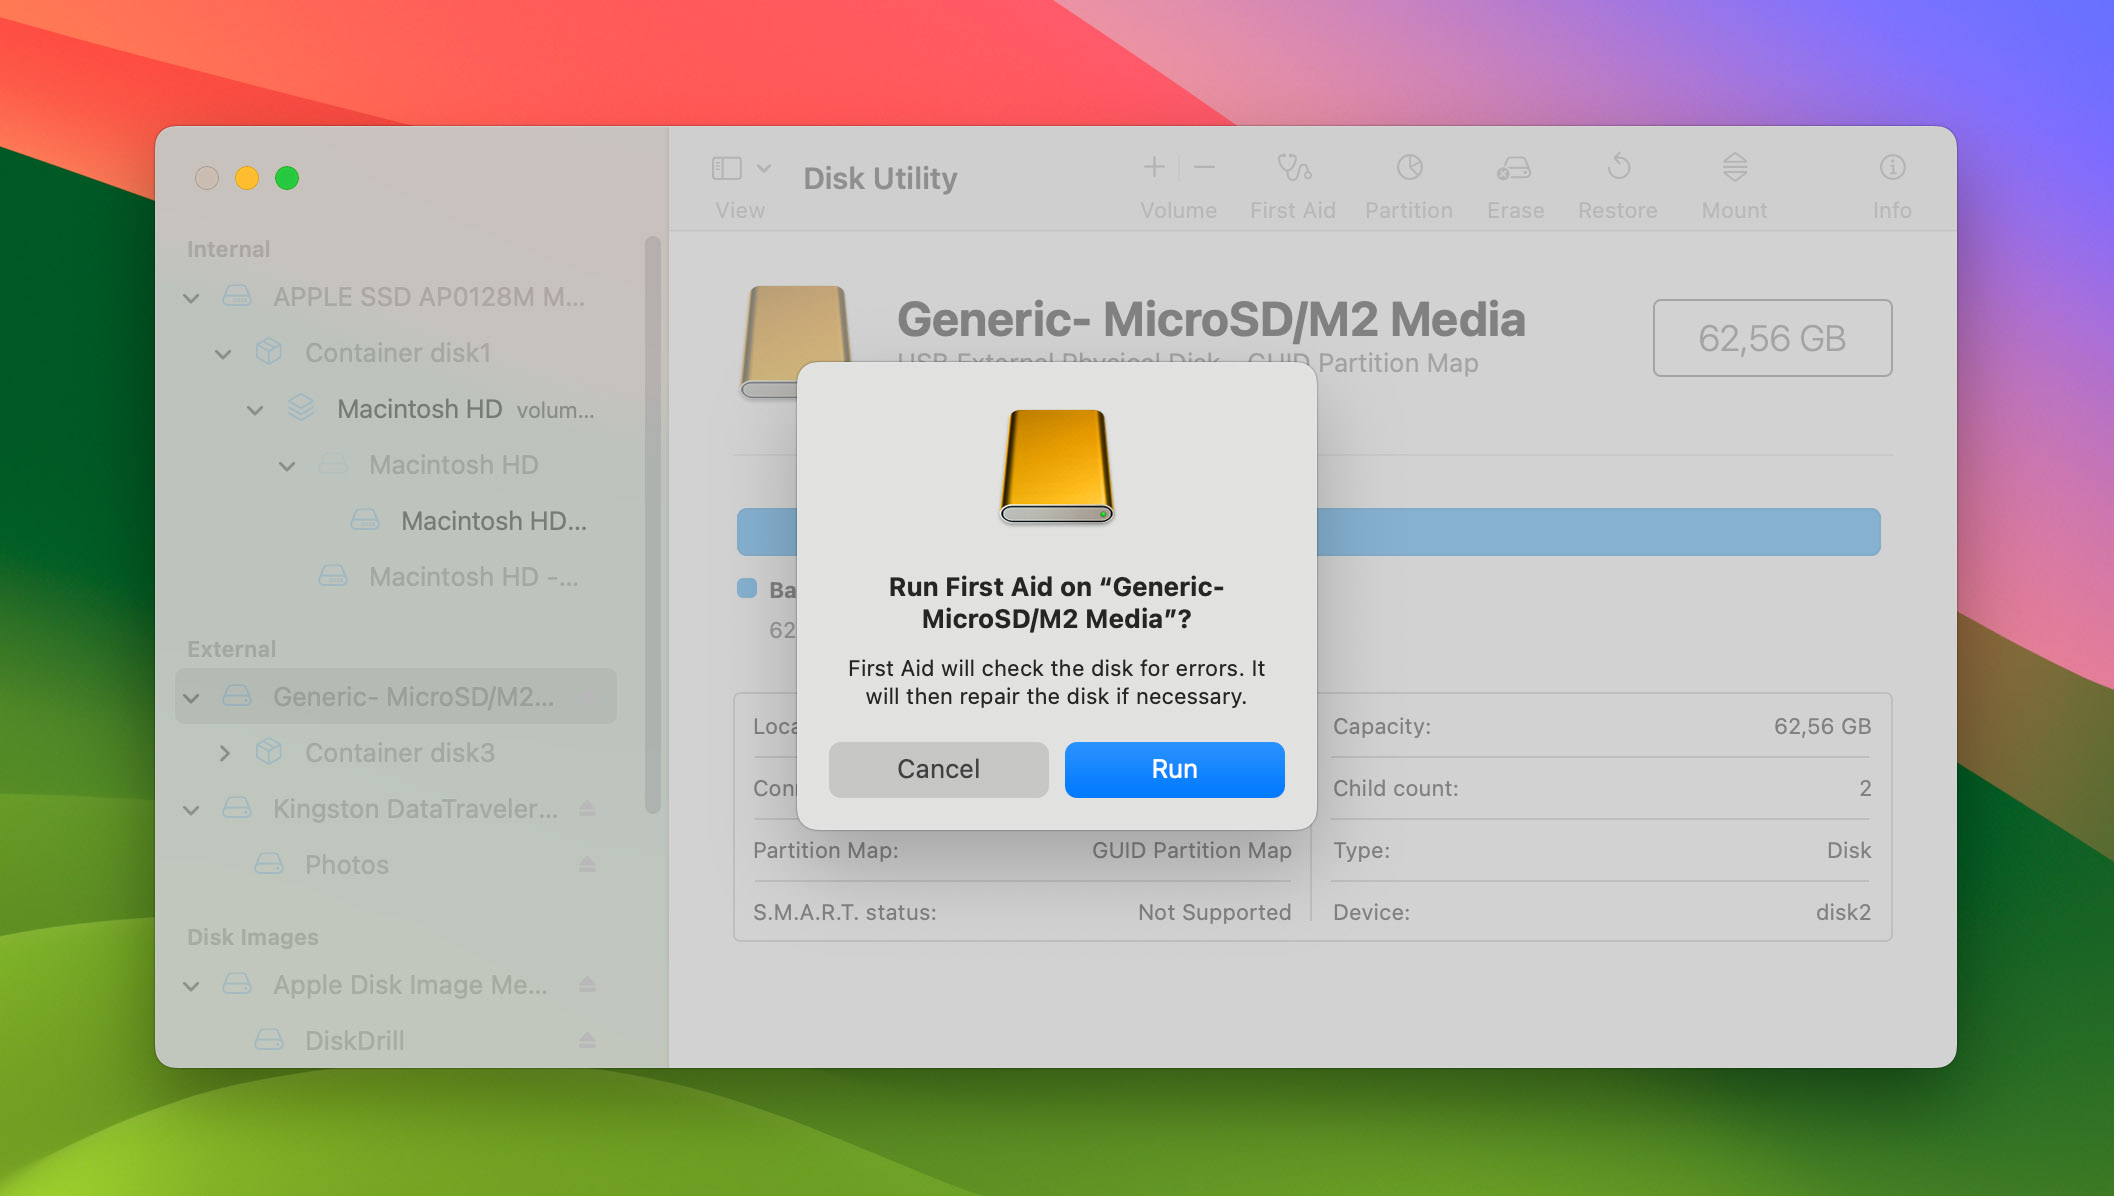
- Follow the on-screen steps shown by Disk Utility.
Solution #3: Make Sure the Problem is Not With Your Card Reader
Besides the CF card itself, data loss can also happen if the CF card slot on your memory card reader is damaged. This is especially true if you’re using an old card reader with ports that are damaged due to wear and tear, and corrosion.
To confirm this, you can use other CF cards on your card reader and check if it reads those cards properly. If the other CF cards also do not show up on your Mac, the card reader’s CF port might be the problem. However, if you can open them using the same card reader, then it is likely that the hardware issue lies in your CF card.
Solution #4: Check Your CompactFlash Card for Physical Damage
If your CF card is not recognized by your card reader, try checking it for physical damage:
- For CF cards that accidentally got wet or were left out in extreme temperatures, dry them out completely first in an open area.
- If you’ve been using your CF card for a while now, try checking its pins for corrosion.
Once you confirm that there’s physical damage, it’s important to avoid using it and store it in a secure case. As soon as possible, get it checked out by a data recovery service center. There, they can assess its damage and see if files are still recoverable.
Solution 5: Format Your CF Card & Scan It With Recovery Tool
Another method you can try is to format the CF card first, and then use a data recovery tool like Disk Drill afterward. This method is effective if your CF card was recently infected by malware or virus or if there is something wrong with the file system on your memory card.
To proceed, follow the steps below:
- Launch Disk Utility.
- Choose your CF card and select Erase. If your CF card has a memory of 64GB or larger, select exFAT. If it’s 32 GB or lower, select FAT32.
- Click Erase again to confirm.
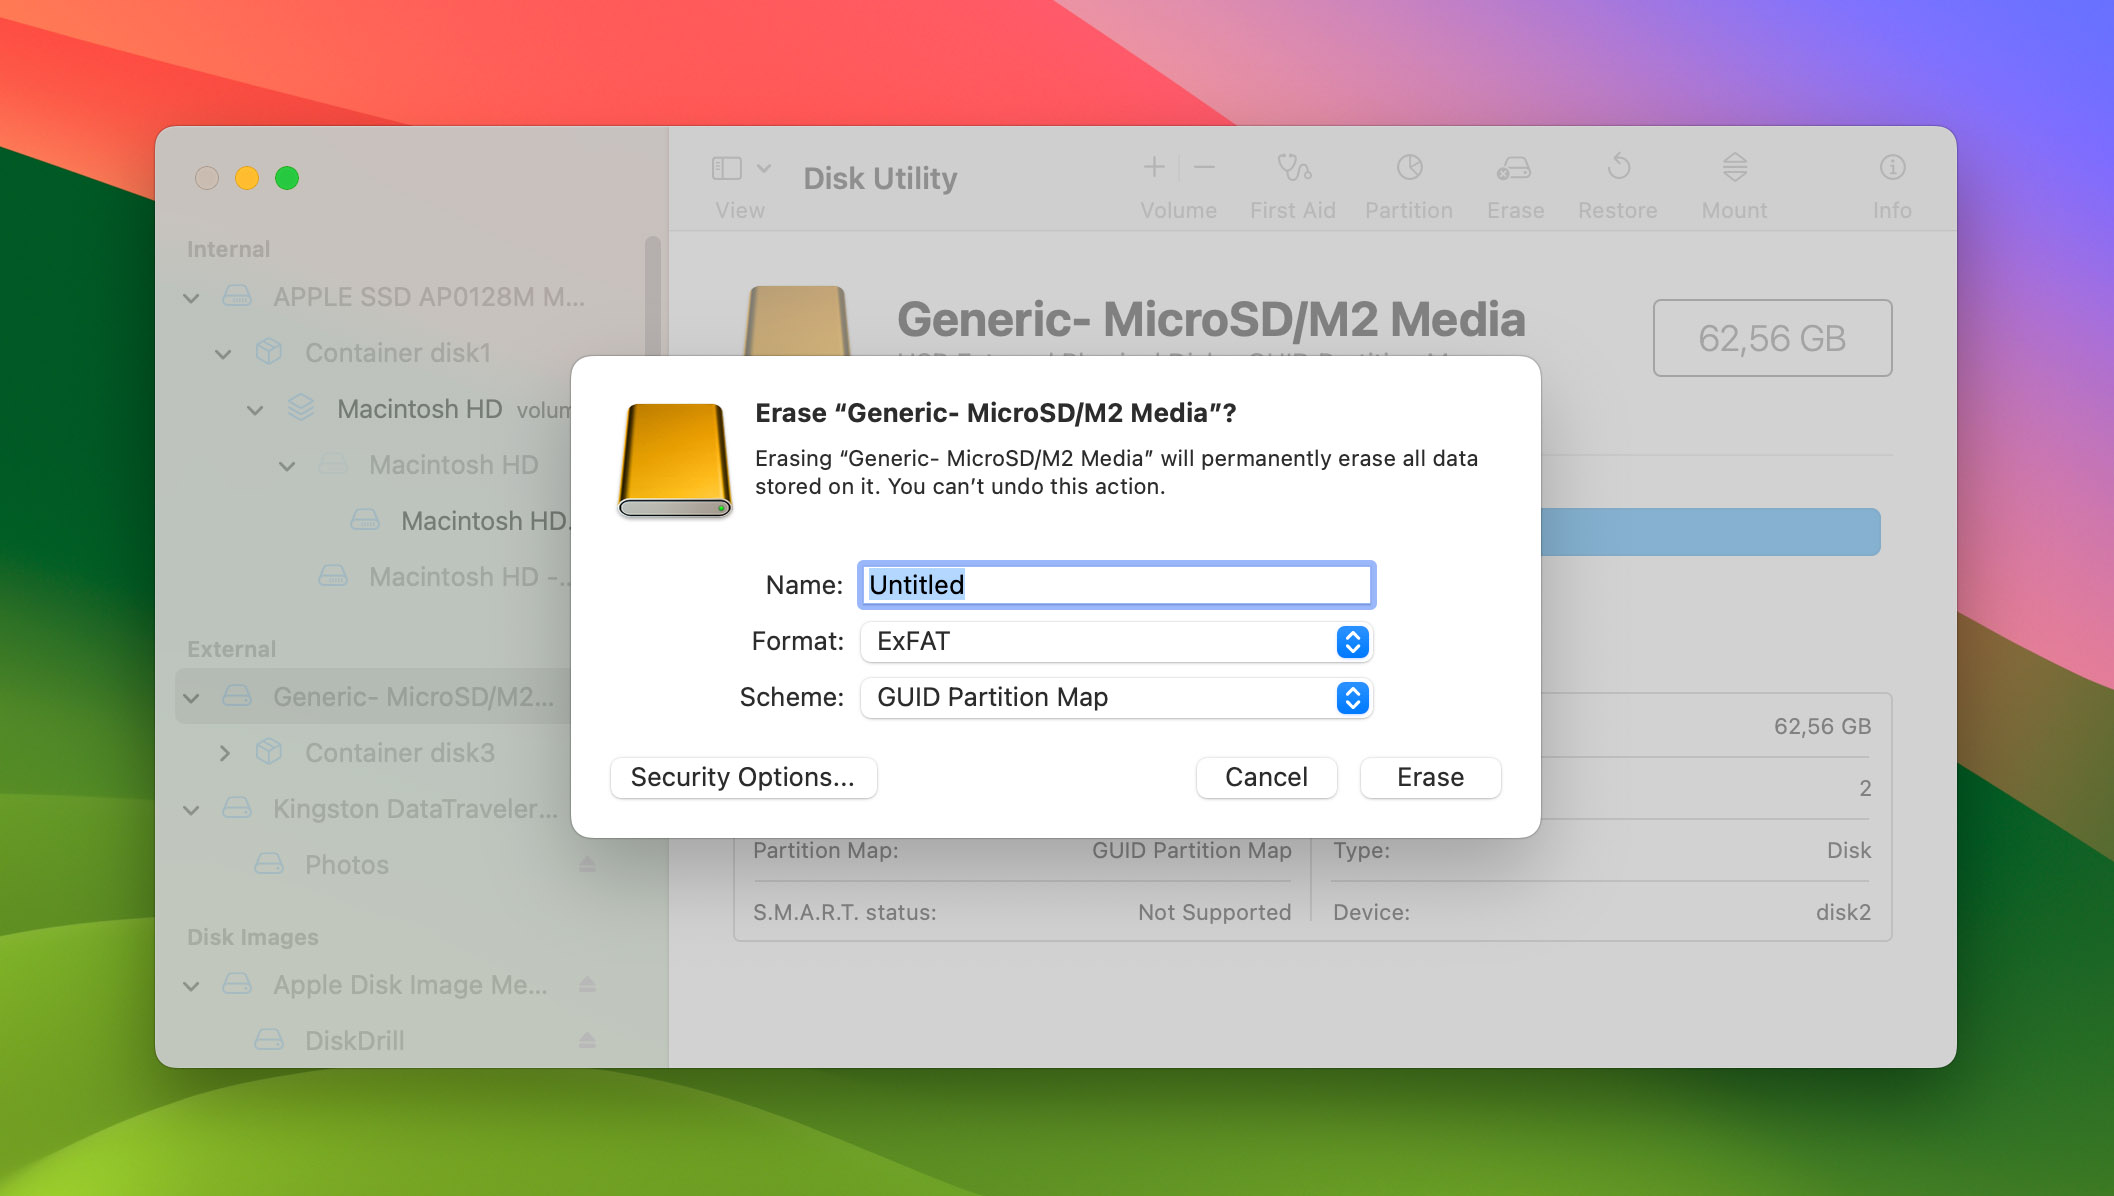
Then, you can proceed with scanning your CF card using a data recovery software tool.
- Launch Disk Drill after the CF card has been formatted.
- Select your CF card from the list of storage devices.
- Click on Search for lost data and check all recoverable files.
- Find the file that you wish to retrieve and select Recover.
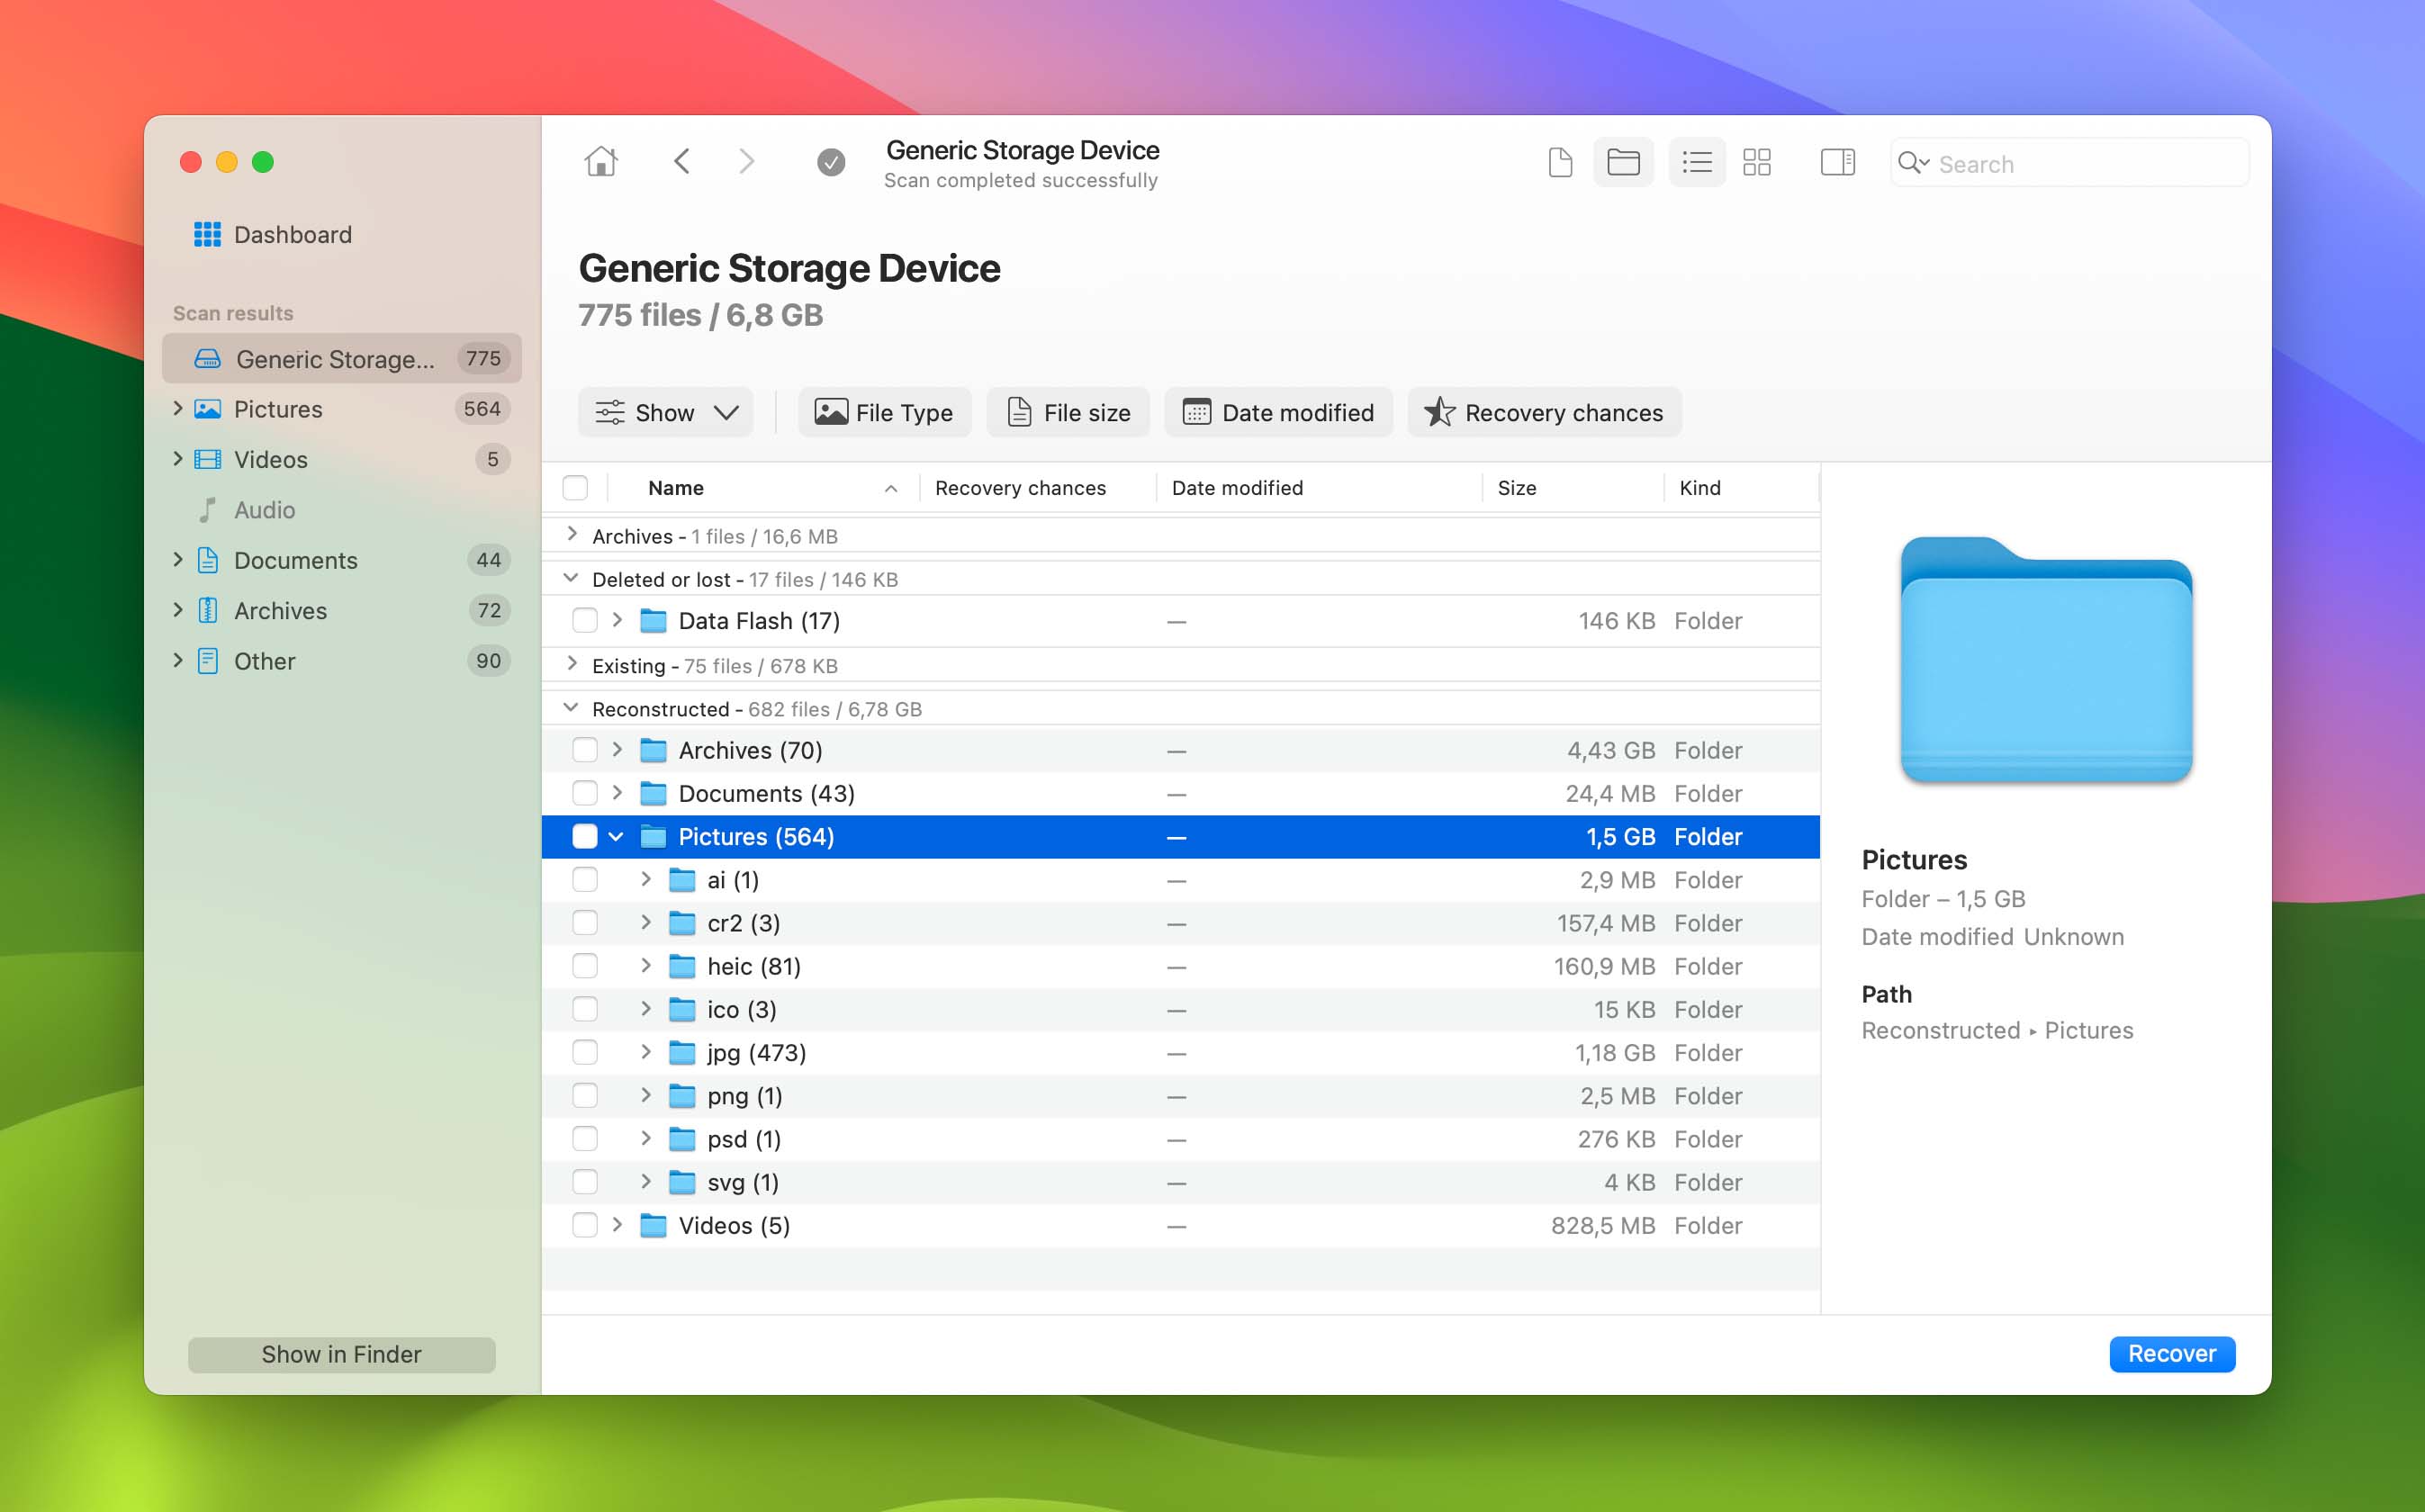
Solution 6: Contact Data Recovery Service
For the last solution, contacting a data recovery service is a sensible recommendation, especially if there are signs of physical damage or if the previous methods were unsuccessful. Professional data recovery services often have specialized equipment and expertise to handle more complex cases.
Several Tips to Prevent Data Loss on CF Cards
- Pay attention to the files you delete. It is always possible to delete a file accidentally. To lessen the chances of this happening, make it a habit to preview a file or inspect its data first before deleting it. Feel free to look at our article about recovering deleted files from SD card on Mac.
- Always backup important files. If you’re actively using your CF card, creating a backup of your important files is essential. While you can create a backup for all of your files, you can prioritize the important files first, especially when you’re limited in storage space.
- Use Safety Eject features. When removing the CF card from your Mac, always eject the CF card safely instead of removing it outright. To remove the CF card on Mac, drag its icon on the Dock to the Trash. Then, remove it from the card reader.
- Use different memory cards for different devices. When saving various kinds of data, a safe practice is to use a different memory card for each device. This way, your data won’t be corrupted easily compared to storing them in a single memory card only.
- Format your CF Card. Regardless if your CF card is new or old, it’s best to format it properly once you experience errors.
- Store memory cards in dry and clean places. Since CF cards and other kinds of memory cards are fragile devices, it’s important to store them in a dry and clean area. Avoid leaving them in humid and extremely hot environments. It also helps if you store them in a memory card case for extra protection.
FAQ
You can clear or format a CF card on Mac using Disk Utility. To do this, follow the steps below:
- Connect your CF card to your Mac’s card reader.
- Launch Disk Utility and select your CF card from the list of storage devices on the left pane.
- Choose Erase. Your CF card’s data will now be cleared.
Conclusion
CompactFlash cards are reliable storage devices that are often used for cameras and professional photography. They can store high-end images and have a higher data transfer rate than most SD memory cards.
However, you can lose your CF card data by accidentally deleting it, or getting your card infected with malware. We hope these methods are able to guide you to recover deleted files from CF card on Mac.

