

Table of Contents
If you want to fix an unreadable USB drive on a Mac, the process is rather straightforward. However, the order of steps in doing so depends on your data loss scenario and your desired outcome.
Key Considerations When Dealing with a Corrupted or Unreadable Flash Drive on Mac
We carefully tested each of the repair methods we demonstrate in this article. While they’re all effective in the right situation, not everyone’s data loss scenario is the same. We’ll help you get started on evaluating the best process and solutions for you.
Before anything else, it’s critical that you identify what caused the flash drive corruption. This step helps you determine whether it can be fixed (most of the time, it can) and if it’s safe to use in the future.
If you need to recover the data on your USB drive, determining the root cause of corruption can help you reasonably evaluate your chances of success.
Reasons for the Flash Drive Corruption
If you want to make your flash drive readable again on Mac, the most important factor you need to consider is the cause of corruption. It affects your chances of recovering your data and whether or not you can safely use the USB after repairing it.
While trying to recreate multiple corrupted USB scenarios (to test the different methods of repair), we managed to boil down the all common causes for USB corruption into 5 core issues. We’ll present these – along with their appropriate solutions – in the table below.
| Reason | Description | Recovery Probability |
| Improper Ejection | Removing the flash drive without using the “safely remove hardware” option. | Moderate to High |
| Power Surges or Fluctuations | Damage due to unexpected power surges while the drive is connected. | Low to Moderate |
| Physical Damage | Damage from being dropped, crushed, or exposed to extreme conditions. | Low to Moderate (varies greatly depending on the extent of damage) |
| Virus or Malware Infections | Corruption due to malicious software attacks. | Moderate to High (depends on the type of malware and extent of infection) |
| Wear and Tear | Degradation from overuse, as flash drives have limited write cycles. | Low to Moderate |
Can a Corrupted USB Drive Be Recovered?
The issues we explained above usually result in corruption. When your USB’s file system is corrupted, your computer won’t be able to communicate with the flash drive properly thus making it unreadable. This issue alludes to 2 possible scenarios:
- Logical damage – If your Mac detects the drive but its contents are inaccessible, the corruption is the result of logical damage. Logical damage encompasses all software-related problems that make your drive not readable. You can fix an unreadable USB flash drive on a Mac using the methods we discuss in this article. You can also attempt to recover data from the flash drive yourself.
- Physical damage – Corruption may also result from physical damage. In this scenario, the actual components of your USB drive are malfunctioning or broken. This may lead to your Mac failing to recognize the device at all. Physically damaged drives can only be safely recovered by specialists.
How to Recover Data from a Unreadable Flash Drive on Mac
Once you’ve determined that your USB was corrupted due to logical damage, check if Disk Utility (Finder > Applications > Utilities) displays its size correctly. If so, you can restore your data using a tool called data recovery software.
Data recovery software is a special tool that can extract and reconstruct data directly from a drive’s file system. There are many great data recovery software for Mac that you can choose from, but you need to make sure these features are present:
- Image backup creation – To prevent further wear to the USB, choose a tool that can create an image backup and scan that instead of the flash drive itself.
- Corruption/RAW recovery – Make sure your tool can bypass any errors that prevent scanning in cases of a corrupt file system or RAW format.
With these considerations in mind, we analyzed dozens of data recovery software for this article. Our top choice landed on Disk Drill – it satisfies both of these conditions and its user-friendly interface makes it highly accessible to users of any level. It was also one of the first recovery apps to be optimized for macOS Sonoma.
We’ll demonstrate how to use Disk Drill in the guide below.
To recover data from an unreadable flash drive:
- Connect an external storage device (like a hard drive or another USB) to your Mac using the appropriate adapter. Make sure it has enough space for an image backup of your USB.
- Connect your corrupted USB to your Mac. Then, download and install Disk Drill.
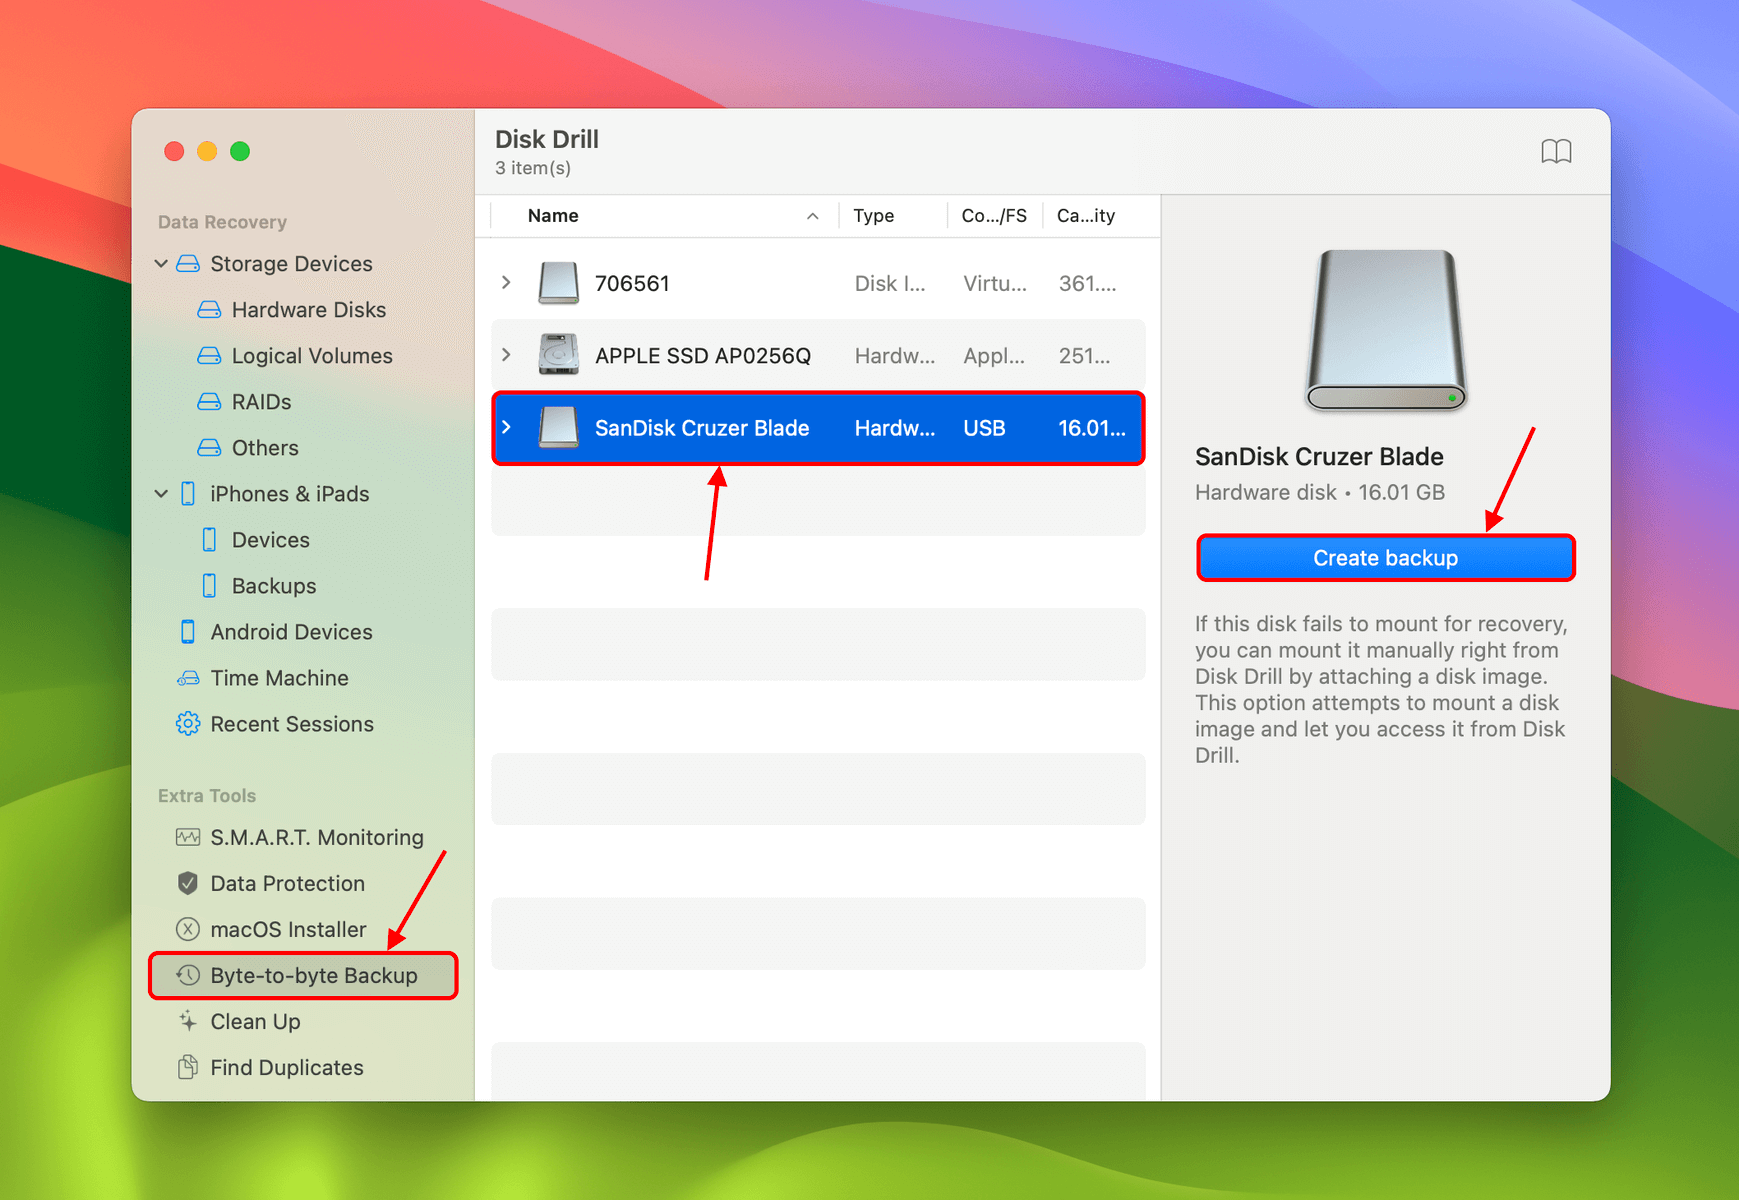
- Open Disk Drill (Finder > Applications) and click Byte-to-byte backup in the left sidebar. Then, select your corrupted USB from the drive list and click Create backup.
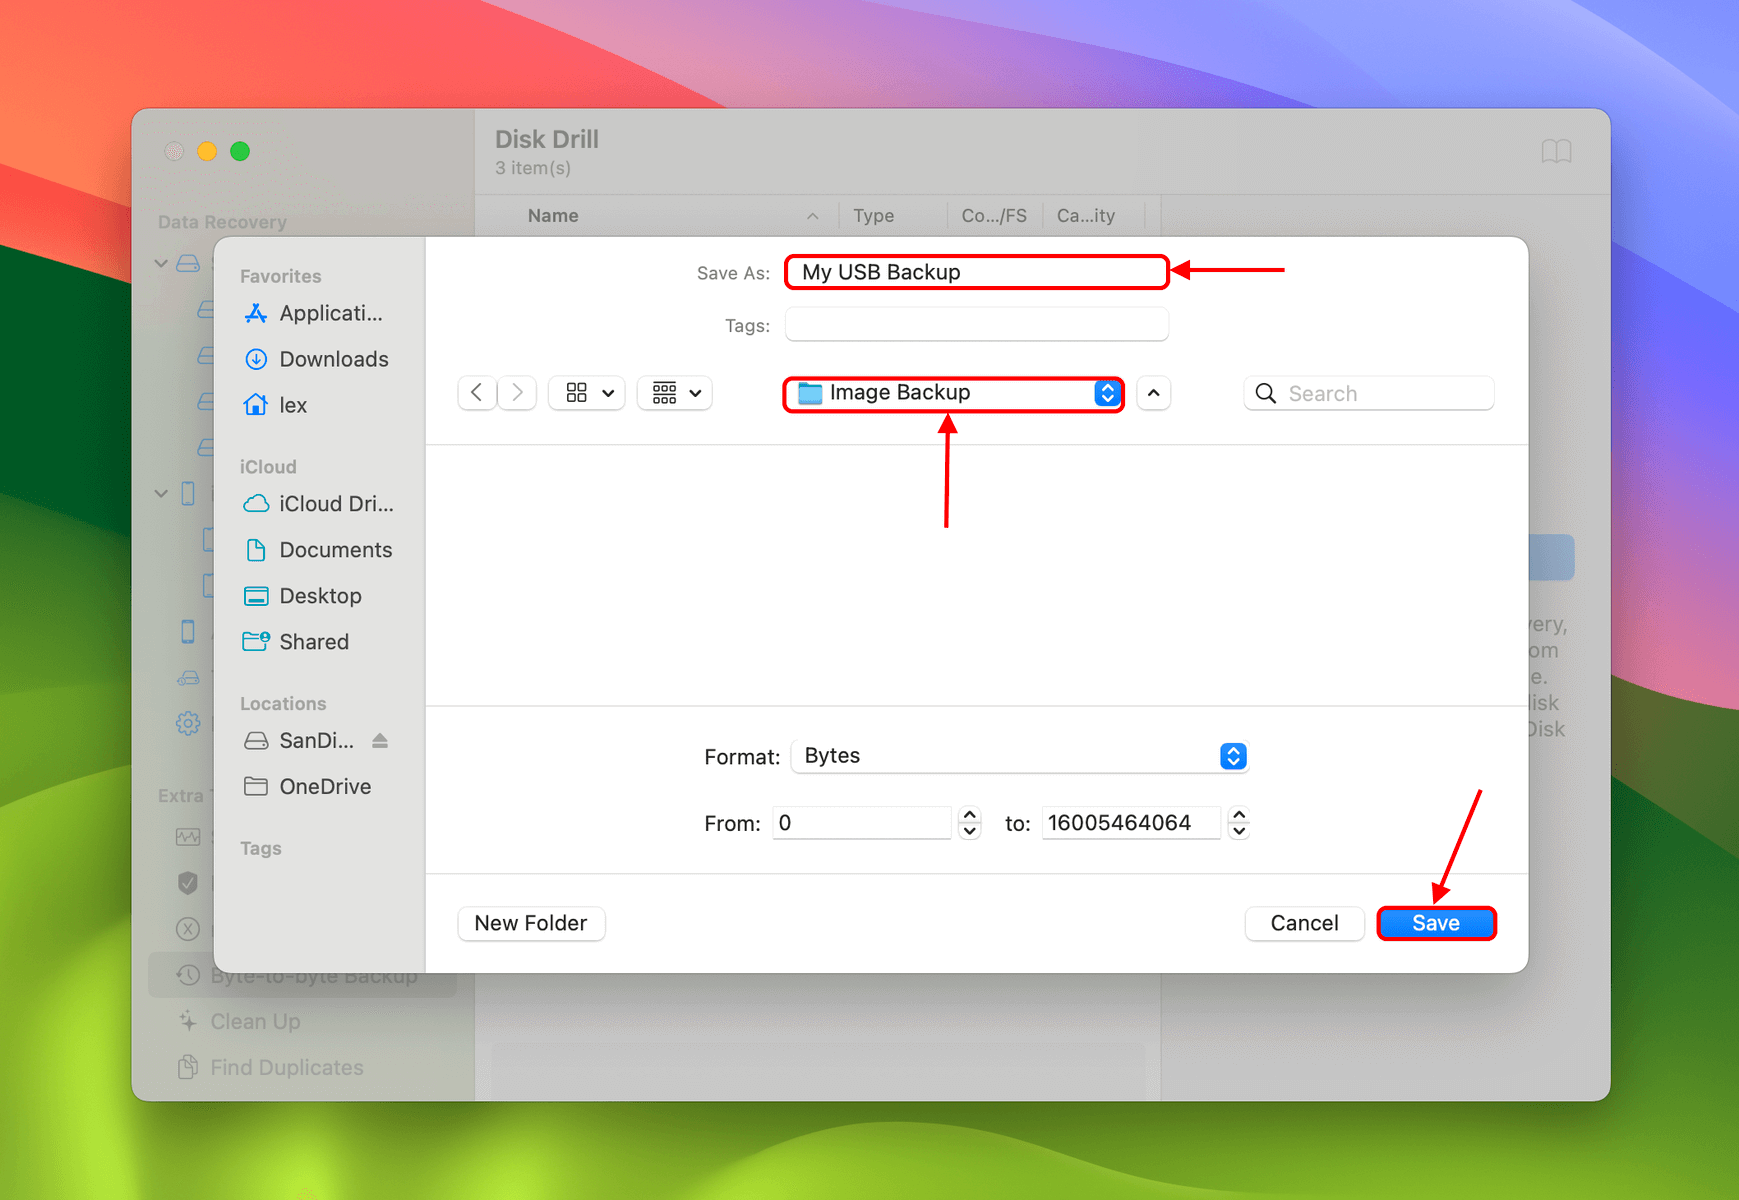
- Choose a location on your Mac where Disk Drill will save the backup file. Then, name the backup and click Save.
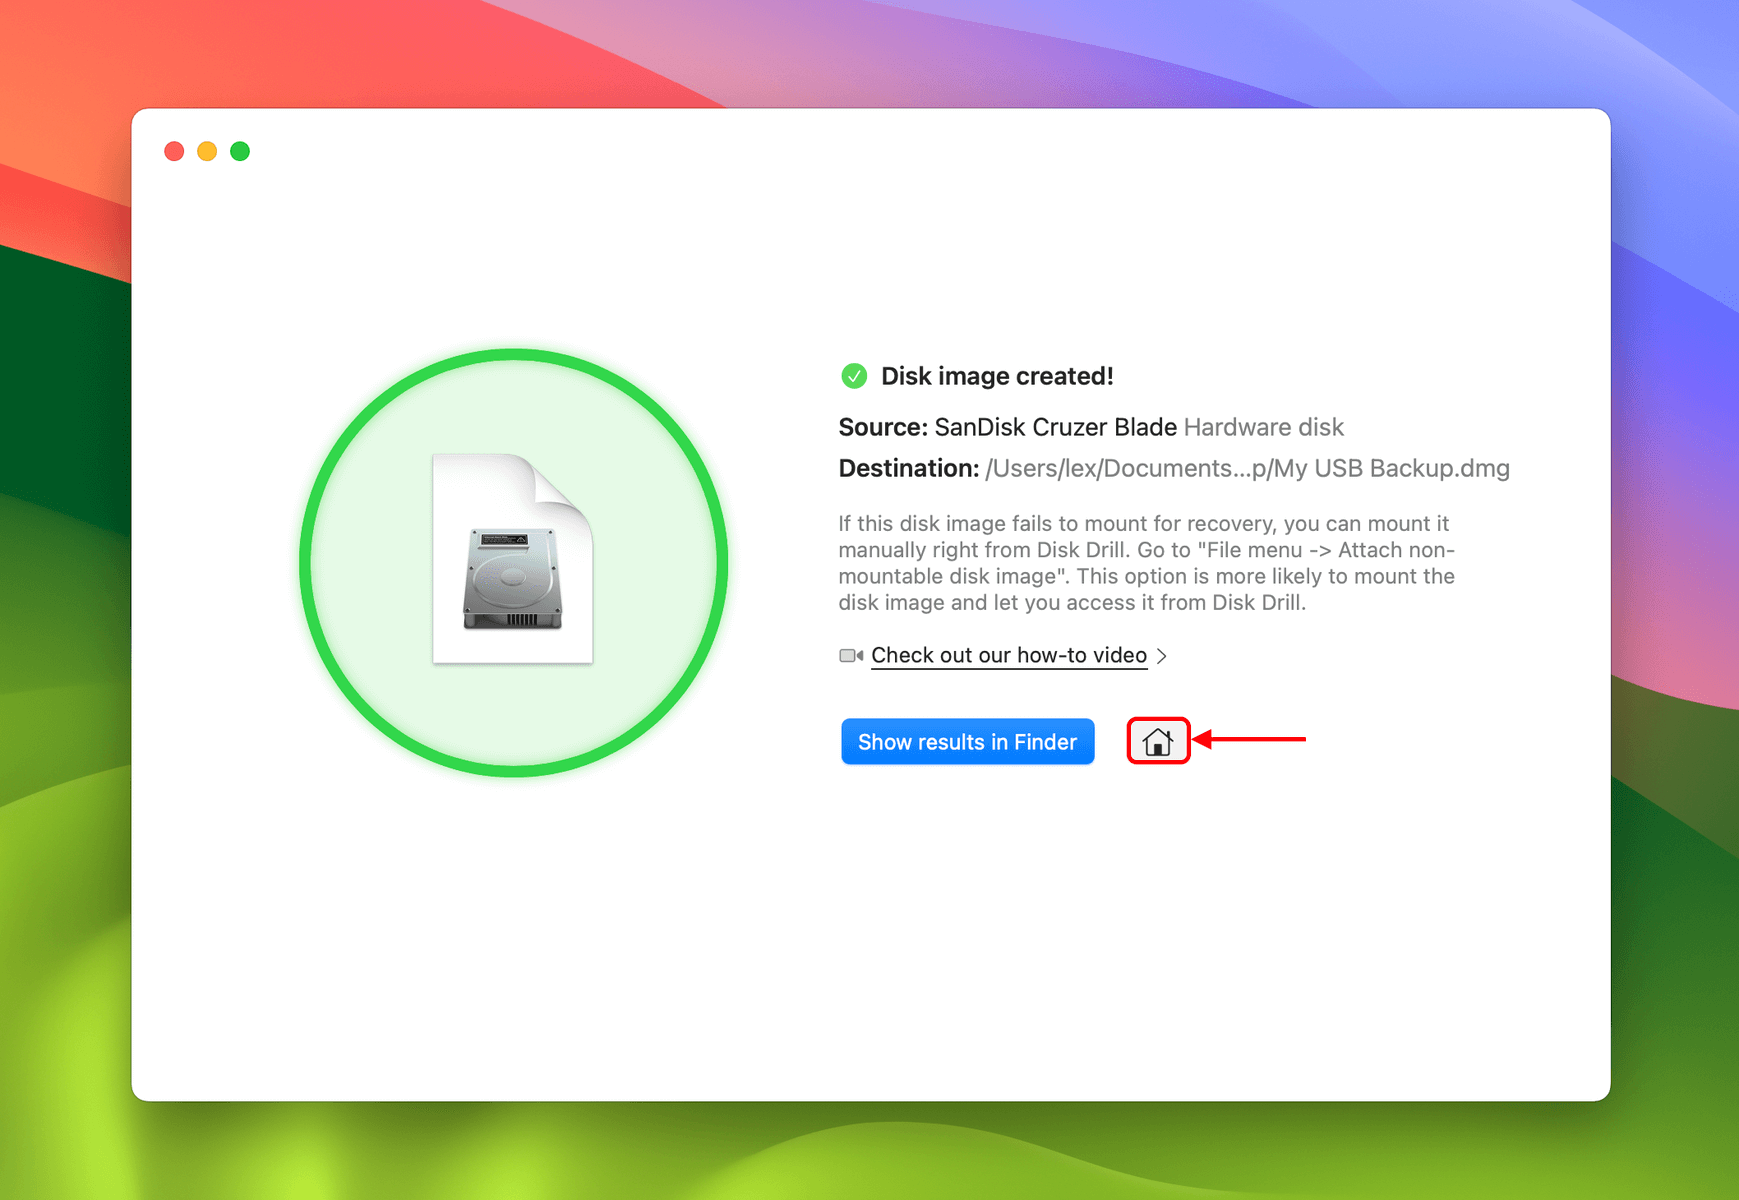
- Once Disk Drill is done saving the backup image, click the home button to return to the main window.
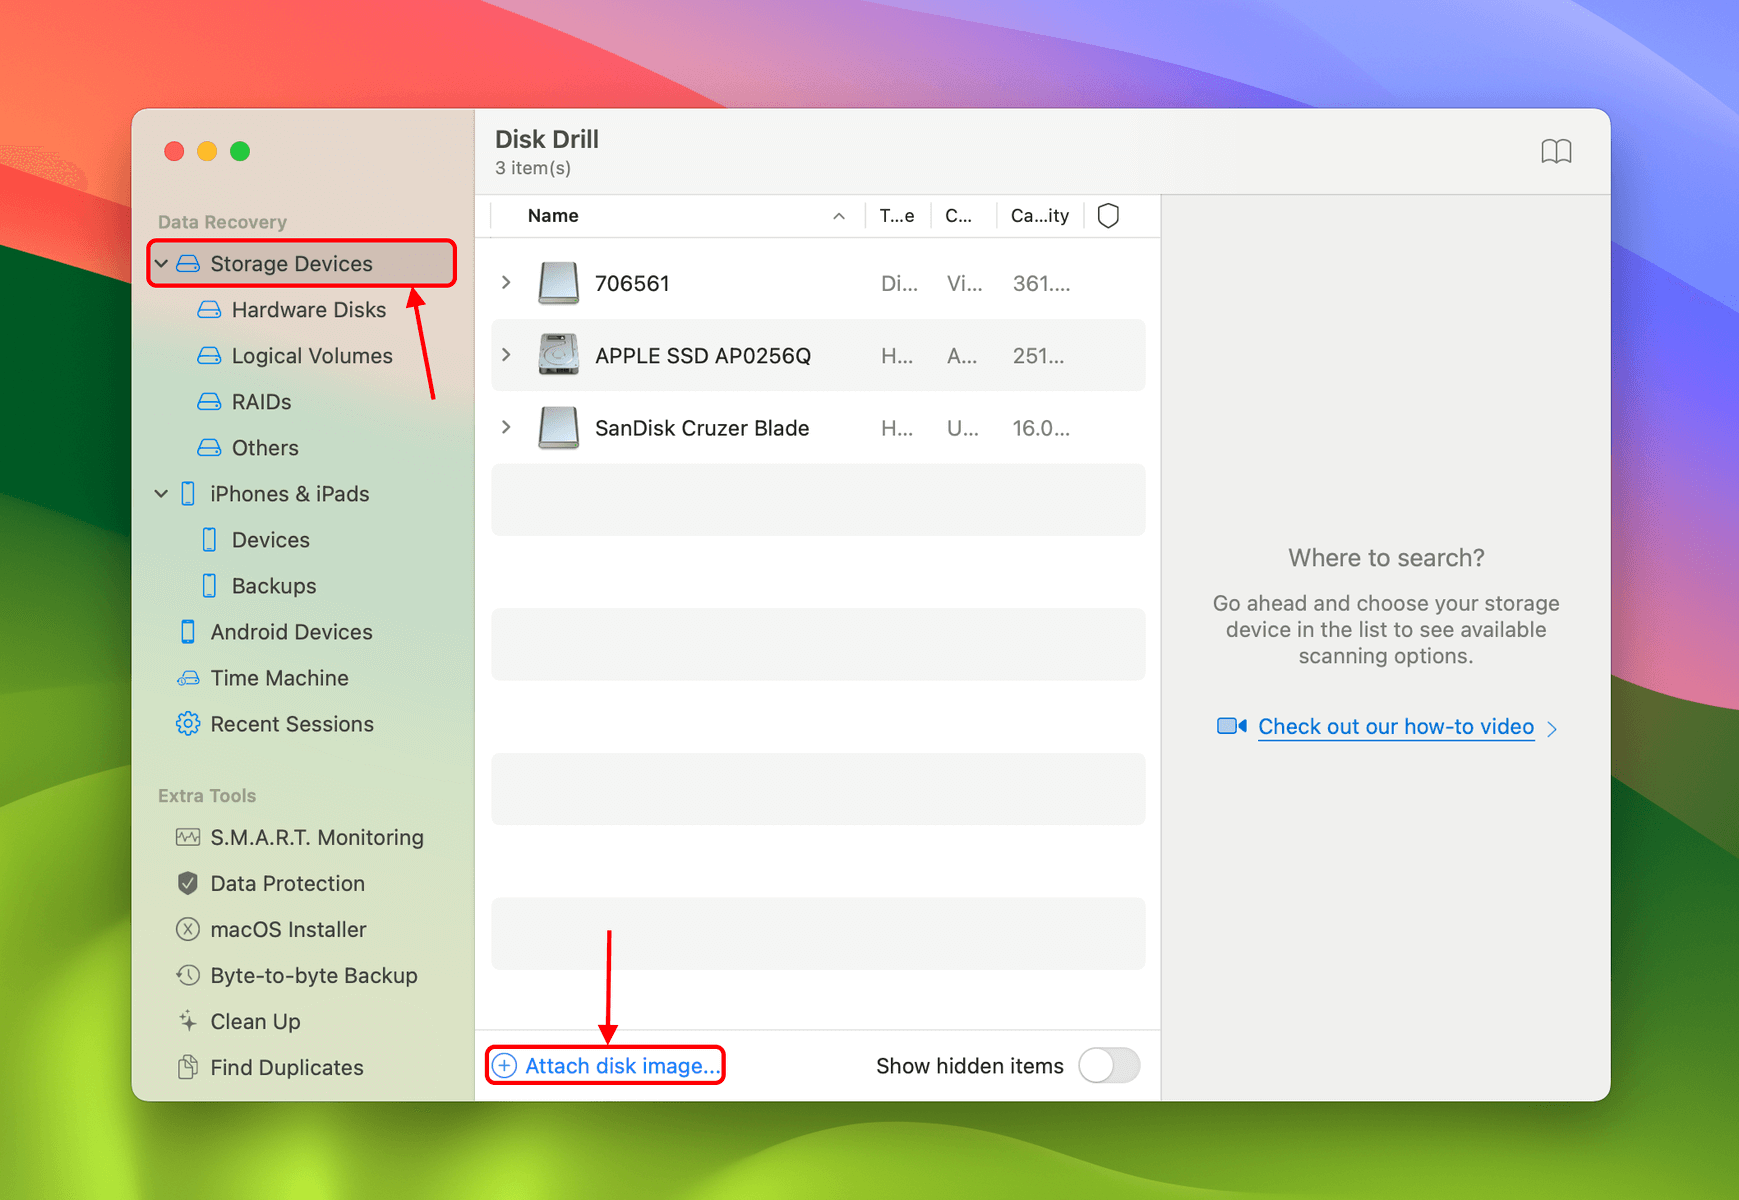
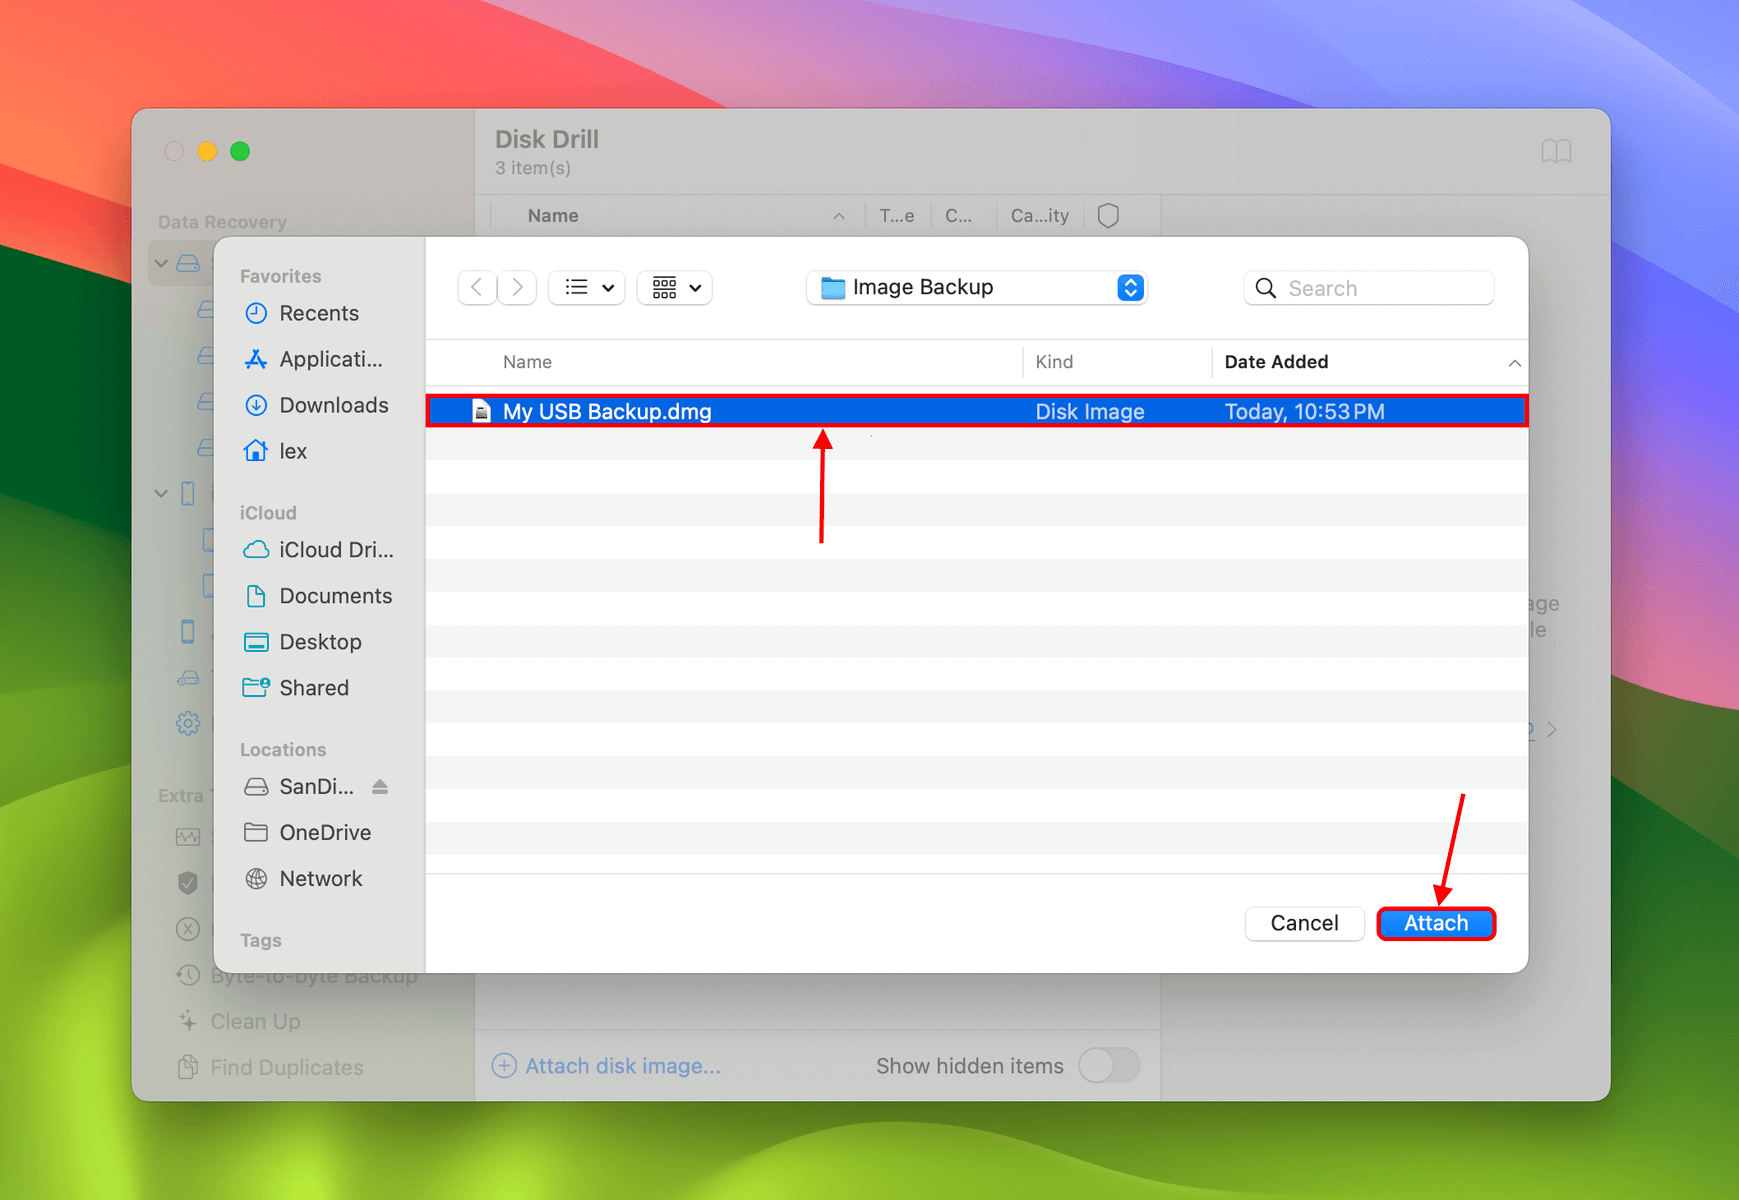
- Click Storage devices in the left sidebar. Then, click Attach disk image… in the bottom of the window.
- Locate and select the backup image of your USB drive (that you created in steps 3-4). Then, click Attach.
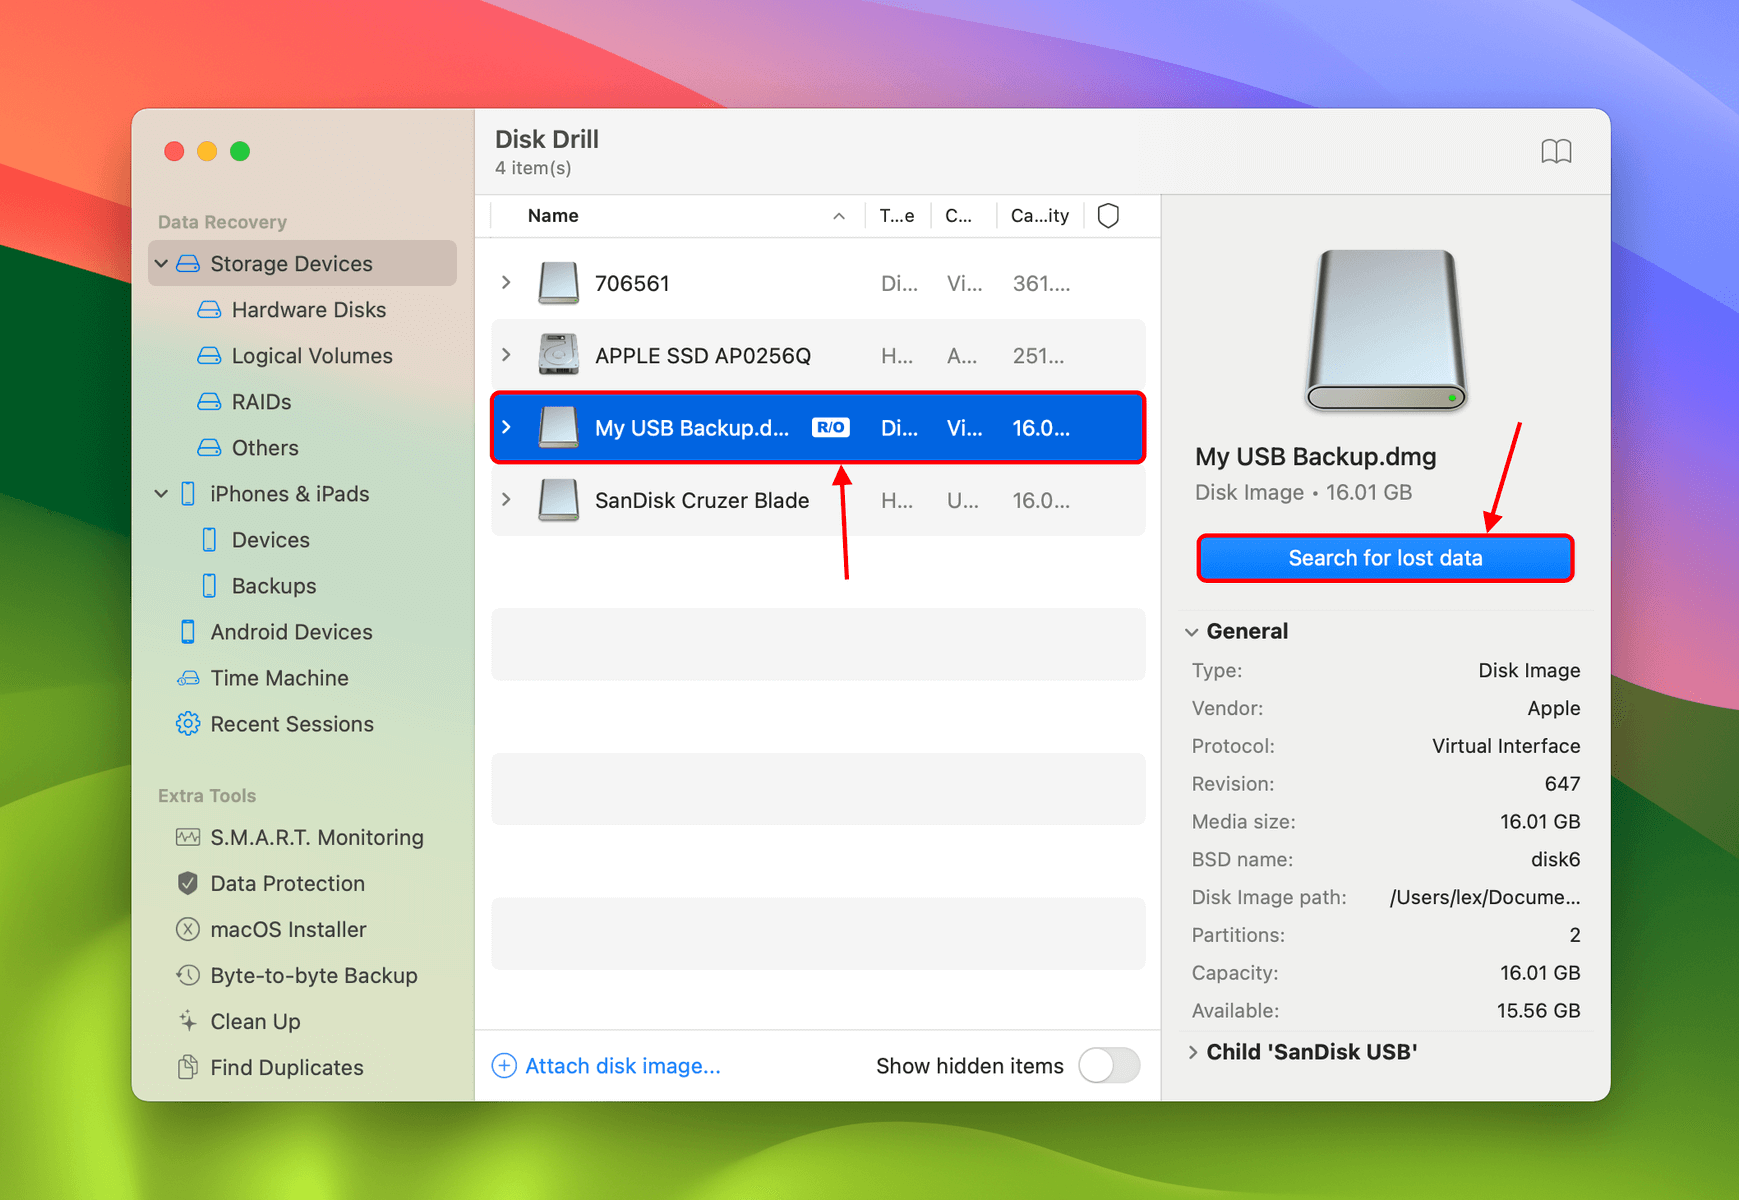
- Click the backup image you attached in step 7 and click Search for lost data.
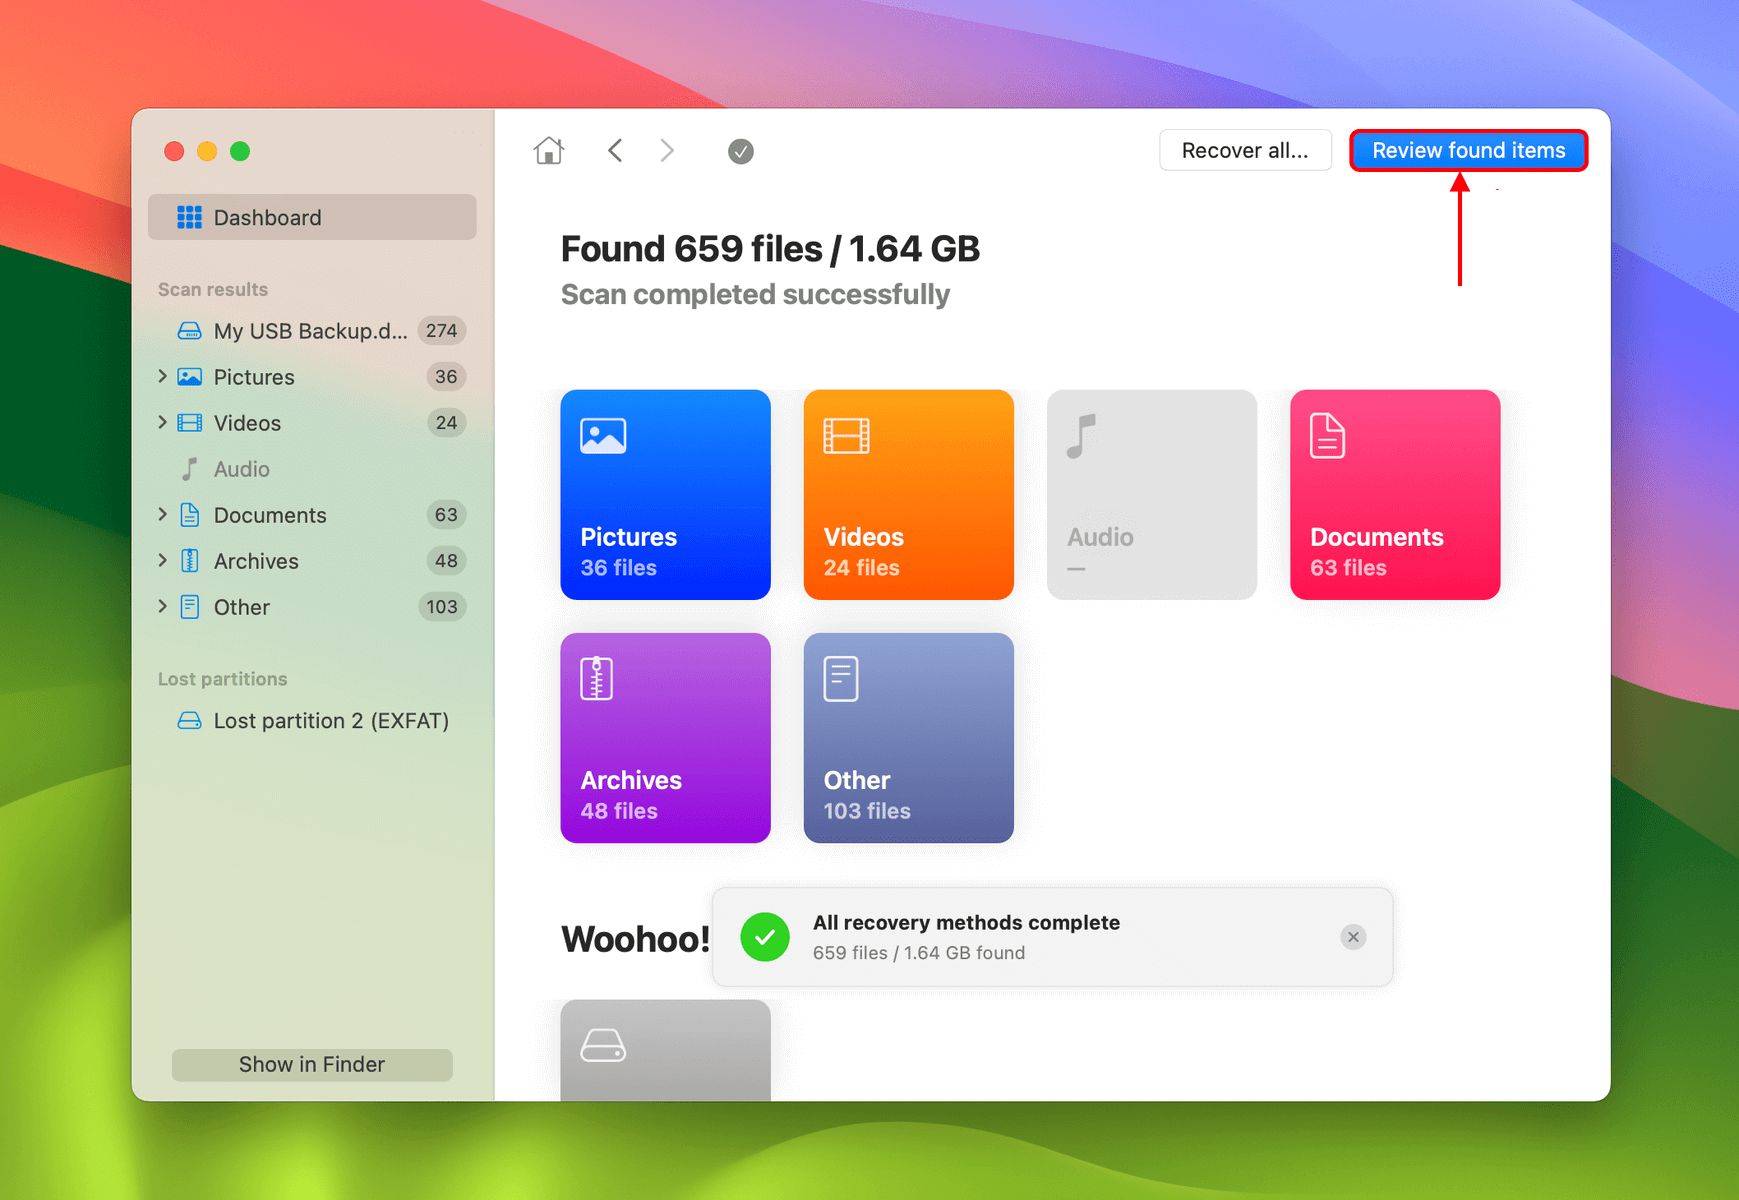
- Once Disk Drill is done scanning your backup image, click Review found items.
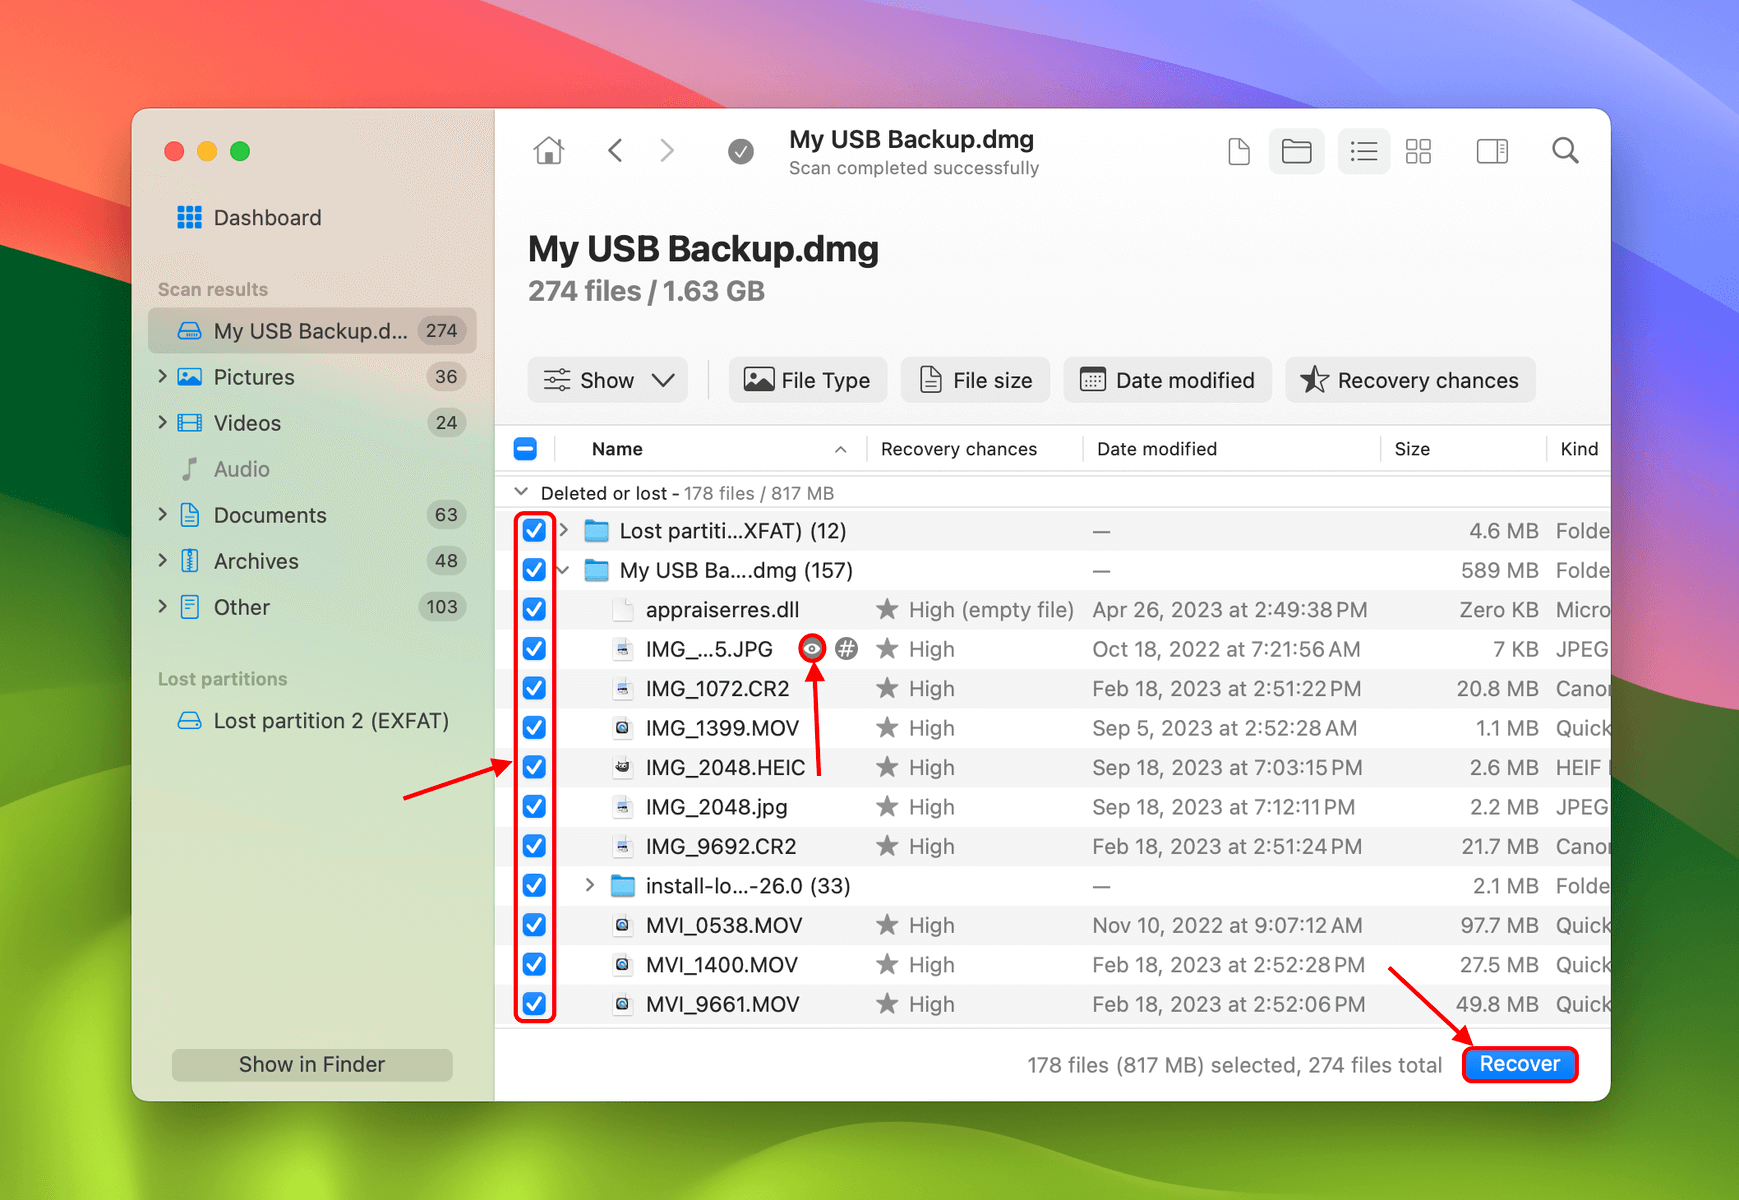
- The Existing folder displays all the data that is currently stored on your USB. However, if any data was lost due to corruption, you’ll find them in the Deleted or lost and Reconstructed folders (which display data that Disk Drill recovered using different techniques). Go through all of them to locate your data.
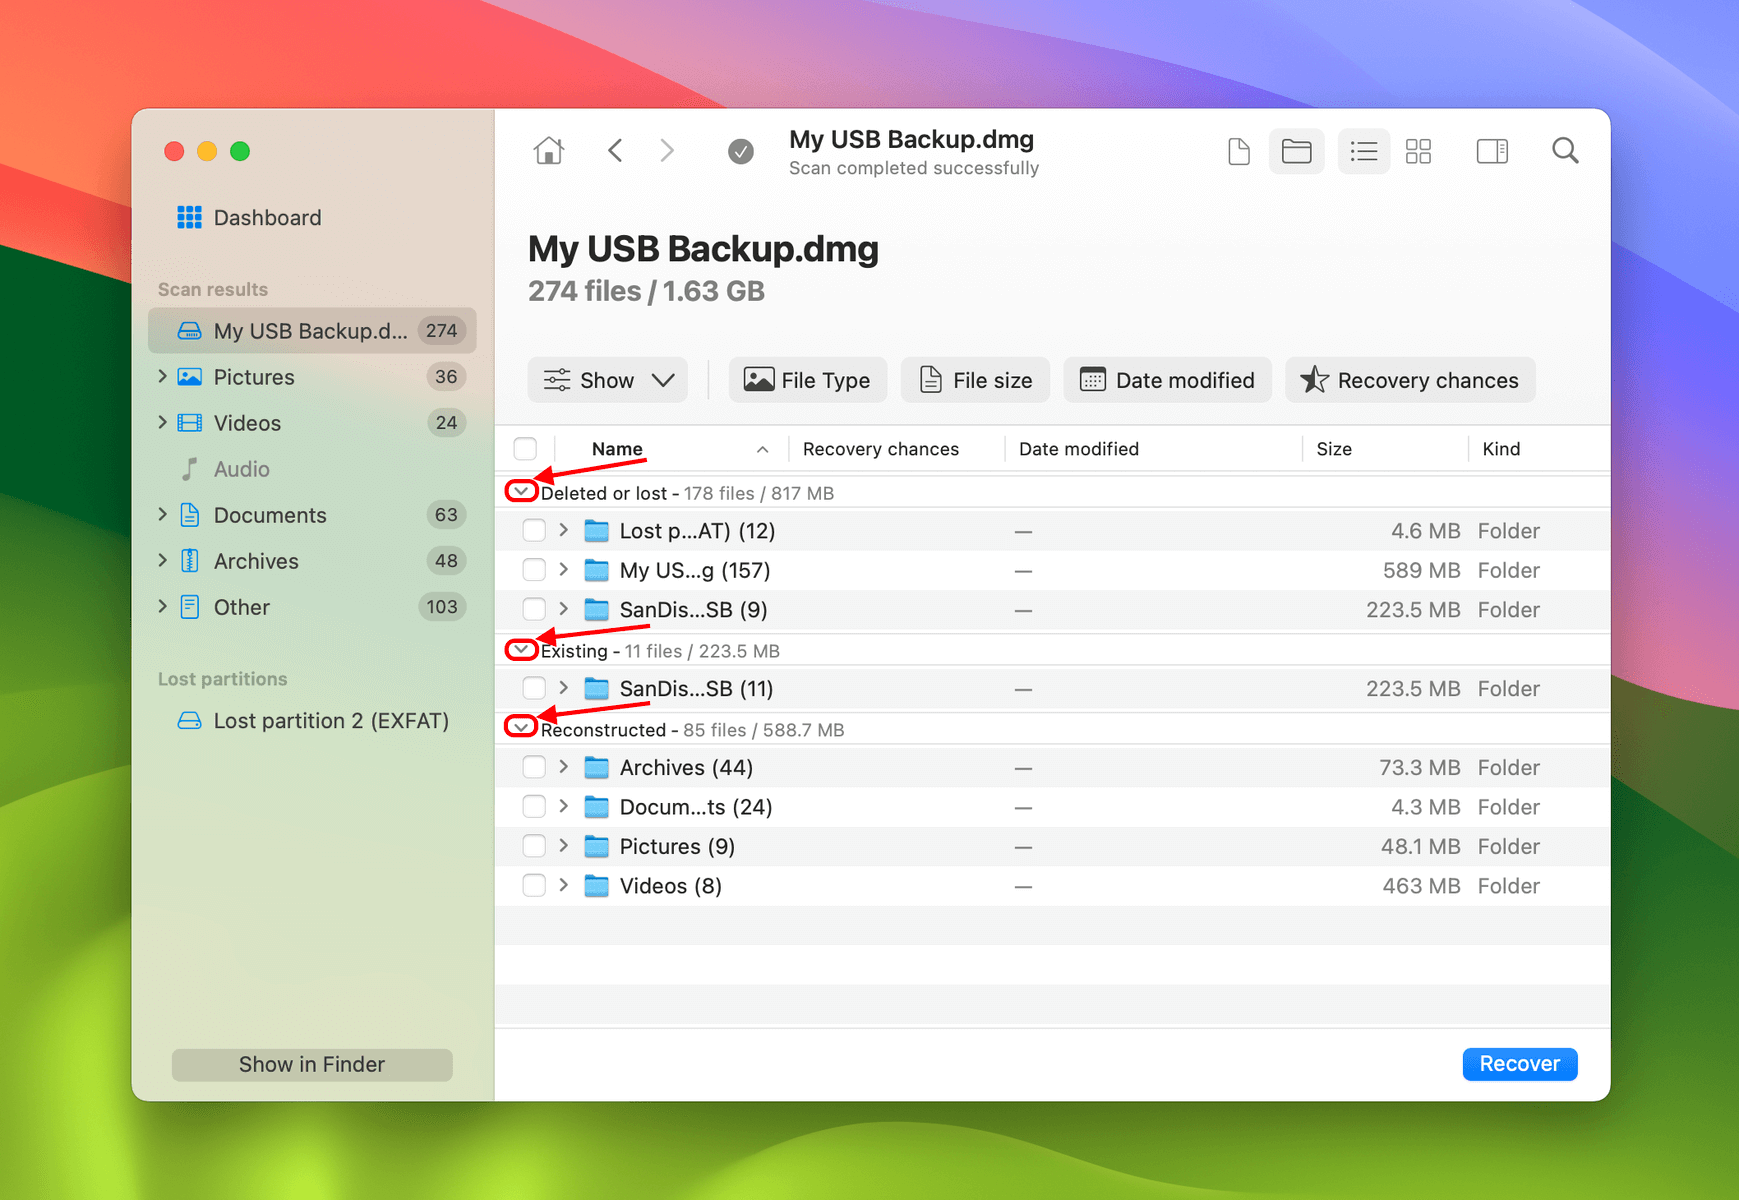
- You can preview your files (ensuring they are recoverable) by hovering your mouse beside them and clicking the eye button. Then, mark the box beside the files or folders you want to restore and click Recover.
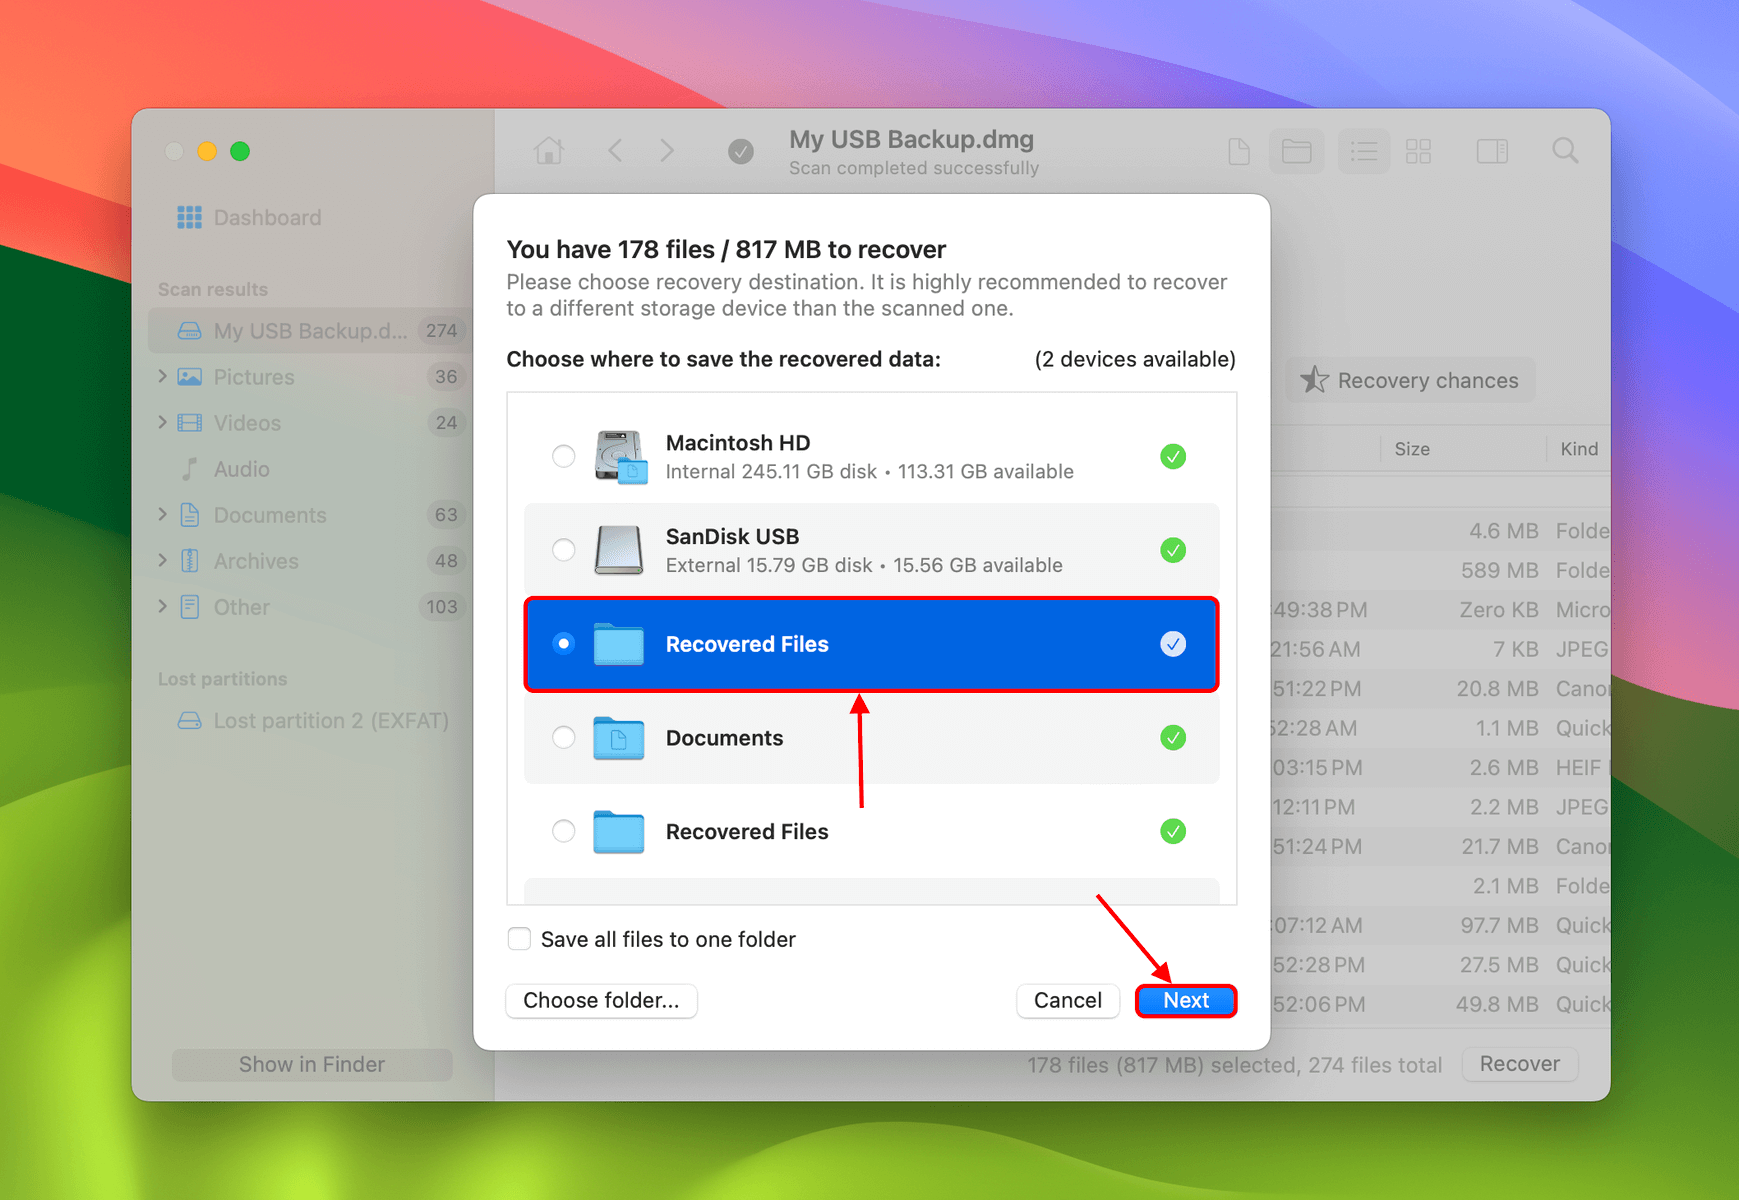
- Choose a location on your Mac where Disk Drill will save the recovered files. Then, click Next to proceed.
How to Repair a Non-readable USB on Mac
In the methods below, we’ll show you how to diagnose and fix your corrupted USB flash drive (including how to check your device for signs of physical damage). While it’s sometimes possible to fix a corrupted pen drive without losing any data, we recommend that you secure your files first. Repairing your drive, by the nature of its processes, usually causes data loss.
Method 1: Diagnose Your Flash Drive for Signs of Physical Damage
If your Mac doesn’t recognize your USB at all, there’s a good chance your flash drive is physically damaged. This section is a basic guide on how to evaluate its condition yourself.
First, you want to rule out any issues unrelated to the USB. Here are some basic troubleshooting tips to isolate the problem:
- ☑️ Remove any foreign objects or debris that may be blocking the connectors of your USB
- ☑️ Connect your USB to a different port
- ☑️ Use another Mac
- ☑️ If you’re using an adapter (e.g. USB to Thunderbolt), try using a different one
If the issues persist despite your troubleshooting efforts, inspect your flash drive for the following:
- ❌ Cracks, dents or physical deformities
- 🔌 Bent or broken connectors
- 🚥 Inconsistent or no LED activity (if your USB has a LED indicator)
- 🔥 Signs of overheating such as burn marks and/or discoloration
- 💧 Signs of water damage such as visible moisture, corrosion, and/or discoloration
If you observed any of the above on your flash drive, your best option is to send it to a professional data recovery service to prevent permanent data loss. See more details in this section.
Method 2: Fix USB Drive Corruption Using First Aid
First Aid is a built-in Mac tool you can find in the Disk Utility app. It scans and automatically repairs many software issues that lead to corruption and prevent your Mac from reading it, such as file system errors, problems with directories, partition map issues, and more.
To repair a non-readable USB on Mac using First Aid:
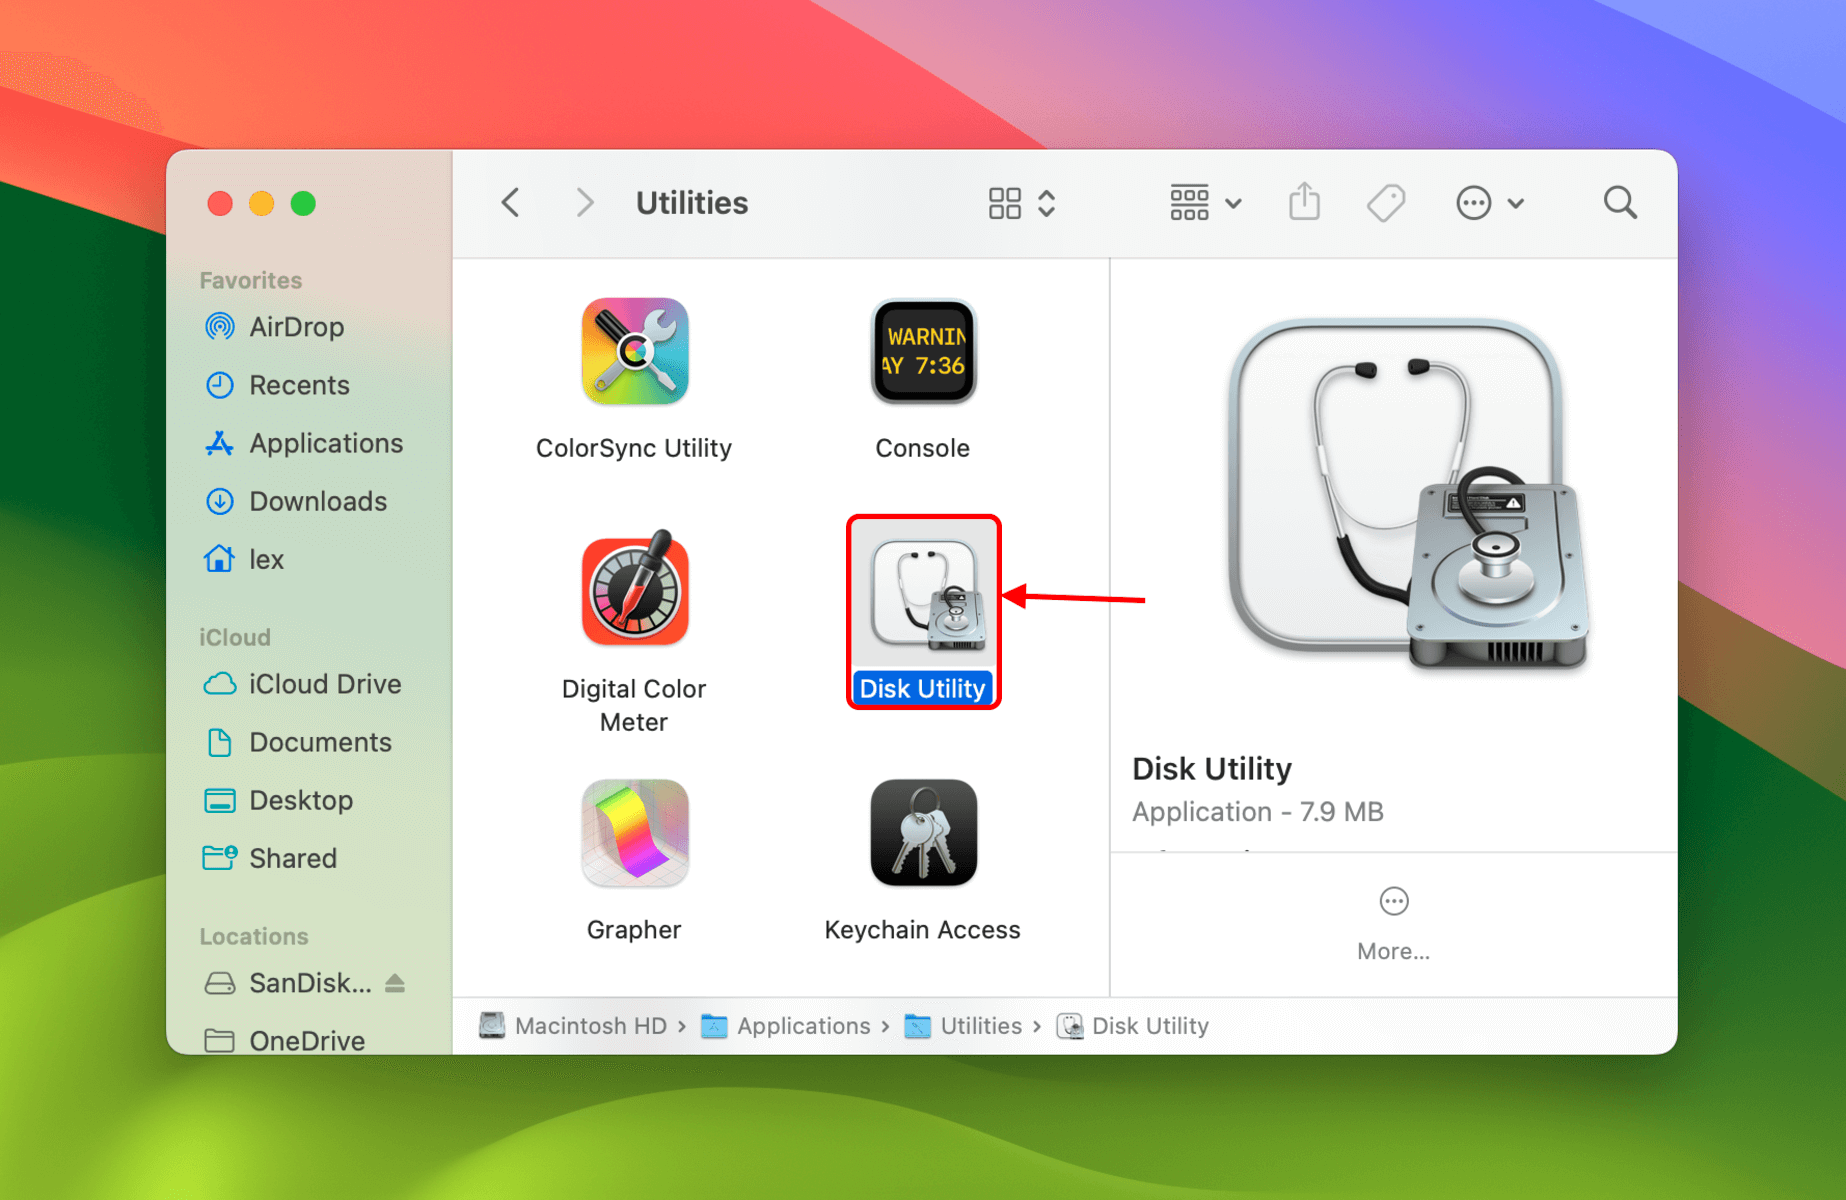
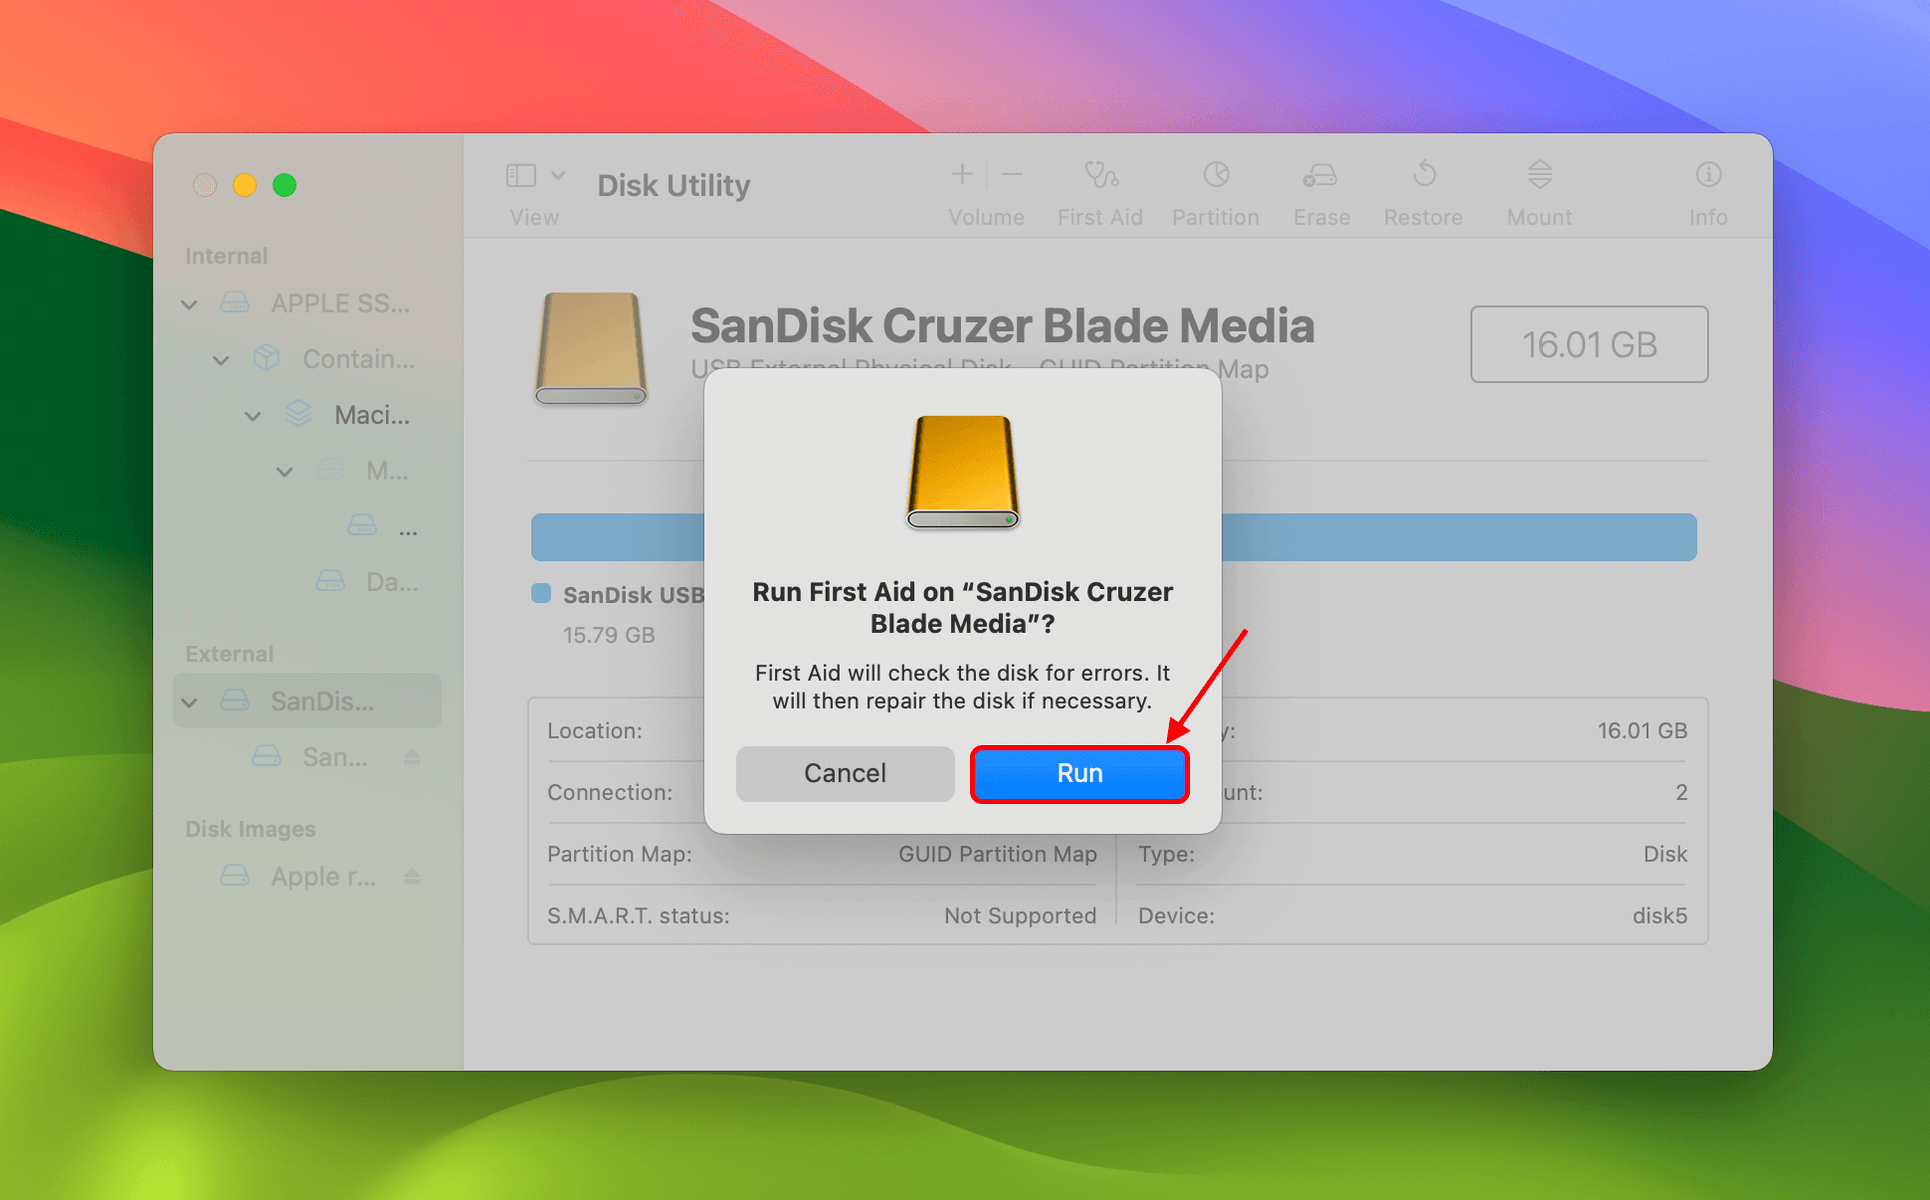
- Connect your corrupted USB to your Mac using the appropriate adapter. Then, launch Disk Utility (Finder > Applications > Utilities).
- On the left sidebar, select your USB drive. Then, click First Aid at the top of the window.
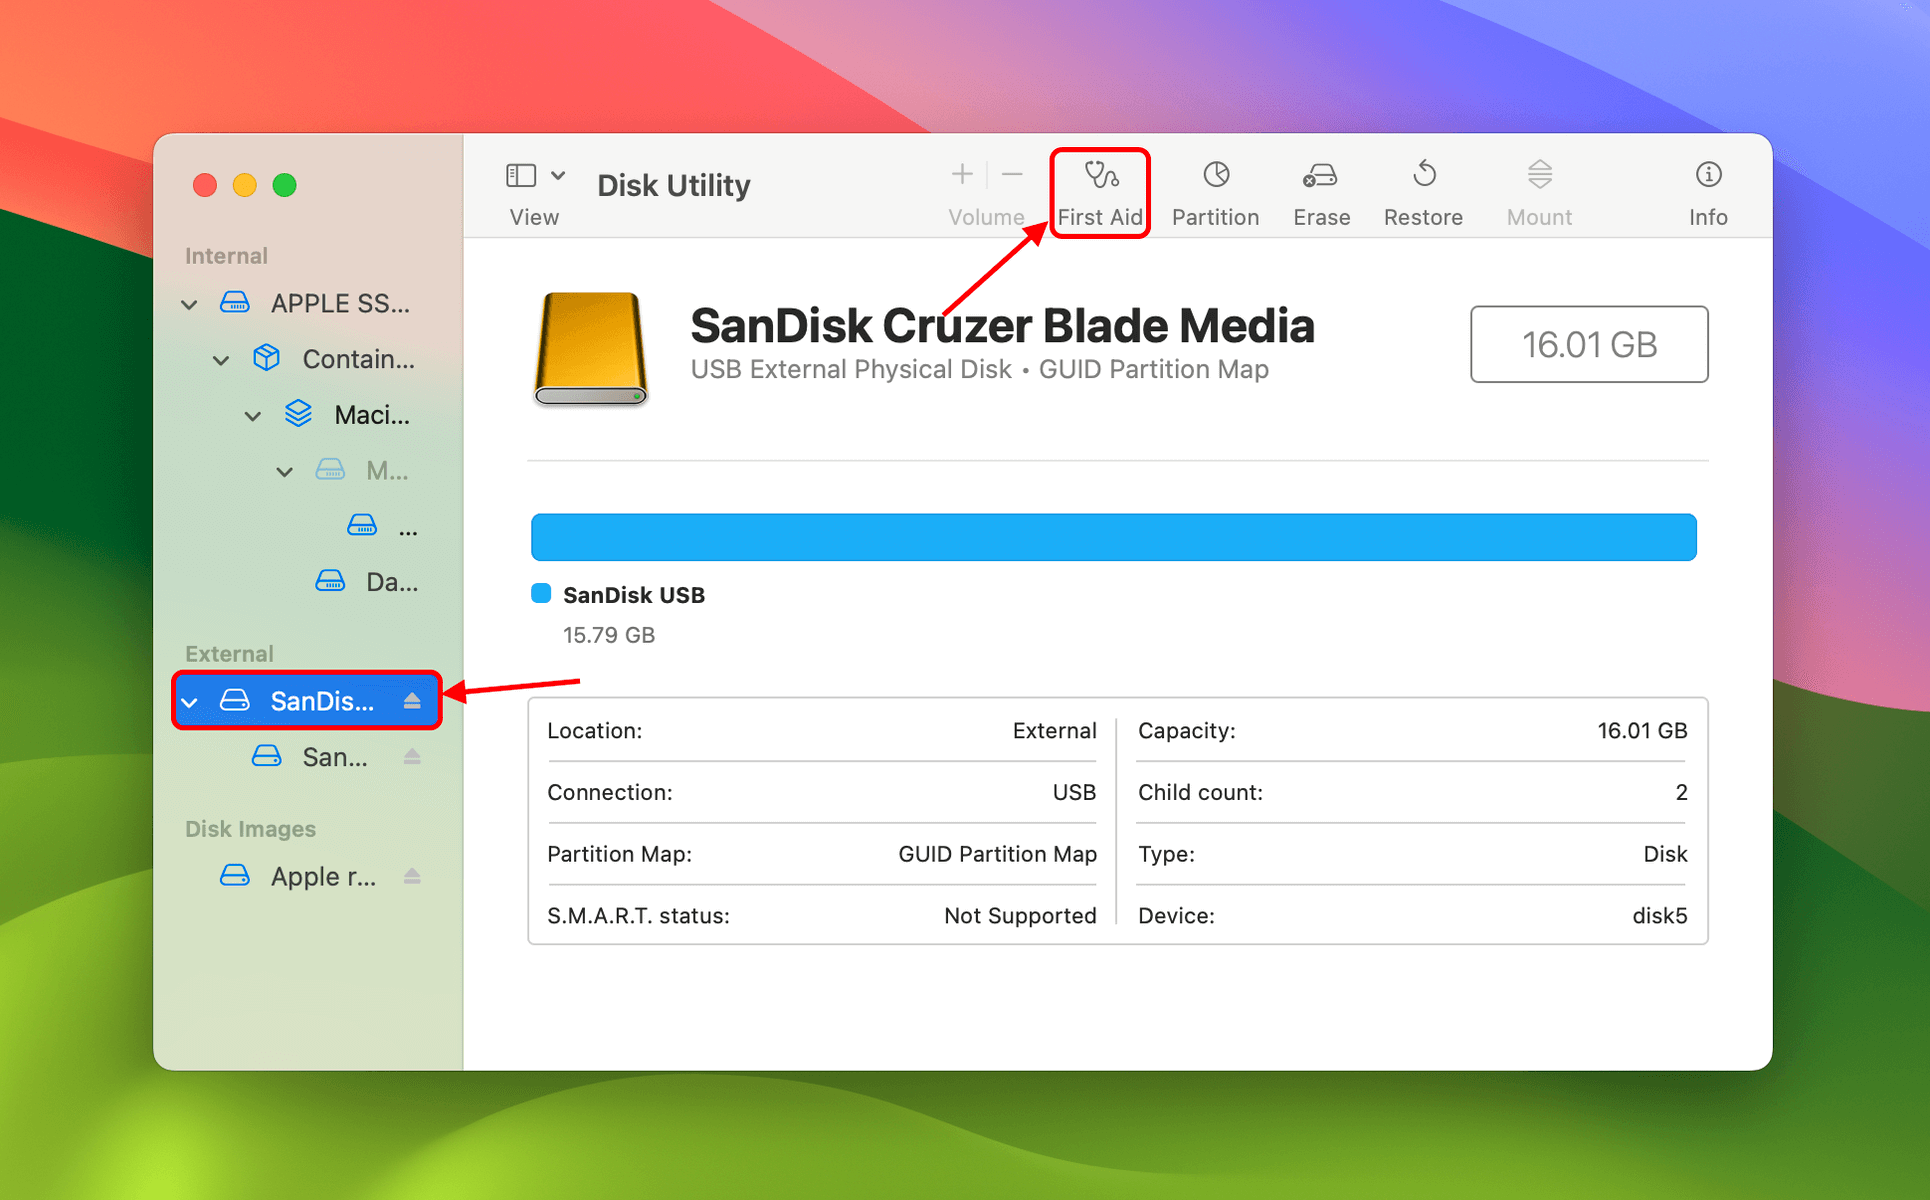
- Click Run to confirm the action.
Method 3: Format Your USB Flash Drive
If First Aid doesn’t fix your USB, the next step is to format it. Formatting will completely erase your flash drive, including the errors causing the corruption. Fortunately, you have access to an easy-to-use formatting tool in Disk Utility.
To format your USB flash drive using Disk Utility:
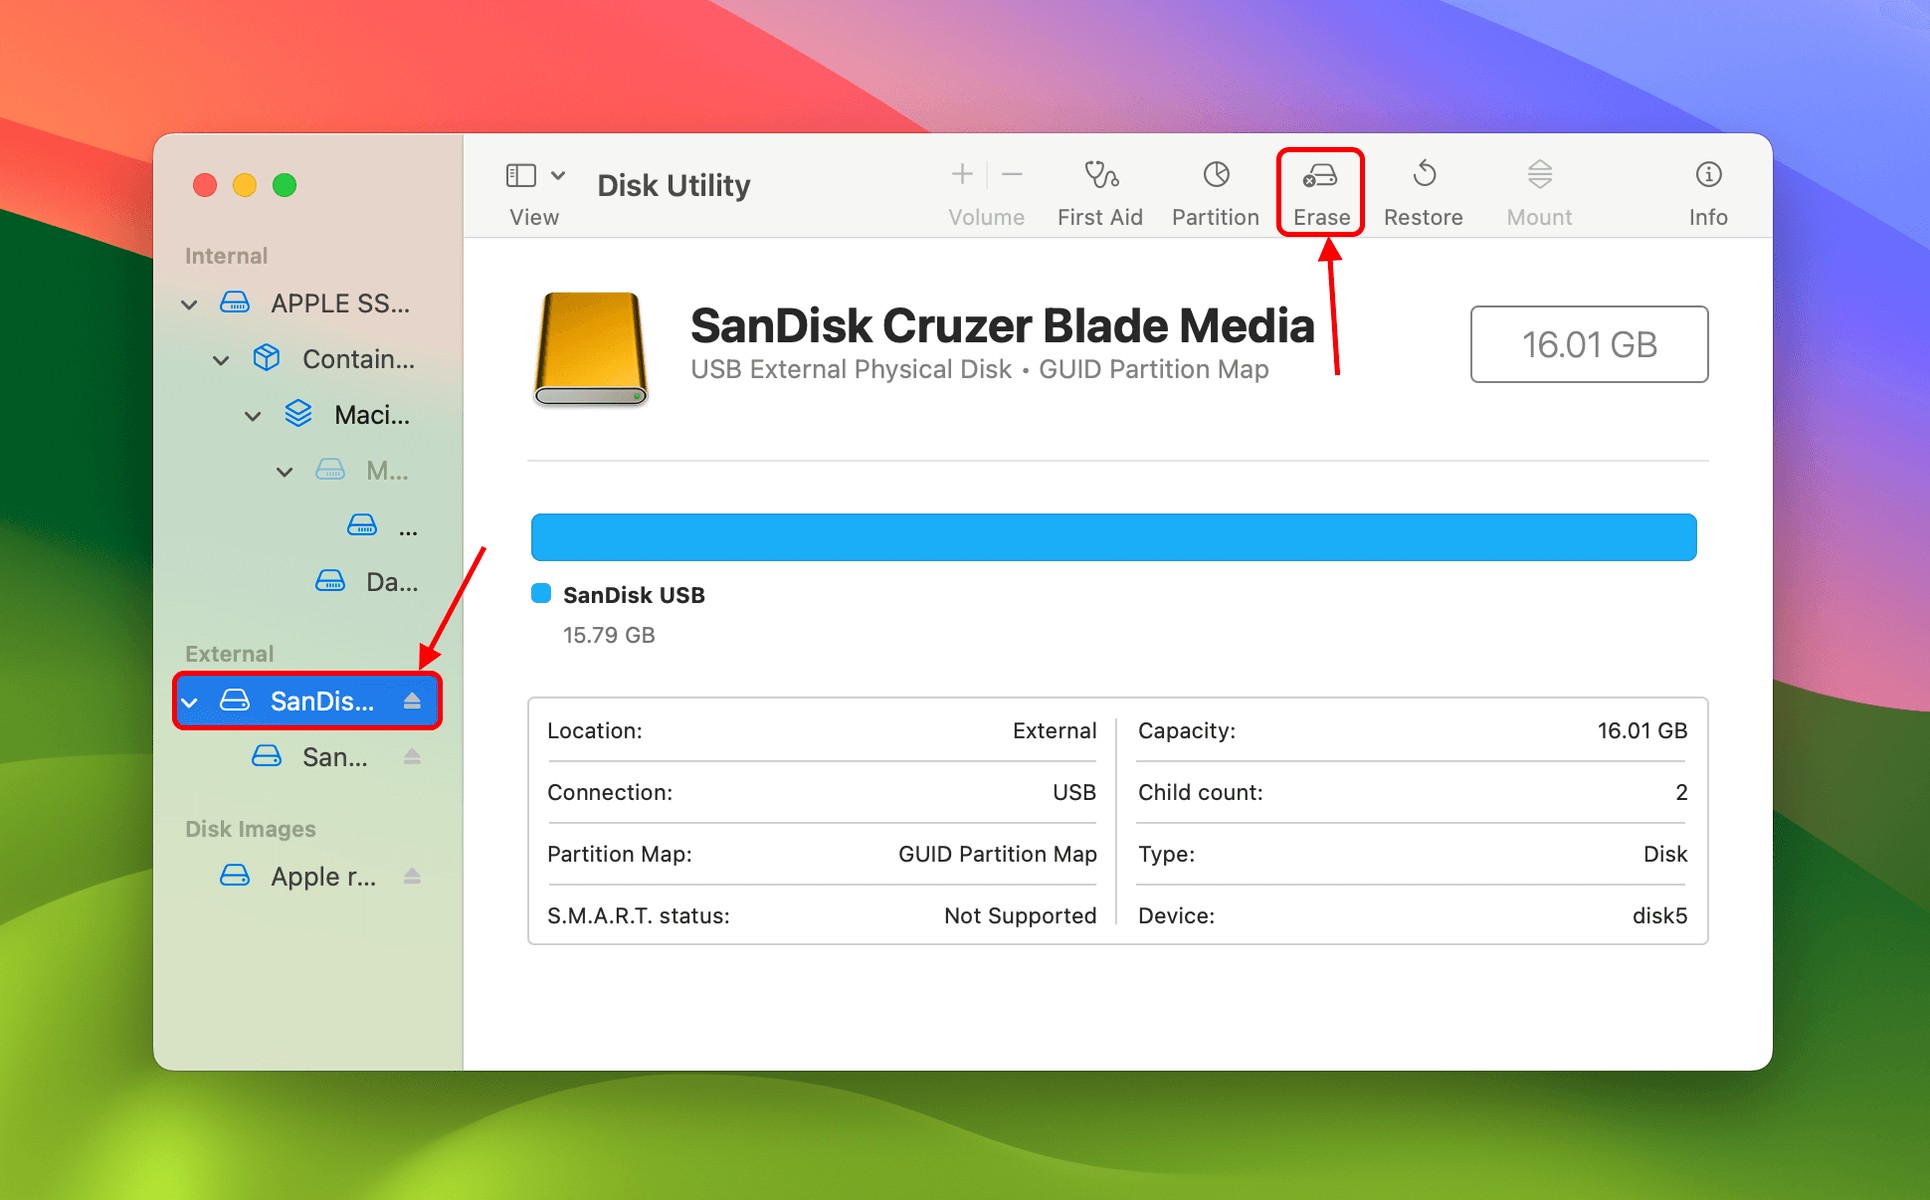
- Connect your corrupted USB to your Mac using the appropriate adapter. Then, launch Disk Utility (Finder > Applications > Utilities).
- On the left sidebar, select your USB drive. Then, click Erase at the top of the window.
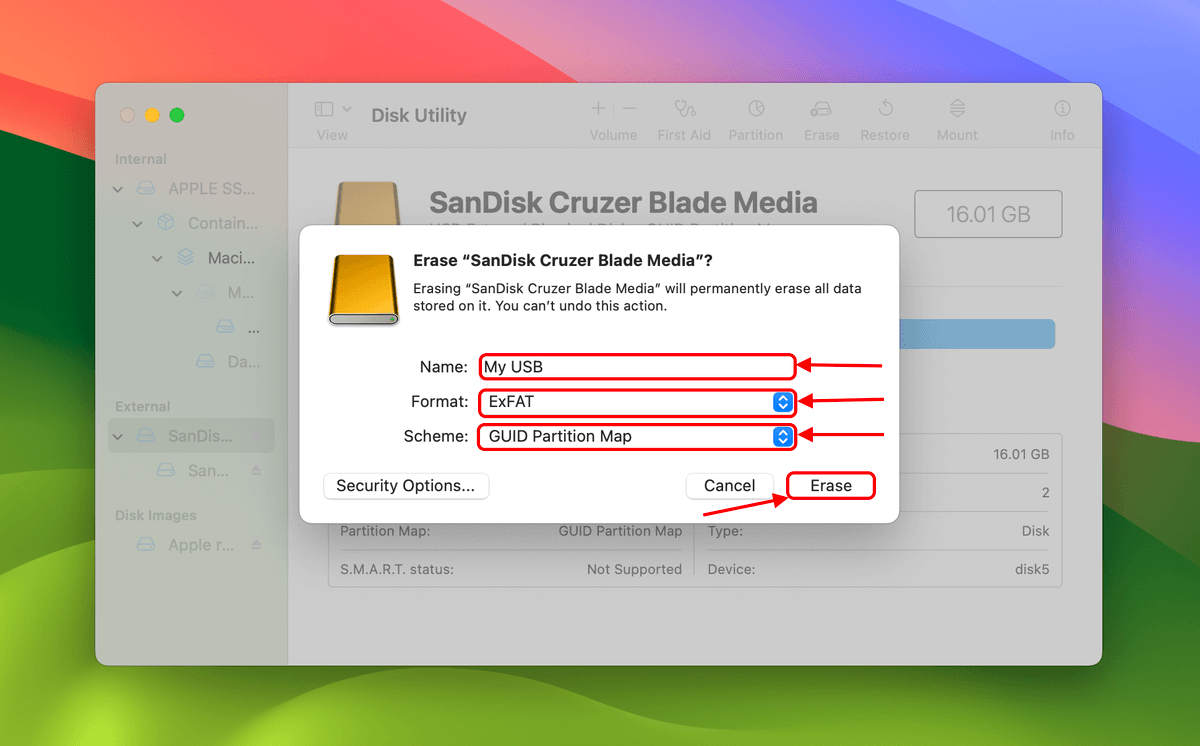
- Name your USB and choose a Format and Scheme (we recommend ExFAT and GUID Partition Map). Click Erase to confirm the action.

Method 4: Contact Data Recovery Service
If your USB flash drive has been physically damaged, you were unable to recover files, and none of the above methods worked for you, your best option is to send your drive to a professional data recovery service.
These are teams of data recovery specialists with advanced tools and facilities that can carefully extract missing data from damaged drives. If you’ve never hired a data recovery service before, here’s what to look for:
- ISO Class 5 Cleanroom – Make sure the service you hire has an ISO 5 Class Cleanroom (or Class 100 Cleanroom). This is a special laboratory designed to be free of particles that can damage the exposed internal components of the drives being recovered.
- No Data – No Charge guarantee – Find a recovery service that only charges you if they are able to restore the files you need.
- Free Phone Estimate – Some services will be able to give you a rough estimate of how much the service will cost you based on the information you give them.
Using Terminal Commands to Repair a Corrupted Flash Drive on Mac
An alternative to using First Aid in Disk Utility is to use the Terminal app. Many users who are comfortable with the command line prefer using Terminal to perform repair and maintenance tasks on their Macs, especially if they’re performing multiple operations (since you can do them all in one place).
However, the commands perform exactly the same function as First Aid – so if you’ve tried that method already, there’s no reason for you to do it this way. It might be intimidating if this is your first time using Terminal commands but the repair process is really simple. Follow the instructions we’ve laid out for you below.
To repair your corrupted flash drive using the Terminal app:
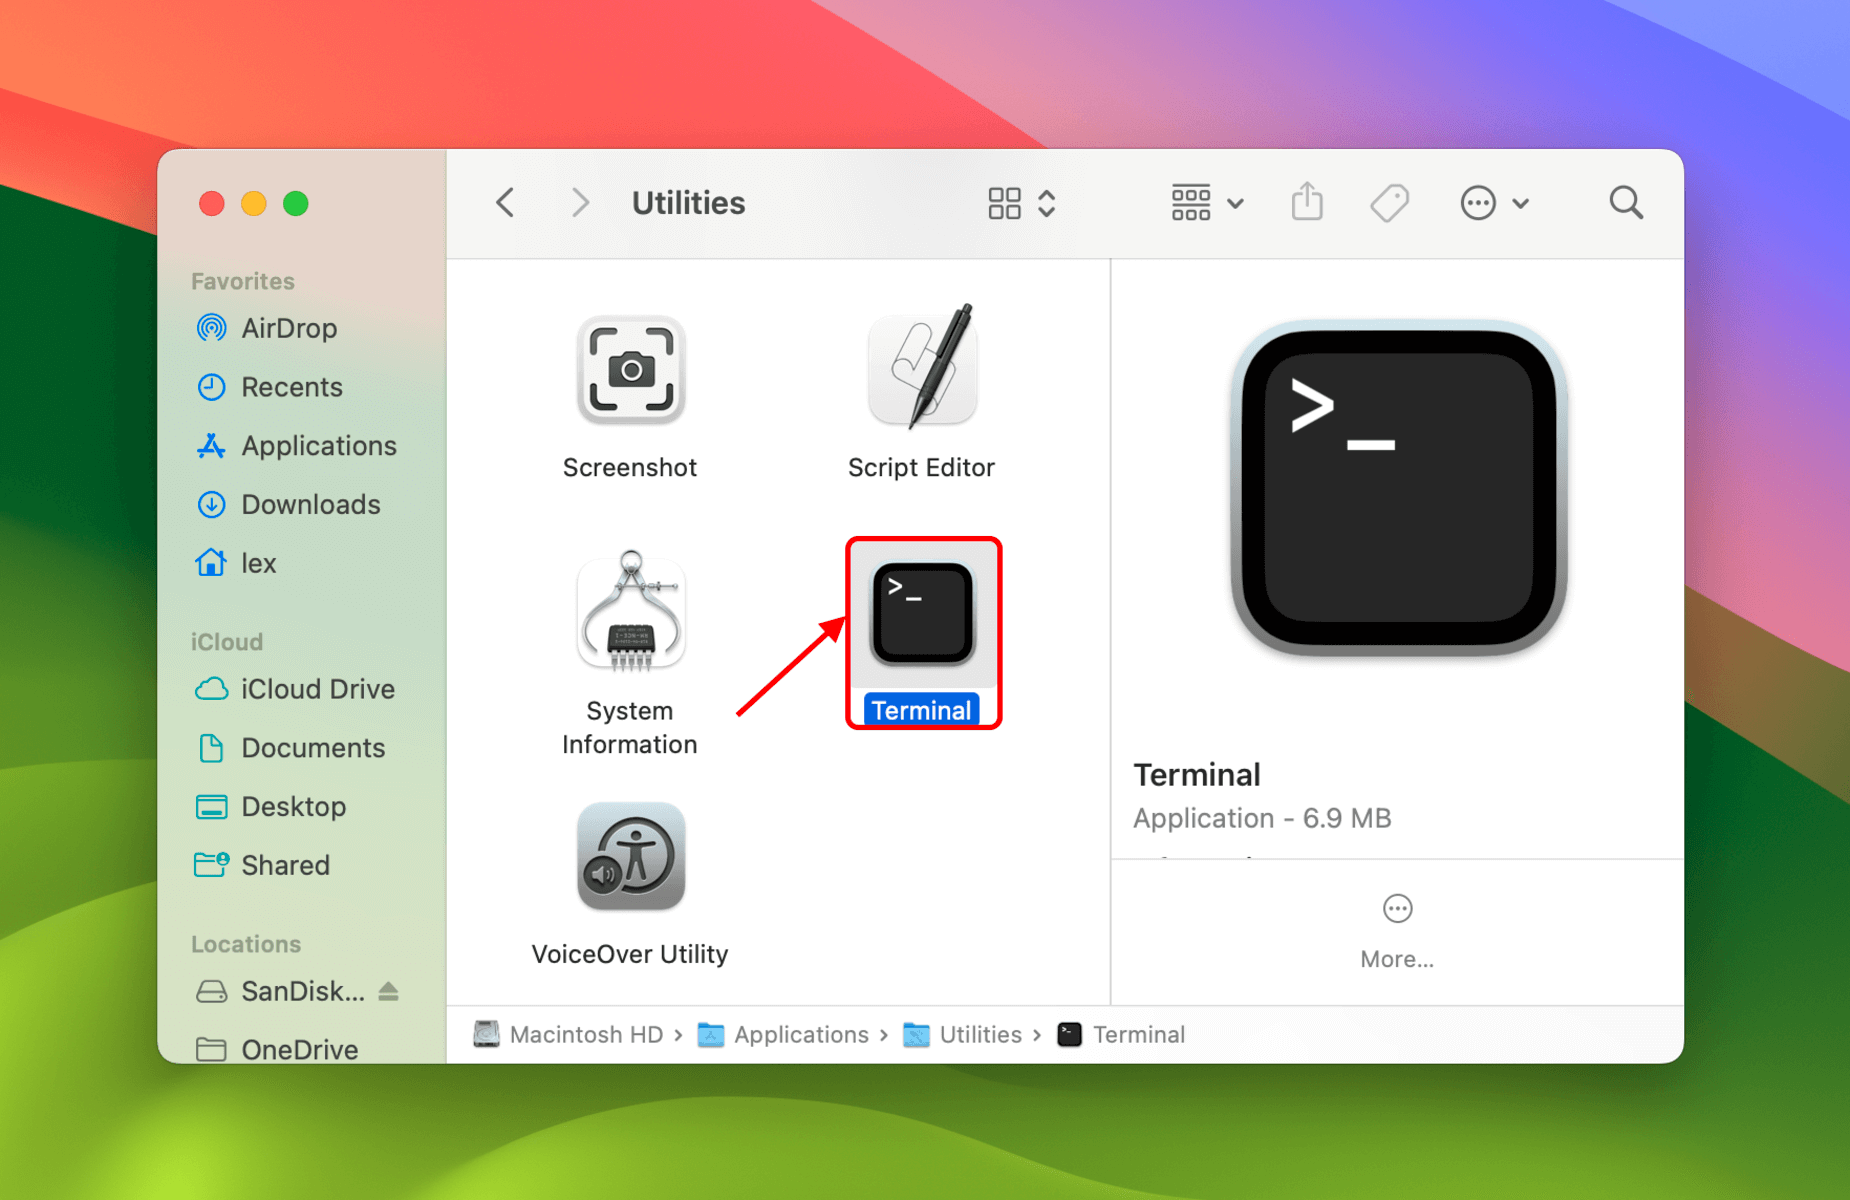
- Connect your corrupted USB to your Mac using the appropriate adapter. Then, launch Terminal (Finder > Applications > Utilities).
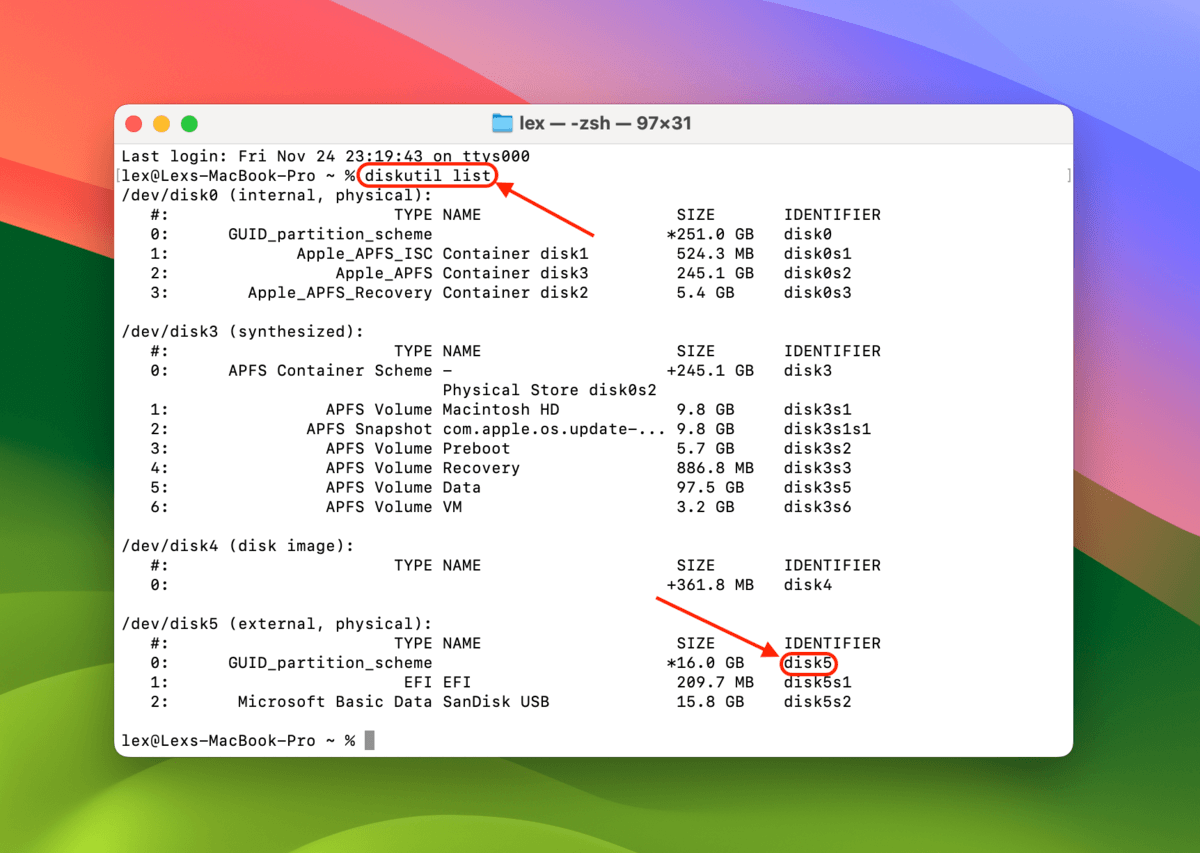
- Type the following command and hit Return:
diskutil list
Note your USB’s identifier.
- Type the following command and hit Return:
diskutil repairDisk diskX
Replace diskX with your own USB’s identifier. When prompted, type Y and hit Return to confirm the action.


Is It Safe to Use a Corrupted Flash Drive After Repair?
Once you’ve gone through the DIY recovery methods in the last section, one more question remains: is it safe to use? We answer that question for every outcome in the table below.
| Scenarios | Is it safe? |
| You determined the cause of corruption and fixed it using the methods in this article | Use your USB as a backup drive for non-critical files. Do not use it as a primary storage device and for important data. |
| You were unable to identify the problem and the same issues reoccur even after troubleshooting (e.g. You cannot open files). | Stop using the flash drive. It’s likely damaged beyond repair. We suggest that you send it to a local electronics recycler to dispose of it responsibly. |
| The USB flash drive is physically damaged | A physically damaged flash drive is no longer usable and may even cause damage to the devices it connects to. Stop using it and dispose of it responsibly. |
FAQ
To repair a USB drive on a Mac using the Terminal app:
- Launch Terminal and execute the diskutil list command.
- Note your flash drive’s identifier.
- Execute the diskutil repairDisk diskX command. Replace diskX with your flash drive’s identifier entry.
- When prompted, enter the Y key and press Return to confirm the repair order.