
Table of Contents
Your internal or external Mac hard drive is a vault that stores vital information, including documents, photos, videos, and other essential files. Unfortunately, this vault can’t be easily accessed from a PC because Apple’s proprietary file systems (HFS, HFS+, and APFS) are not supported by the Windows operating system.
This can be a huge problem when your Mac stops working or you don’t have access to it, and the only option you’re left with is to recover data from your Mac hard drive to a PC. Fortunately, several solutions do exist, and this article explains how they can help you save your data.
Can You Recover a Mac Hard Drive on a PC?
| 🗂️ File System | 🍏 Compatible with macOS | 🪟 Compatible with Windows |
|---|---|---|
| HFS | Yes | No (requires software) |
| HFS+ | Yes | No (requires software) |
| APFS | Yes | No (requires software) |
| NTFS | Yes (read-only) | Yes |
| FAT | Yes | Yes |
| FAT12/16/32 | Yes | Yes |
| exFAT | Yes | Yes |
Yes, you can recover data from a Mac hard drive on a PC, but it may require the use of specialized software that can read Apple’s proprietary file systems, namely:
- HFS (Hierarchical File System): Introduced in 1985, HFS was the primary file system for Macintosh computers. The file system has now been replaced by more advanced file systems.
- HFS+ (Hierarchical File System Plus): HFS+ was introduced in 1998 to address the limitations of HFS with features like Unicode support and journaling.
- APFS (Apple File System): APFS is the newest file system for Mac computers, introduced in 2017 with the release of macOS High Sierra. This file system is fully optimized for solid-state drives (SSDs) and is now the default file system across all Apple platforms.
These three file systems are not natively supported by the Windows operating system—similar to how macOS doesn’t provide native read/write support for Microsoft’s NTFS file system.
However, HFS, HFS+, and APFS are not the only file systems Macs can recognize. Mac users often format external hard drives and other portable storage devices using the FAT family of file systems:
- FAT (File Allocation Table): Developed in 1977 for floppy disks and later adapted for other storage devices, FAT was originally introduced with 8-bit table elements, which quickly stopped being adequate, requiring three major variants to be released.
- FAT12/16/32: These are specific versions of the FAT file system, with each number indicating the size of the table elements in bits. These days, FAT32 (called MS-DOS FAT by macOS) is by far the most popular variant because it can store files up to 4 GB large.
- exFAT: exFAT is a modern version of the FAT file system, designed to address the limitations of FAT32. It was released in 2006, and it supports files up to 16 EB large.
All of these variants of the original FAT file system are supported by both macOS and Windows, so any storage device that uses them, including a Mac HDD or SSD, can be recovered on a PC without the need for specialized software—if your drive is healthy and readable, of course.
How to Recover Data from a Mac Hard Drive to a PC
Let’s now go through the steps for recovering data from a Mac system or external drive, both without and with a working Mac.
Situation 1: Recovering Data from a Mac System or External Drive Without a Working Mac
If your Mac won’t boot and you don’t have another Mac that you could connect your drive to, then your best option is to recover Mac data on a Windows PC. As explained in the previous section, you will need to install third-party software if the drive uses a Mac-specific file system like APFS (the default file system of Mac system drives) because Windows can’t natively read Mac file systems.
Step 1. (System Drive Only) Remove the Hard Drive from Your Mac

Photo by PxHere
Before you can recover data from a Mac system drive, you need to remove it from your Mac. Some Macs, such as the Mac Pro make this extremely easy, but there are also Macs that make this impossible, such as the new Apple Silicon MacBook Air models, which integrate storage as part of the motherboard.
We recommend you follow detailed hard drive removal instructions published on a reputable how-to website like iFixit. For example, here’s how to remove the system hard drive from the MacBook Pro.
Step 2. Connect Your Mac Hard Drive to Your Windows PC

Photo by Ravenperch
To recover data from your Mac hard drive on Windows, it’s necessary to connect the drive to your Windows PC. This can be done in a number of different ways, depending on if you want to connect a system drive or an external drive.
Connect a System Drive
System drives are designed to be connected directly to the motherboard via the SATA or PCIe interface. If you have a desktop computer with a free SATA or PCIe slot, then you can connect the Mac system drive directly to the motherboard. This video tutorial explains how to do so.
But what if you only have a Windows laptop with USB or USB-C ports? In that case, you have the following options:
- You can insert the drive into a USB drive enclosure and then connect the enclosure to your PC using a USB cable.
- You can purchase a SATA to USB adapter and connect the SATA interface of your hard drive to the adapter before plugging the USB end into your Windows PC.
- You can get a hard drive docking station and simply insert your hard drive into it just like you insert a memory card into a memory card reader.
Connect an External Drive
External hard drives are much easier to connect because most of them already come with a USB or USB-C cable, so the only thing you need to do is plug the cable into an available USB or USB-C port on your PC.
If your PC has only, let’s say, USB-C ports, but your external hard drive comes with a full-size USB cable, then you can purchase a hub or an adapter to bridge the connection.
Step 3. Recover Your Data
Now we’re getting to the juicy part. But before you recover files from your Mac hard drive with Windows tools, you should verify that the Windows operating system can recognize the drive without any issues. To do that:
- Press Win + X on your keyboard.
- Select the Disk Management option.
- See if your Mac hard drive is listed in the Disk Management tool.
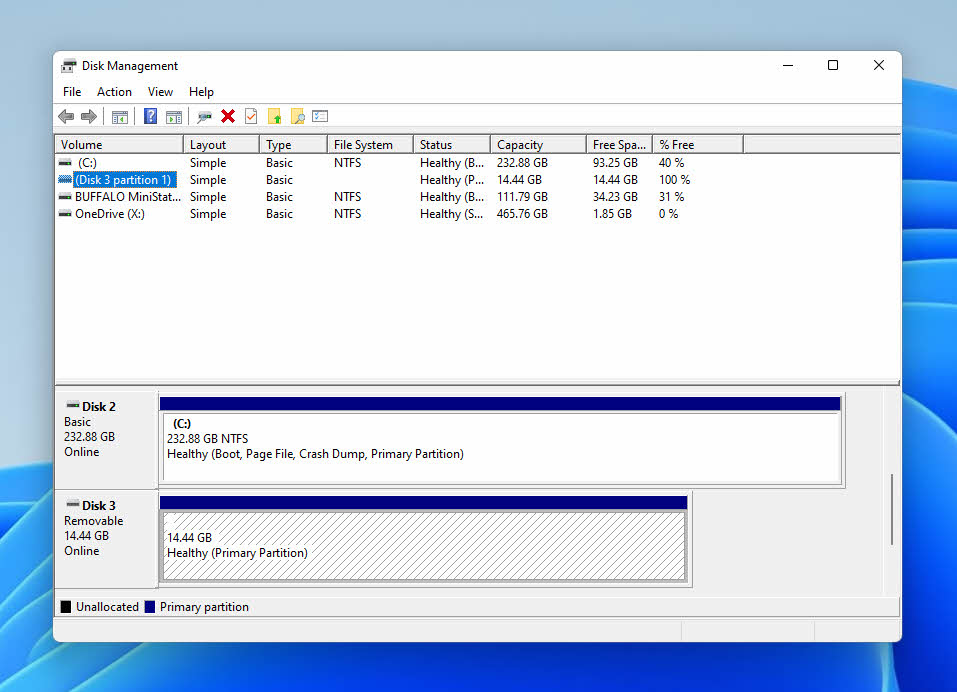

If your hard drive is listed, then it has been successfully recognized, and you should be able to recover data from it without any issues. If it isn’t listed, then you need to check the connection and possibly try a different connection method.
Option 1: Scan Your Drive Using Recovery Tool
Our top recommendation for recovering Mac hard drives on Windows is a data recovery application called Disk Drill (you can read our full review here) because it brings to the table several important advantages that make it a great solution for the task at hand, namely:
- Compatibility with all Mac and Windows file systems.
- The ability to recognize storage devices that are not listed in File Explorer.
- The inclusion of a deep scanning algorithm that can recover even deleted or otherwise inaccessible files, including Mac-specific file formats.
- Extensive file filtering and preview capabilities that make it easy to recover only what you really need, such as specific images and videos.
- An intuitive user interface that makes the data recovery process straightforward.
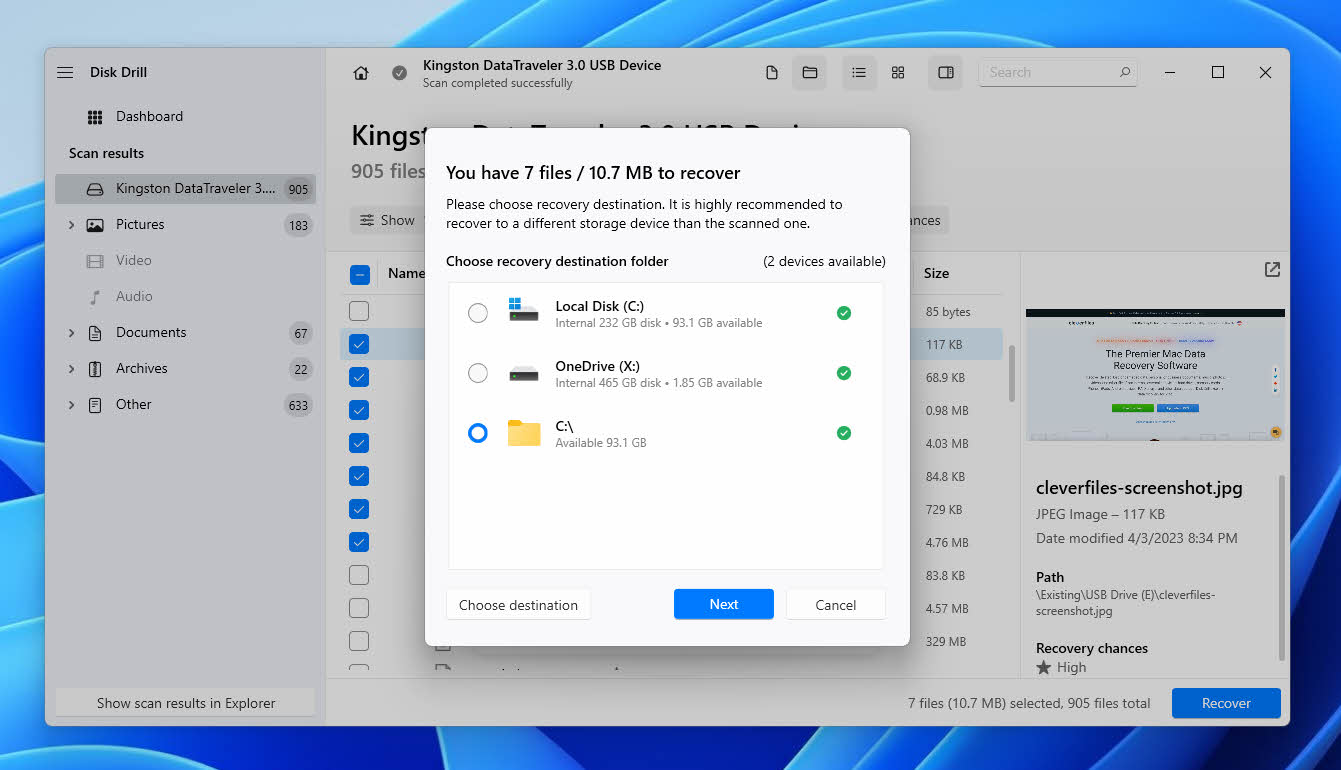
These and other advantages make Disk Drill one of the best data recovery applications for Mac and Windows. To use Disk Drill to recover data from your Mac hard drive on a Windows PC, follow these steps:
- Download Disk Drill from its official website and install it.
- Launch Disk Drill and scan the Mac hard drive.

- Click Review found items and select your lost files.

- Click the Recover button.

- Choose a recovery destination and confirm.


Option 2: Use APFS for Windows to Access an APFS Drive
APFS for Windows by Paragon Software is a commercial application that enables Windows users to read and write files on APFS-formatted storage devices. One of its biggest advantages is the ability to auto-mount hard drives without any user interaction. The application comes with a 10-day free trial, so you should be able to follow the steps below without purchasing a license:
- Download APFS for Windows from its website.
- Install the application on your Windows PC.
- Connect your Mac hard drive to your Windows PC.
- Access the drive using File Explorer just like you would any other storage device.


Option 3: Use HFSExplorer to Access an HFS/HFS+ Drive
HFSExplorer is a free application that can read any HFS and HFS+ Mac drive on a PC. The application hasn’t been updated for the last two years, but it still runs fine even on Windows 10 and Windows 11. To transfer your files with its help, you need to:
- Install Java SE Runtime Environment on your Windows PC.
- Download HFSExplorer from its website.
- Launch the downloaded installer and complete the step-by-step installation process.
- Launch HFSExplorer.
- Open the File menu and select the Load file system from device option.
- Click Autodetect to load your HFS/HFS+ partition automatically or select it manually.

- Extract files from your Mac drive.

Situation 2: Recovering Data from a Mac Drive With Access to a Mac
Do you have access to a working Mac? Then you don’t need to remove your Mac drive just to transfer files from it to a Windows PC. Instead, you can use one of the recovery options below.
Option A: Transfer Data from Your Mac to PC Using an External Storage Device
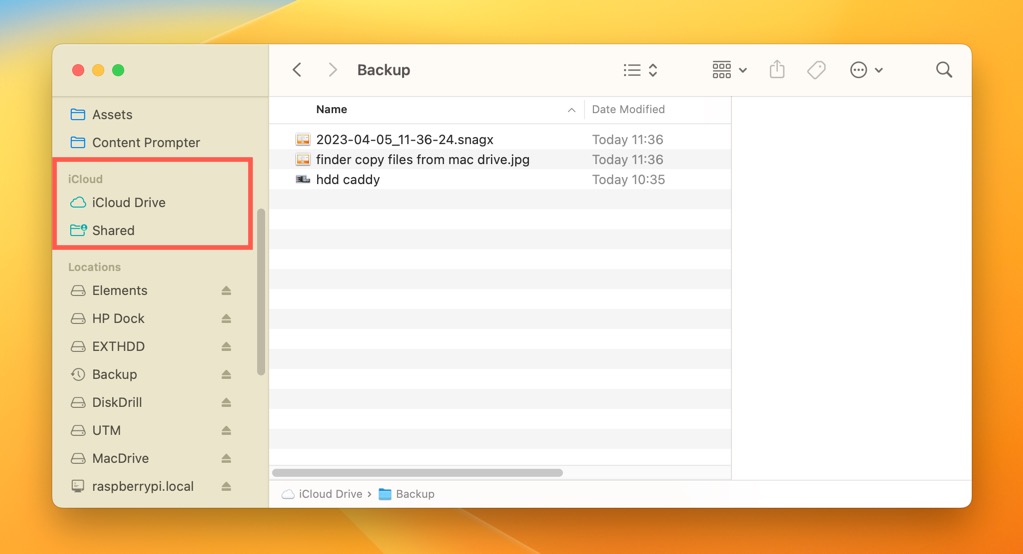
An external storage device, such as a portable HDD or USB flash drive, can be used to easily transfer data from a Mac computer to a PC. The only condition is that the external storage device must be formatted using a file system that is compatible with both macOS and Windows, such as FAT32 or exFAT. Once this condition is met, you can do the following:
- Connect the external storage device to your Mac.
- Transfer files from your Mac hard drive to the external storage device using Finder.
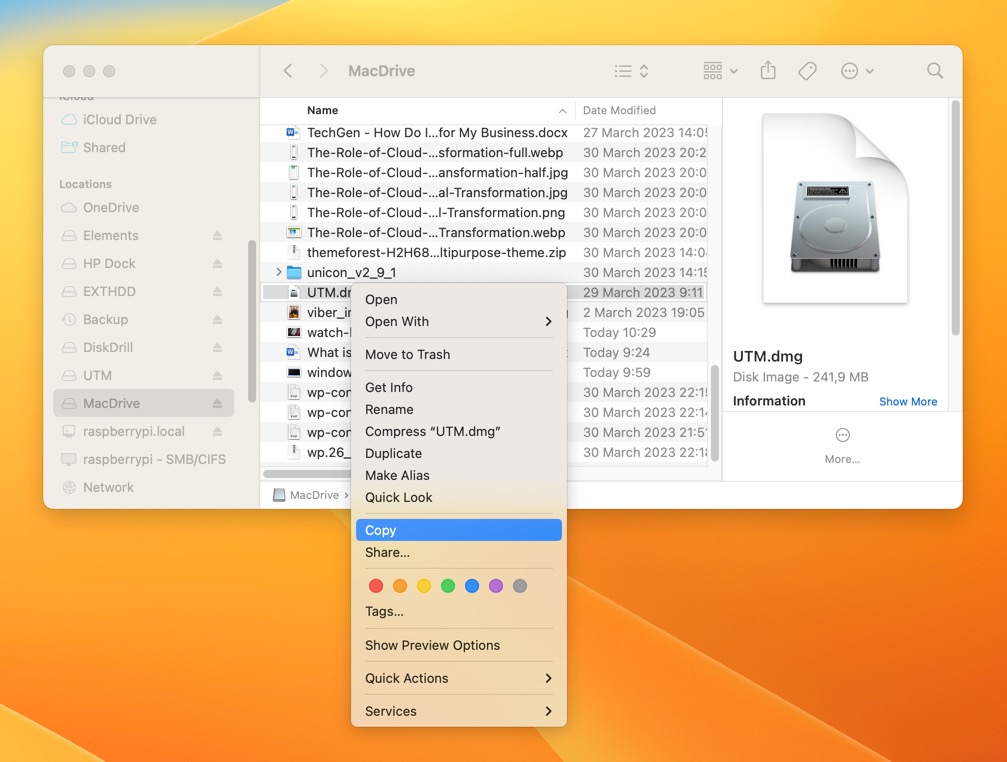
- Safely disconnect the external storage device and connect it to your PC.
- Transfer files from the external storage device to your Windows PC using File Explorer.

If some of the files you want to transfer from your Mac to PC are not available because they’ve been deleted, then you can attempt to recover them from the external hard drive directly on your Mac.
Option B: Relocate Data from Mac Hard Drive to PC Using File Sharing
Both macOS and Windows support the SMB network file-sharing protocol. This protocol makes it possible for a Mac computer to send files directly to a Windows PC across a local network. To use SMB file sharing, follow the detailed instructions on Apple’s website.
Once file sharing is enabled on your Mac, you can go to your Windows PC, and do the following:
- Launch File Explorer.
- Navigate to the Network section.
- Select your Mac.
- Enter your account name and password.
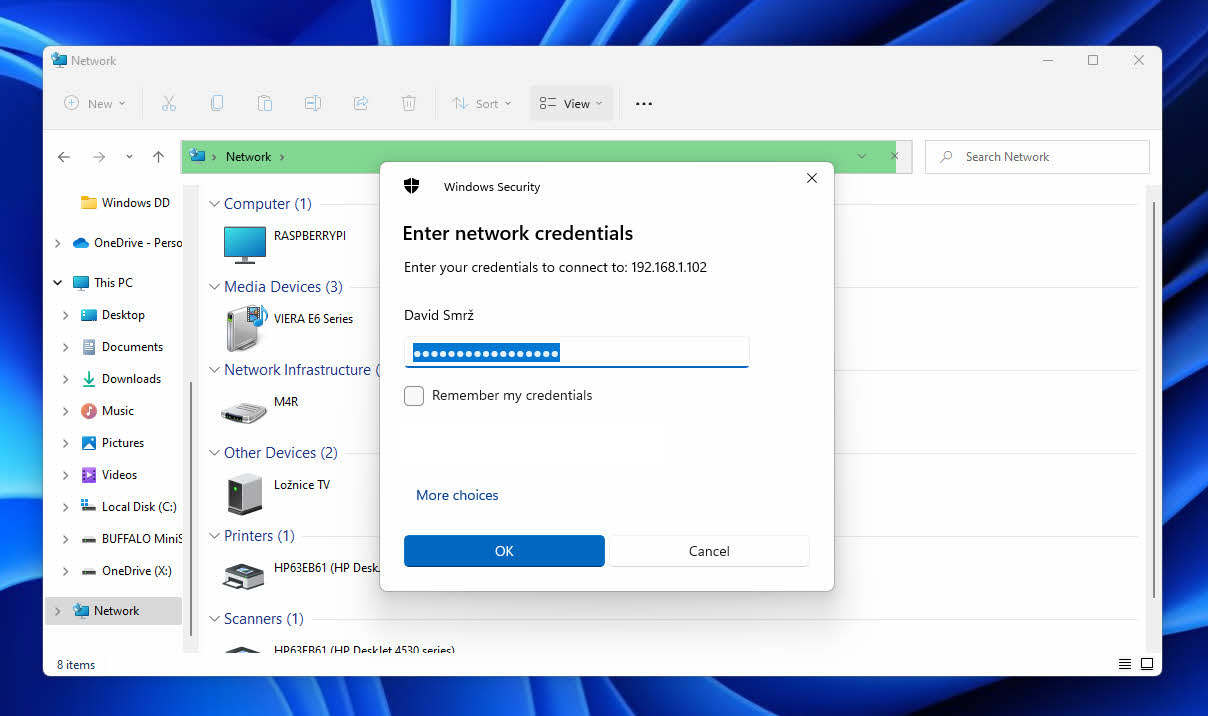
- Copy your Mac files to a safe location on your PC.

Option C: Transfer Data Using Cloud Storage
Using cloud storage is another convenient way to transfer data between your Mac and Windows PC. There are many cloud storage solutions available, such as Google Drive, Dropbox, Microsoft OneDrive, and Apple’s own iCloud.
Regardless of which cloud storage solution you decide to use, the process is always the same:
- Log in to the cloud storage service from your Mac.
- Upload your Mac files.
- Log in to the same cloud storage service from your PC.
- Download your Mac files.


FAQ
You can read a Mac hard drive on Windows using data recovery software like Disk Drill or with the help of HFS/HFS+ and APFS file system browsers like HFSExplorer and APFS for Windows by Paragon Software, respectively.
To transfer files from a Mac hard drive to a Windows PC:
- Remove the hard drive from your Mac if necessary.
- Connect it to your Windows PC using a USB cable or SSD/HDD adapter.
- Scan the Mac hard drive using Disk Drill for Windows.
- Select the files you want to transfer.
- Transfer them to a different drive.
If your Mac external hard drive is designed to connect via a full-size USB or USB-C cable, then you should be able to just plug it into a corresponding port on your PC. Just keep in mind that only FAT and exFAT drives can be accessed from Windows without additional software.
You can extract files from a Mac hard drive on a Windows PC using Disk Drill, a data recovery application that supports all Mac-specific files systems (HFS, HFS+, and APFS), as well as Windows (NTFS) and Linux (EXT2/3/4) file systems.
Conclusion
Recovering data from a Mac hard drive on Windows is not just possible but also relatively painless. The process requires specialized software only when dealing with Apple’s proprietary file systems, and the solutions we recommend are all easy-to-use and either free or affordable. These tools and techniques help bridge the gap between Mac and Windows systems, ensuring that you can access and recover your valuable data with minimal effort, regardless of which operating system you currently have access to.