

Table of Contents
Quicktime is the default video player for macOS users. It provides ease in accessing your existing media files and making new audio, video, and screen recordings.
Like any other app, QuickTime can experience glitches, which can cause deleted or unsaved QuickTime recordings. This is an inconvenience, especially if you are recording something important, lengthy, or impromptu, and the application crashes, shuts down, or malfunctions. This article will provide solutions to recover your deleted or unsaved QuickTime recordings on Mac.
Methods for Restoring Unsaved or Deleted QuickTime Recordings on a Mac
If you have deleted, unsaved, or lost essential screen recordings in QuickTime on your Mac, don’t worry because there are several solutions to restore them.
Read on below to know more.
Method 1: Use Disk Drill to Recover Deleted QuickTime Recordings
Disk Drill is one of the best data recovery programs for Mac. This software has become popular among many tech enthusiasts due to its user-friendly interface and simplicity in recovering a deleted QuickTime recording in just a few clicks.
If you have a more modern Mac with an SSD as the system drive, you should quickly restore the data before TRIM is triggered. However, even if you don’t, it’s still a good idea to install Disk Drill and check which files can be recovered, because it’s completely free.
We wrote a detailed review of Disk Drill, and here are the steps to retrieve your deleted QuickTime recordings using Disk Drill.
- Download Disk Drill from their official website.
- Then, double-click the downloaded installation file, drag and drop the Disk Drill icon to your Applications folder, and wait until all data is copied.
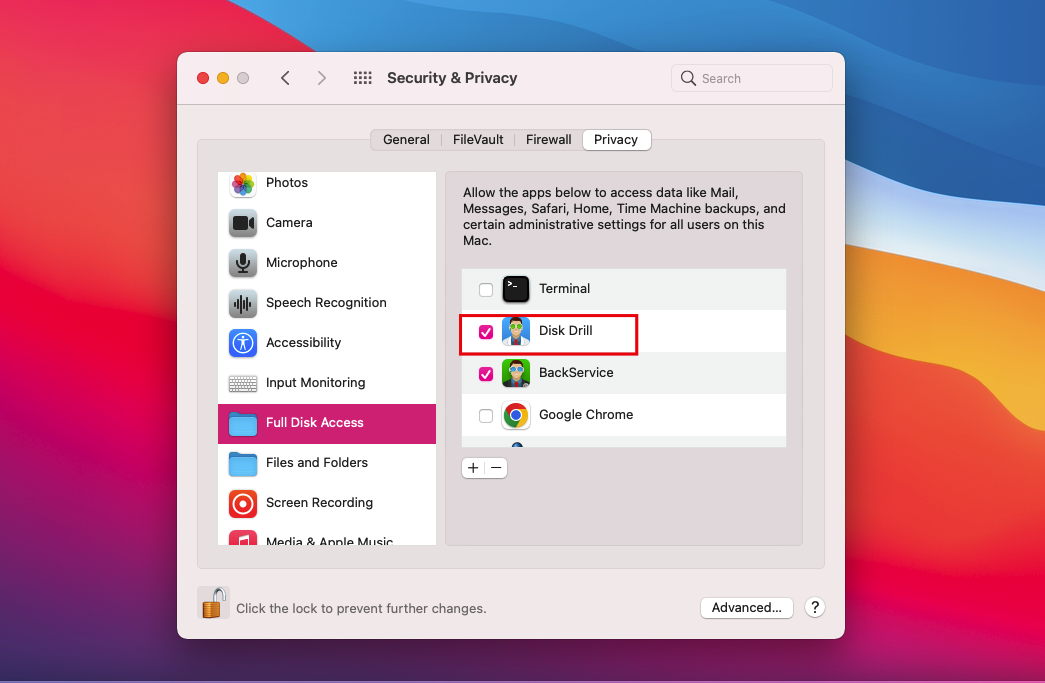
- In your Applications folder, double-click the Disk Drill icon. Click the Open button to confirm the app’s launch. Permission to grant full disk access will show up on your screen. Grant this permission by accessing Privacy under Security & Privacy in your System Preferences and dragging the application into the Full Disk Access list. You can only grant this permission once, so this method is unnecessary if you already use Disk Drill.
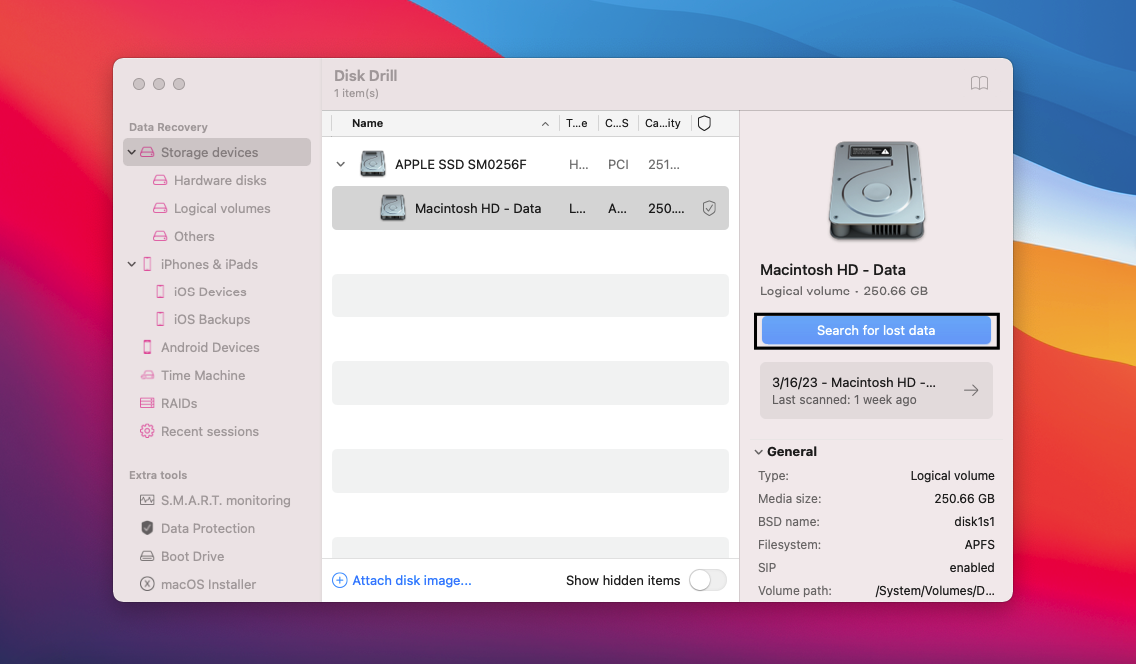
- On the homepage of Disk Drill, select the storage device you want to scan to recover your deleted QuickTime recordings.
- Next, hit the Search for Lost Data button at the bottom right.
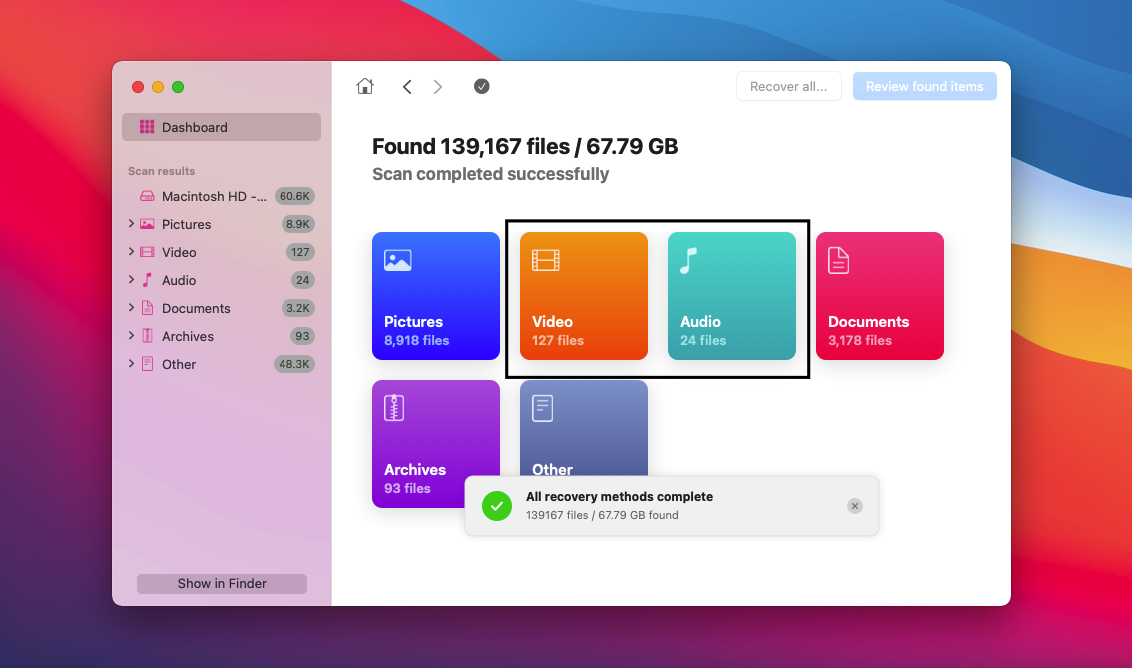
- Once the scanning is done, Disk Drill will group the files into different categories. You can select either Video or Audio since you are looking for deleted QuickTime recordings.
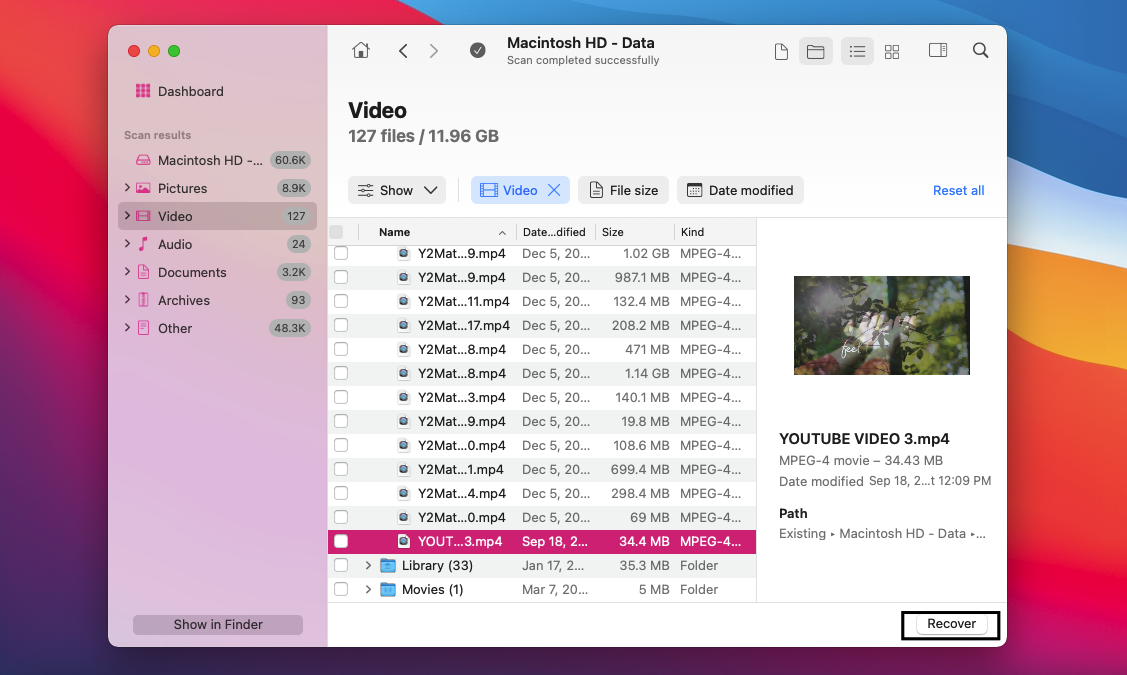
- Look for the file on the list and select the file that you want to recover. You have the option to preview the file first by clicking the eye button beside the file name.
- Recover your files by selecting the files and clicking the Recover button. Choose the desired location of your newly recovered files, and click OK.
It is advisable not to save your recovered files in the location where you lost them. Instead, find another safe location for the file to prevent recurring data loss.
Method 2: Recover Unsaved QuickTime Recordings from AutoSave Location
Fortunately, macOS has the AutoSave feature, which automatically saves your files whenever you accidentally lose your QuickTime recordings.
If this is your case, here are the steps to recover unsaved QuickTime recordings on Mac from AutoSave Location. Take note that recovering your unsaved QuickTime recordings depends on how you lose them.
If your QuickTime recordings are unsaved due to technical errors such as the application crashing or your battery running out, a temporary file is often saved. Most of the time, these files are recoverable, and you can find unsaved recordings by accessing the following:
- Click Go on the Apple menu bar, then select Go to Folder.

- Copy and paste this address:
~/Library/Containers/com.apple.QuickTimePlayerX/Data/Library/Autosave Information/
and click Go.

- You can now locate the AutoSave Location of the QuickTime recordings stored on your Mac.
- On your recording file, right-click and choose Open With > QuickTime Player.
- Save your screen recording by clicking File and Save. You can rename the unsaved QuickTime player document and hit Save to recover the unsaved QuickTime audio recording or recover deleted QuickTime files on Mac.
If you accidentally clicked “Don’t Save” instead of “Save”, this means that you discarded your file for good. Hence it is already impossible to recover QuickTime files using this feature at all.
Method 3: Restore QuickTime Recordings from Temporary Folder
Temporary Folder is another method of retrieving deleted QuickTime Recordings. The Temporary Folder serves as temporary storage for your unsaved files and for your cache files. These will still be accessible whenever you close the app or even restart your Mac.
Here are the steps to recover deleted QuickTime recordings using the temporary folder:
- Open Finder > Applications > Utilities. Then, double-click Terminal. You can also open Terminal by simply hitting the command + space keys and typing Terminal on the search bar.
- Input “open $TMPDIR” and run the command line by hitting Enter key.
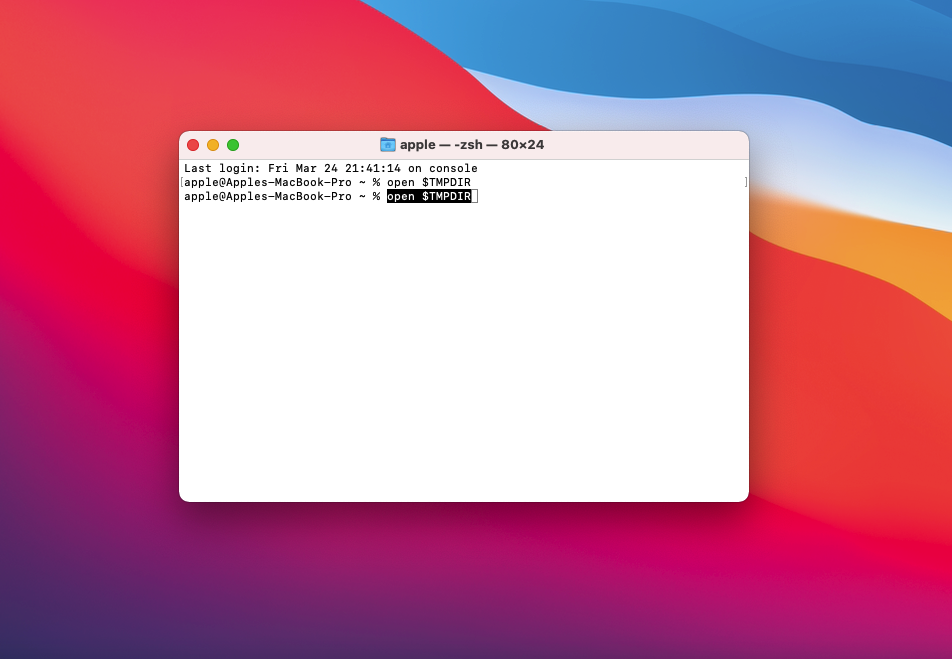
- You are now navigating to the Temporary folder, where you can access all the Temporary Items saved on your device.
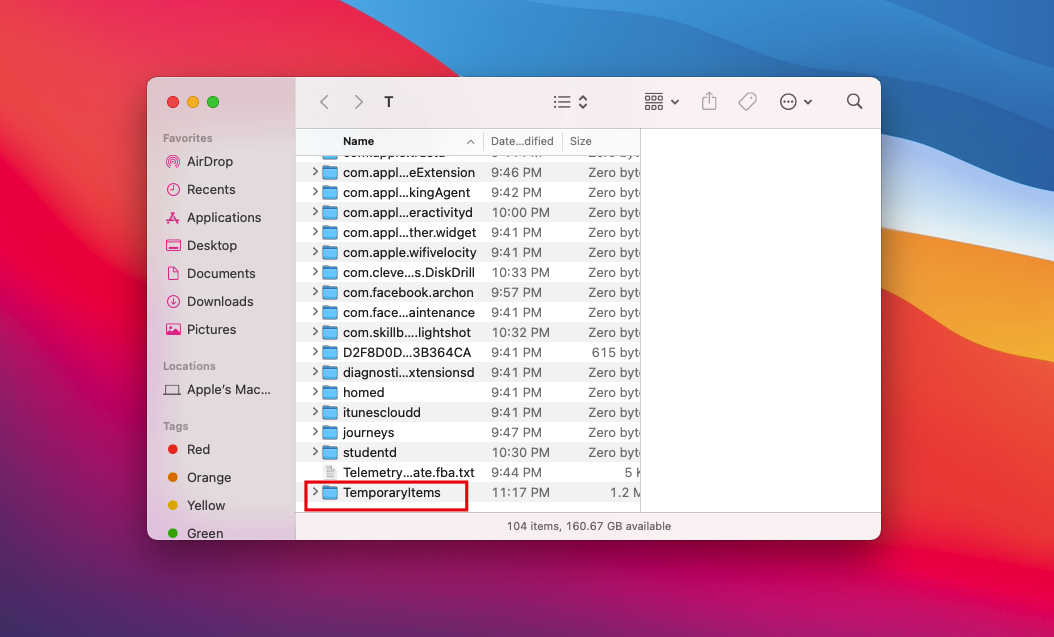
- Go to TemporaryItems folder and check the location of your unsaved QuickTime recording.
- Open with QuickTime Player, save it into a designated folder, or copy and paste it to a secured location.
Method 4: Restore QuickTime Recordings using Time Machine Backup
Time Machine is one of the most powerful data recovery tools on macOS. If you regularly back up your Mac using Time Machine, you can still recover your deleted QuickTime recordings. In Time Machine, aside from retrieving accidentally deleted recordings, you can also restore the previous versions of the file.
Below are the instructions on restoring QuickTime recordings from a Time Machine backup.
- Connect the Time Machine backup drive to your Mac. If you use an internal drive to back up your Mac, skip this step.
- Launch Time Machine from the menu bar and select Browse Time Machine backups.

- Find the folder where the deleted video was originally located using the sidebar.
- Select the backup version you want to restore using the arrows or timeline on the right.
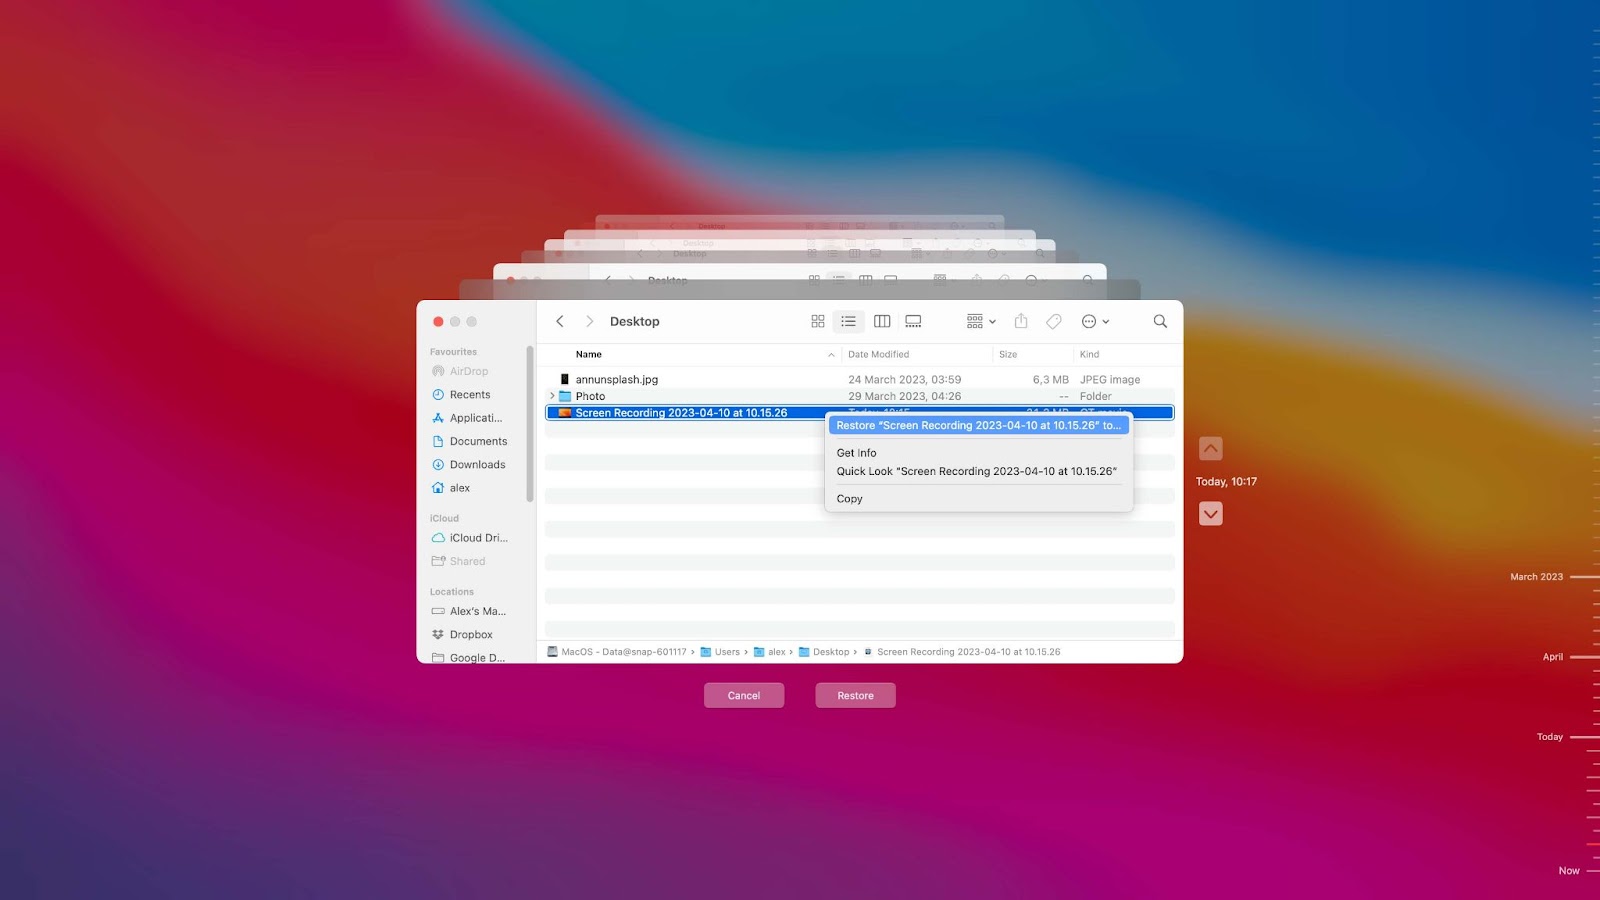
- Click on the QuickTime video you want to recover and click Restore.
- Wait for the restore process to complete and check the original location for the restored video. Alternatively, if you don’t want to overwrite the current version, you can also select Restore To.. and choose a different folder.
FAQs
By default, QuickTime screen recordings don’t automatically save. But you have the option to set it to save automatically.
To do so, go to the QuickTime Player menu and select Preferences. In the Preferences window, click on the Recording tab and select Save recorded files to, then choose a location to save your recordings automatically.
If the video recording is not permanently deleted, you can still retrieve it via Trash, AutoSave, or Temporary Folders. On the other hand, if the video recording was permanently removed from the device, one of the best applications to recover deleted videos is the Disk Drill.
- Download Disk Drill and follow the on-screen instructions.
- Launch Disk Drill, select the drive, and click Search for lost data.
- Click Review found items.
- Preview by clicking the eye button beside its file name.
- Click the Recover button.
- Save the file and click OK.
Conclusion
Losing files can happen to anyone. Fortunately, there are different ways to recover unsaved or deleted QuickTime recordings on a Mac. As you can see, the methods are relatively easy. To prevent future data loss, make sure to do regular backups and make use of QuickTime’s Autosave feature.