

Table of Contents
When you connect your SD card to your computer, do you get errors, disappearing data, or gibberish file names? Or is your Mac struggling to recognize your memory card when it never had a problem before? Bad news: your SD card is probably corrupted. Worse news: your data is definitely at risk.
How to Know if Your SD Card Is Corrupted?
SD card corruption can happen due to both physical damage and logical damage. There are a number of symptoms that can tell you which one it is. We’ve enumerated them all in the table below, along with jump links to different methods to repair your corrupted SD card on Mac.
| Signs of Physical Damage | Reasons & Symptoms | Solutions |
| Your Mac suddenly stops recognizing the SD card |
|
|
| Unwanted physical influence (impact of heat, water or other mechanical damage) | ||
| Power outages | ||
| Signs of Logical Damage | Files start disappearing or incorrect file names are displayed | |
| You get read and write failures when using the device | ||
| The SD card does not show any files. | ||
| You have performed and interrupted the formatting process | ||
| Malware or virus infection | ||
| You started getting error messages |
How to Recover Data from Corrupted SD Card on a Mac
You can recover data from a corrupted SD card by yourself using a special tool called data recovery software. They can extract data directly from the SD card’s file system and can use data fragments it finds to reconstruct corrupted files.
For this section, we recommend 2 well-known apps: (1) Disk Drill and (2) PhotoRec. They’re both excellent – but to help you pick, here’s a quick rundown of their pros and cons.
| ✅ Pros of Disk Drill | ❌ Cons of Disk Drill |
|
|
| ✅ Pros of PhotoRec | ❌ Cons of PhotoRec |
|
|
Below, we’ll demonstrate how to use both of these apps to recover data from an SD card on Mac.
Option 1: Recover Data from a Corrupted SD Card Yourself
Disk Drill makes data recovery really easy for users at any level, and it supports most memory cards and file types – including RAW, which makes it a great tool to recover photos.
Disk Drill can also recognize and scan SD cards that aren’t showing up in Finder (as long as it appears in Disk Utility) due to corruption and other logical damage. Most importantly, it has a very useful tool called Byte-to-byte Backup, which lets us copy the entire drive – we can use this file as the recovery target and avoid having to interact further with the corrupt SD card. Why is this important? The rule of thumb is: the more you use a corrupted drive, the worse it gets. We’ll show you how to do this in the guide below.
If you want to know more about this app before installing it on your Mac, you can read our full Disk Drill review. Here’s how to use Disk Drill for corrupted SD card recovery on Mac:
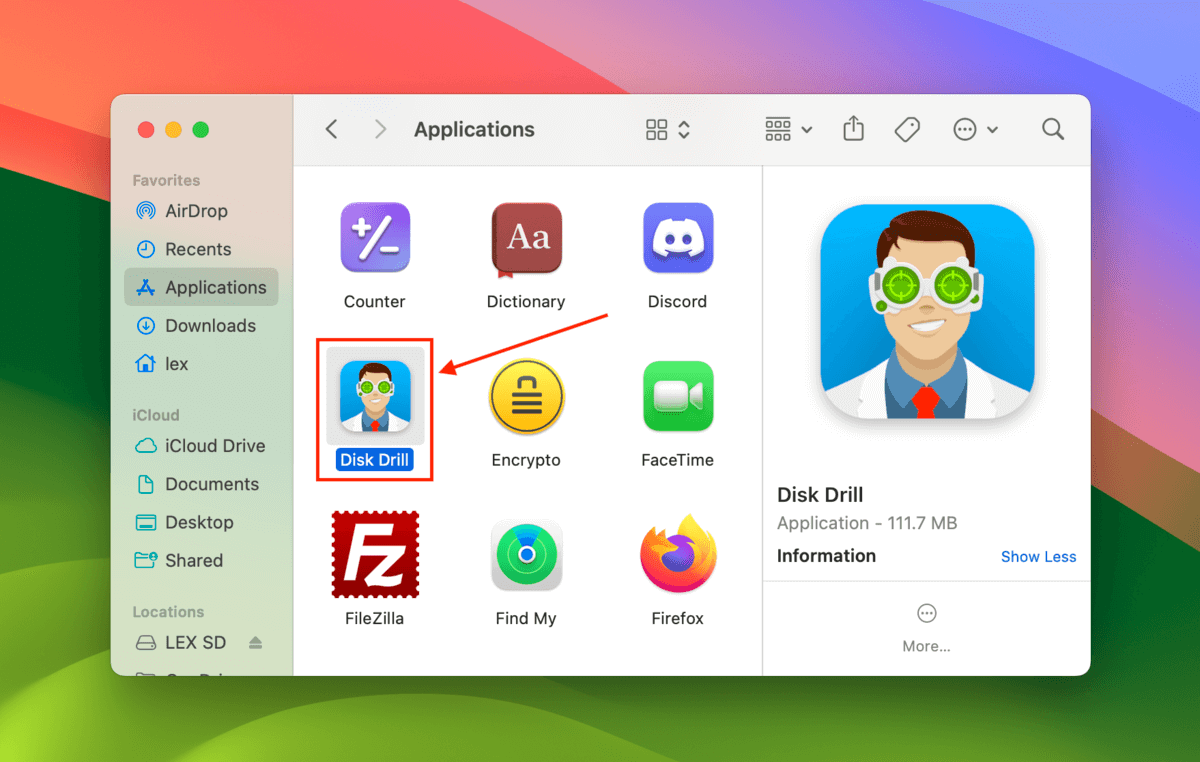
- Download and install Disk Drill for Mac.
- Launch Disk Drill (Finder > Applications > Disk Drill).
- Click Byte-to-byte backup in the left sidebar. Then, select your SD card (may appear as “Generic Storage Device” if using a card reader) and click Create backup. Make sure to save the backup file to a location on your computer when prompted, to avoid overwriting data on your SD card.

- Once you’ve created your backup file, you can double-click it in Finder or navigate back to the Storage devices screen and click the Attach disk image… button to load it up in Disk Drill. You can also eject your actual SD card at this point. Then, select the backup file and click Search for lost data.

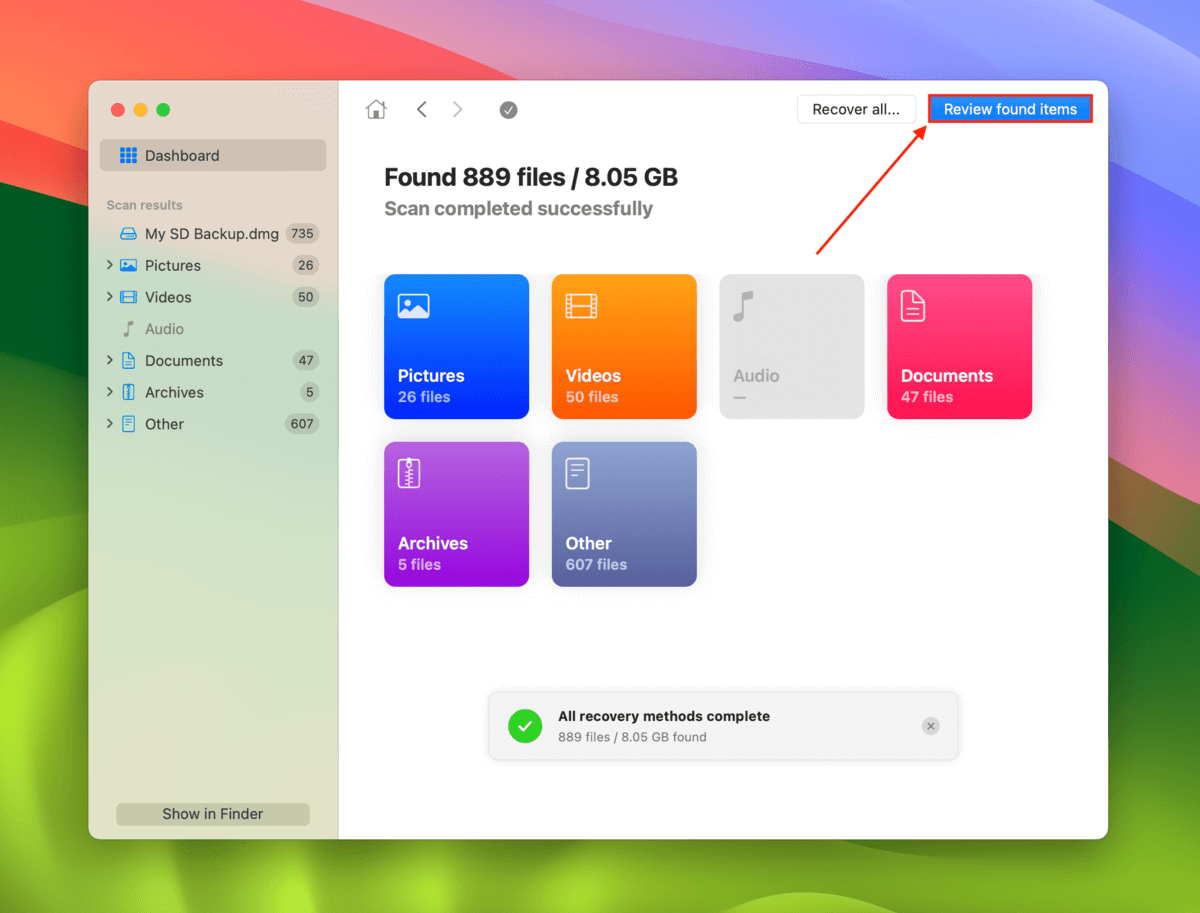
- You can start browsing the files Disk Drill already found or you can wait for the scan to complete. Once it’s done, click Review found items.
- If you want to restore specific files, you can use the search tool and the category links in the left sidebar to filter the search results. Check the Deleted or lost and Reconstructed sections for your data. In cases where your files were untouched, you can check the Existing section as well.
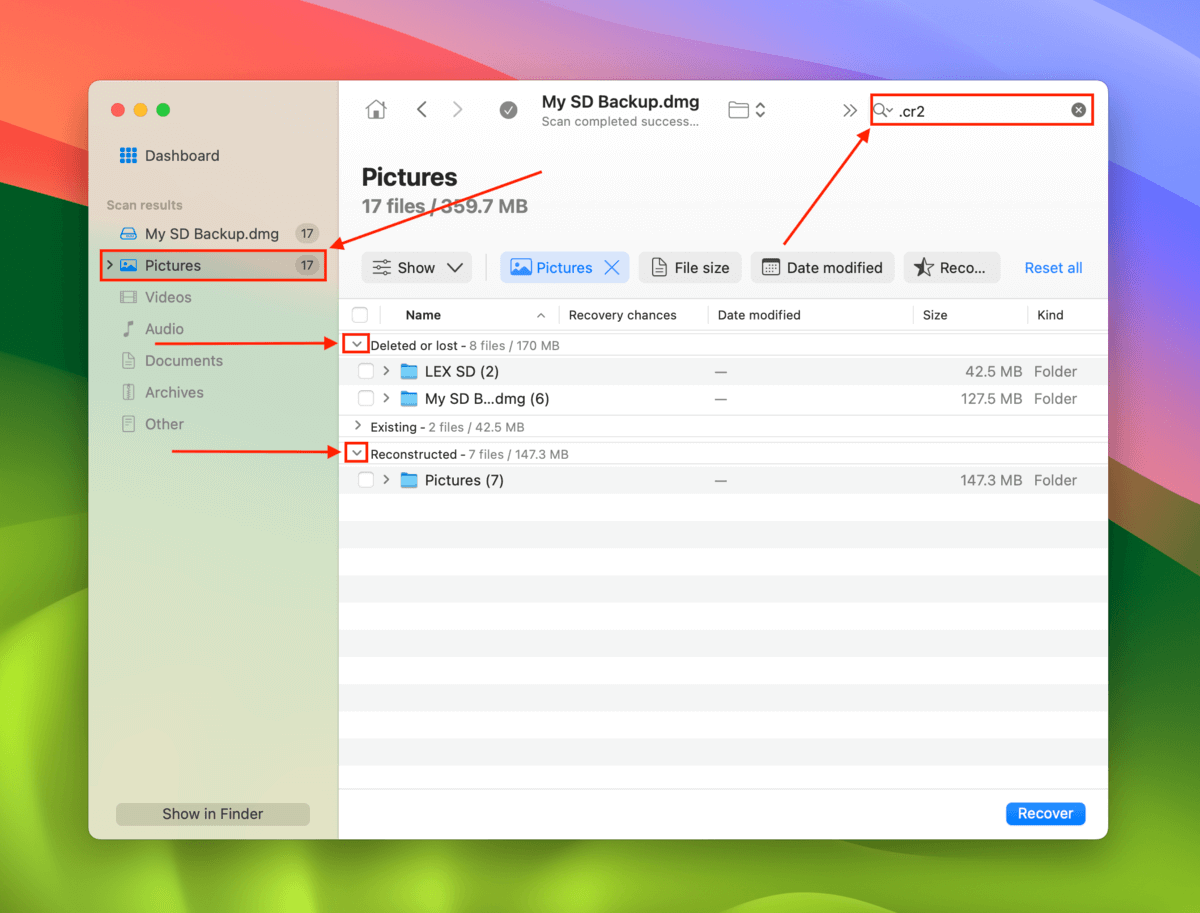
- You can preview your data by hovering your mouse pointer beside a file and clicking the eye button that appears. To select the files you want to restore, mark their boxes in the leftmost column. Then, click Recover.

- In the dialogue box, select a destination folder for your recovered files. Do not save it to your SD card again, because you might overwrite existing data. Once you’ve chosen a safe location, click Next to start the recovery process.


Option 2: PhotoRec
PhotoRec is a reliable data recovery app that many people use to this day, even if it hasn’t had a major update in years. As previously mentioned, PhotoRec doesn’t have a GUI; its interface looks like the Terminal app and you can only use your keyboard to navigate it.
But if you’re willing to brave the slight learning curve (or simply follow our instructions below), we’ve successfully used PhotoRec to recover corrupted drives – it might just work for you.
- Download and install PhotoRec (by downloading TestDisk). Then, connect your SD card to your Mac using a card reader.
- Open the Terminal app (Finder > Applications > Utilities). Then, type the following command and hit Return:
sudo photorec

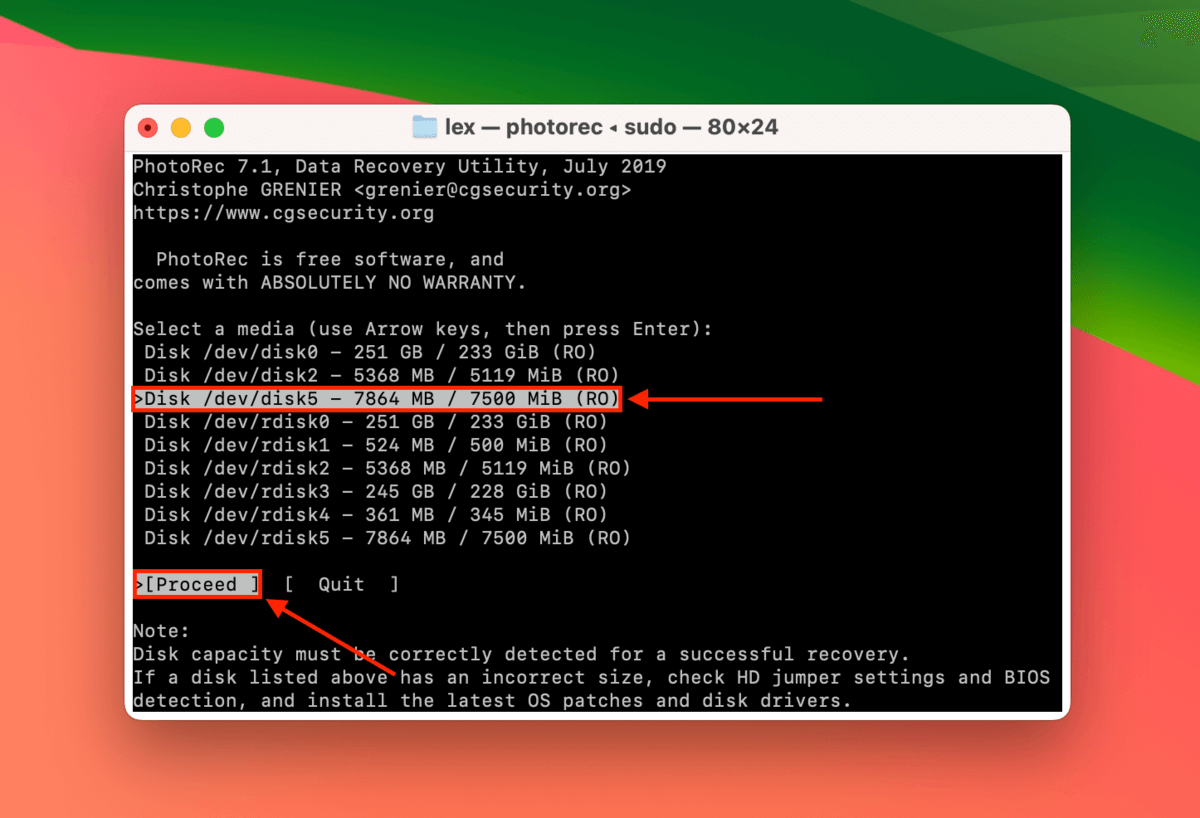
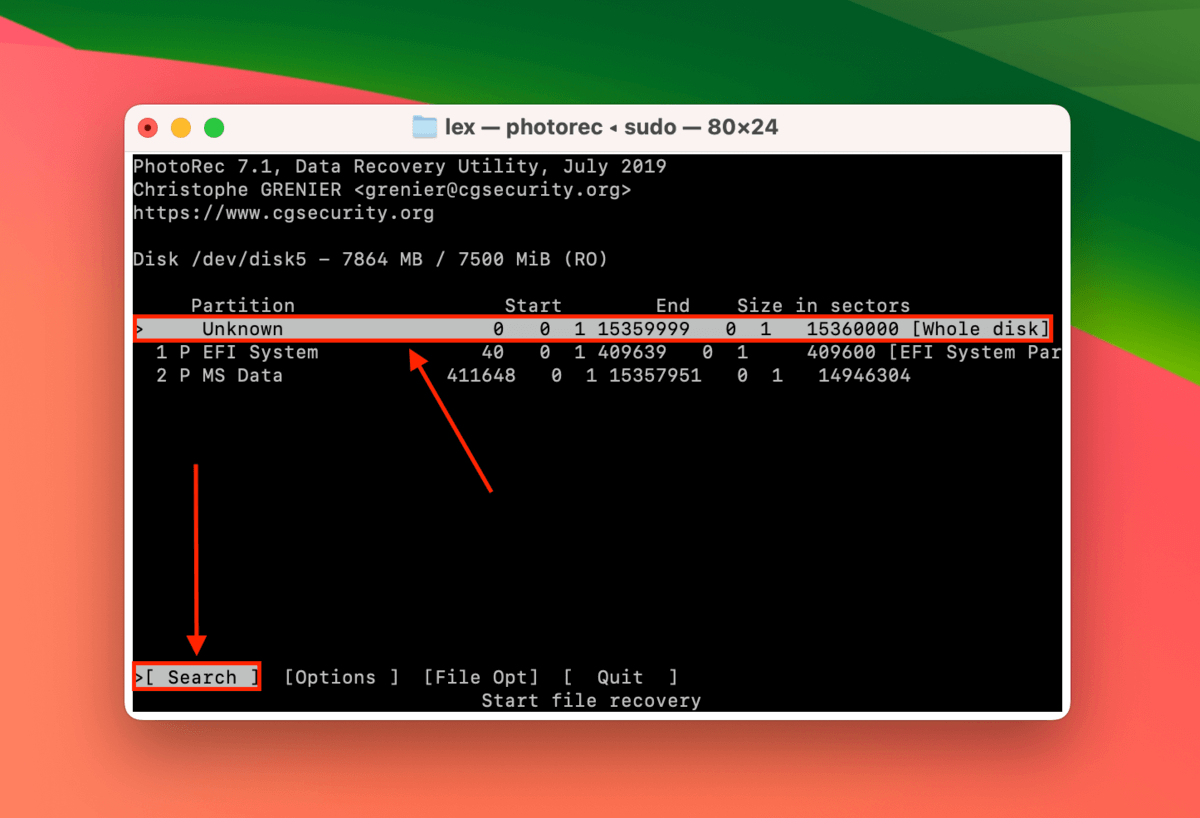
- Using your arrow keys, select your SD card and the Proceed option. Hit Return.
- Using your arrow keys, select No partition or Unknown (so it scans the whole disk) and the Search option. Hit Return.
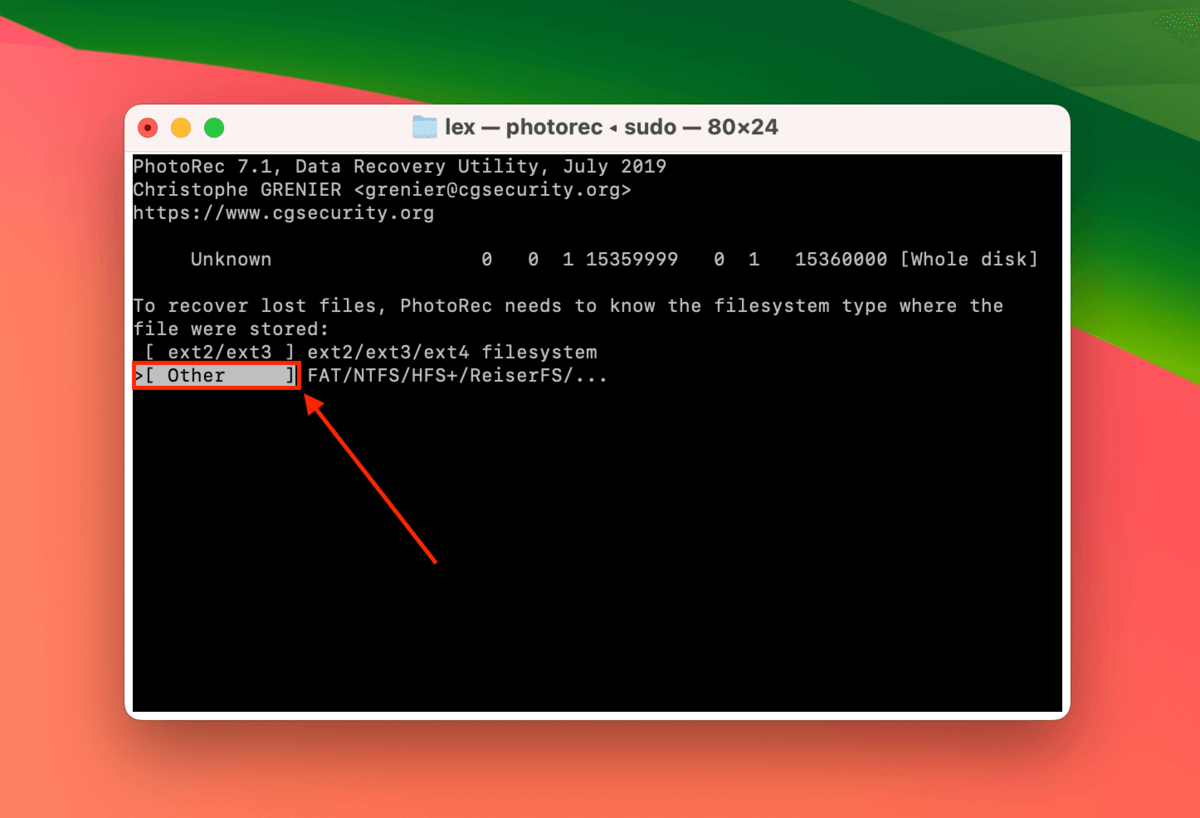
- Select Other and hit Return.
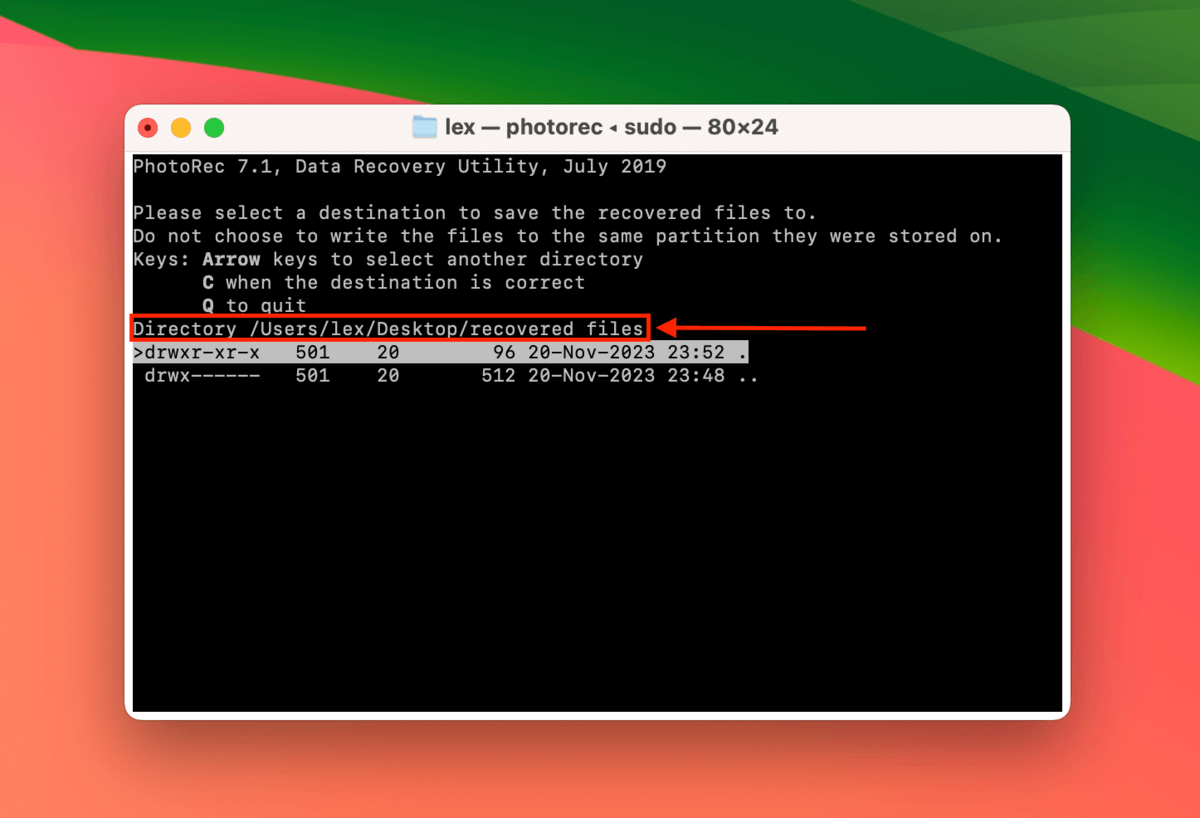
- Choose a destination for the recovered files. Use the up and down arrow keys to browse the folders in a location. Use the left and right arrow keys to enter and exit the highlighted folder. We strongly recommend saving the recovered files to your Mac, not your SD card. Once you’re satisfied with your selection, hit C.


How to Fix Corrupted SD Card on Mac
The method you use to fix your corrupted SD card depends on what caused the corruption in the first place. However, you can safely try them all one by one. We listed all the methods below in order of difficulty along with step-by-step instructions.
Method 1: Try to Repair Your Card Using First Aid
First Aid is a powerful repair tool that comes included in Disk Utility. It can find and repair disk errors caused by corruption and other logical damage. This is the easiest method to fix a corrupted drive on Mac and it should be the thing you should try.
To use it, connect your SD card to your Mac and launch Disk Utility (Finder > Applications > Utilities > Disk Utility).

Then, select your SD card in the left sidebar and click the First Aid button at the top of the window. Confirm when prompted and wait for the process to complete.

Method 2: Diagnose Your SD Card Using Terminal
If First Aid didn’t work, we can use diskutil Terminal commands to identify the problem and attempt to repair it. If you’ve never used the Terminal app before, don’t worry – we’ll go through the commands step by step.
- Connect your SD card to your Mac and launch the Terminal app (Finder > Applications > Utilities > Terminal).

- Type the following command and hit Return:
diskutil list
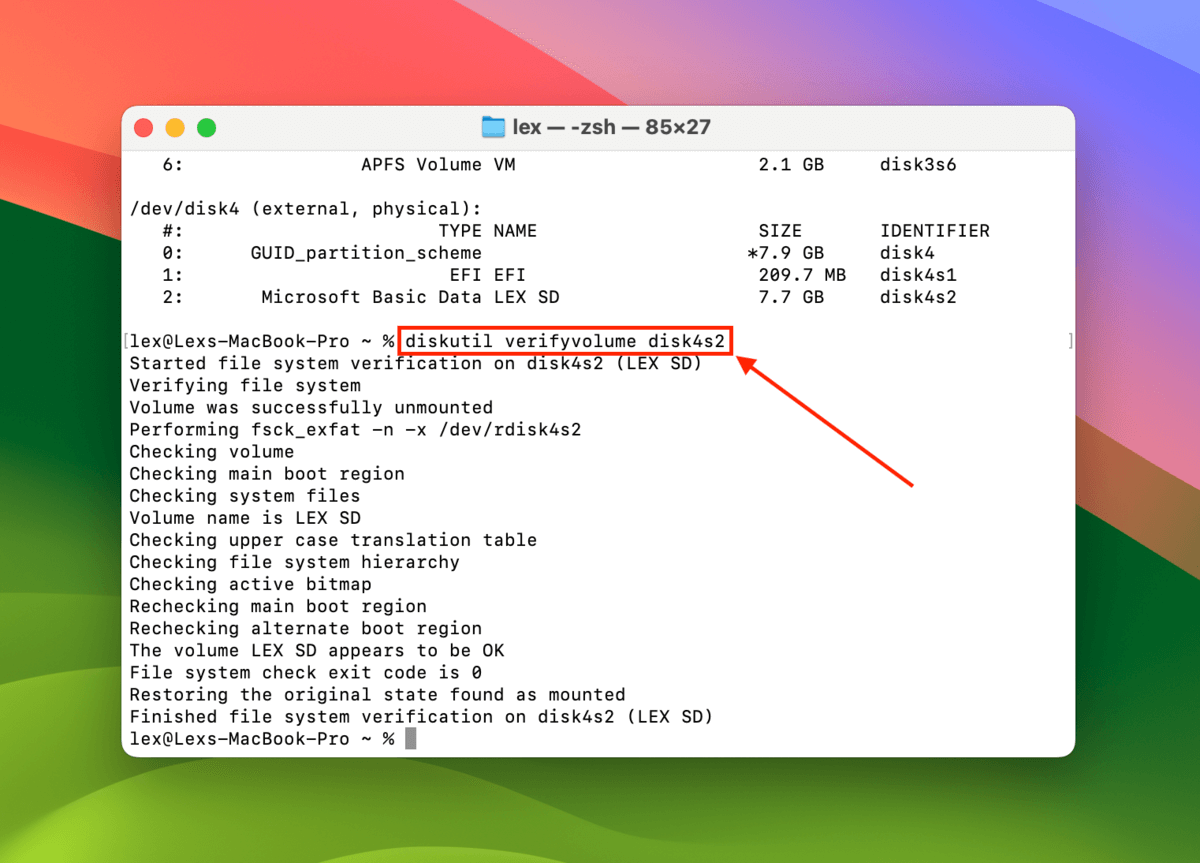
Take note of your SD card’s Identifier.

- Type the following command and hit Return:
diskutil verifyvolume “identifier”
Replace “identifier” with your SD card’s disk identifier.
- If the command returns any errors, type the following command and hit Return:
diskutil repairvolume “identifier”
Make sure to replace “identifier” with your SD card’s.


Method 3: Perform SMC or NVRAM Reset
The SMC (System Management Controller) is a chip that stores the settings of the physical components of your Mac, such as your keyboard, hard drive, etc. On the other hand, NVRAM (Non-Volatile Random-Access Memory) stores the settings for virtual functions like screen resolution, boot order, etc.
If the SMC or NVRAM gets damaged or corrupted, strange things can happen to your Mac. In some cases, it won’t even boot. Depending on the model of your Mac, you usually only have one or the other (or none at all). We’ll go through both methods for different Mac models together.
To reset your Mac’s SMC:
Desktop Macs
- Power off your Mac and unplug the power cord.
- Press and hold the power button for 10 seconds, then release.
- Reconnect the power cord and turn on your Mac.
- MacBooks with non-removable battery
MacBooks with non-removable battery
- Shut down your MacBook.
- Press and hold the following keys for 7 secods: (Shift + Option + CTRL + power button).
- Release the keys and wait for a few seconds.
- Turn on your Mac.
MacBooks with removable battery
- Shut down your MacBook, unplug the power cord, and remove the battery.
- Press and hold the power button for 10 seconds, then release.
- Reconnect the battery and power cord, then turn on your MacBook.
To reset your Mac’s NVRAM:
- Shut down your Mac.
- Press the power button and immediately press and hold the following keys until you hear the startup sound a second time (Intel-based Macs) or the Apple logo appears and disappears the second time (T2 Macs):
(Command + Option + P + R)
Method 4: Format Your Memory Card
If none of the above methods work, your last DIY resort is to format your memory card. This process should get rid of everything – including viruses, corruption… And your data. So before formatting your SD card, recover your data by following the instructions in the data recovery section in this article and save it to your Mac or another drive.
Once your data is secure, (1) launch Disk Utility as before (Finder > Applications > Utilities > Disk Utility), (2) select your SD card from the left sidebar, and (3) click Erase at the top of the window.

Choose the format you want your SD card to use (we suggest exFAT) and click Format to proceed with the operation.

Method 5: Contact a Professional Data Recovery Service
If you suspect that your SD card has suffered physical damage from heat, breakage, water, etc., the safest way to get your data back is to use a professional data recovery service. This refers to service centers with clean rooms, advanced equipment, and specialists that can safely retrieve data from storage devices that have been physically damaged.
If you have options in your area, we suggest that you consider the following:
- ISO 5 Cleanroom/Class 100 Cleanroom
- No data-no charge guarantee
- Free phone consultation with estimate
Several Tips to Prevent SD Cards Corruption in the Future
SD card corruption can happen suddenly, it’s often tough to figure out what caused it. However, there are a few best practices to decrease its likelihood and preserve your SD card for as long as possible:
- Only buy SD cards and card adapters directly from known manufacturers and from trusted distributors.
- Properly eject your SD card before disconnecting it from your Mac.
- Keep your SD card away from heat, dust, and water.
- Pay attention to your device’s battery and don’t read or write to the SD card if there’s a possibility of sudden power loss.
That said, some things are just out of our control, and storage devices have a natural lifespan. To avoid the worst consequences of corruption (data loss), back up your data to a separate storage device and/or to the cloud.
FAQ
To uncorrupt a corrupted SD card, try the following fixes:
- Use Disk Utility’s First Aid tool.
- Use the diskutil Terminal command to verify and repair your SD card’s volumes.
- Perform an SMC or NVRAM reset (jump link).
- Format your memory card.
There are a few reasons why your SD card is not mounting on your Mac. Here are all of them and what you can do about it:
- Faulty connection – Make sure your SD card is physically unlocked, clean your ports/try other ports, or use a different memory card reader.
- Logical damage – Use Disk Utility’s First Aid tool, use Terminal’s diskutil command, or format your SD card. Note that formatting wipes your data, but you can use data recovery software to recover deleted files from your SD card on your Mac.
- Physical damage – Send your SD card to a professional data recovery service to retrieve your data.
Conclusion
If your SD card gets corrupted, data loss is usually soon to follow – and it only gets worse. Once you notice your SD card acting up, secure your data ASAP and attempt to fix it. But to avoid the worst consequences of corruption, back up your data regularly using Time Machine.
Finally, don’t resort to formatting immediately, as the process wipes your data. But if you already did, you can still use data recovery software to restore deleted files from your SD card.