
Table of Contents
Clearing recent files on your Mac can help with privacy, organization, and performance (somewhat). However, many users get confused about how the Recents folder on Finder works and are unable to optimize it properly and gain those benefits. Worse, some may even end up causing unwanted data loss.
This article explains how the Recents folder works on Mac, how to clear recent files in Finder on Mac (and Spotlight), and how to set it up to prevent certain files and folders from appearing in it in the future. Read on!
How Recents Functions on Mac
The Recents folder can usually be found in the Finder sidebar in the Favorites list. It shows you all the files that you recently accessed or used, which you can open, move, or delete straight from the folder.
However, the files you see in this folder are not duplicates of the original files. They are the actual files.
Here’s how that works:
The Recents folder is a Smart Folder. Smart Folders on macOS are “virtual” folders that you can use to access and organize files from different locations on your Mac in one place (without having to duplicate or move them).
In other words, you are accessing the exact same files, just from an alternative “virtual” location. The Recents folder is a pre-made Smart Folder that automatically compiles every file that you recently interacted with.
So the process to clear recent files in Mac Finder isn’t as straightforward as with regular files and folders. In the sections below, we’ll explore the proper ways to clean up Recents with and without file deletion.
How to Clean Up Recents on Mac
The method you use to clean up the Recents folder on your Mac depends entirely on the desired result. Due to the limited functionality of this folder, the two viable outcomes are: (1) an emptied Recents folder or (2) removal of the shortcut to the folder’s shortcut from Finder (to prevent misclicking or clutter).
If you want to prevent the Recents folder from getting cluttered in the first place, we also prepared tips that can help you keep certain files and folders from appearing there. See this section of the article for details.
Method 1: Clear Recent Items in Finder Menu
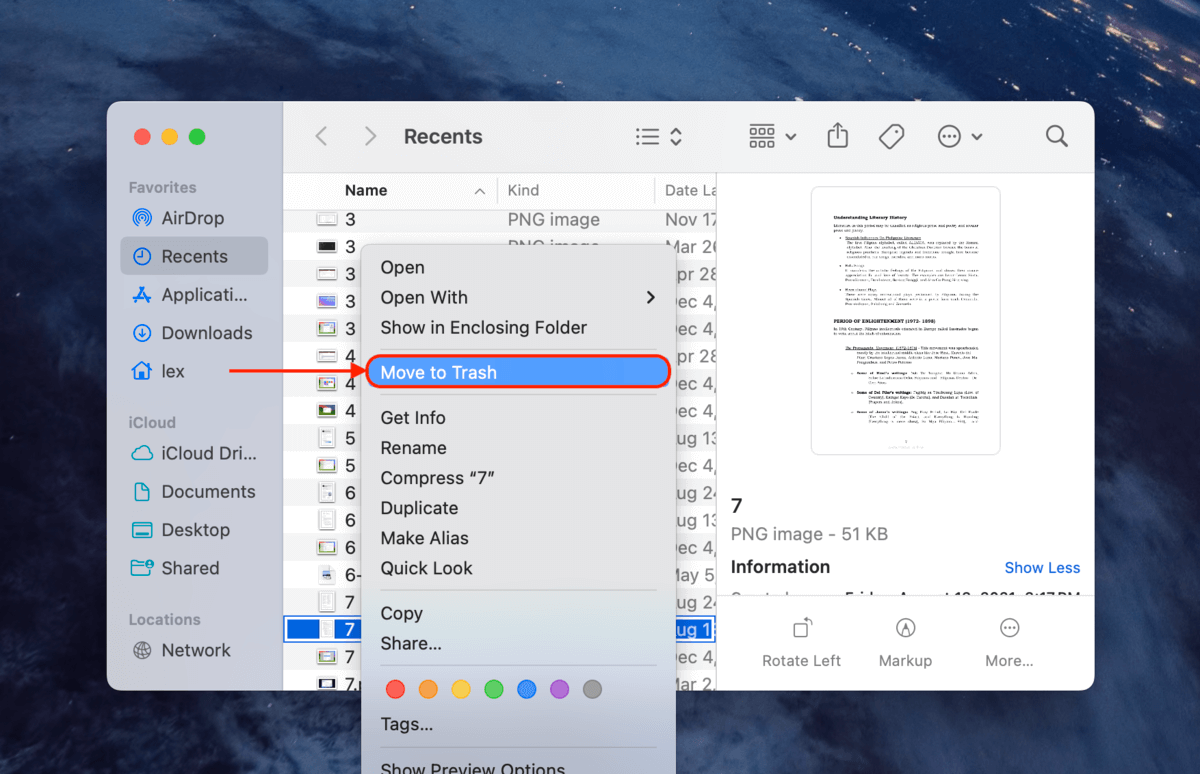
The most straightforward method to clear your recents is to delete recent files from your Mac. However, since the Recents folder is a Smart folder that simply compiles existing files, deleting its contents will also delete the actual files. Only use this method if you don’t need the files in the Recents folder.
- Open Finder and click Recents in the left sidebar (it’s under Favorites by default).
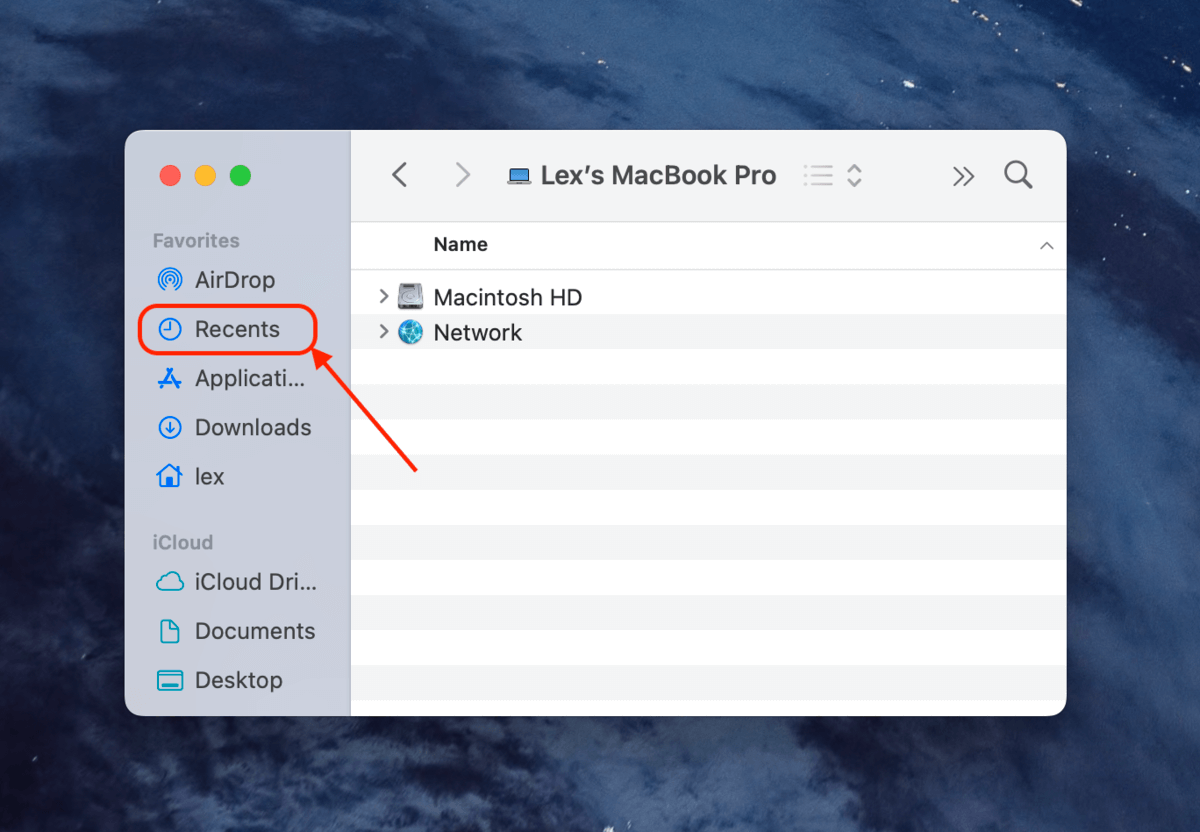
- Select individual files or click Edit > Select All. Then, right-click your selection and click Move to Trash.


Method 2: Remove Recents from Finder Sidebar
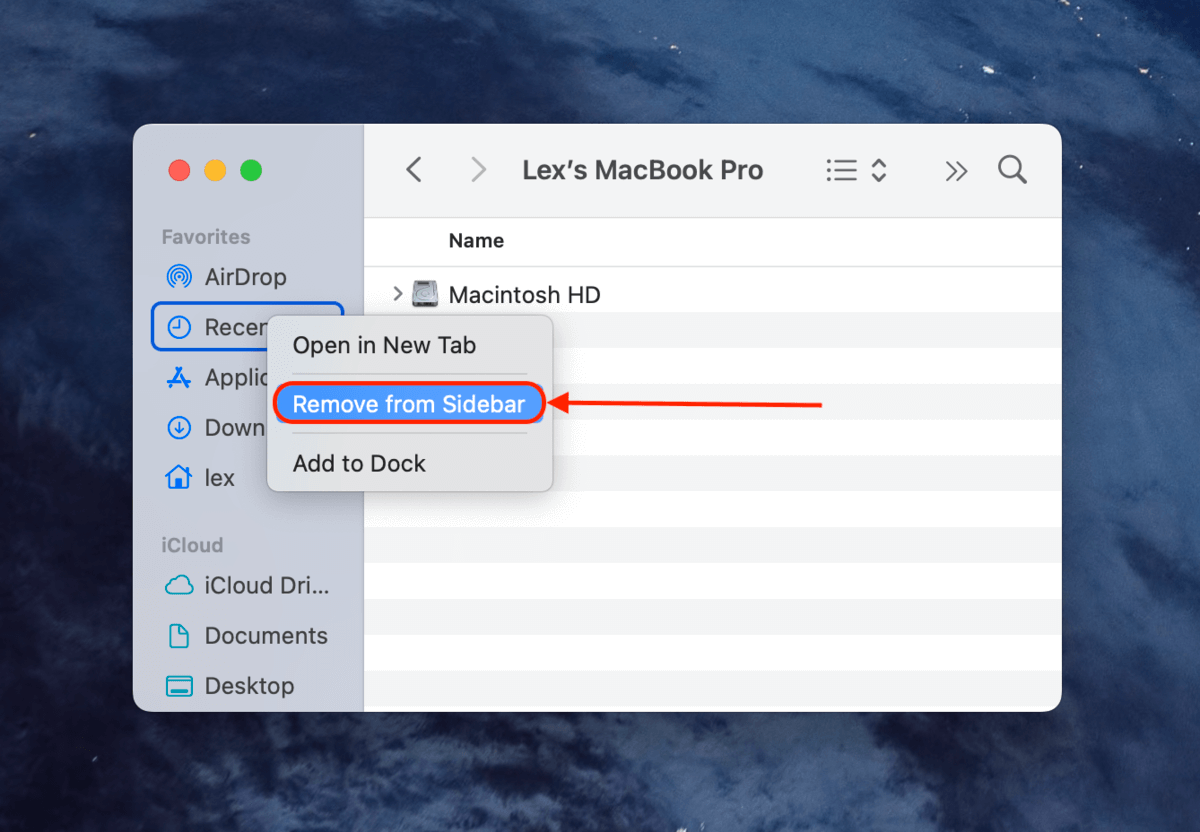
If you just don’t want to see the Recents folder in Finder because you don’t need it or you don’t want to click on it by accident, you can remove it from sidebar without deleting it or its contents.
- Open Finder.
- Right-click Recents in the left sidebar. Select Remove from Sidebar.

Method 3: Disable Access to Folders
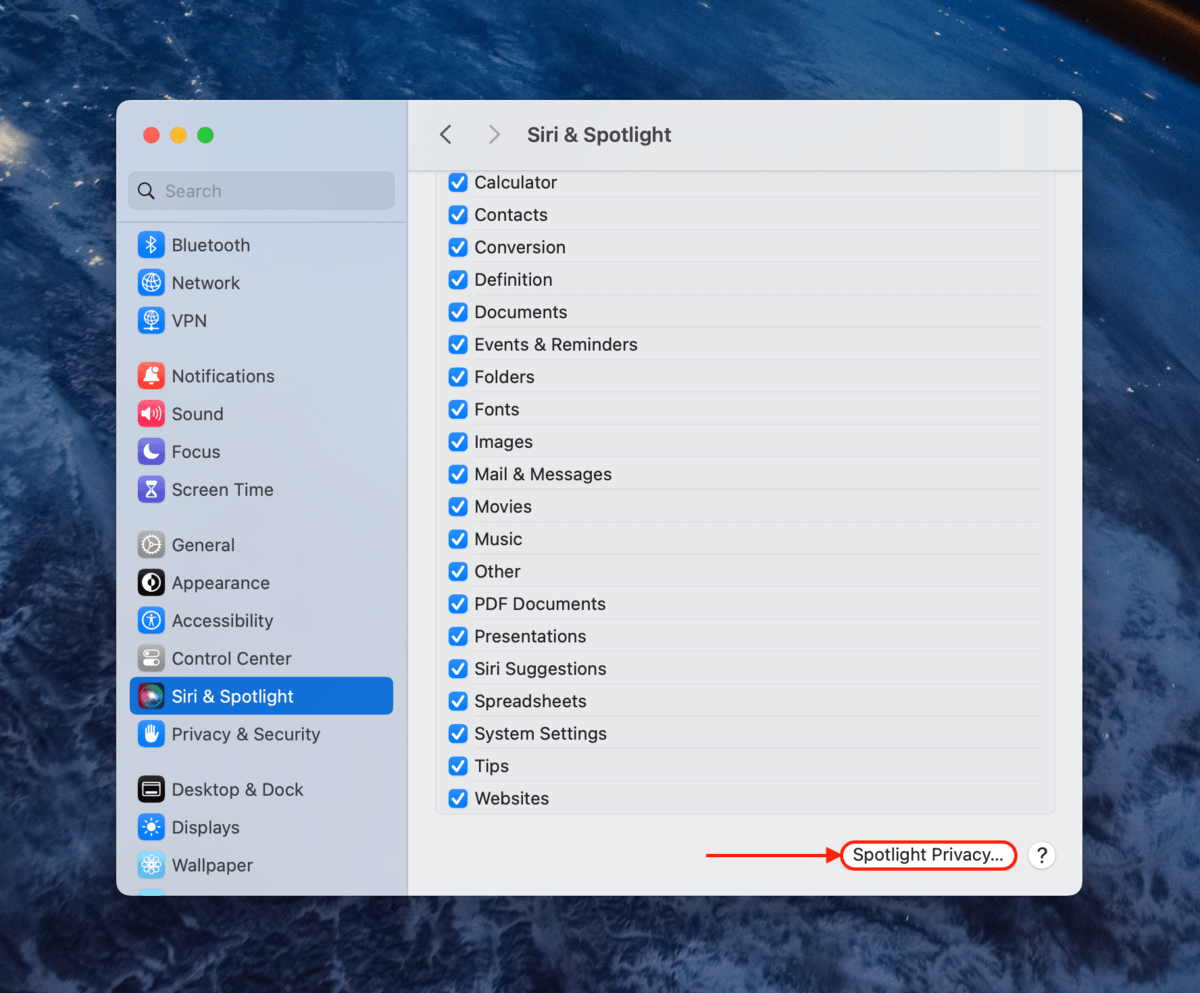
The Recents folder in Finder relies on Spotlight’s indexing to determine which files should be included. This method allows you to exclude a folder from Spotlight’s indexing, which also prevents it from appearing in the Recents folder.
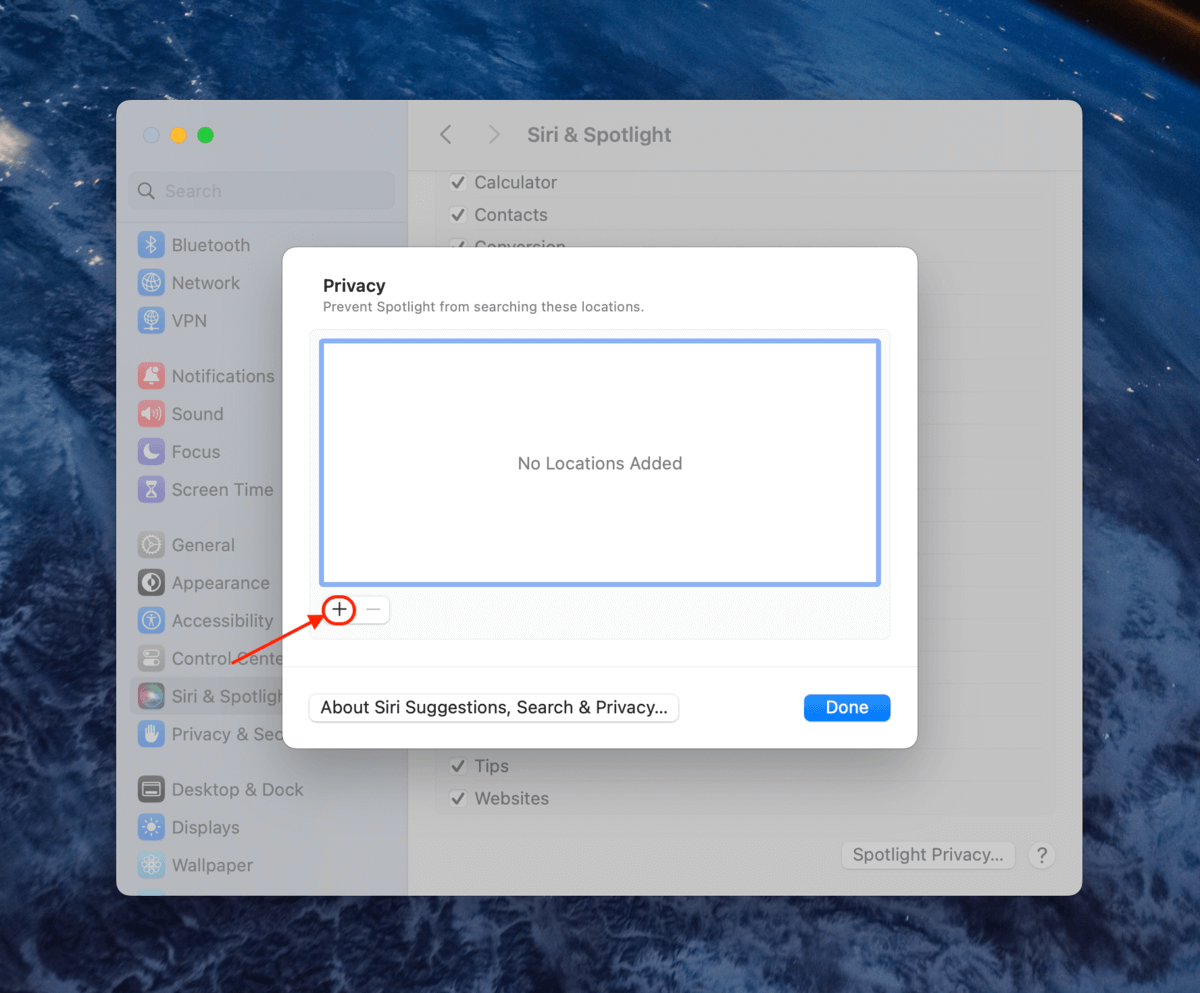
- Open the Settings app and select Siri & Spotlight. Then, scroll to the bottom of the window and click Spotlight Privacy.
- Click the + button.
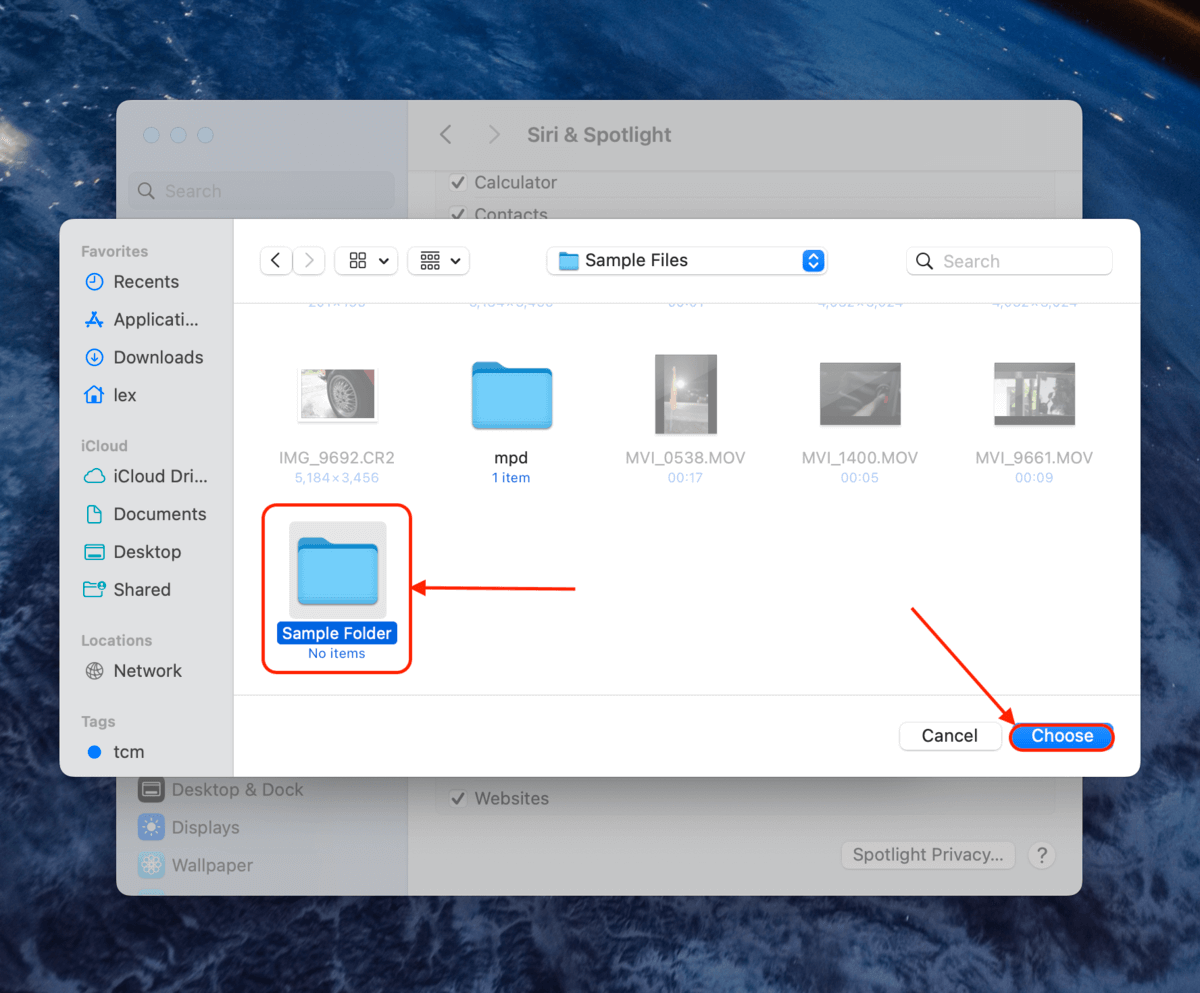
- Use the tree views on the various panes to navigate to a folder you want to “hide” from the Recents folder and Spotlight. Then, click the folder and click Choose (confirm if prompted).
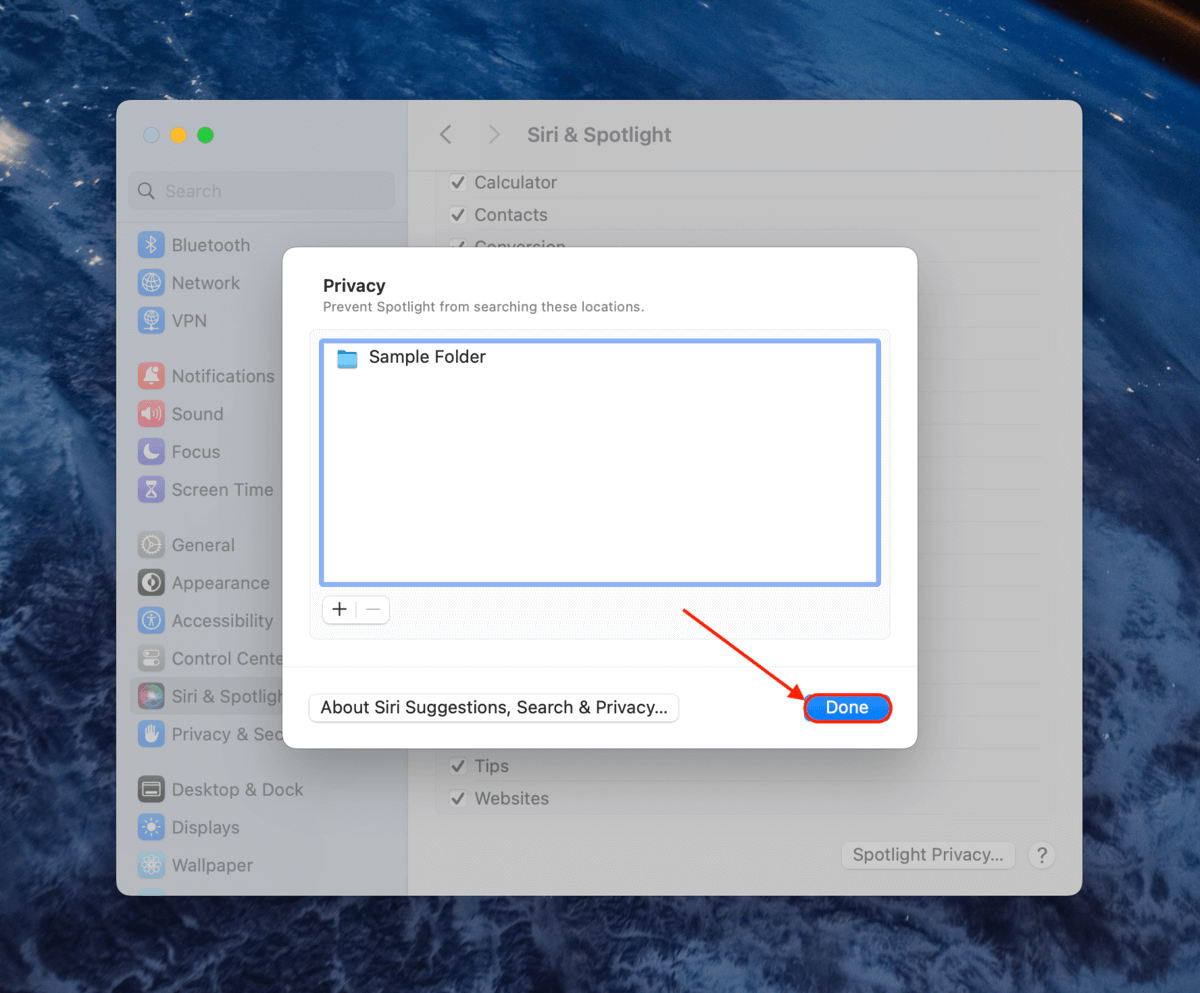
- Click Done. Now, any file in the folder you added in step 3 will no longer appear in your Recents folder and will not be searchable by Spotlight.


How to Prevent Files from Appearing in Recents
Due to the data loss, cleaning up the Recents folder after files have been saved isn’t always a great solution. And if you still want to benefit from its functionality, removing the folder from Finder won’t help.
Really, the best way to clean the Recents folder is to prevent it from getting cluttered in the first place – “prevention is better than cure” heavily applies here. Here are some tips on how to prevent files from appearing in the Recents folder, even if you interact with them:
- Change file permissions – You can change file and folder permissions to prevent them from being accessed by certain users or user groups – this also prevents them from showing up in the Recents folder (for the selected users or user groups).
- Use a different account – If you want a fast way to have a clean Recents folder without deleting anything, use a different Mac user account. Mac users do not share personal files with each other, even on the same computer. In other words, the Recents folder will be completely empty when you first log in to a new account.
- Encrypt the drive – A more extreme solution to hide the contents of your Recents folder is to simply prevent unauthorized access by encrypting the system drive of your MacBook Air/Pro.
FAQ
You can’t clear recents in Mac Finder (as in, make empty) without deleting anything, but here are some alternative solutions depending on your needs:
- Use a different macOS user account.
- Remove the Recents folder from Finder (right-click > Remove from Sidebar).
- If you use Spotlight, you can remove the Recents folder from being indexed (so its contents don’t appear in the Spotlight Recents list).
You can clear recent activity on your Mac by deleting the files in the Recents folder. However, this will also delete the actual files. If you don’t want to lose your files, you can alternatively:
- Hide the files and folders you don’t want to appear in the Recents folder by adding a . (period) at the beginning of their names.
- Use a new macOS user account so your Recents folder is fresh.
The Recents folder itself does not have settings or preferences you can customize directly, because it’s managed by the system (based on your interactions with your Mac). You can only somewhat alter how it appears to you in two ways:
- Remove the Recents folder from the Finder sidebar (right-click in Finder > Remove from Sidebar)
- Exclude the Recents folder from Spotlight indexing so its contents don’t appear in Spotlight’s Recents list (System Preferences > Spotlight > Privacy)
Conclusion
Due to its status as a Smart Folder, it can be confusing to clear recent files on a Mac. The cleanup attempt may even cause data loss if you aren’t careful. If you want a fully functioning but spotless Recents folder, you will simply have to prevent frequently accessed files from appearing there in the first place.
And while risks are quite low, we highly recommend that you back up your data before attempting any cleanup methods, even if you don’t intend on deleting anything.