

Table of Contents
Many Mac users use Microsoft Word and it’s easy to accidentally lose or delete a file. You may need to recover a deleted, lost, or unsaved Word document for multiple reasons including human error, accident, or malware infection. We are going to show you a variety of techniques for recovering a lost, deleted, or unsaved Word document.
Estimating the Chances of Word Document Recovery on Mac
Before you jump right into recovering your lost Word document, it’s important that you first figure out just how likely it is that you’ll be able to retrieve the file based on how it went missing in the first place. After all, setting proper expectations is paramount to avoiding disappointment, and it can help dictate how much effort you should be willing to put into the recovery process.
Below, you’ll see a table with the most common situations that lead to the loss of a Word document on Mac, as well as the factors that affect its recovery and the likelihood of restoration when encountered.
| Factor | Influence on recovery chances | Qualitative score |
| 😨 Accidental Deletion | Usually recoverable if not emptied from the Trash | High |
| ❌ Unsaved Document | Chances vary depending on AutoRecovery and recent saves | Moderate |
| ✒️ Overwritten document | Highly challenging to recover if data is overwritten | Low |
| 💽 Regular Backups | Significantly improves chances when up-to-date backups are available | High |
| ⌛ Elapsed time | Acting promptly increases chances of recovery, while delay decreases them | Moderate |
| ⚙️ Utilizing data recovery software | Can be very effective for deleted or lost files, provided no overwriting has occurred | High |
| 👨💻 Professional data recovery services | Success depends on the type of data loss, expertise of the service, and cost, making it a less predictable option | Variable |
How to Recover Unsaved and Deleted Word Documents on Mac
Now that you have a better idea about your recovery chances, let’s look at the different methods you can use to retrieve missing Word documents on your Apple computer. This, of course, depends on the circumstances that led to your document going missing.
Method 1: Recover Deleted Word Documents from the Trash Bin
The first thing you should do whenever you are looking for a lost or deleted file is to check the Trash. The Mac Trash is a dedicated folder that temporarily stores items that have been logically deleted from the system.
Use the following steps to recover a lost file from the Trash.
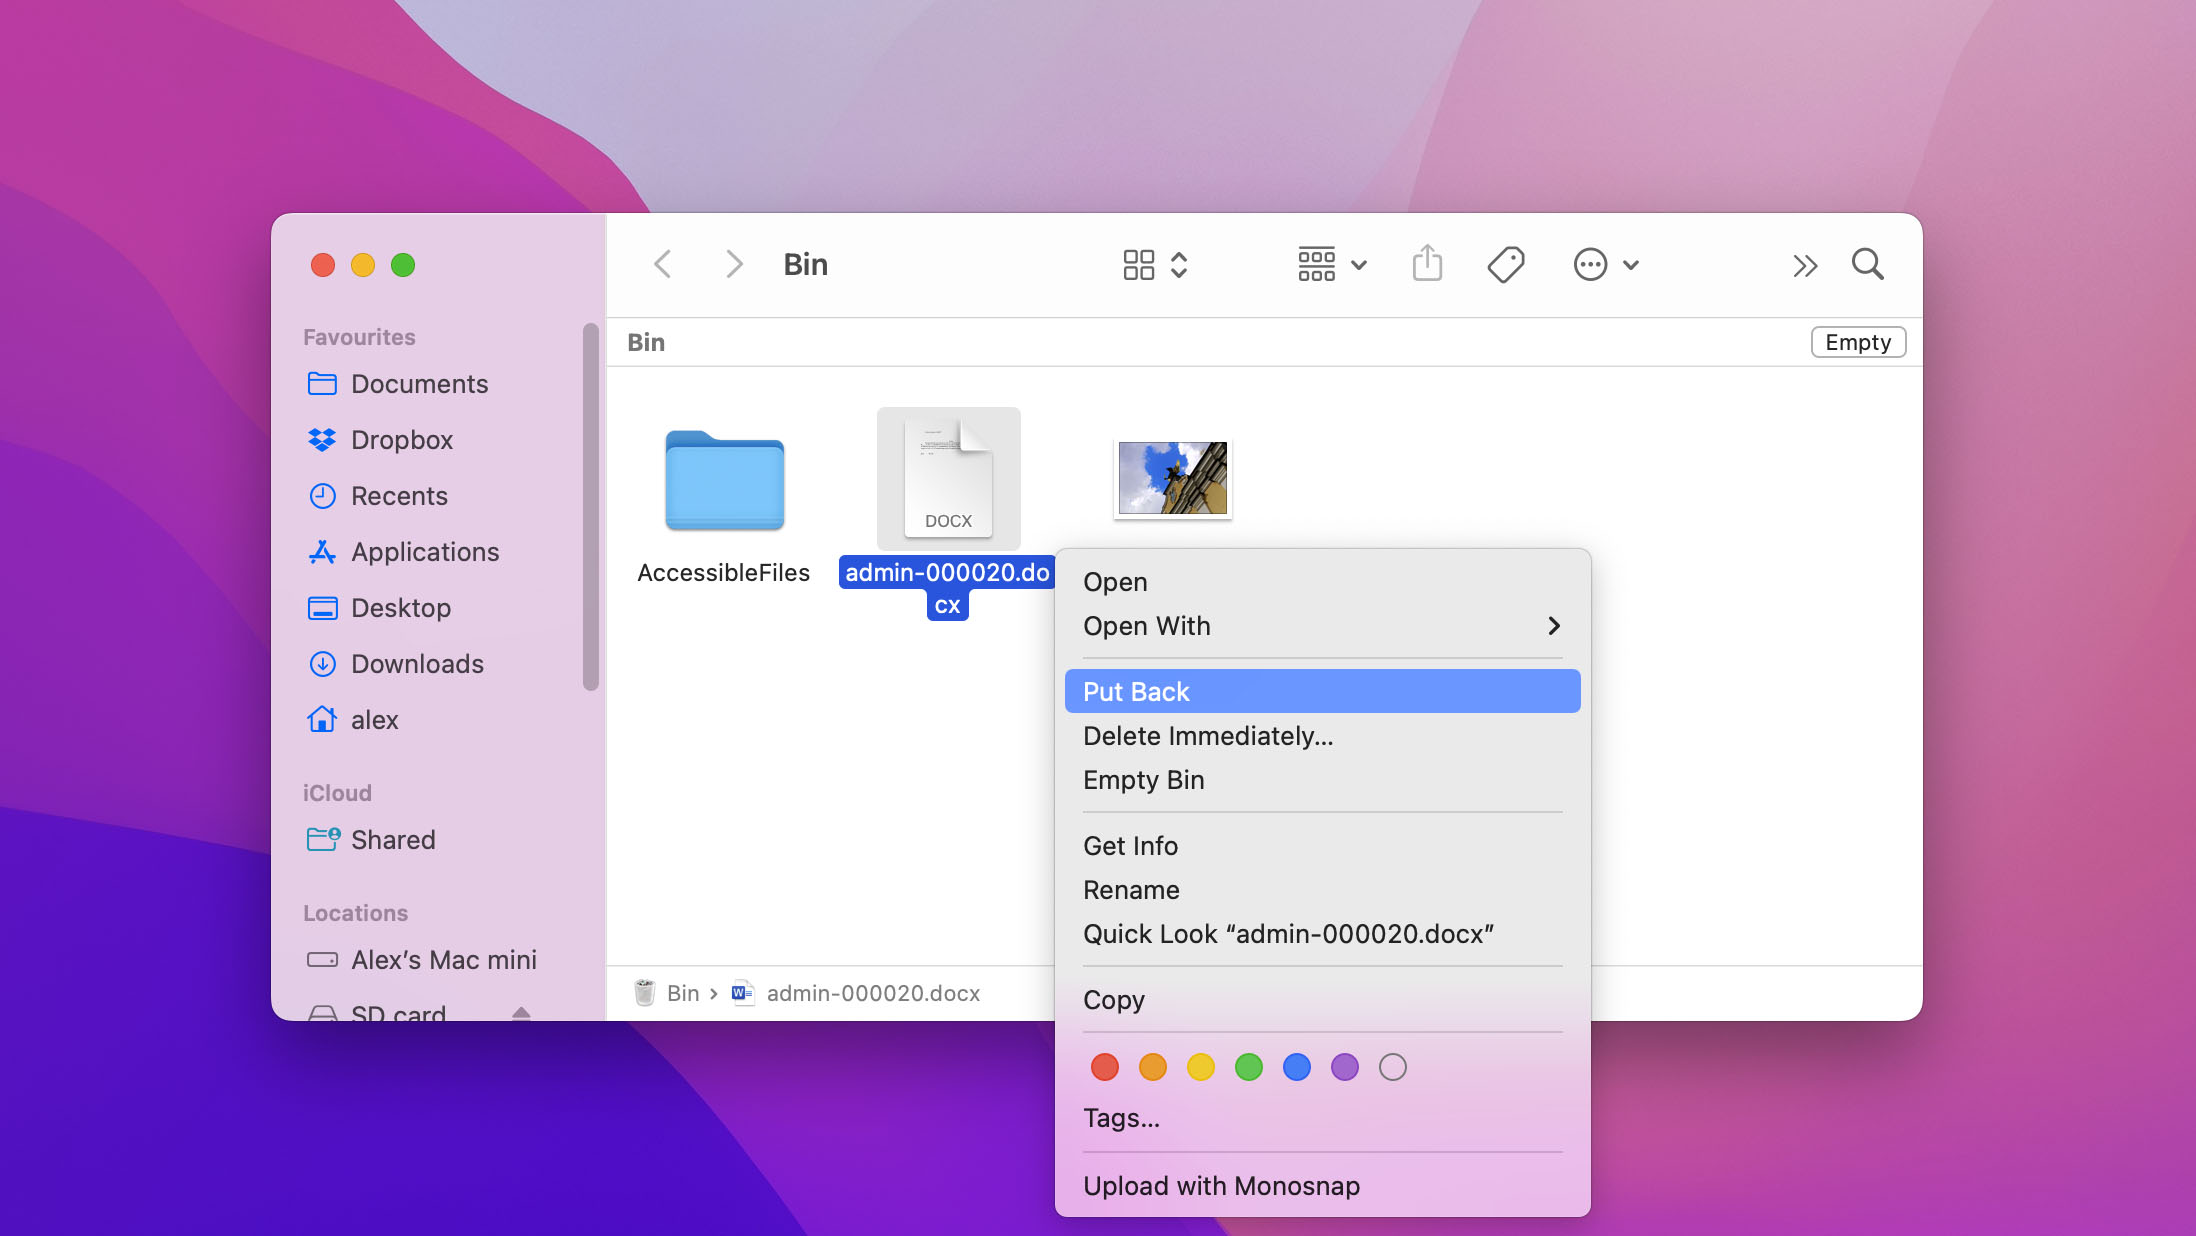
- Open the Trash by clicking on its icon.
- Search the folder for the lost Word file.
- Right-click on the Word file you want to retrieve and click Put Back. The file will be recovered to its original location.
Hopefully, that procedure got your file back. If not, keep reading for other methods of recovering your document.
Method 2: Recover an Unsaved Word Document with AutoRecovery
Microsoft has built the capability to recover unsaved Word documents with its AutoRecovery feature. The Microsoft Office apps, including Word and PowerPoint, automatically save versions of your file if you have the AutoRecover feature turned on.
If your Office for Mac is configured to autosave your work, the following procedure can be used to recover an unsaved document:
- Make hidden folders visible using the Command + Shift + Dot (.) keystroke combination.
- Navigate to this folder: /Users/<username>/Library/Containers/com.Microsoft/Data/Library/Preferences/AutoRecovery.
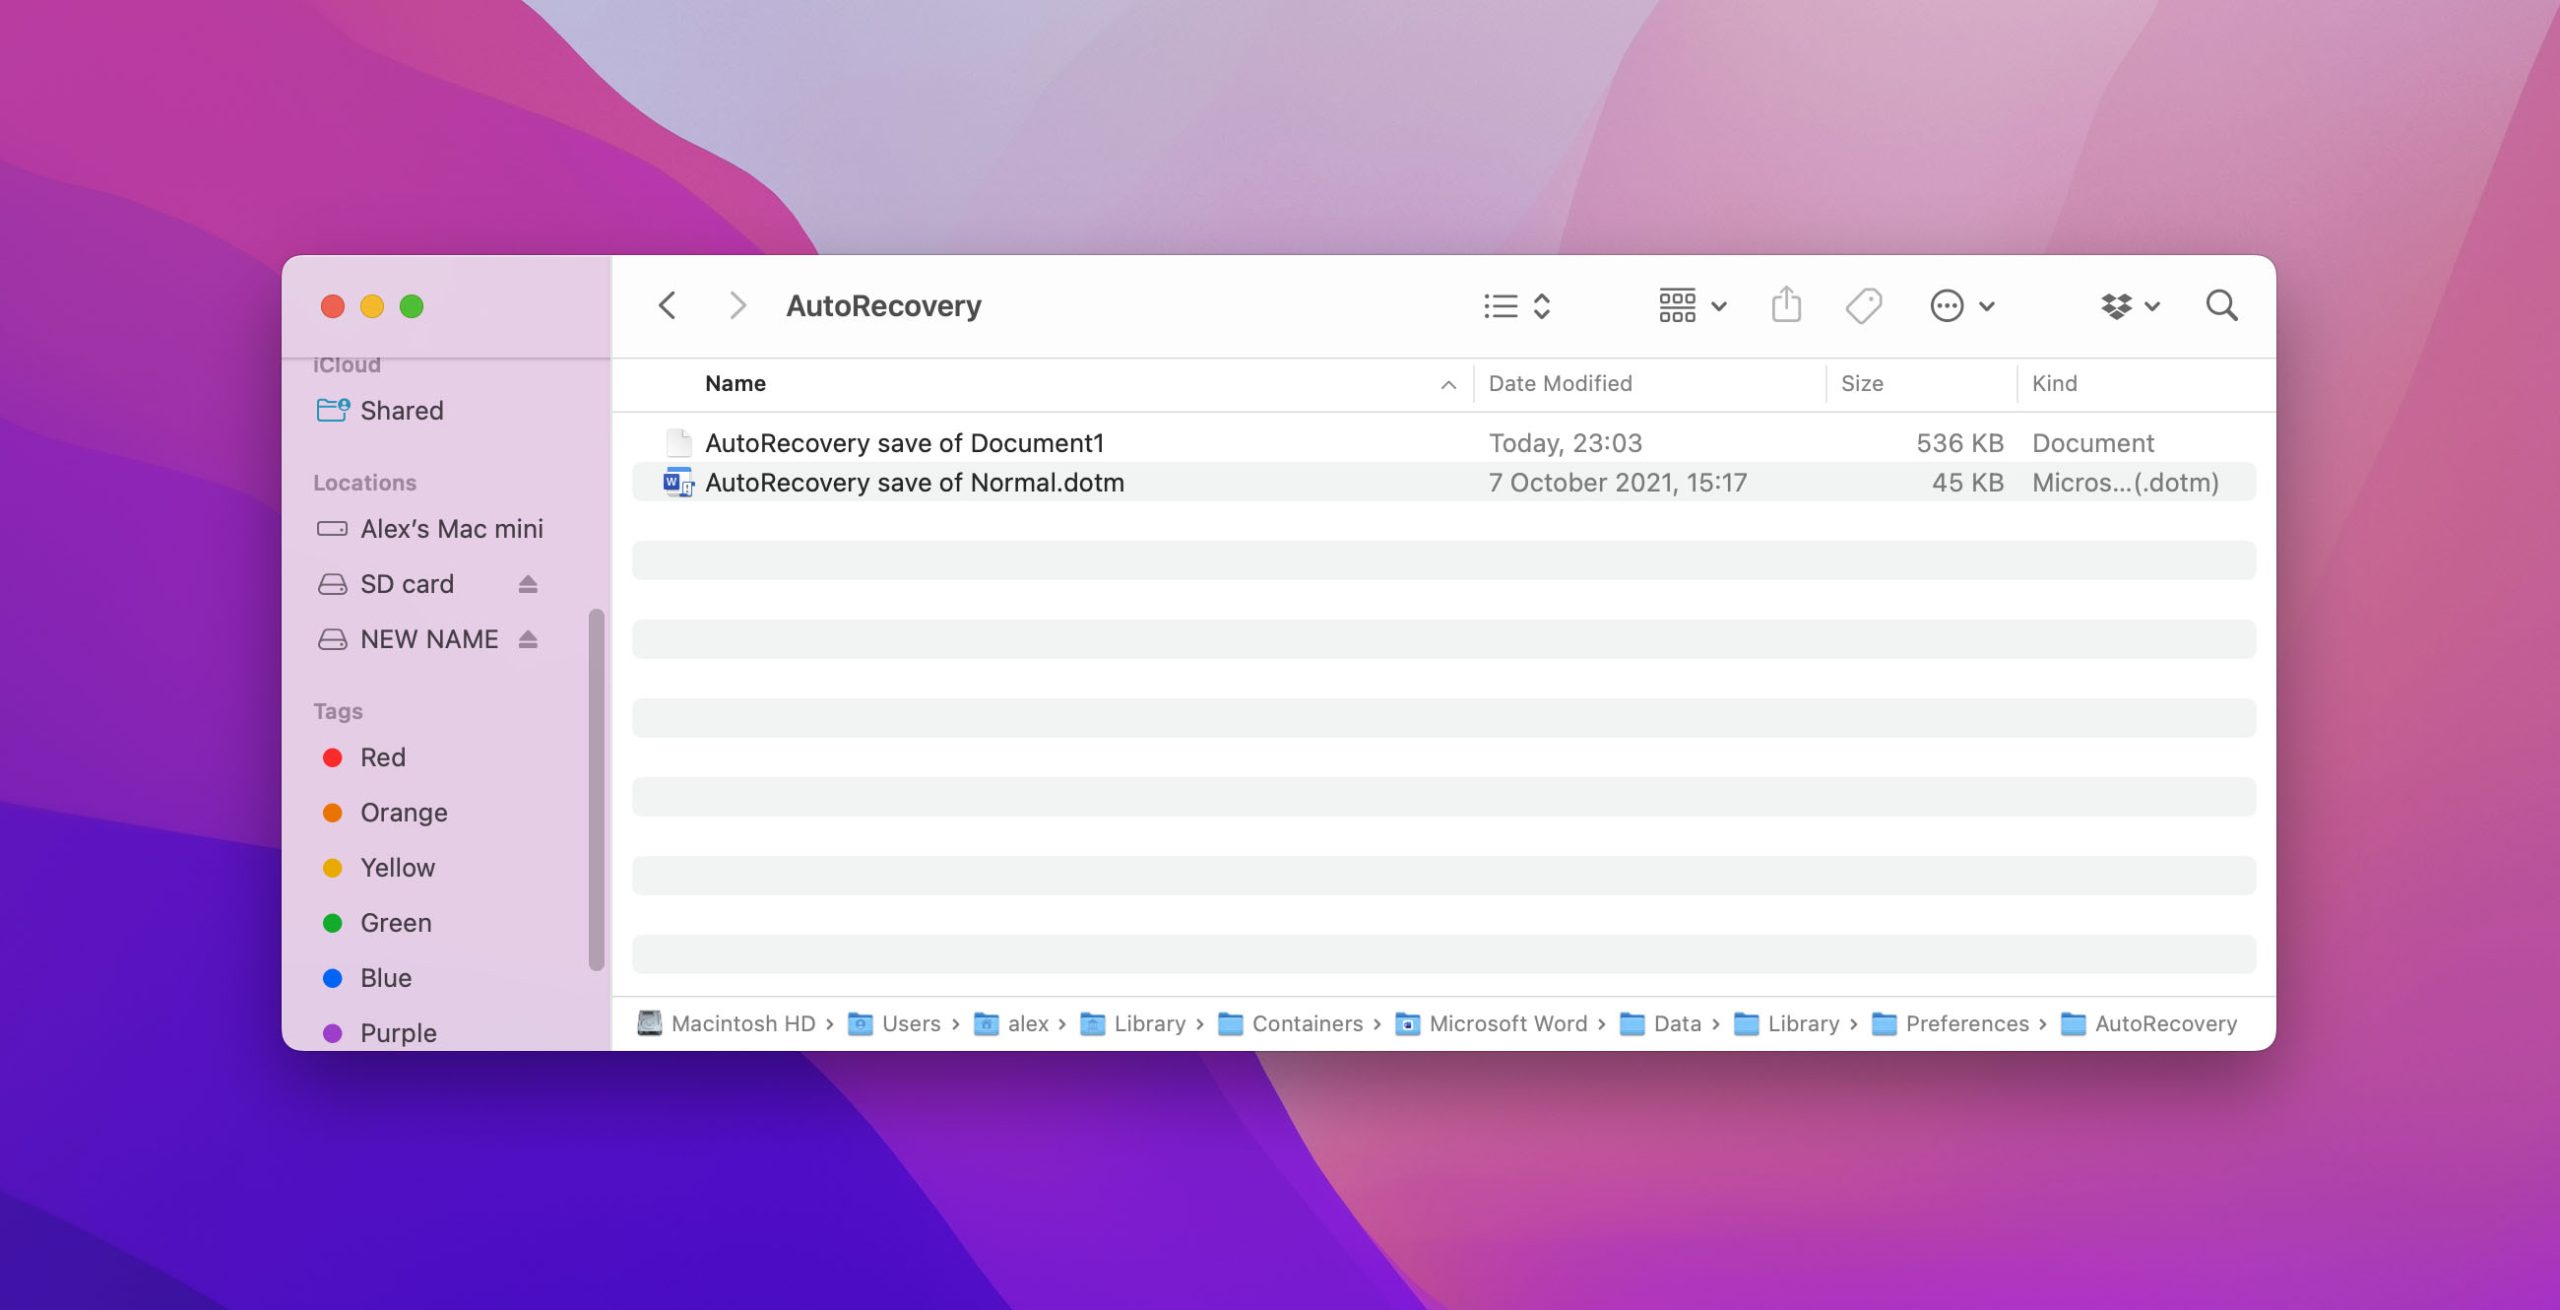
- Search for your file and open it in the Word application
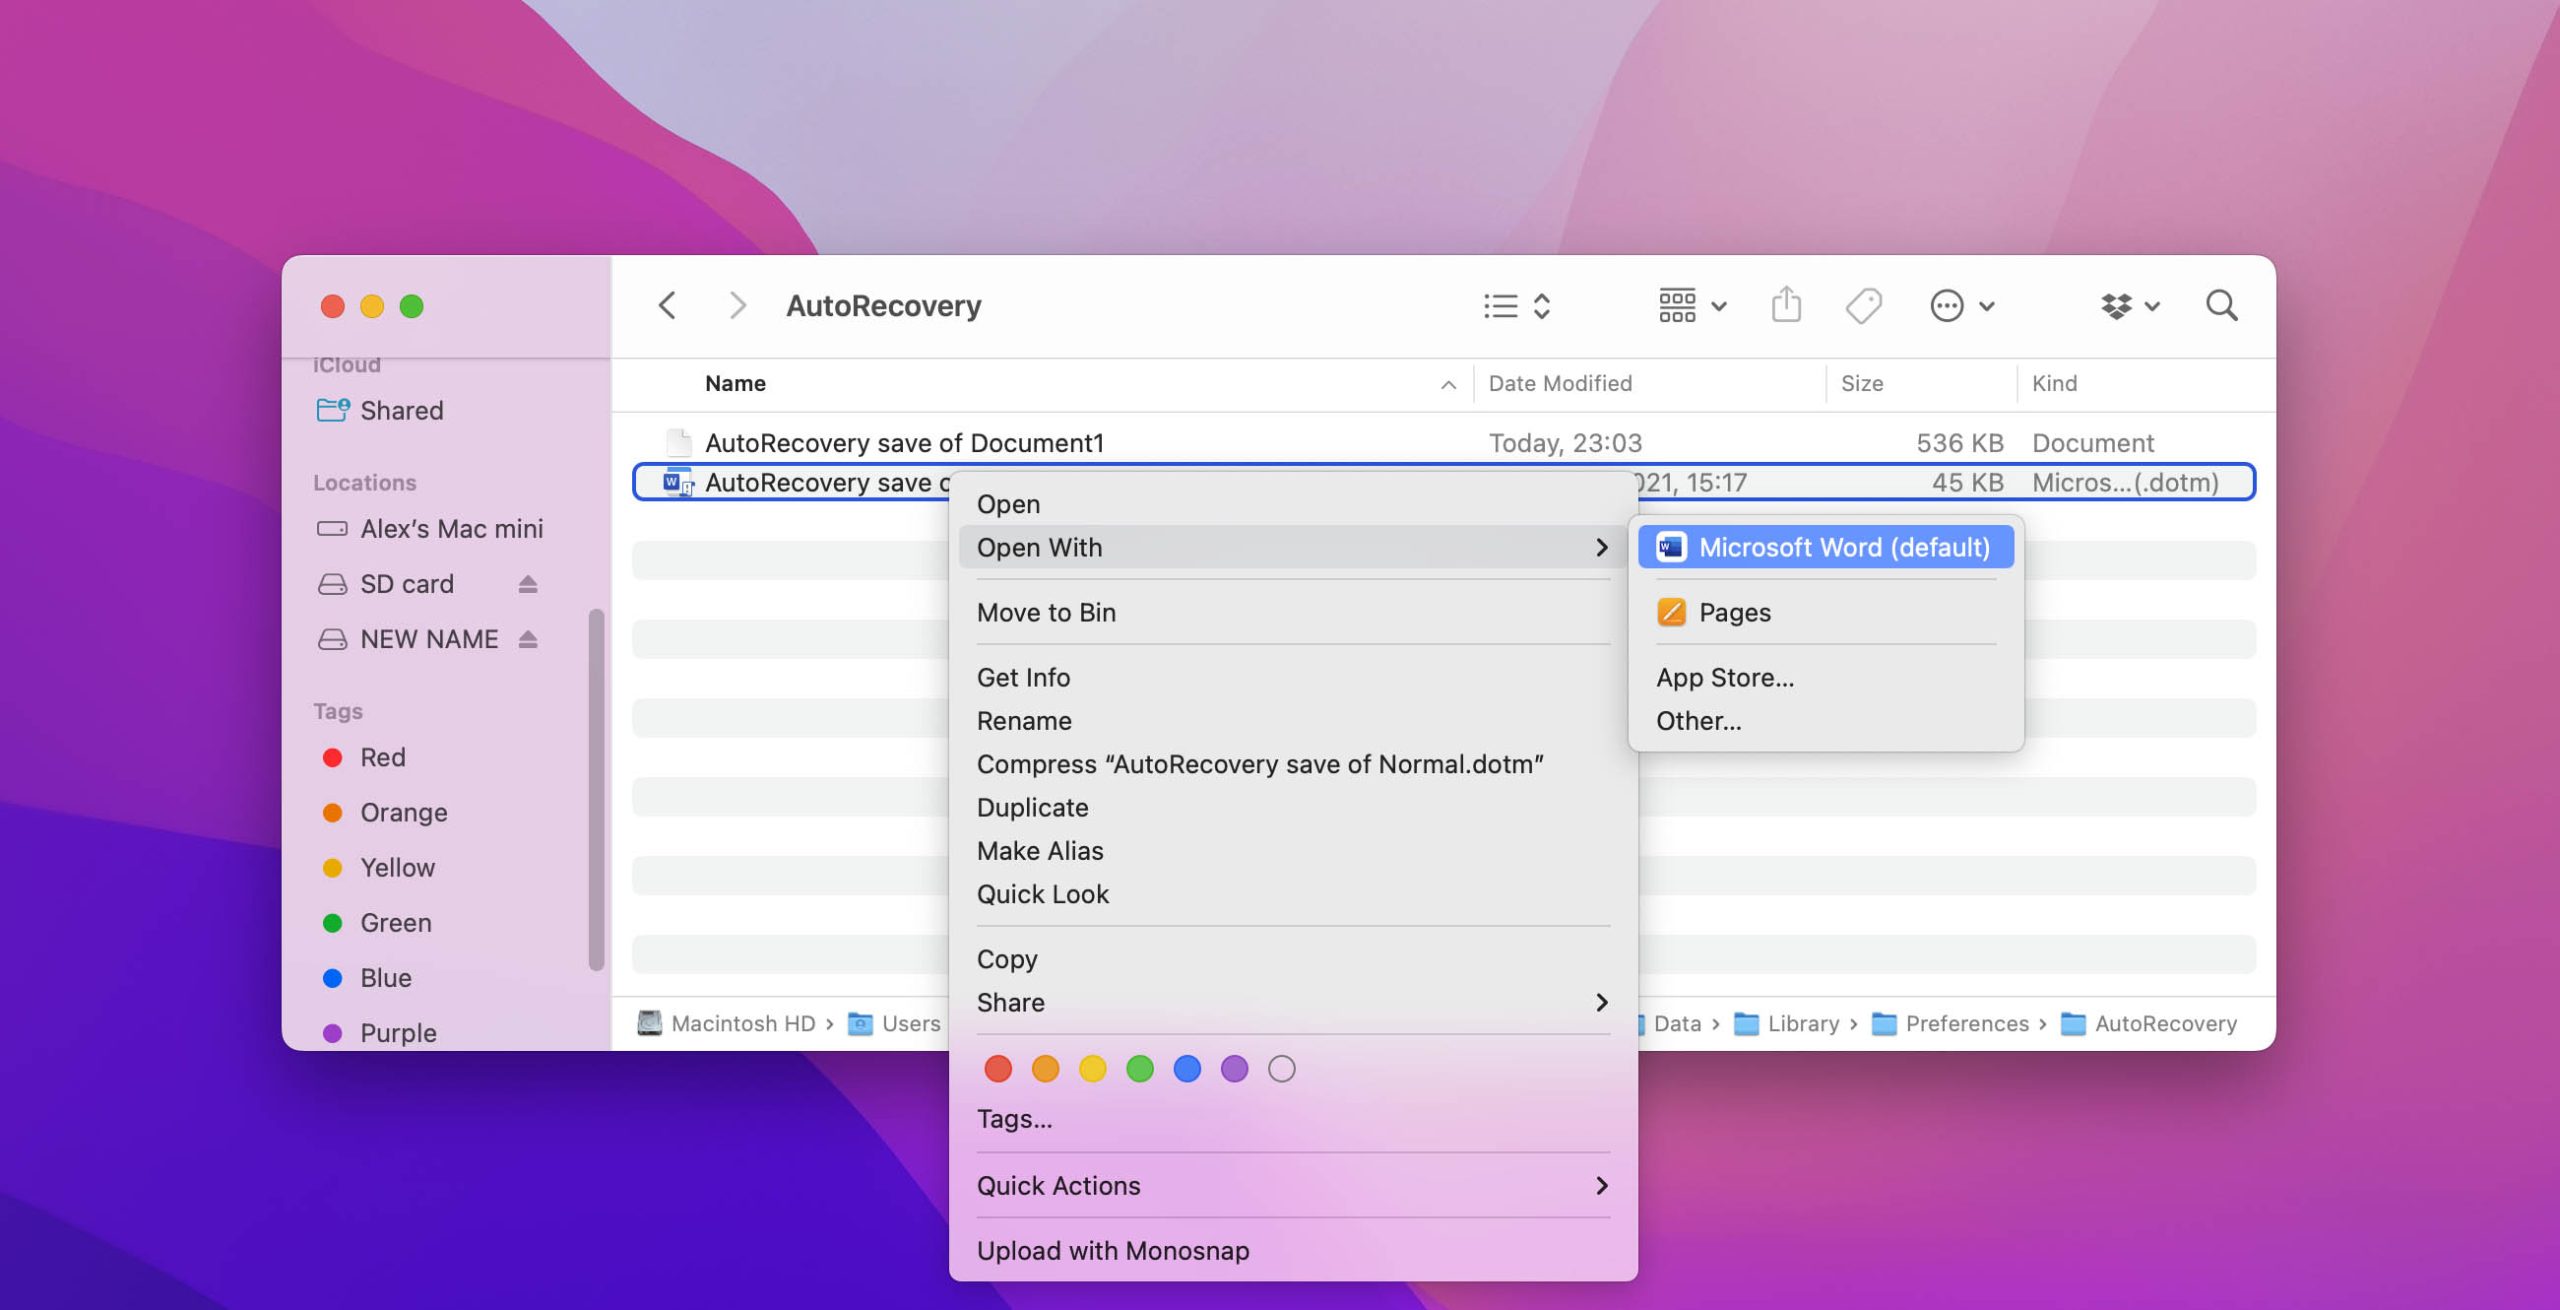
- Save the Word file to a new location to protect it.


Method 3: Recover a Lost Word Document from the Temporary folder
You might be able to recover a lost or unsaved Word document by searching your Mac’s temporary folder. Use the following steps to access the folder to see if it holds your file.
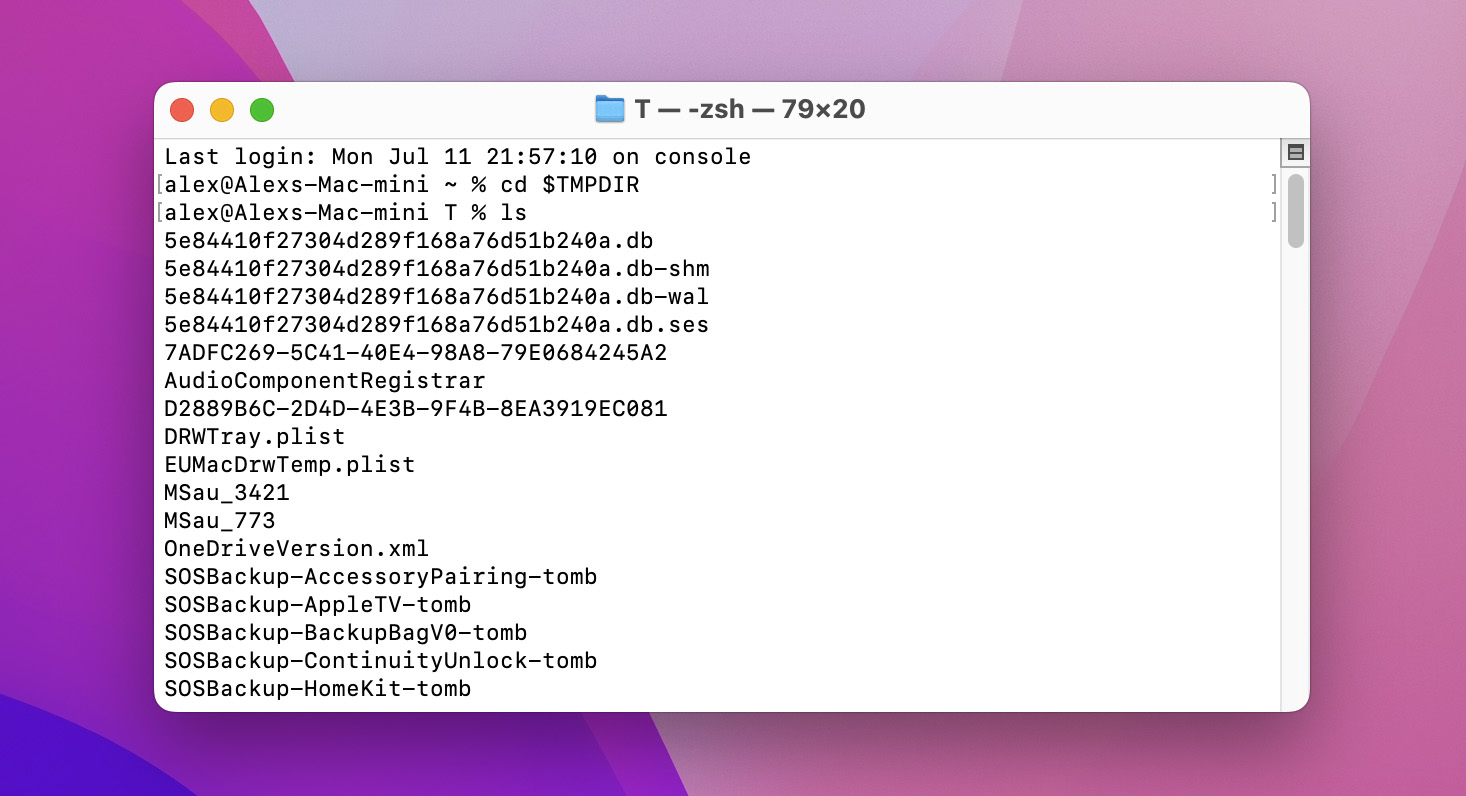
- Open the Terminal app.
- Type: cd $TMPDIR.
- Type: ls to list the files in the directory.
- Look in the TemporaryItems subfolder for temporary files.
- Search for the missing Word file. If you identify a Word doc you want to keep, save it to a new location.

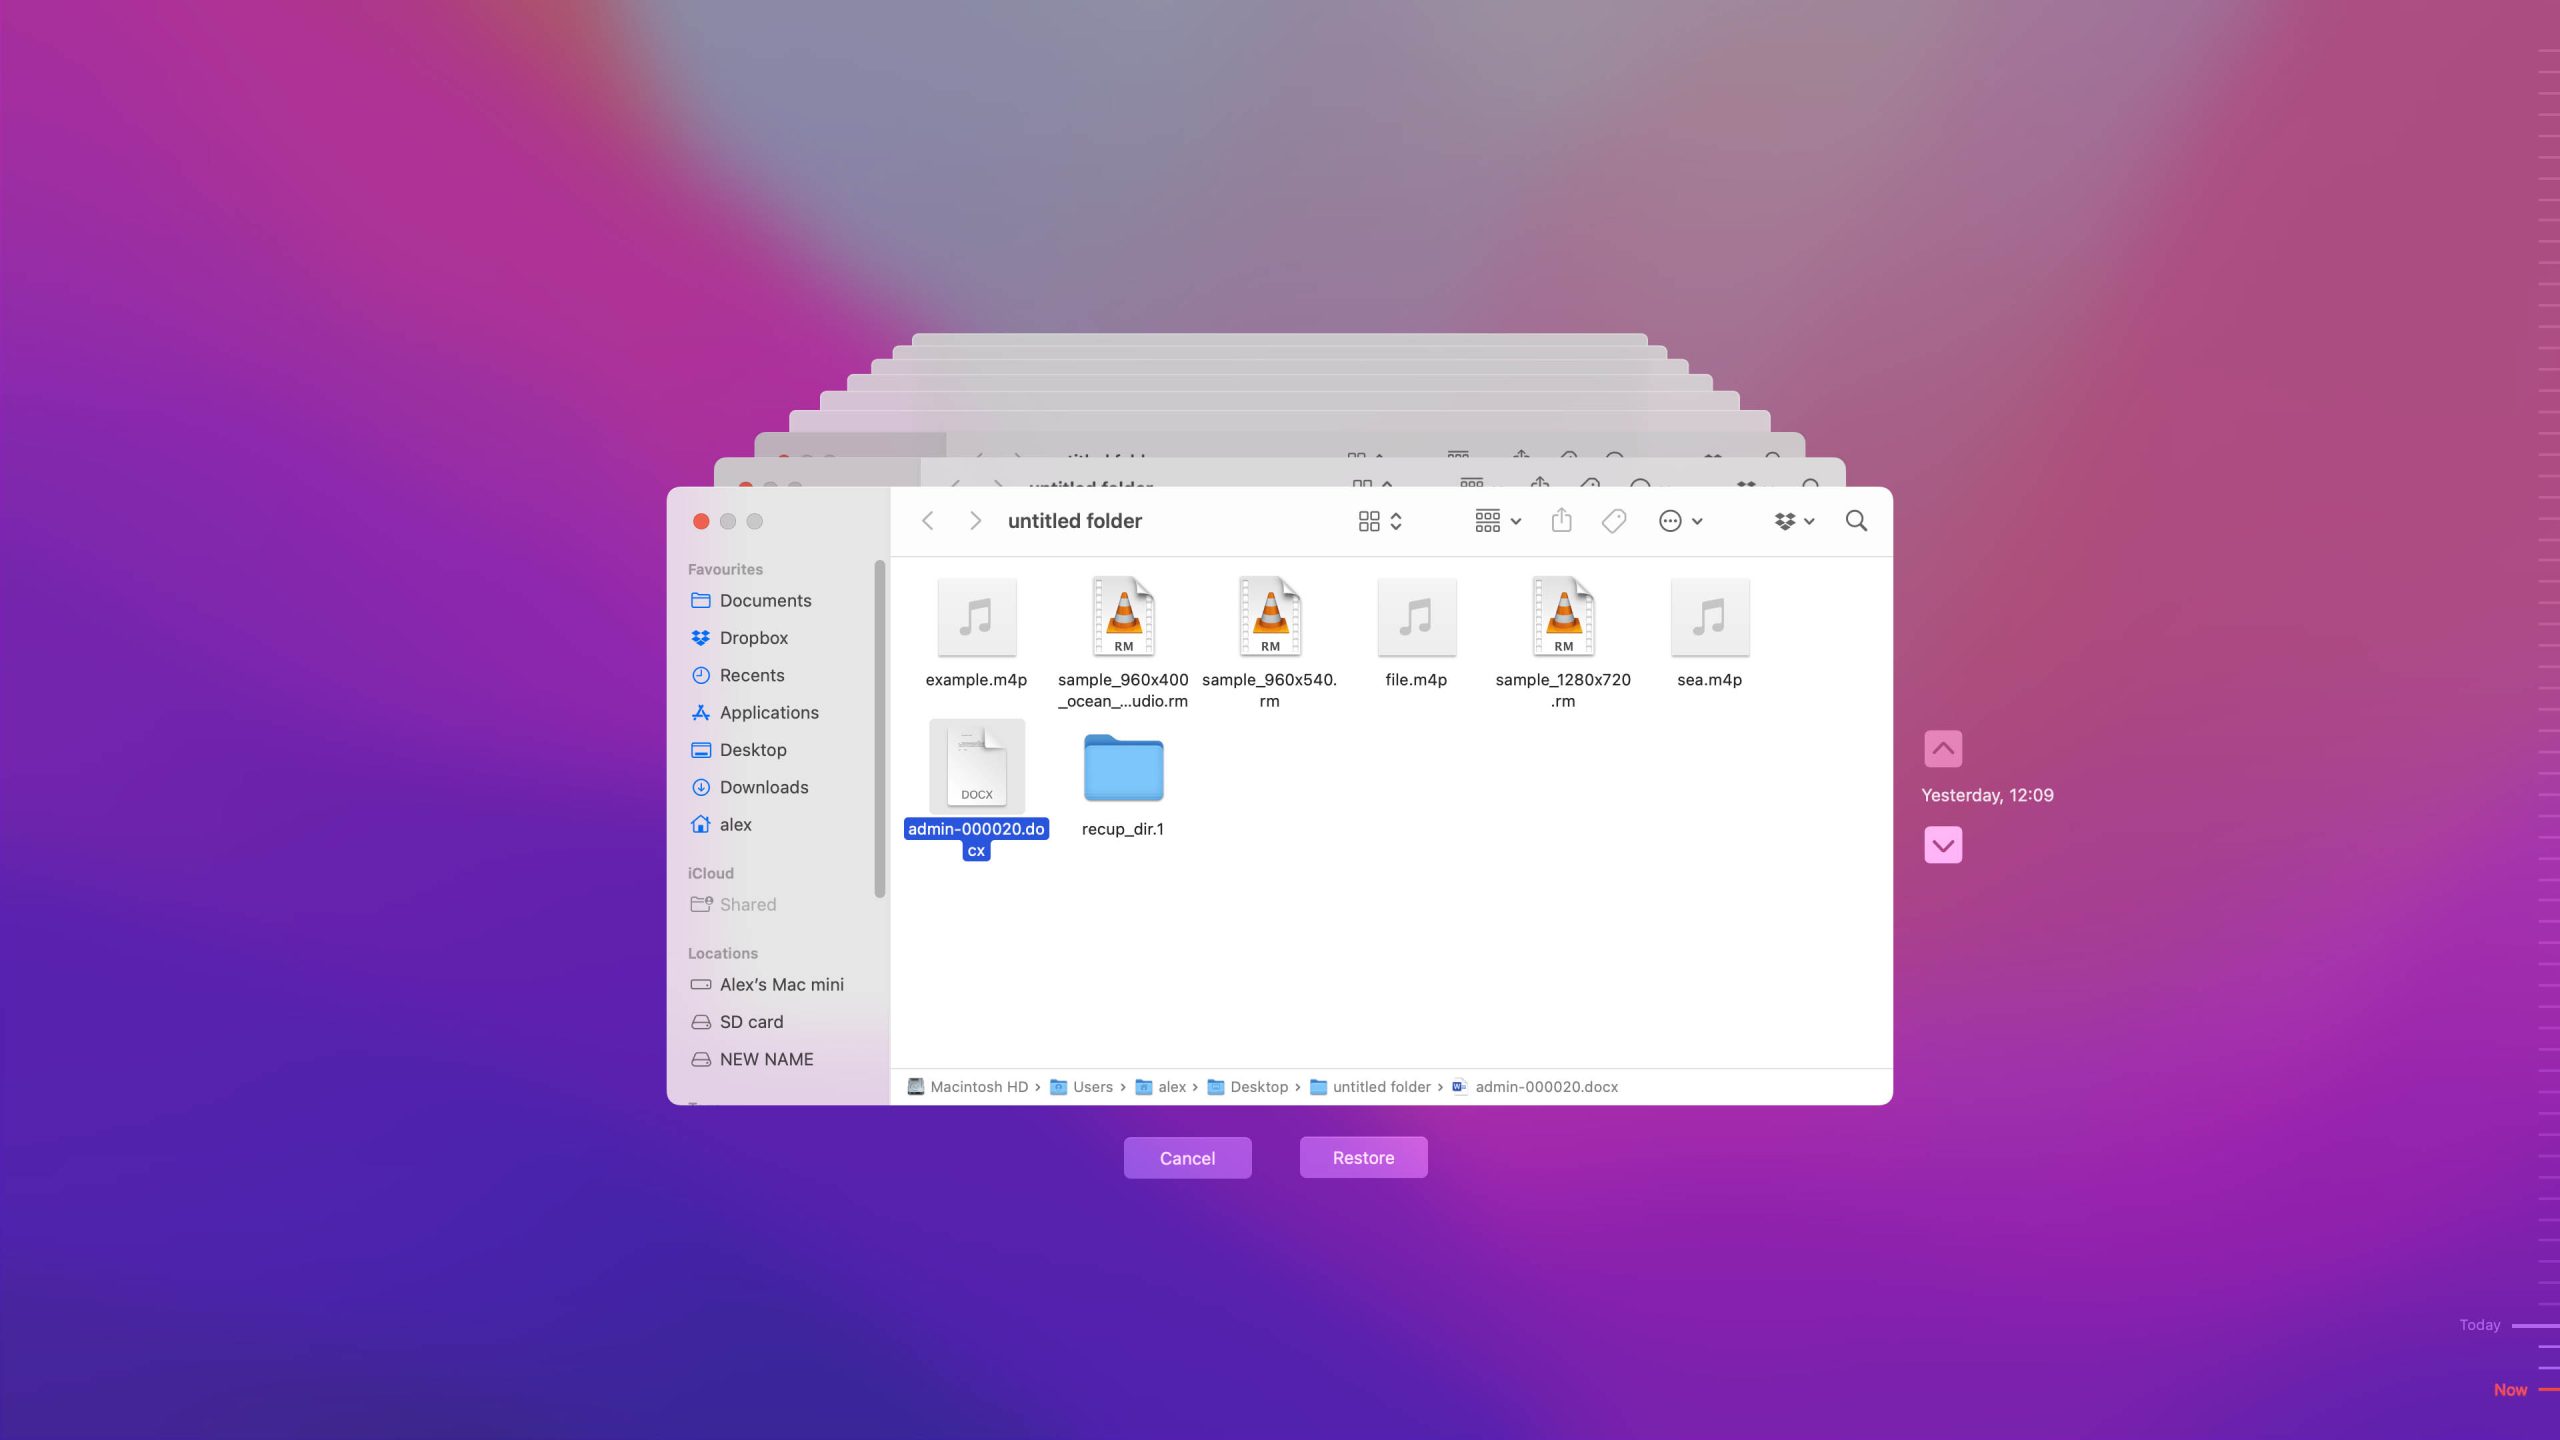
Method 4: Recover an Unsaved Word Doc with Time Machine
The next recovery method we will discuss requires that you have a Time Machine backup available. The backup has to have been taken when the Word file you want was still on the disk. Of course, it will be an older version of the file if you modified it after the backup, but that’s better than no file at all.
- Connect the storage device that contains the Time Machine backup files to your computer.
- Open a Finder window in the folder that last stored the lost Word file.
- Start Time Machine by clicking the Time Machine icon on the menu bar.

- Search through the snapshots and backups available using the Time Machine interface to find the Word document you want to recover.
- Select the file you want and click the Restore button. The Word file will be restored to its original location in the designated folder.
Using Time Machine or an alternate backup solution regularly protects your valuable data and should be an important part of maintaining your Mac. While Time Machine is often used with an additional drive to store backups, it’s not mandatory. The tool actually creates local snapshots of your files on your Mac, allowing you to restore data even when your backup disk is unavailable.
The main difference between local snapshots and Time Machine backups is that local snapshots are kept on the same disk as the files they’re safeguarding and are stored for a maximum of 24 hours or until the storage space on the disk is required. Once the 24 hours are up or some space is needed on the device, Time Machine automatically gets rid of local snapshots.
💡The most updated local snapshot date doesn’t appear in the most recent backup dates found in Time Machine settings.
Method 5: Recover Deleted Word Docs with a Software Solution
You may need to recover a deleted Word doc that has not been backed up and is no longer in the Trash. Once the Trash is emptied, the files are considered permanently deleted and the space they formerly occupied is marked as available for use. Until they are actually overwritten by new data, the deleted Word files can be recovered with specialized data recovery software.
💡It’s important to mention that if you delete files from an internal SSD, it’s highly likely that the device’s TRIM feature will take action to permanently scrub the data. This makes it impossible to recover the files.
For this guide, we’re covering two popular popular options – Disk Drill and PhotoRec. Disk Drill is far superior in terms of recovery prowess, additional features, and ease of use. It also allows you to restore specific files and folders. The downside is that its trial version only allows you to view recoverable files. Actually retrieving them requires you to purchase a license.
PhotoRec, on the other hand, is open-source and free for good, allowing you to attempt file recovery to your heart’s content. But its command-line style nature can be pretty difficult for those who aren’t technically skilled with computers and it doesn’t allow selective file recovery.
Option A: Disk Drill
Disk Drill is among the most well-respected data rescue solutions around and boasts a host of impressive features, such as:
- 🤗 User-friendliness – Disk Drill features an intuitive interface that makes it easy for anyone with general computer skills to recover lost data in just a few simple steps.
- 🏅 Recovery capabilities – Disk Drill employs advanced scanning algorithms that provide exceptional recovery capabilities. It can recover data that other tools miss. Furthermore, the app features cross-platform scanning, allowing you to start and pause a scan on a Mac and then continue on a Windows computer or vice versa.
- ⚙️ Device and file format compatibility – Virtually any type of disk-based storage device can have lost data recovered with Disk Drill. It supports Word document recovery as well as files created in hundreds of other formats.
- 💸 Free data protection tools – In addition to its exceptional recovery capabilities, Disk Drill features free tools to help manage and protect your data. This includes the incredibly helpful byte-to-byte backup function, which lets you create a copy of your files and recover from the backup to mitigate the risk of further data loss from your storage device.
In case you’re not completely sold on the program just yet, Disk Drill comes with a free trial that lets you try out every one of its features and view all the files you can potentially recover.
Without further ado, here’s an easy guide on how you can recover a Word document on a Mac using Disk Drill data recovery software:
- To get started, download the latest version of Disk Drill from the Cleverfiles website and install it on your Mac.
- Run Disk Drill, then select the storage device where your lost Word document was last saved and click the “Search for lost data” button.

- Disk Drill will begin scanning your selected drive for files it may be able to retrieve. The time this process takes depends on how much overall capacity your storage device has. After that, click the “Review found items” button in the top-right corner to proceed to the results screen.
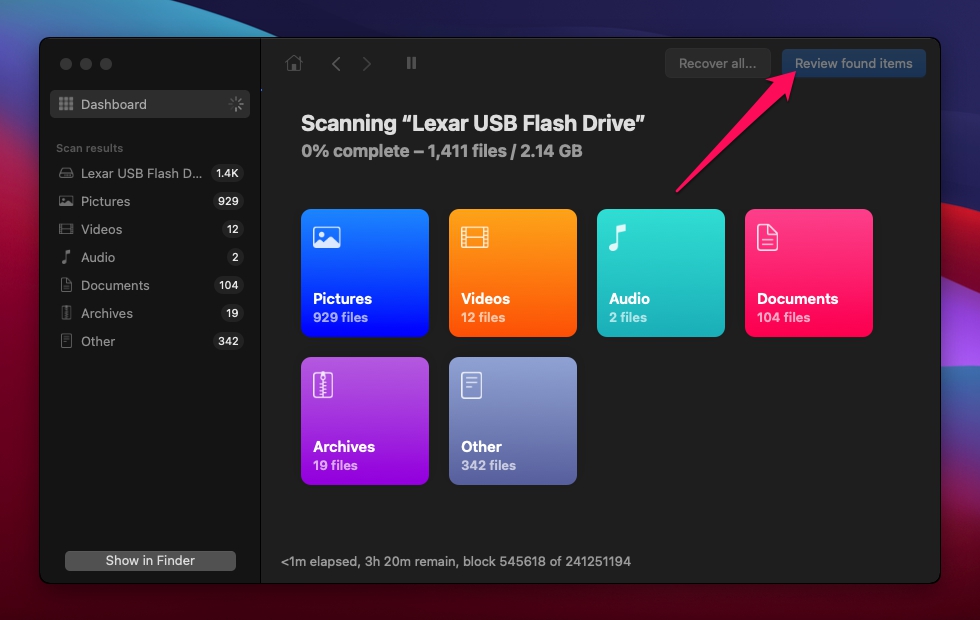
- There’s a good chance you’ll be faced with an overwhelming number of results. Fortunately, Disk Drill offers a couple of ways to narrow down the list. Since we’re looking for a Word document, you can use the “Documents” category on the left-side panel. From there, you can go even further and use the “File Type” dropdown to only display items of a specific file type.
Alternatively, you can use the search bar in the top-right corner. The search feature accepts file extensions, so you can use “.doc” or “.docx,” which are common extensions for Word documents. Once you find the one you want to retrieve, make sure to tick the checkbox next to the file name, then click the “Recover” button to continue.

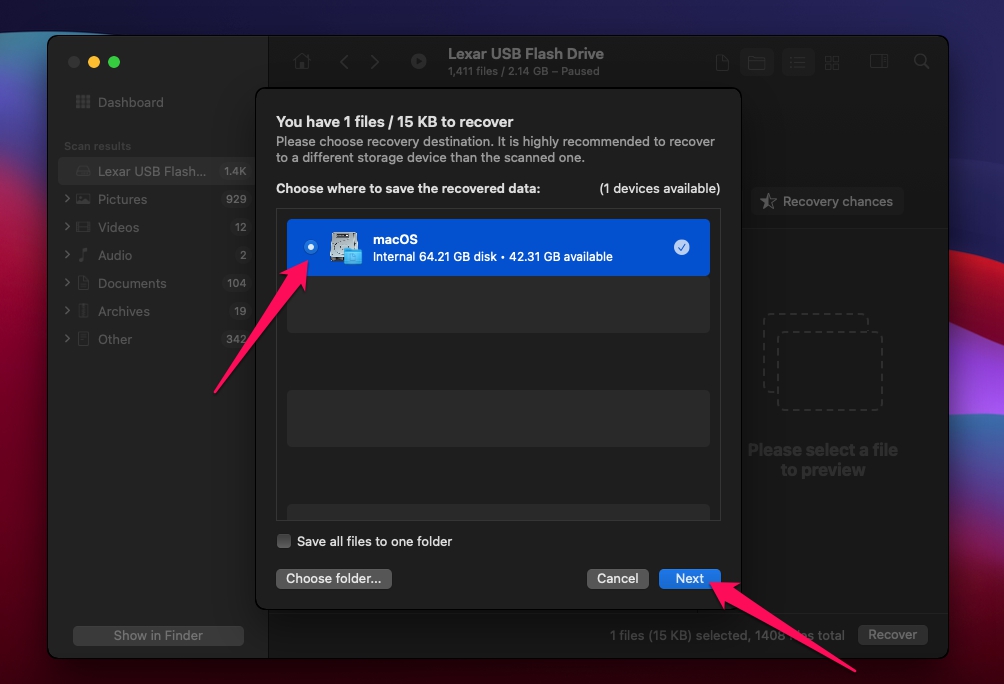
- Upon clicking, a small pop-up will appear, asking you to decide on a destination for your retrieved Word file. To avoid issues, it’s best that you choose a storage device separate from the one you just scanned. Click “Next” and Disk Drill will begin attempting to restore your lost document.
- Once done, you’ll be greeted with a completion message.


Option B: PhotoRec
Photorec is a respectable alternative that’s open-source and completely free. The downside is that the app doesn’t have a graphical interface on Mac and requires you to navigate the recovery process through a terminal session.
This may prove to be a bit more advanced than most casual users are comfortable with and a bit of a cumbersome experience overall. It’s also only capable of indiscriminately recovering all detected files from a disk or partition, though you can decide on the file types you want to retrieve. On the other hand, it remains an excellent option if you’re not willing to shell out money to get your Word document back.
It’s worth noting that PhotoRec comes bundled with another recovery executable called TestDisk, so don’t be confused if they’re often mentioned in the same breath. Here’s a step-by-step guide on how to recover a lost document using PhotoRec:
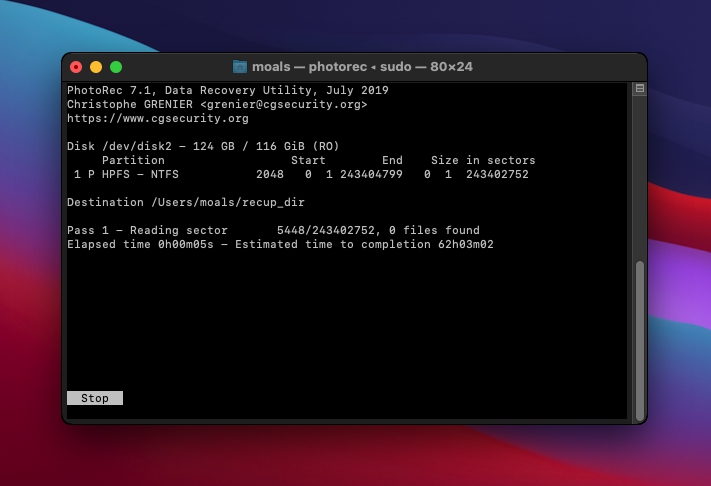
- First, download the PhotoRec archive from the CGSecurity website and extract it on your Mac.
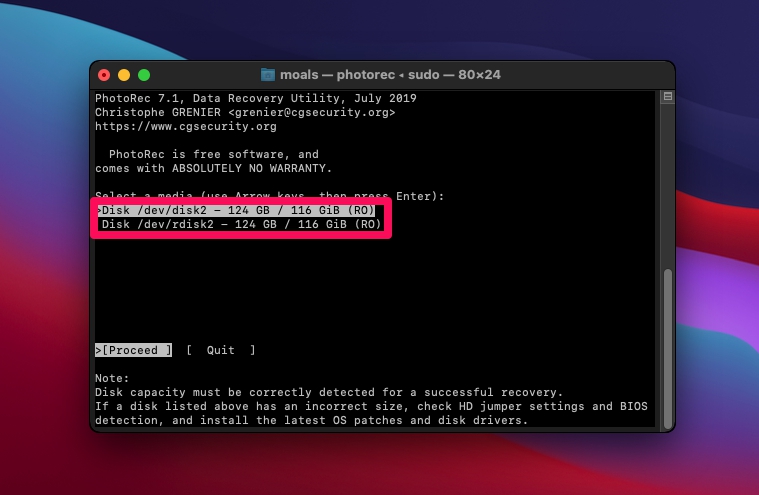
- Launch Photorec, then select the media you want to recover from and hit the Enter key.
- Next, highlight the partition you want to scan and hit Enter. You can also choose the “No Partition” option if you want to scan the whole disk. Another thing you can do is head to “File Opt” and select only doc and docx formats, which are the file formats used by Word documents.

- After that, select the file system of the partition and press Enter.

- Choose the destination where you’d like your recovered files to be saved and press the “c” key to proceed.

- Upon clicking, PhotoRec will begin scanning your disk/partition for all retrievable files, and any recovered ones will be saved in the destination location you specified in the previous step.


Method #6: Recover a Previous Version of a Word File on a Mac
This method attempts to recover a previous version of a Word file from within Microsoft Office. You have two options.
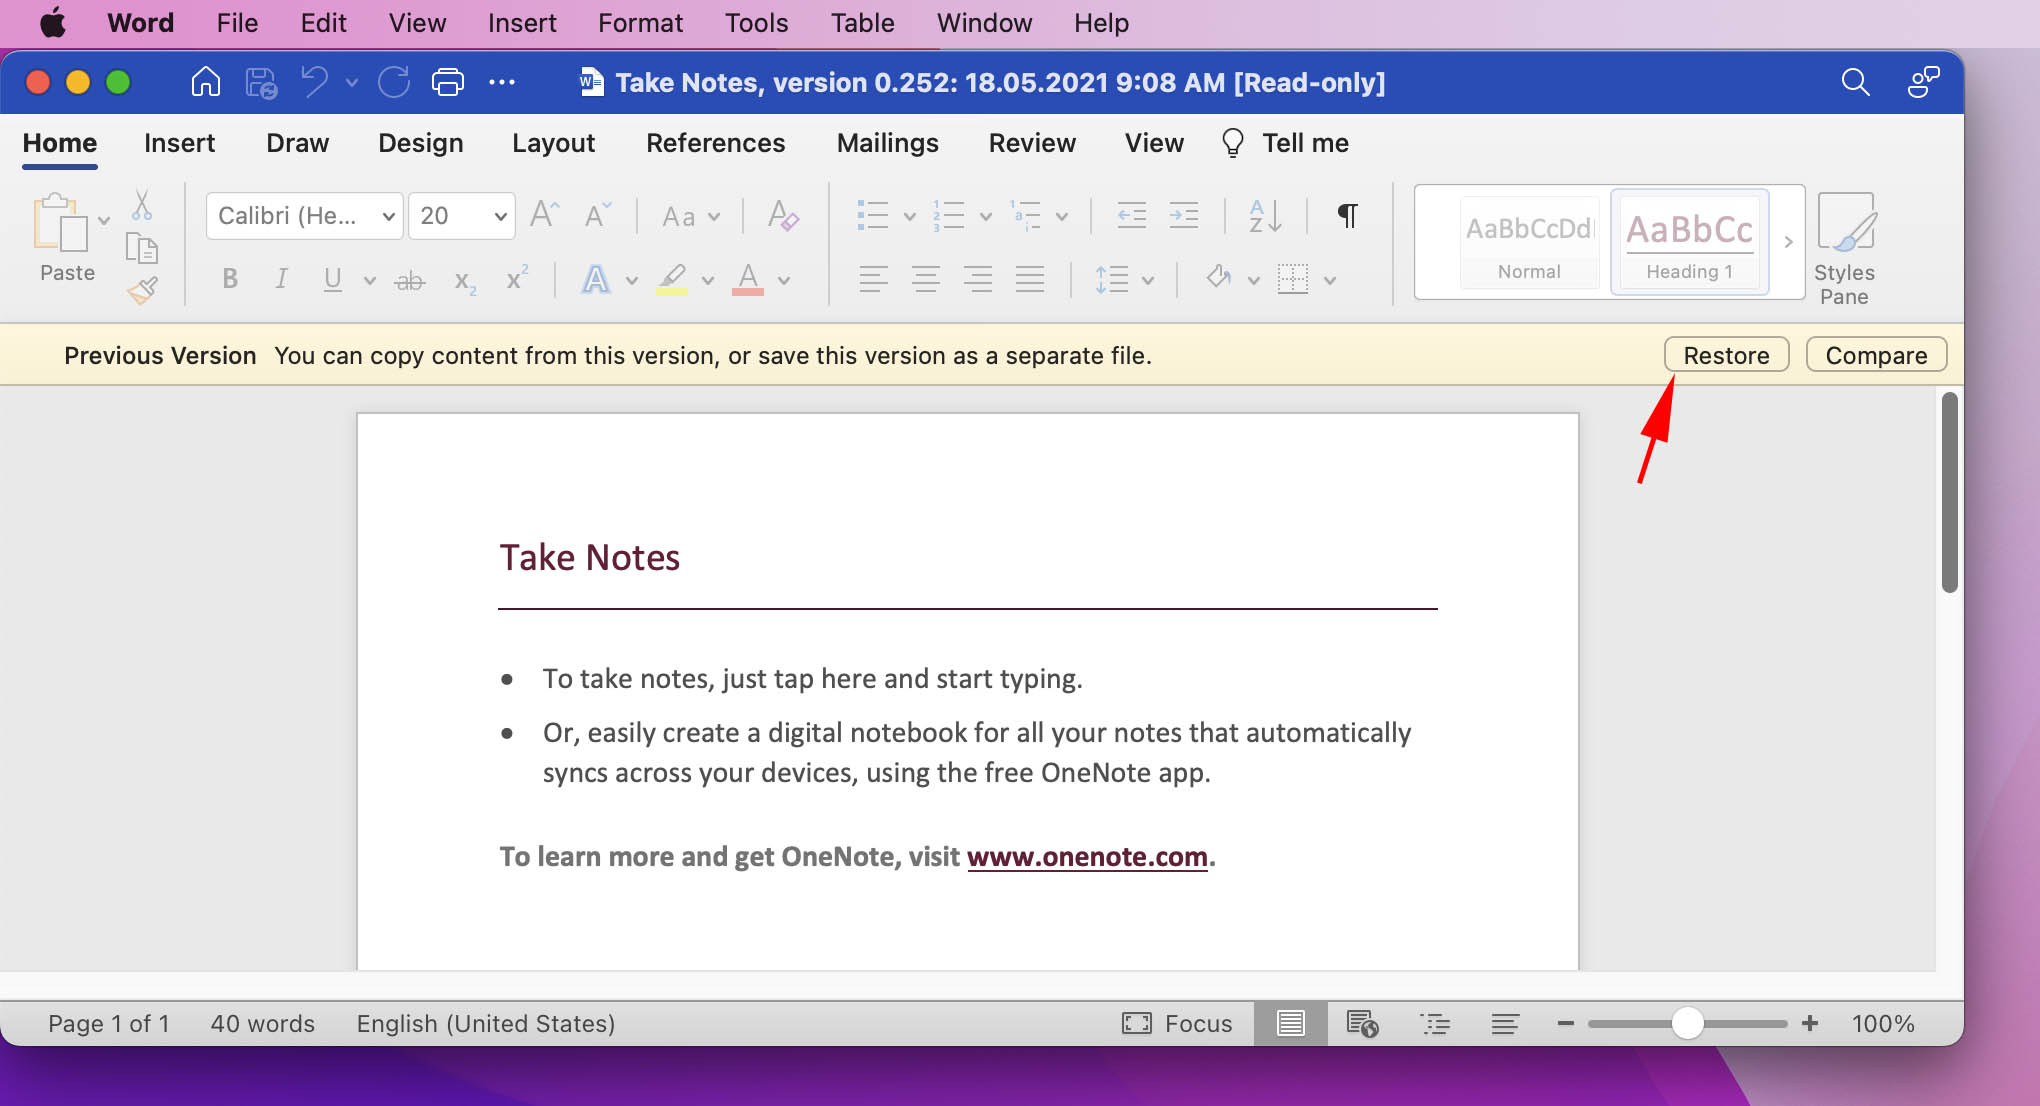
If the file has been saved, follow these steps:
- Open the file.
- Click File > View Version History.
- On the Version History tab, select the desired version.
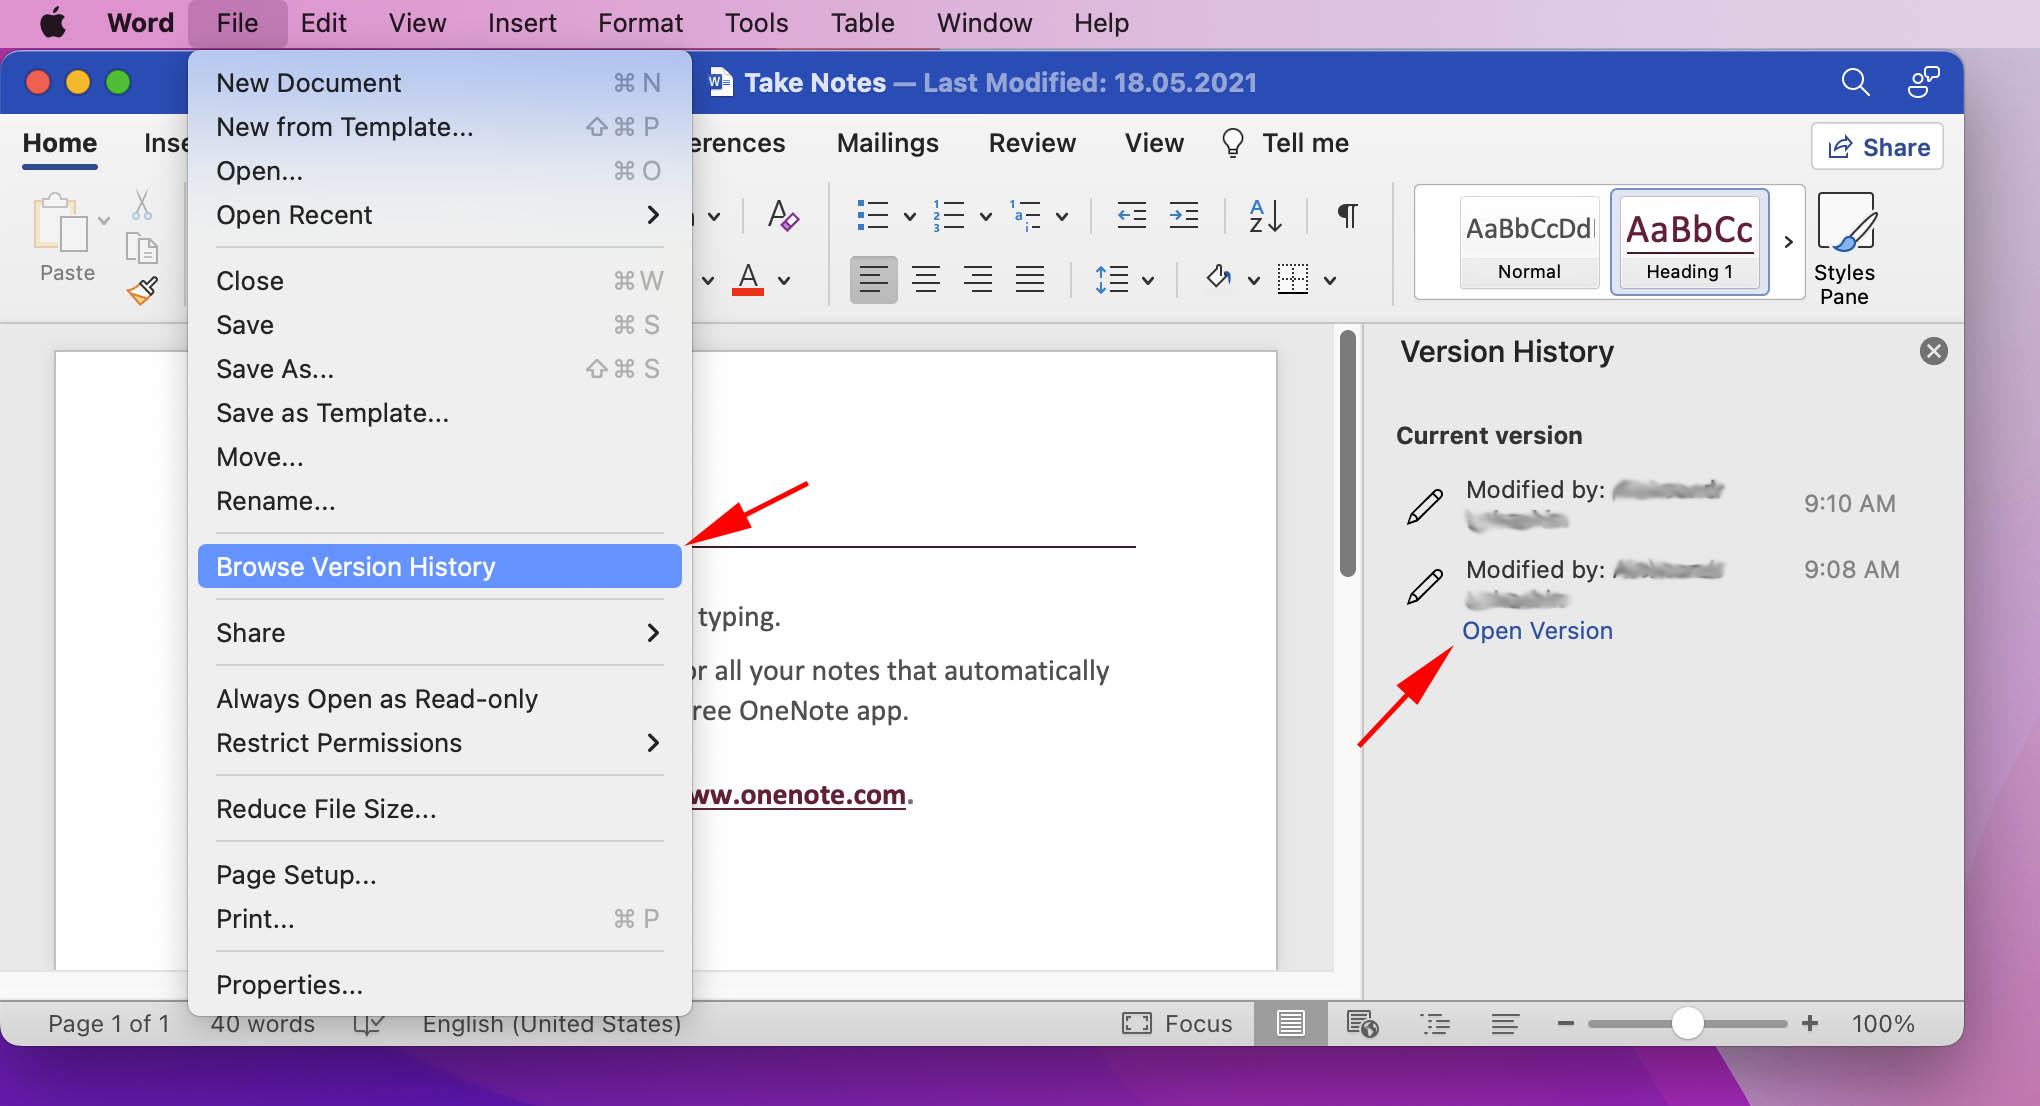
- Click Restore in the bar at the top of the file to use the current version or save it to another location.
Use these steps if you have not saved the file:
- Open Microsoft Word and the unsaved document will be opened.
- In the bar at the top of the file, select File > Save As… to save the file.

Method #7: Contact Data Recovery Service
If none of the aforementioned methods do the trick, then your next course of action would be to look up a competent data recovery specialist in your area. Or at least one that’s able to provide services to your location. The recovery experts specialize in retrieving data from scenarios that are beyond conventional DIY methods. If you’re on the fence about using such a service, here are some pros and cons to help you decide:
Pros:
- Given how you’ll have professionals handle the job, using a data retrieval service usually yields much higher chances of recovery.
- They’re equipped to deal with a far wider range of data loss scenarios.
- It’s safer overall.
Cons:
- They usually cost quite a bit more than investing in any of the other methods outlined in this list.
- It may take a considerable amount of time to retrieve your files, especially if you need to ship out your storage device.
Tips to Improve Your Odds of Recovering Lost Word Documents
Data loss scenarios are often unexpected, so it’s always a good idea to prepare for these types of situations before they even happen. That way, you’ll give yourself the best chance of recovering Word documents if they ever end up missing. Here are a few tips to keep in mind that are sure to improve the likelihood of recovering lost Word files:
- Enable AutoRecovery: Microsoft Word includes an AutoRecovery feature that automatically saves a backup of your document. You can even dictate the number of minutes before each backup and the location where they’re saved. You can find and enable this feature in File > Options > Save.
- Configure the backup: The best way to safeguard data on your computer is to routinely create backups. That way, if you encounter issues like accidental deletion or system/device trouble, you can just simply retrieve important files from your backup. You can use backup solutions built into your MacOS, like Time Machine, or you can opt for one of the many available third-party programs instead.
- Utilize online storage: If you prefer an online solution or just don’t have the storage space for regular offline backups, then you should look into an online storage platform. This lets you back up your files to cloud storage services like Google Drive or Microsoft OneDrive, allowing you to access them anywhere there’s an internet connection.
- Enable Online File Saving: Microsoft Word includes a built-in feature that, when enabled, allows the program to automatically save a document to OneDrive or SharePoint Online whenever a change is made. This can be an excellent way to keep your documents safe against unforeseen data loss scenarios.
FAQ
Use the following procedure to recover an unsaved Word document on your Mac if you have AutoRecovery turned on in the app.
- Make hidden folders visible with the Command+Shift+Dot (.) keystroke combination.
- Go to this folder: /Users/<username>/Library/Containers/com.Microsoft/Data/Library/Preferences/AutoRecovery.
- Look for the unsaved file and open it in the Word application.
- Save the file to a safe location to protect it.
You can find temporary files on your Mac by opening and searching the TMP directory with this procedure:
- Launch the Terminal app from /Applications/Utilities/.
- Enter the following command: open $TMPDIR.
- Search the directory for your missing files.