

Table of Contents
Losing an important file or folder on your MacBook Air or MacBook Pro is always a stressful experience. Unfortunately, it can happen to anyone: when you mistakenly empty Trash with your files, accidentally reformat the hard drive, physically damage your computer, and the list can go on and on. But the good news is that in most cases, it’s possible to bring back the deleted or missing data.
| Recover data from a working MacBook | Method #1: Use a Data Recovery Tool Method #2: Use Target Disk Mode Method #3: Restore From Time Machine Backup Method #4: Use iCloud Backup Method #6: Contact Data Recovery Service |
| Recover data from a dead MacBook | Method #2: Use Target Disk Mode Method #3: Restore From Time Machine Backup Method #4: Use iCloud Backup Method #5: Mount Your Drive to Another Device Method #6: Contact Data Recovery Service |
Factors that Can Impact the Chances to Recover Data from MacBook
When it comes to retrieving lost data from your MacBook, several crucial factors can significantly influence the outcome of your recovery efforts. Here’s a breakdown of these key elements, complete with practical examples:
⚠️ Type of data loss: The specifics of how the data was lost play a pivotal role. For instance, accidentally deleting files and then emptying the Trash is a common scenario, often with a higher recovery success rate. In contrast, data loss due to a hard drive failure, like a MacBook not booting up after a software update, presents a more complex challenge.
⏱️ Elapsed time since data loss: The interval between losing your data and starting the recovery process is critical. The longer you wait, the more likely new data will overwrite the lost files. For example, if you continue to download files or install applications after data loss, these actions can reduce the chances of successful recovery.
💻 HDD vs. SSD recovery differences: The success of data recovery on MacBooks largely depends on whether the device uses an HDD or an SSD. HDDs, being magnetic storage devices, often allow for easier data retrieval after deletion, as the data remains until overwritten. In contrast, SSDs, common in most modern MacBooks, use TRIM technology which quickly erases deleted data to optimize performance, making recovery more challenging. The majority of MacBooks (especially models post-2015) are equipped with SSDs, significantly influencing the approach and success rate of data recovery.
🛠️ Condition of your drive: The health of your MacBook’s hard drive or SSD is a determining factor. A drive with physical damage, such as one from a MacBook that has been dropped, may require professional data recovery services, unlike a drive in good condition.
💾 Backup availability: Regular backups, like those made with Time Machine, can be a lifesaver. If you’ve accidentally deleted your Downloads folder but have a recent Time Machine backup, restoring your files becomes a straightforward process.
How to Perform a MacBook Pro Data Recovery
Once you’ve checked the Trash on your MacBook and are sure that the files you’re looking for are actually gone from your computer, you can start the recovery process. Here are the most effective data recovery methods that can help you restore deleted files on your MacBook Pro. Let’s dive in since time is of the essence in these situations.
Method #1: Recover Permanently Deleted Data from a MacBook Pro
Using a specialized data recovery tool is usually the go-to method for most data loss scenarios on your Apple computer, whether it’s the latest MacBook running an M2 or M3 chip or any earlier model. However, this method will work only for MacBook that are properly functioning and don’t have any physical damage.
If you’ve never used recovery software or want advice on which one to choose, our recommendation would be an application called Disk Drill since it’s easy to navigate and has shown incredible data recovery results, especially with MacBook Pros.
Follow these steps to recover missing, lost, or deleted files from your MacBook using a data recovery tool:
- Download Disk Drill on your MacBook Pro and follow the onscreen instructions to install it.
- Launch the application on your computer.
- Click Storage devices on the sidebar on the left and select the drive that contains the files which you wish to recover.
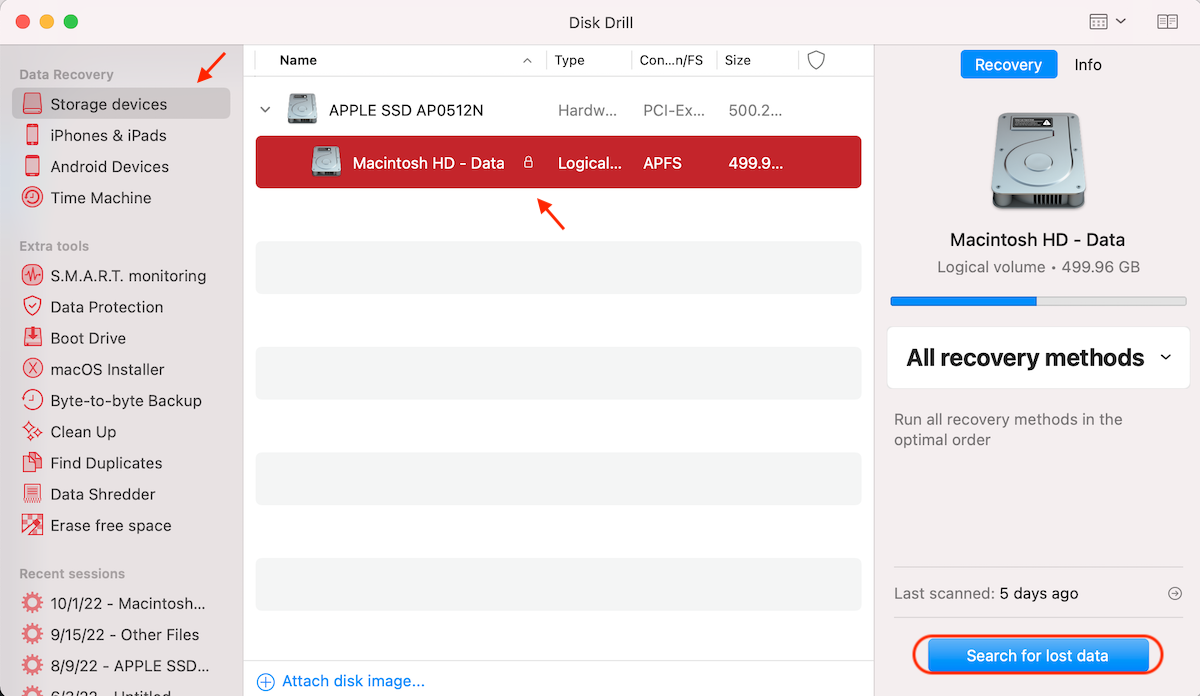
- Click the Search for lost data button to start the scan.
- Wait for the scan to finish and click Review found items.
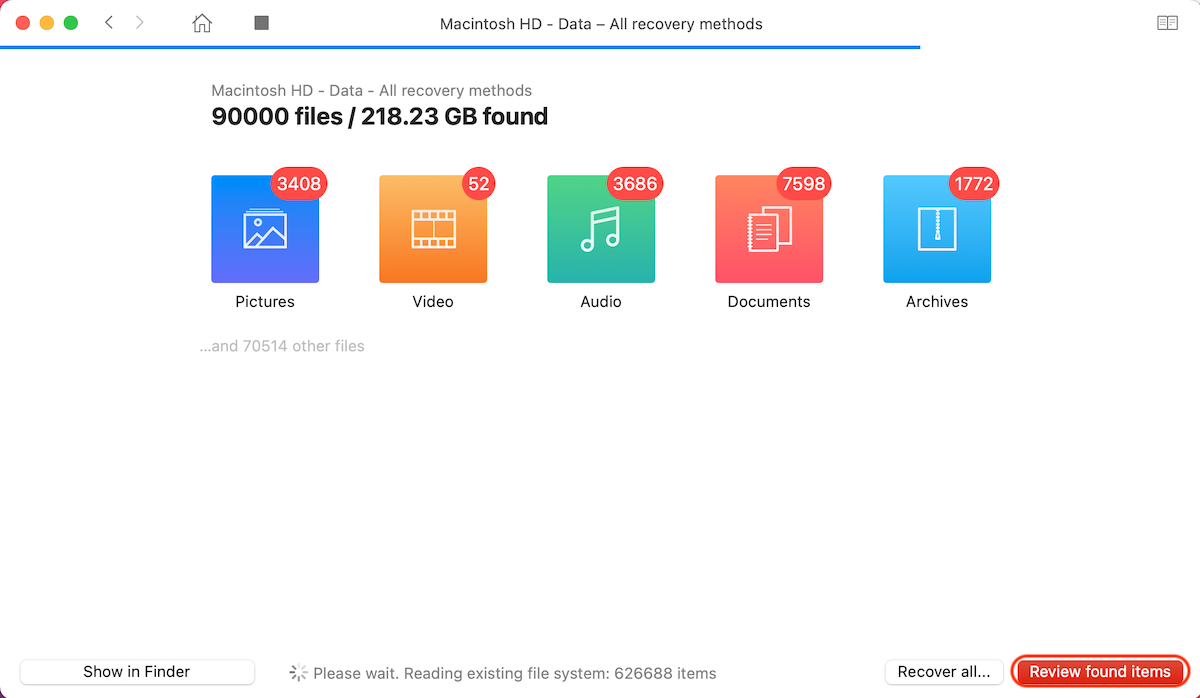
- Use the sidebar on the left to look for specific files (pictures, documents, archives, etc.), or use the search field on the top-right corner to type in the file’s name or extension.
- Choose the file or files that you wish to restore and click the Recover button.

- Select a preferred destination for the recovered data and click OK.
Aside from this standard way of using Disk Drill, it’s also possible to launch this application from Recovery Mode on your MacBook Pro. So if for any reason, your MacBook is not functioning properly, it’s a good idea to perform the data recovery process with Disk Drill once your computer is booted into macOS Recovery Mode.
Method #2: Retrieve Data Using Target Disk Mode
Target Disk Mode is a feature that comes with all Macs that allows one to connect two Macs and transfer data between them. It can also be used for the purpose of data recovery for MacBook Pro (it’s especially helpful when the troublesome Mac isn’t functioning properly).
To apply this method, connect the working Mac and the one that has suffered from data loss with the help of the recovery port and a cable (USB, USB-C, or Thunderbolt). Then follow these steps to recover data from a MacBook Pro hard drive:
- Download and install Disk Drill on the working Mac.
- To boot the troublesome MacBook Pro in the Target Disk Mode, press the power button and then immediately press and hold the T key.

- Launch Disk Drill on the working Mac and choose the troublesome MacBook from the list of available devices.
- Click Search for lost data to initiate the scan.
- Follow steps 6-9 described in Method #1.
Method #3: Restore Data Backed Up with Time Machine
Time Machine is a built-in tool that comes with every Mac used for backing up and recovering data. There are two options when trying to recover data from a Time Machine backup on your MacBook Pro: either recover separate files or the entire system backup.
Method #3.1: Recover Previous Versions of Files
Follow these steps to recover lost or deleted files on a MacBook Pro SSD or HDD using Time Machine:
- Connect the recovery disk containing your Time Machine backups (if you used an internal drive for backing up your computer, skip this step).
- Click the Time Machine icon on the menu at the top of the screen and choose Enter Time Machine.

- Go to the folder where the file used to be located before deletion (or use the search field at the top left to type in the file extension or name) and then use the arrow or the timeline on the right of the screen to choose the needed backup version.
- Select the file you wish to recover and click the Restore button.

Method #3.2: Recover Entire System Backup
You should choose this option if your MacBook Pro’s system or drive is damaged. But keep in mind that before you proceed with the recovery process, you must first reinstall macOS on your computer. To do that, you should:
- Boot your MacBook Pro in Recovery Mode (if you have an Intel-based Mac, turn it on by pressing the power button and then immediately press and hold Command + R; with M1 Macs, press and hold the power button until you see the Startup Options window).
- Choose Reinstall macOS and click Continue.
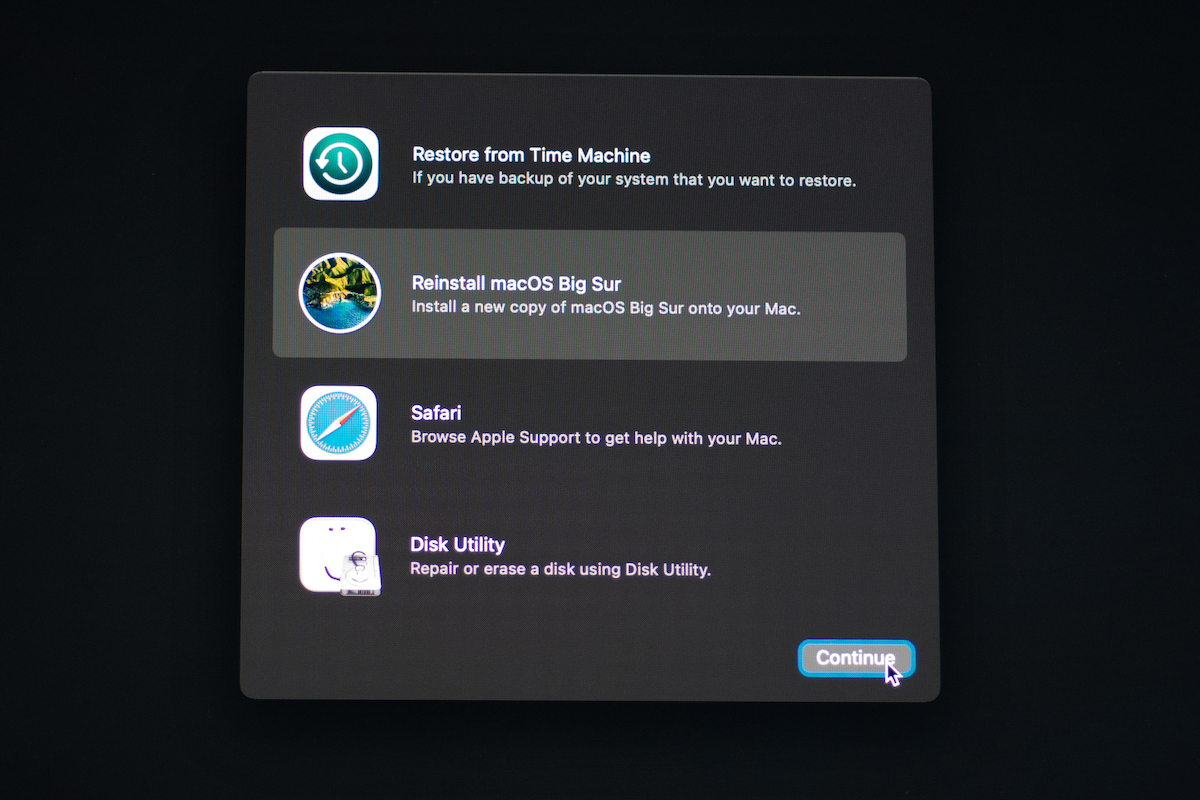
- Follow the onscreen instructions.
In the process of reinstalling the operating system, Migration Assistant will ask you whether you wish to transfer data. When that happens, choose Transfer From a Time Machine Backup and click Continue to confirm. After that, select the needed backup version and wait for your computer to finish the recovery process.
Method #4: Use iCloud Backups
If you used to export or synchronize your MacBook Pro files with iCloud Drive, you should be able to easily retrieve a copy of the missing or deleted file from it. Here’s how to recover MacBook files using iCloud:
- Go to icloud.com and use your Apple ID and password to sign into your account.
- Click the iCloud Drive icon.

- Choose the file or files that you wish to recover.
- Click the cloud (with an arrow pointing down) icon to download the selected files.

Method #5: Mount Your Drive to Another Device
This data recovery method can be of great help, especially in cases when your MacBook won’t turn on. However, mounting your MacBook’s drive to another device is not an easy thing to do, therefore only experienced users or data recovery professionals might be able to handle such a task.
It’s possible to mount your MacBook’s drive to either another Mac or a Windows-based computer. To do that, you’ll have to properly remove the drive from your faulty MacBook Pro and place it in an enclosure. Then you should connect the enclosure to a working computer and perform the data recovery process from there.
Method #6: Contact Data Recovery Service
If you’ve tried the methods described above or you’re afraid that you can do even more harm to your data loss case, the one last option that you have is to resort to a data recovery service for help. But keep in mind that the data recovery lab will have only one chance of recovering the lost data from your MacBook Pro, so make sure to choose a reliable and professional service.
FAQs
If your MacBook Pro is unbootable, your best option would be to remove the drive from the computer and, using a specialized enclosure, connect it to another device. Once you’ve successfully mounted the drive, you should be able to access all your files or scan the drive using a tool like Disk Drill and recover the data.
It’s impossible to give a simple answer since every job is different, and the price depends on multiple factors such as data loss reasons (the price for recovering data from Macs that had water damage and from ones that had HDD corruption will be different), timing, etc. MacBook Pro hard drive recovery price may be as low as $100 or as high as $3000.
When it comes to choosing a data recovery tool for macOS-based computers, we recommend trying out Disk Drill since this application is simple to navigate, reliable, and after performing multiple tests, has proven to be an effective solution to various data loss scenarios. This tool has a free version that allows you to scan your drive and preview the potentially recoverable data. But to actually recover the files, you need to get the Pro version.
Also, depending on your data recovery needs, there are a few other tools that you can try, such as EaseUS, Stellar, DiskWarrior, PhotoRec, etc.
Yes, there are ways to recover data from a dead MacBook. However, the results will vary depending on the severity of the issue. Here are a few options that you can try:
- Use Target Disk Mode
- Restore from a Time Machine backup
- Use iCloud backup
- Mount your Drive to another device
- Contact data recovery service
Yes, you definitely can. If your broken MacBook is still bootable, the easiest option would be to back up the data from it to an external drive with the help of Time Machine. Or another option would be to use Target Disk Mode to transfer the data directly from one Mac to the other.
The easiest way would be to type in Google search the following: data recovery service near me. But unfortunately, it’s not always possible to find a reliable and professional data recovery center at all locations, which is why it’s a good idea to explore remote data recovery services.
Conclusion
Data loss is no joke. And unfortunately, MacBook Pro data recovery is not always a simple and straightforward process. But the good news is that in most cases, you can actually bring back the lost or deleted files with one or the other data recovery method. Just make sure that you start the data recovery process as soon as possible since time is of the essence in such situations.