

Table of Contents
Many MacBook users try to avoid using the Terminal app because of its command-line interface. If you’re one of those people, then you’re missing out on a lot since this tool has awesome data recovery capabilities that can help bring your deleted files back. And don’t worry, there’s nothing complicated in using Terminal (our step-by-step instructions will guide you all the way).
Can You Recover Deleted Files Using Terminal Commands on Mac?
Many Mac users shy away from using the Terminal due to its command-line interface, but it’s actually a powerful tool for data recovery. The Terminal app, preinstalled on all Macs, offers a range of commands that can help recover deleted data. However, its effectiveness varies based on the complexity of the data loss situation.
✅ Pros:
- Direct system interaction: Terminal lets you dive straight into system operations. For instance, if you’ve just deleted a file and it’s still in the Trash, using cd .Trash and then mv filename ../ can quickly restore it to its original location.
- Efficient for simple tasks: For basic recovery, like retrieving files that haven’t been permanently deleted, Terminal is quite effective and faster than navigating through graphical interfaces for users that get used to command-line interface.
❌ Cons:
- Complex for average users: Terminal can be intimidating. A small typo in a command, like mistyping a file name or path, can lead to further issues.
- Limited in complex scenarios: In cases of severe data loss, like a corrupted hard drive or files that have been permanently deleted (not just sitting in the Trash), Terminal’s ability to help dwindles. In such situations, its commands might not suffice, and you would need more advanced tools or professional help.
In summary, Terminal is a handy tool for straightforward file recoveries, but its utility is not as robust in more complicated data loss scenarios. For intricate recoveries, professional data recovery software or services are the safer bet.
How to Launch Terminal
Terminal is a native macOS application that comes preinstalled on all Macs. Therefore, this tool can be opened just like any other app that’s already installed on your computer.
Here’s how to locate and launch Terminal on your Mac:
- Open Finder (click the first icon from the left on the Dock).

- Click Applications from the sidebar and open the Utilities folder.

- Double-click the Terminal icon to launch it.


Another way to open this application is through Launchpad. To do that, simply press F4 on your keyboard and then type Terminal in the search field on the top.
Also, before you start using Terminal on your Mac for data recovery purposes, make sure that the application has full disk access. To do that, go to System Preferences > Security & Privacy and click Full Disk Access from the sidebar on the left. If Terminal isn’t on the list, click the plus icon to add it.

How to Recover Deleted Files Using Mac Terminal
This section explores the most effective ways you can use Terminal to restore deleted files from your Mac. It covers the effectiveness of basic Terminal commands for simple recoveries, the use of advanced tools like Disk Drill and PhotoRec for more challenging scenarios, and the role of Time Machine in data restoration. Each method’s effectiveness is compared, offering insights into the best approaches for varying levels of data loss.
Method #1: Recover Permanently Deleted Files With Recovery Tool
If you want to recover permanently deleted files on Mac using Terminal, your best option is to run a specialized data recovery tool with it and then restore the data using that tool. We’ll show you how to do this with two data recovery tools: Disk Drill and PhotoRec.
Choosing the right data recovery tool for your Mac can be crucial. Below is a comparison between Disk Drill and PhotoRec, focusing on five essential aspects to help you understand their key differences and strengths.
| Parameter | Disk Drill | PhotoRec |
|---|---|---|
| Interface | Graphical User Interface (GUI) | Command-Line Interface (CLI) |
| Ease of Use | User-friendly, suitable for beginners | Requires technical knowledge of CLI |
| File Format Support | Extensive, supports various formats | Specializes in photo recovery, supports various formats |
| Cost | Free version available; Pro version is paid | Completely free and open-source |
| Recovery Capability | High success rate for diverse scenarios | Effective in specific scenarios, especially for photos |
Option A: Disk Drill
Our recommendation is Disk Drill since it provides fascinating results in no time and is incredibly easy to navigate. Moreover, it’s compatible with the newest macOS X versions and supports a wide range of file formats and file systems. For more info on the tool, check out our in-depth Disk Drill review.
To download Disk Drill, go to the CleverFiles official website and click the link. Then follow the onscreen instructions to install the application.
And if you for any reason need to open this tool through Terminal, you can definitely do that, just follow these steps:
- Launch the Terminal application on your Mac.
- Copy-paste the following command line into Terminal:
/Applications/Disk\ Drill.app/Contents/MacOS/Disk\ Drill
- Hit Return.

- Once the tool has launched, choose the drive containing the deleted data and click Search for lost data to initiate the scan.

- Wait for the scan to finish and click the Review found items to look through the discovered data.
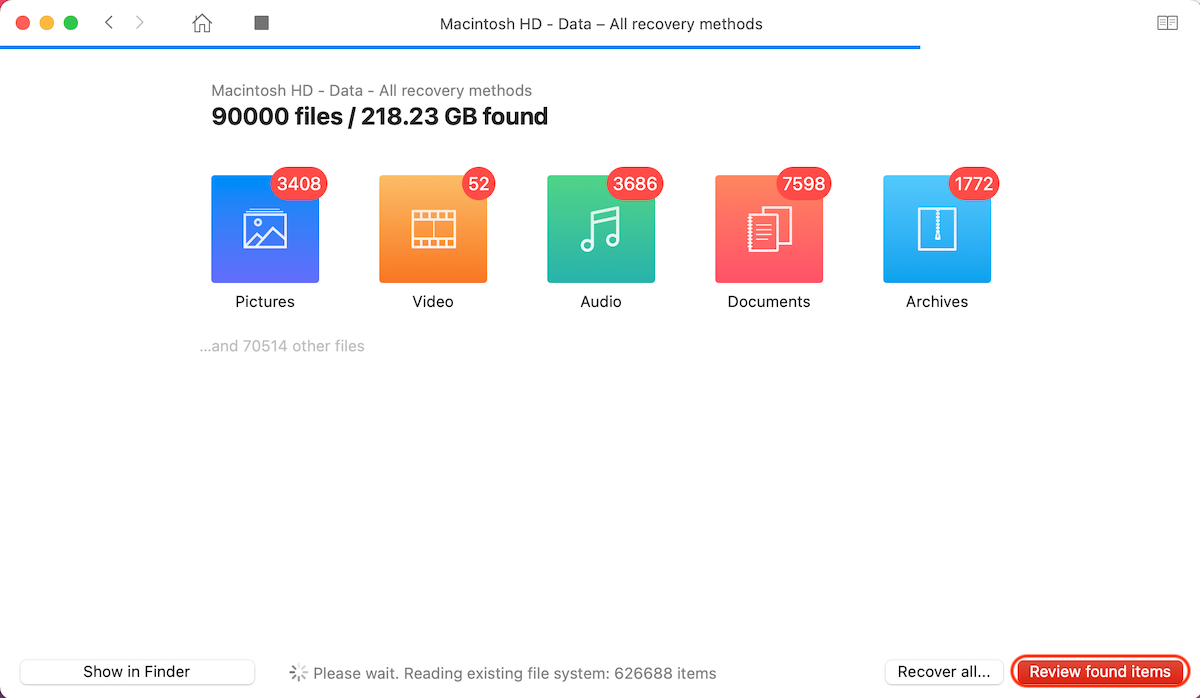
- Use the search field at the top right corner to find the needed file, or click a specific tab on the sidebar on the left to narrow down your scan results.
- Select the files that you wish to recover and click the Recover button.

- Choose a preferred destination for the recovered data and click OK to confirm.


Option B: PhotoRec
PhotoRec is a free and open-source data recovery software that can recover deleted files of various formats and sizes. It is very similar to Terminal since it also has a command-line interface.
Follow these steps to use Terminal to run PhotoRec and recover your deleted files:
- Download PhotoRec and TestDisk (you can’t download these two applications separately).
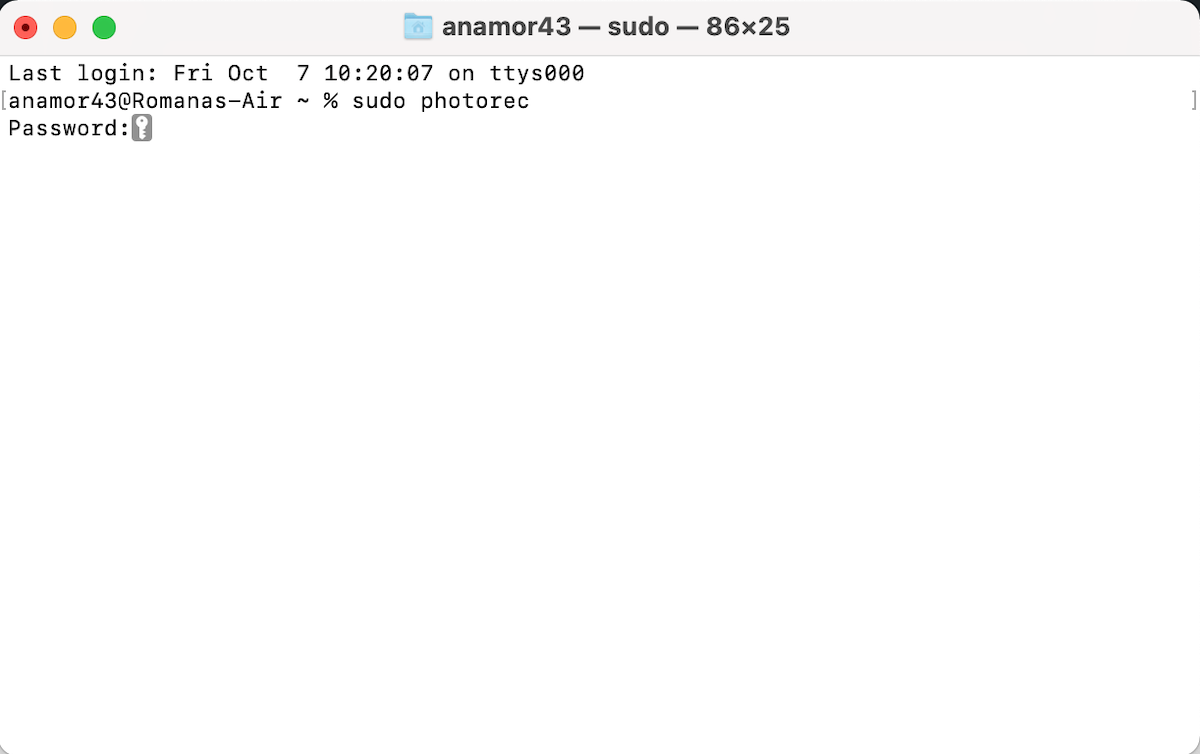
- Open Terminal.
- Type in the following command and hit the Return key:
sudo photorec
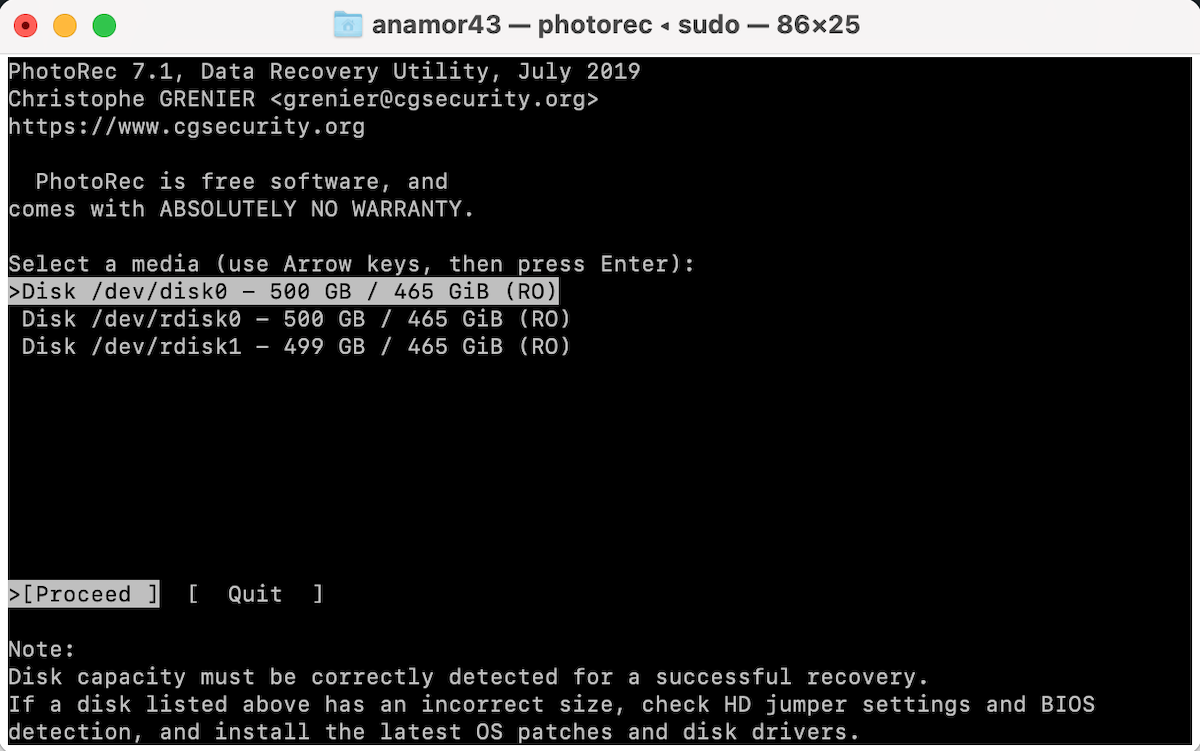
- Use the arrows on your keyboard to choose the needed disk. Hit Return to confirm.
- Choose the filesystem type where the deleted files used to be located.
- Select Free to scan for the deleted files or Whole to recover the data from the whole partition.
- Choose a folder on your Mac that you wish to use as the destination for the recovered data and hit the C key to confirm.


Method #2: Search for Deleted Files In Mac’s Temporary Files Folder
Temporary folders on your Mac contain various cache and temp files. Such folders are hidden on your computer and can’t be manually found by the users. Therefore, if you think that the file that you’re searching for might be in one of those folders, the quickest way to access them will be through Terminal.
Follow these steps to access the Temporary Files Folder on your Mac via Terminal:
- Open the Terminal app on your computer.
- Type in the following command line and hit the Return key:
echo $TMPDIR
- Open the Temporary folder by typing this command and hit Return to confirm:
open $TMPDIR

- Once you’ve located the needed file, drag and drop it to a different folder.


Method #3: Recover Deleted Items From Trash
Basically, Trash is just another folder on your Mac (but with a special purpose). Once you delete a file from your computer, it first gets moved to this folder, and only after you empty Trash, the data get permanently erased.
There are two ways to access the Trash folder: without software (by clicking the Trash icon on the Dock) or through the Terminal app if the first option, for some reason, doesn’t work. And you’ll be able to both preview the files located there and even recover deleted folders on Mac using Terminal from Trash.
Follow these steps to recover deleted files on Mac using Terminal from Trash:
- Open Terminal.
- Type the following command and hit Return:
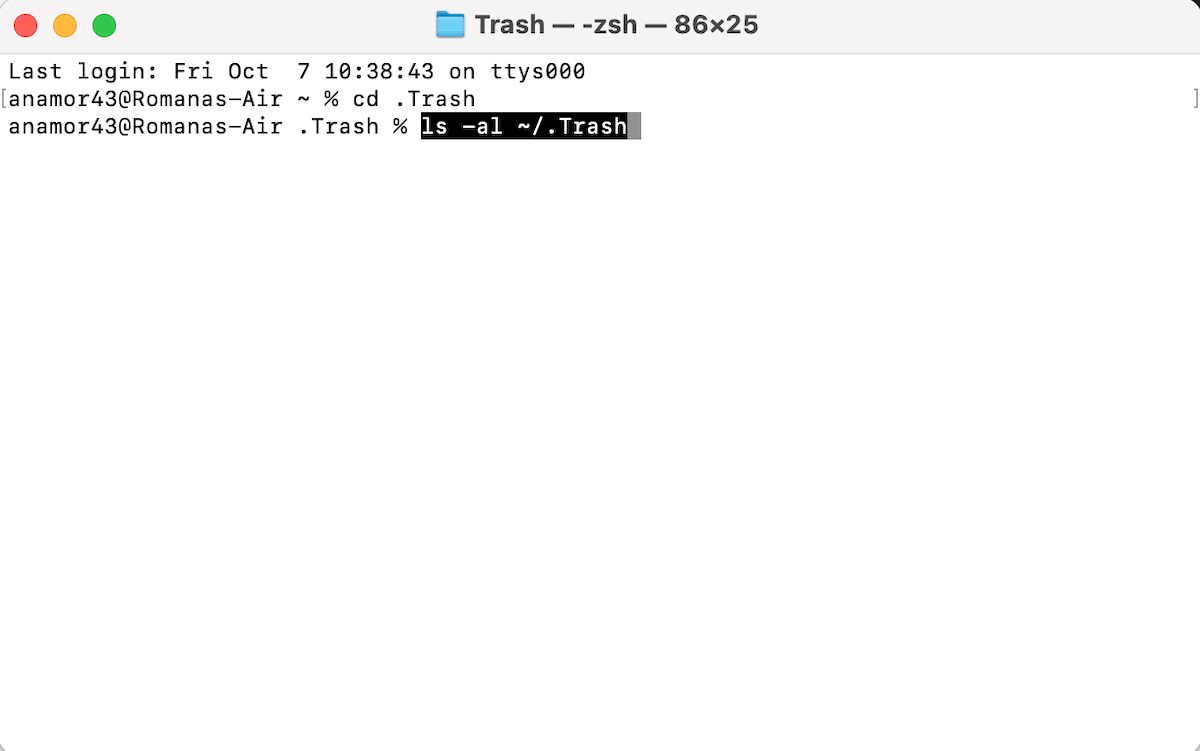
cd .Trash
- Copy-paste or type the following command to look through the names of the files loaded in the Trash folder:
ls -al ~/.Trash
- Hit Return.
- To restore a file back to its original location, type in the following command and hit Return:
mv filename …/ (replace filename with the corresponding one)
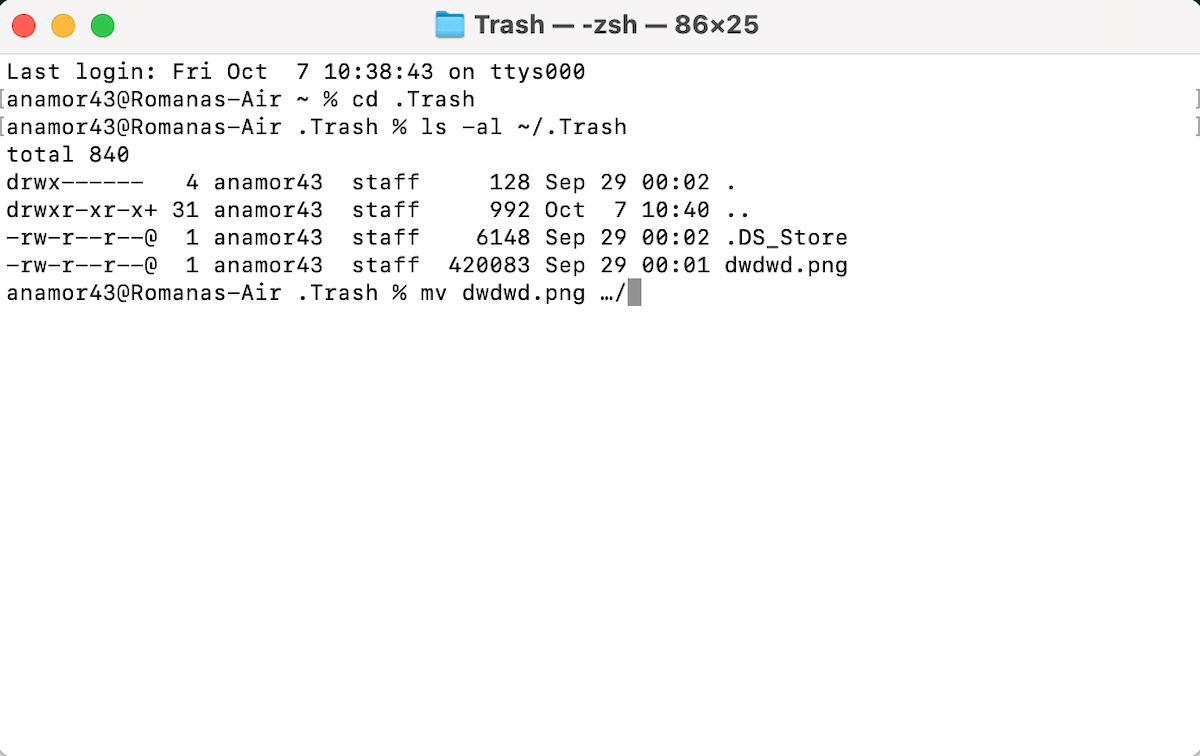
- Quit Terminal.


To view the recovered file, go to the folder where the file used to be located before deletion.
Method #4: Recover Deleted Files Using Time Machine
You might be wondering, why not just launch the Time Machine app on your Mac and complete the data recovery process from there? The truth is, doing it through Terminal can be incredibly helpful, especially in cases when your mouse isn’t working or when you simply can’t restore the deleted data from a Time Machine backup because the app won’t launch.
Here’s how to recover deleted files on Mac in Terminal with the help of Time Machine:
- Connect the drive containing your Time Machine backups to your computer (if they are located on an internal drive, skip this step).
- Launch the Terminal app on your Mac.
- Type in the following command and hit the Return key:
tmutil listbackups

- Use this command as the basis for the one that suits your data recovery needs:
tmutil restore ‘backup_path/original_path’ ‘~ destination’

FAQs
While Terminal can be a handy tool for simple file recoveries, its utility diminishes in more complex scenarios. In such cases, specialized data recovery software or professional recovery services are recommended.
In this article, we’ve covered tools such as Disk Drill and PhotoRec that are designed to recover permanently deleted files.
It depends on your specific data loss situation, and sometimes not much can be done to undo the trouble. However, if not much time has passed since you’ve deleted the file on your Mac with the rm command, you should be able to recover the data with the help of a specialized data recovery tool (for example, using Disk Drill). But in some more complex cases, you might need to resort to a data recovery center.
Unfortunately, it’s almost impossible to recover emptied Trash through the Terminal app on your Mac since this command-line application is just a replacement for the graphical user interface of the Trash folder. But Terminal can be used to launch or use other specialized data recovery tools (like Disk Drill) that can help restore files from the emptied Trash.
There are many Mac data recovery Terminal commands. But depending on your data loss situation, you might need to modify the command to meet your specific recovery needs. Here are some examples of Terminal data recovery commands:
- Navigating to Trash Folder:
cd .Trash– Changes the directory to the Trash folder. - Listing Files in Trash:
ls -al ~/.Trash– Lists all files, including hidden ones, in the Trash. - Restoring Files from Trash:
mv filename ../– Moves a specified file back to its original location. Replace filename with the actual file name. - Using Time Machine for Recovery:
tmutil listbackups– Lists all Time Machine backups.tmutil restore ‘backup_path/original_path’ ‘~destination’– Restores a file from a Time Machine backup.
- Accessing Temporary Files:
echo $TMPDIR– Displays the path to the Temporary files directory.open $TMPDIR– Opens the Temporary files folder.
Conclusion
As you can see, there’s nothing complicated in using the Terminal app on your Mac to recover deleted files. Even though the tool doesn’t have a graphical user interface, it’s quite simple to navigate when you know which commands to use.
But unfortunately, Terminal has some downsides and isn’t capable of recovering missing data in more complex data loss situations. If that’s your case, keep in mind that you have other amazing options (for example, restoring the needed files with the help of a data recovery tool like Disk Drill)