Table of Contents
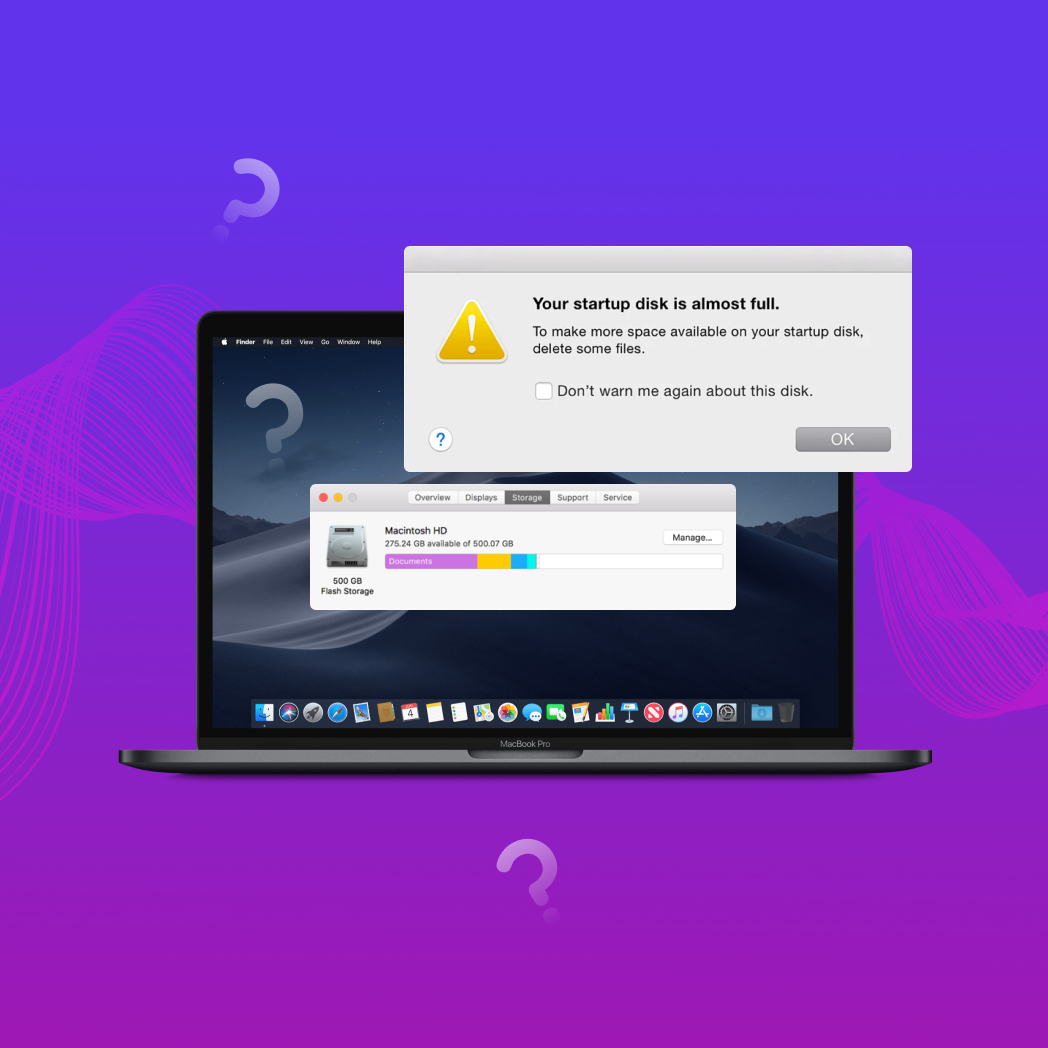
Don’t let your Mac startup disk get full! Having enough space on your startup disk isn’t just important for storing data and installing apps. It also makes a big difference in your Mac’s performance – failing to optimize your startup disk can lead to errors, slowdowns, and other consequences.
Consequences of a Full Startup Disk on a Mac
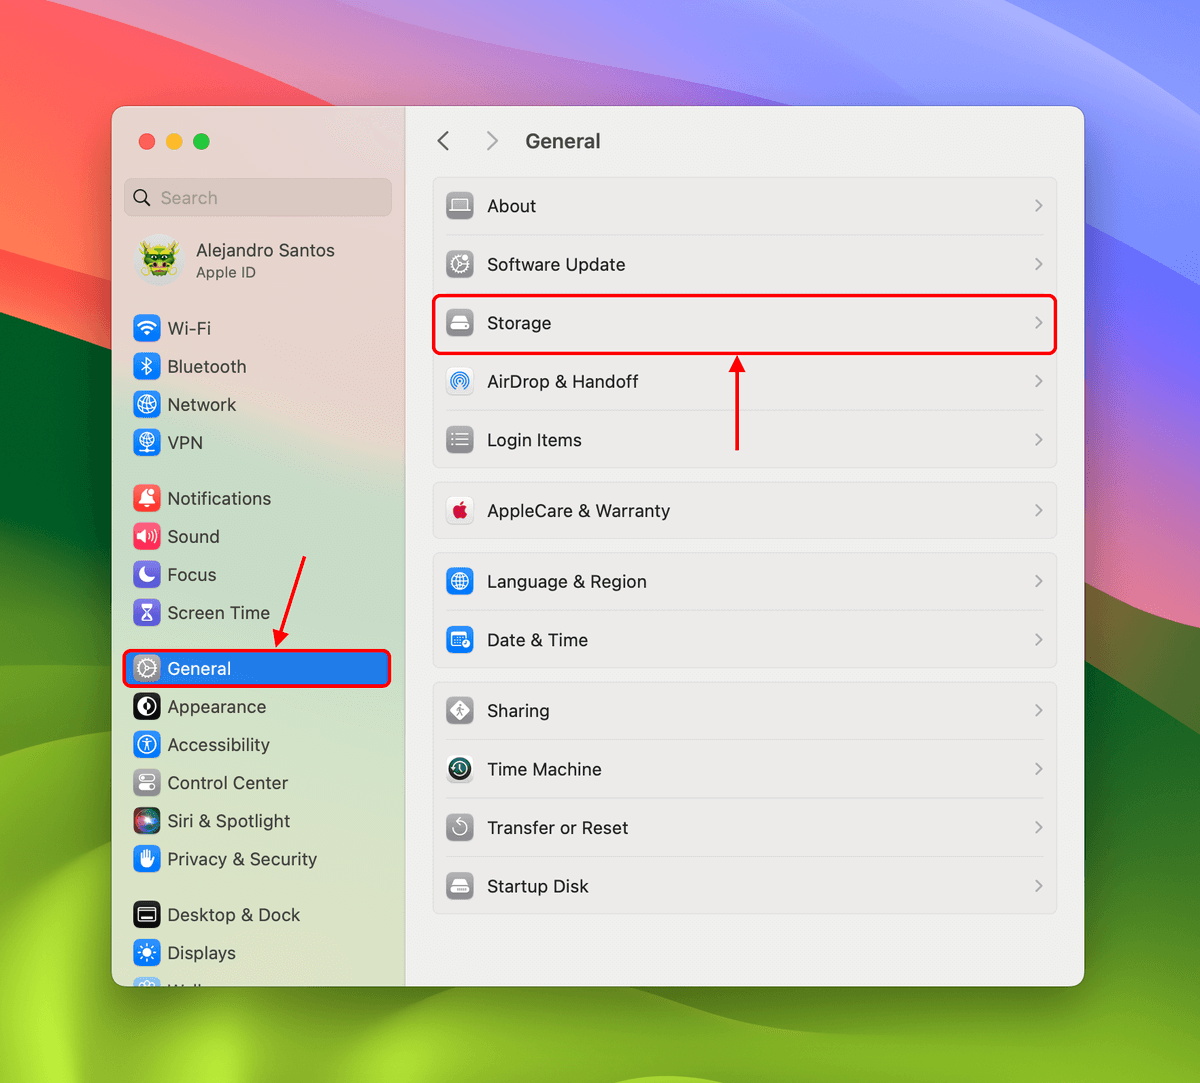
The first thing you should do once you decide to clean the startup disk on your Mac is to check the status of your storage space. Open the System Settings app and click General > Storage.

In this menu, you can see how much available disk space is left and how your Mac’s used disk space is allocated.
This information can help you choose a starting point for your cleanup mission. You tackle the biggest disk space guzzlers first to improve importance ASAP.
But don’t stop there! Get rid of as much unnecessary data as possible. We always notice a massive negative impact when a start-up disk is full on a Mac. Here are some of the consequences you can expect:
- 💾 Can’t save files – The most obvious consequence of a full disk is the lack of storage space. You can’t store or download files and install new apps.
- 🛑 No more updates – You can’t update macOS or your apps because free space is needed for the update files.
- 🐌 Slowdowns – Many system processes require free space so they can temporarily store files and operate more efficiently. With a full startup disk, many simple tasks (e.g. opening a browser) will feel slower than usual.
- 💥 Application crashes – Some apps need space to store temporary files to operate properly. If this is unavailable, the app may malfunction.
- ❌ Errors – System processes and apps may not work as expected. You may also receive the “disk is full” message on your Mac.
How to Clean Startup Disk on Mac
Your Mac has a lot of tools and components that take up storage space in some way. We identified which of the data was potentially useless and compiled instructions on how to find and eliminate them.
Our goal is to help you perform a deep clean on your Mac without requiring advanced technical skills or resorting to third-party tools or paid apps. With this in mind, we evaluated the following 8 methods based on 3 important factors:
- Ease of implementation
- Impact on storage space
- Required skills
Method 1: Clear Cache Files
| Ease of Implementation | Impact on Storage | Required Skills |
| 4 | 4 | Beginner |
Cache files are data that apps and system processes temporarily store while they perform tasks. macOS does its best to self-regulate by automatically deleting unused cache files but some temporary data gets missed and accumulates over time.
Fortunately, most temporary files are neatly compiled in a single folder on macOS. Due to the potential size of the cache folder and the simplicity of deleting its contents, this is one of the best methods to clear startup disk space on your Mac. We’ll show you how to locate this folder and clear it in the guide below.
To clear your Mac cache files:
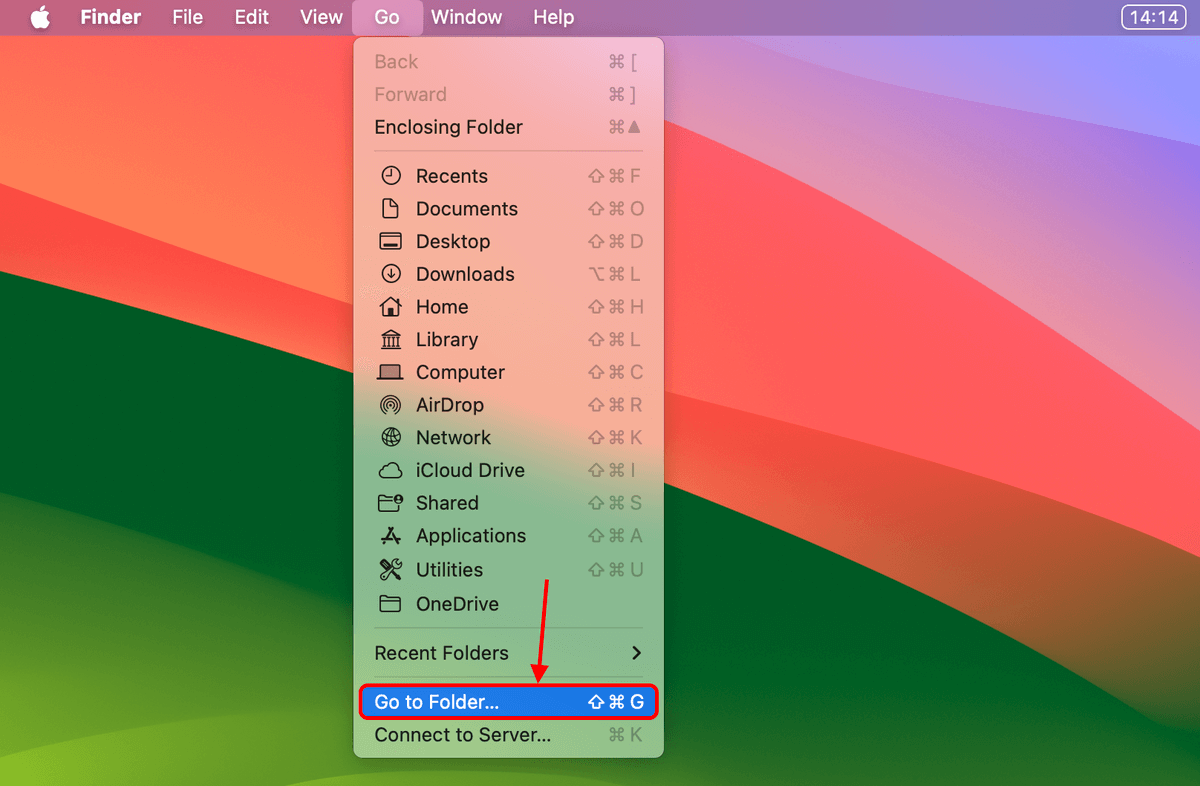
- Open Finder. Then, on the Apple menu bar, click Go > Go to Folder…
- In the empty field, type ~/Library/Caches/ and hit Return.

- Finder will now display the contents of the Caches folder. Select everything by pressing Command + A simultaneously. Then, right-click your selection and click Move to Trash.


Method 2: Empty the Trash
| Ease of Implementation | Impact on Storage | Required Skills |
| 5 | 5 | Beginner |
The Trash folder stores everything you delete from your system disk. In other words, when you delete a file from Finder, it gets sent to the Trash folder.
More importantly, it stays there continuing to take up space until you decide to restore it or delete it permanently. You can enable a setting that tells the Trash folder to delete its contents automatically but that setting is usually turned off by default so you’ll have to do it manually.
Like Method 1, cleaning up your Trash folder can make a huge impact on your Mac’s storage space and it’s super easy to do.
To delete files from the Trash folder:
- Right-click the Trash icon on your dock and click Empty Trash.
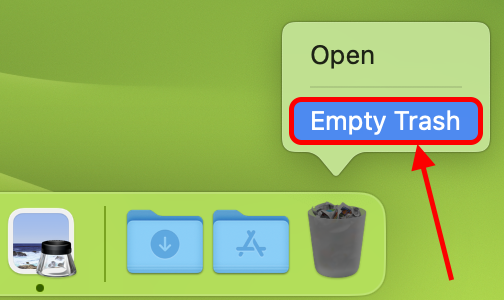
- Click Empty Trash again in the dialogue box to confirm the action.


Method 3: Remove Old Downloads
| Ease of Implementation | Impact on Storage | Required Skills |
| 3 | 4 | Intermediate |
The Downloads folder stores attachments, AirDrop files, and anything you download from the internet. This includes app installer files you no longer need, taking up gigabytes of storage space just by existing.
We’ll show you how to find the Downloads folder and systematically delete the largest files first (or clear everything in one go). This method can clear startup disk space on your Mac very quickly.
To clear the Downloads folder on your Mac:
Open Finder and click Downloads in the left sidebar (under Favorites). If it’s not there for some reason, click Go > Go to folder… and type ~/Downloads.
Then, click Size at the top of the window until the files are arranged from largest to smallest. Perform right-click > Move to Trash on the largest files first. Or hit Command + A to select everything and perform the deletion.

Method 4: Check for Duplicates
| Ease of Implementation | Impact on Storage | Required Skills |
| 2 | 3 | Advanced |
Have you checked your Mac for duplicates? Many Mac processes and apps directly and indirectly create duplicate files.
For example, the Pages app has a file versioning tool that allows users to roll back unwanted changes. iCloud Photos creates copies of images for synchronization; errors with this process can result in duplicates.
Both of these scenarios are all you need to understand to eliminate all duplicate files on your Mac. The first section of the guide demonstrates how to find and delete duplicate files (like Pages documents) using Finder and the second section walks you through duplicate photo removal in the Photos app.
To delete duplicate files on your Mac:
- Right-click the Finder icon on your dock and click Find…

- Notice the Kind parameter under This Mac. Beside it, click Any and select the file type of the duplicate data. This should display all the files on your Mac of that type.

- Click the + button on the far right to add more parameters that can help you find duplicates faster. For example, I’m looking for duplicate documents that were opened within the last 30 days and had file names that contained the word “sample.”

- Review the list of files. Select any duplicates you want, then right-click > Move to Trash.


Two things you mustn’t forget: (1) leave at least one copy of the file if you need it and (2) delete the duplicates from the Trash folder after deleting them from Finder.
To delete duplicate photos on your Mac:
- Open the Photos app. On the left sidebar under Photos, click Duplicates.
- Click Merge Items for the duplicates you want to clear.
Method 5: Uninstall Unused Apps
| Ease of Implementation | Impact on Storage | Required Skills |
| 5 | 5 | Beginner |
Apps are notoriously reaching 50GB or larger in file size. If you have automatic updates enabled for your apps, that number will rapidly increase over time due to newly downloaded files.
Uninstalling just one app can greatly clean up the startup disk on your Macbook on the spot. Evaluate whether you have apps that you don’t use anymore or can live without. The System Settings app makes it very easy to assess and delete apps – we’ll show you how it works.
To quickly uninstall large and unused apps from your Mac:
- Open the System Settings app. On the left sidebar, click General. On the right pane, click Storage.

- Beside the size indicator of the Applications entry, click the i button.

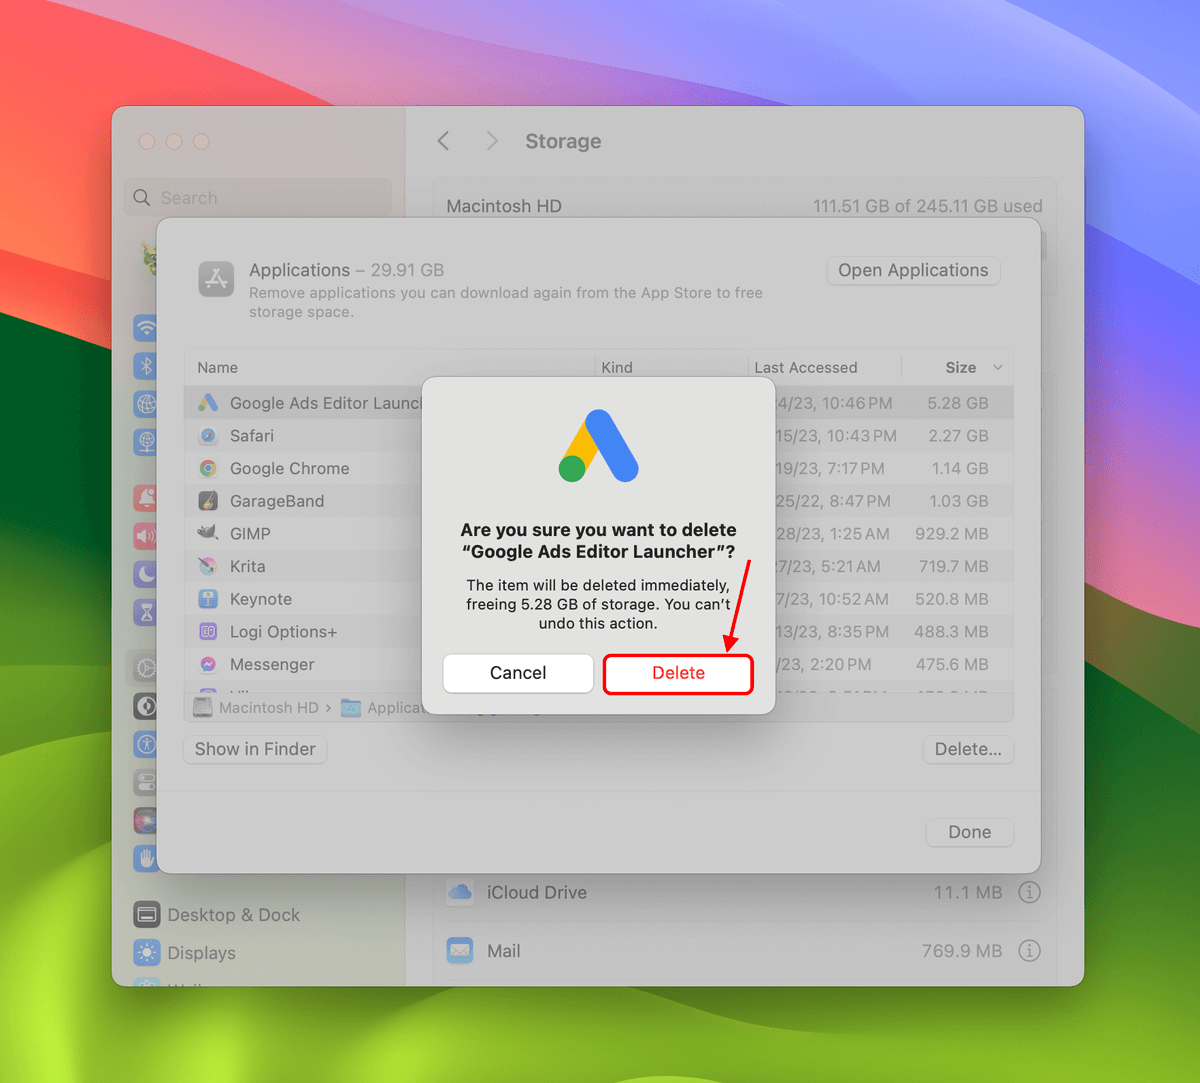
- Click the parameters at the top of each column to rearrange the list. We recommend arranging the list by Size. Then, select the app you want to delete and click Delete…

- Click Delete again to confirm the action.


Method 6: Manage Large and Old Files
| Ease of Implementation | Impact on Storage | Required Skills |
| 4 | 4 | Beginner |
A highly effective way to free up space fast on your Mac is to remove the biggest files you don’t need. Using the same storage menu featured in the last method, you can conveniently browse the files that Mac recommends for evaluation. These files were chosen due to their notable file size.
You can leverage this tool further by toggling the Last Accessed parameter, which rearranges the list to show you files you haven’t opened in a long time. This method makes a big impact on your storage space fast and is super easy to perform. However, it does require manual review.
To efficiently remove large and unwanted files on your Mac:
- Open the System Settings app. On the left sidebar, click General. On the right pane, click Storage.
- Scroll down and locate the data type you want to clean up. Beside its size indicator, click the i button.
- Click the parameters at the top of each column to rearrange the list. We recommend using the Size or Last Accessed parameters. Then, select the file you want to delete and click Delete…
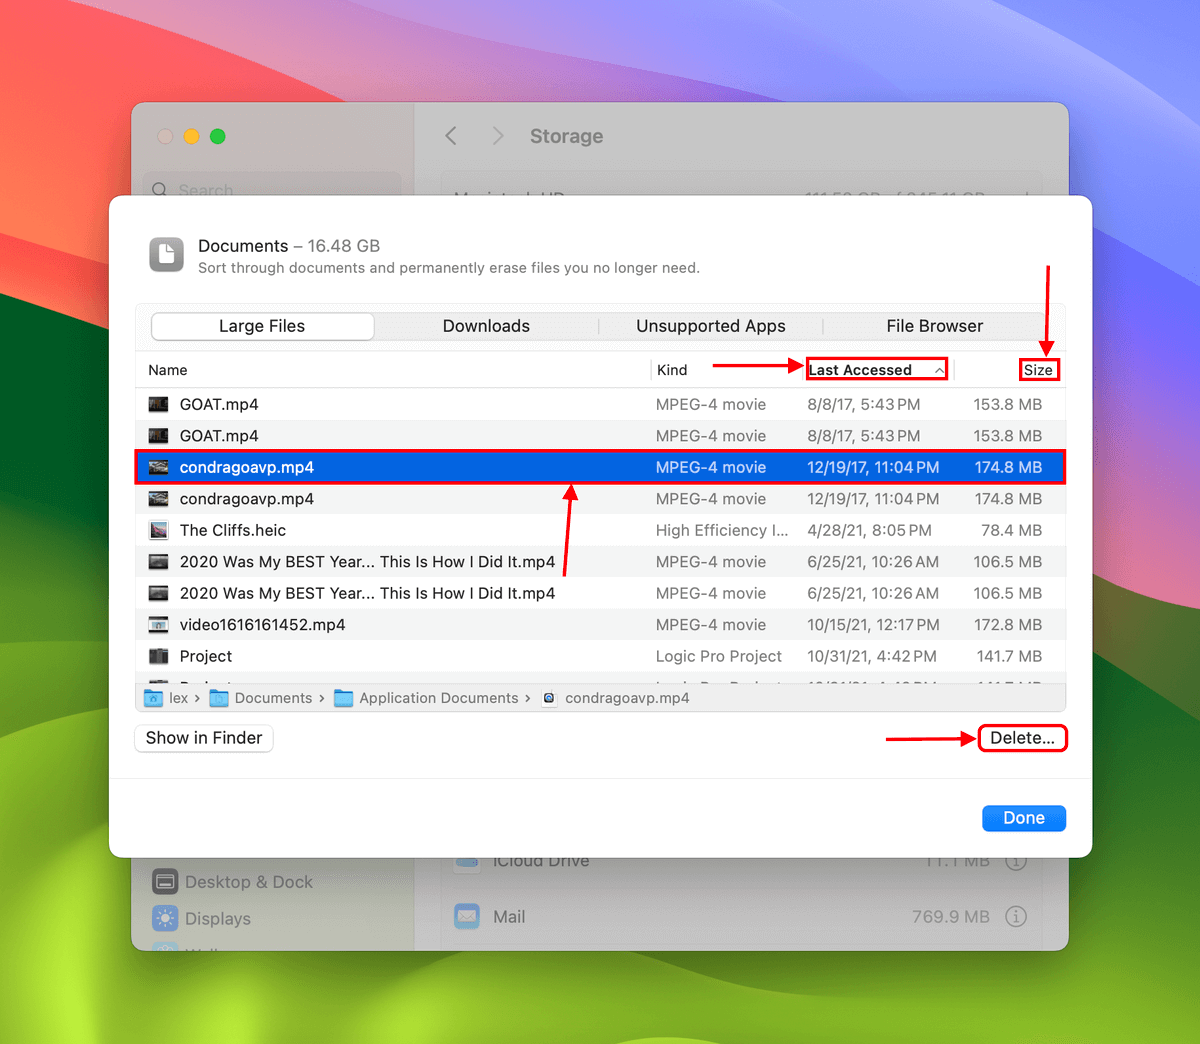
- Click Delete again the confirm the action. You can also opt to purge your Downloads folder from this tool.


Method 7: Remove Old Backups
| Ease of Implementation | Impact on Storage | Required Skills |
| 3 | 4 | Intermediate |
Because you only use them in special circumstances, it’s easy to forget that backup files exist. But they can easily take up dozens of gigabytes of storage space on your Mac. Two types of backups get stored on your startup disk: iOS backups and local Time Machine snapshots.
iOS backups are copies of the data on your iPhone or other iOS device, while local Time Machine snapshots are incremental backups of your files and folders that are stored for 24 hours from the last modification.
This method will allow you to get rid of outdated, useless backups that you never plan to restore but take up loads of storage space anyway. This method is a bit tedious because you need to connect your iPhone to your Mac or execute simple codes in Terminal. But you can free up a lot of storage space with just this method, depending on your backups.
To delete local iOS backups stored on your Mac:
- Securely connect your iOS device to your Mac using the appropriate cable.
- Open Finder and click your device in the left sidebar. Then, click Manage Backups…

- Select the backup you want to delete and click Delete Backup.

- Click Delete again to confirm the action.


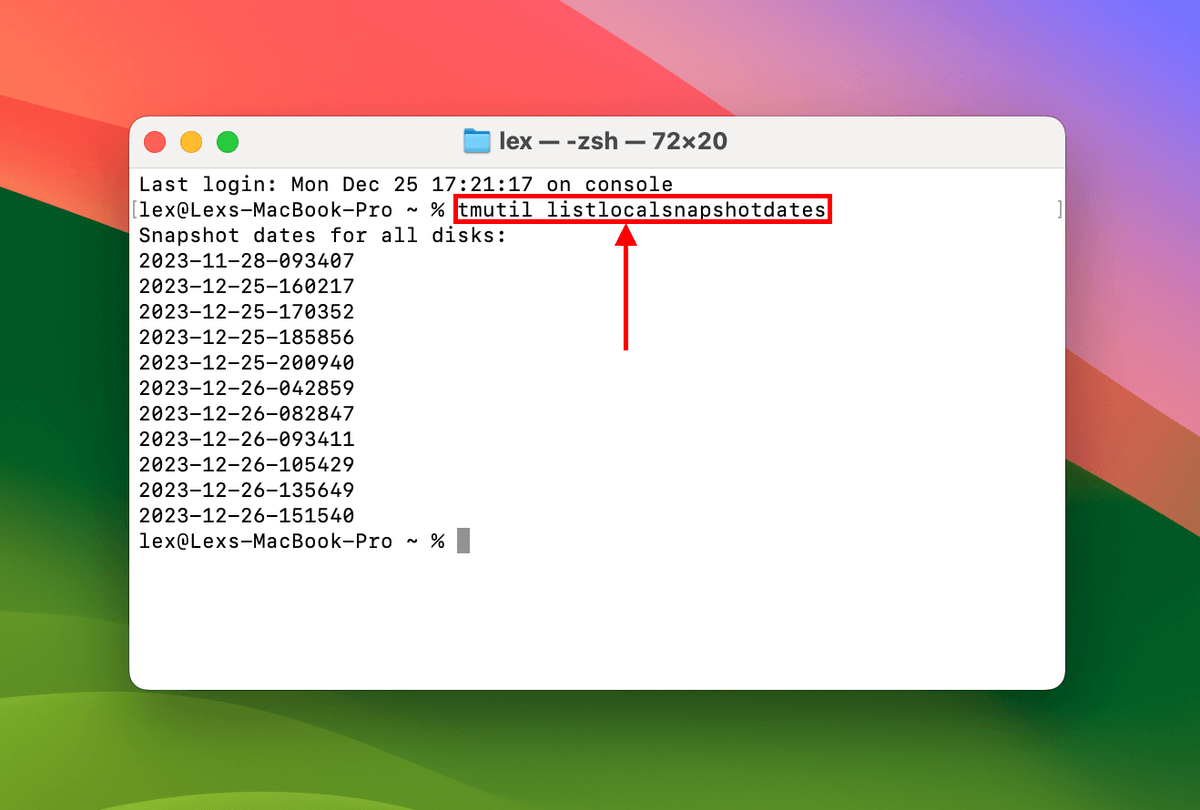
To delete local Time Machine snapshots:
- Open the Terminal app (Finder > Applications > Utilities). Then, type the following command and hit Return:
tmutil listlocalsnapshotdates
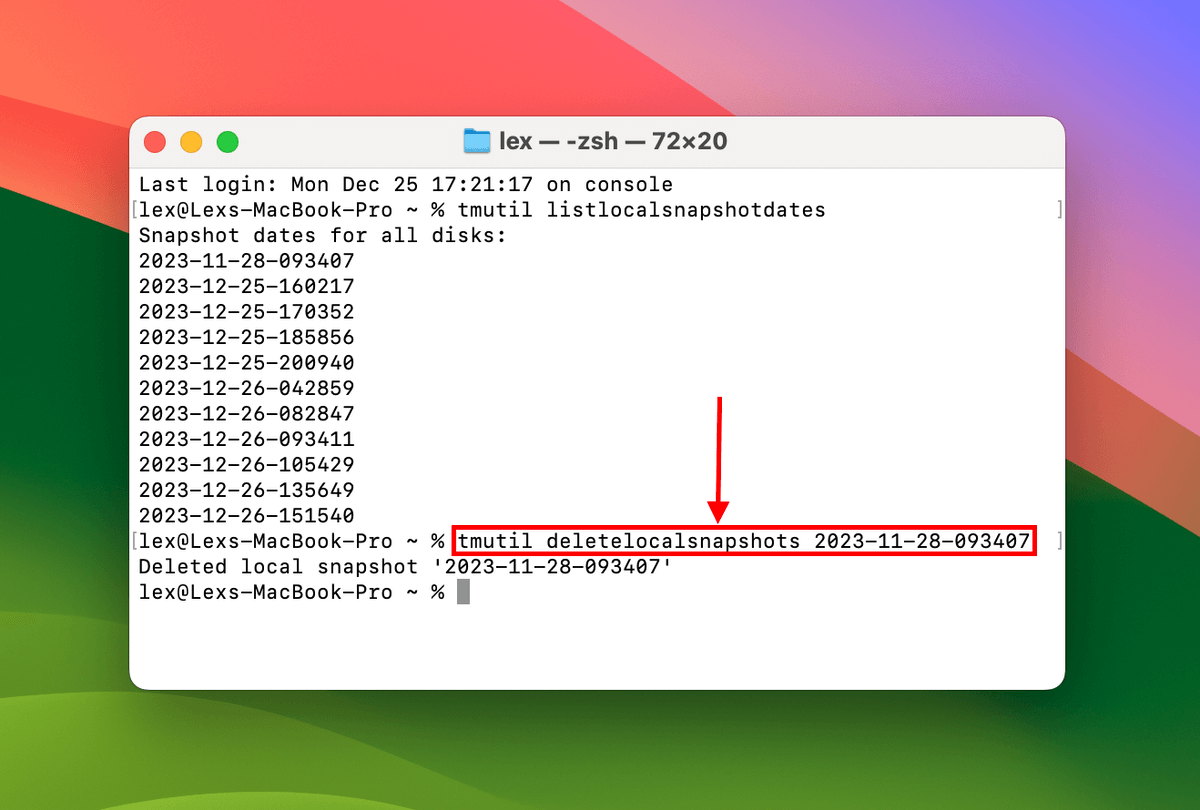
- Note the entries that were generated by the last command. From the list, select the backups you want to delete. Copy the snapshot’s file name and use it to replace XYZ while executing the following command:
tmutil deletelocalsnapshots XYZ


Method 8: Utilize Cloud Storage
| Ease of Implementation | Impact on Storage | Required Skills |
| 2 | 5 | Intermediate |
Utilizing cloud storage is a great way to actively manage your startup disk’s available space. Its primary function is to serve as an internet-based storage drive with expandable memory, but some utilities offer more functionality.
For example, iCloud can integrate with your operating system and optimize memory usage in real time. Here’s what you can expect in terms of space-saving features:
- iCloud saves HD copies of your photos and videos online, leaving their lower-quality copies on your Mac.
- iCloud will delete local copies of files that haven’t been opened in a while. When needed, the files can be downloaded from iCloud.com.
If you never used iCloud before, you may have to adjust to some new behaviors on your Mac (like needing to download files you haven’t opened in months). But it’s an invaluable tool that can save you a lot of time and space in the long run.
To utilize cloud storage to free up space on your Mac disk:
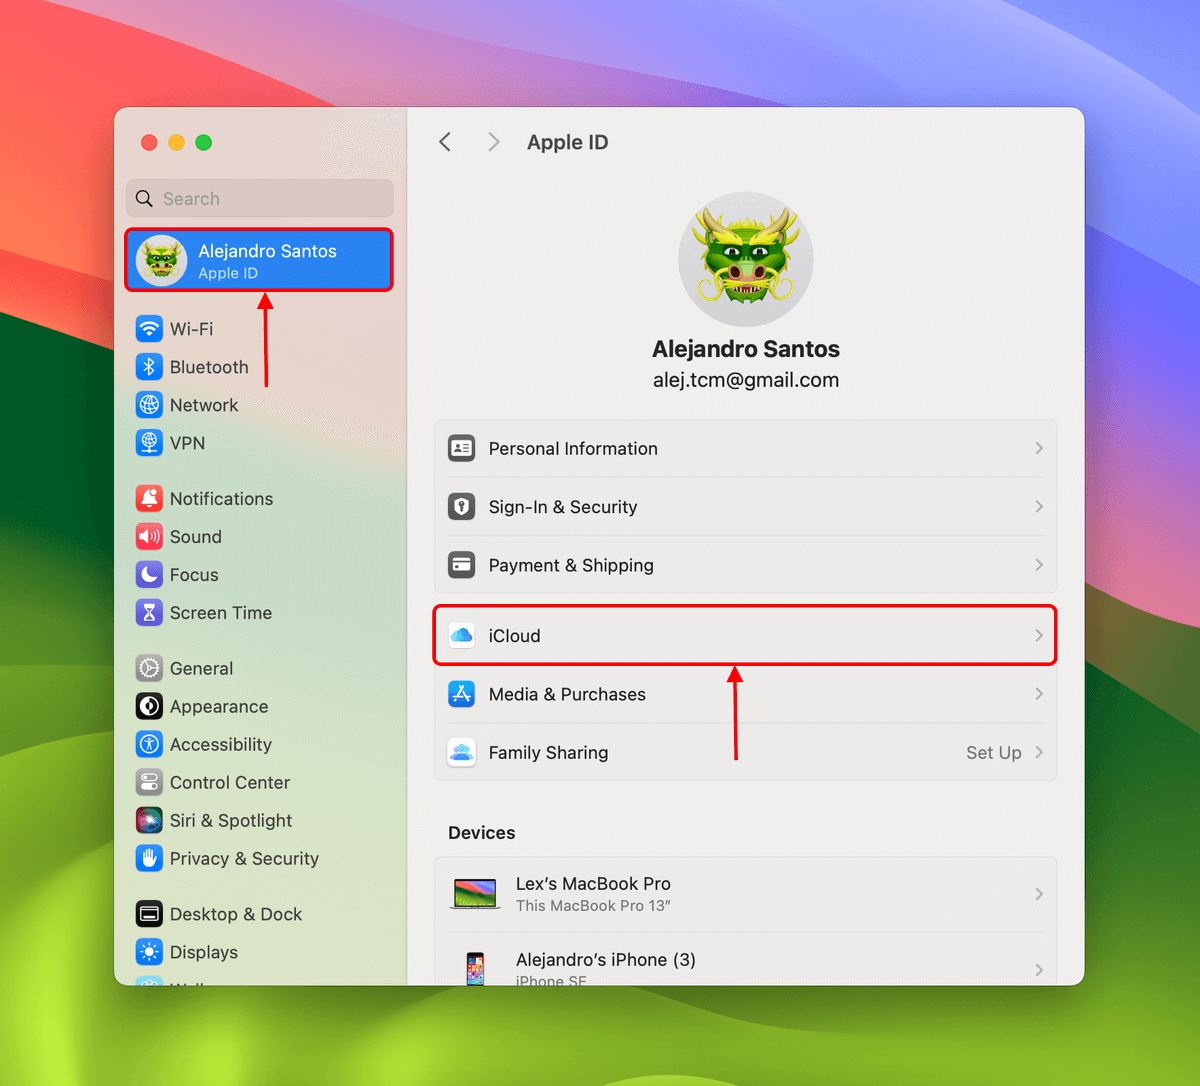
- Open the System Settings app. Click your Apple ID in the left sidebar, then click iCloud in the right pane.
- Click Photos.

- Click Photos. Switch the toggle beside Sync this Mac to the on position. Click Done.

- Click iCloud Drive.

- Switch the toggles beside Sync this Mac and Desktop & Documents Folders to the on position. Then, click Done.

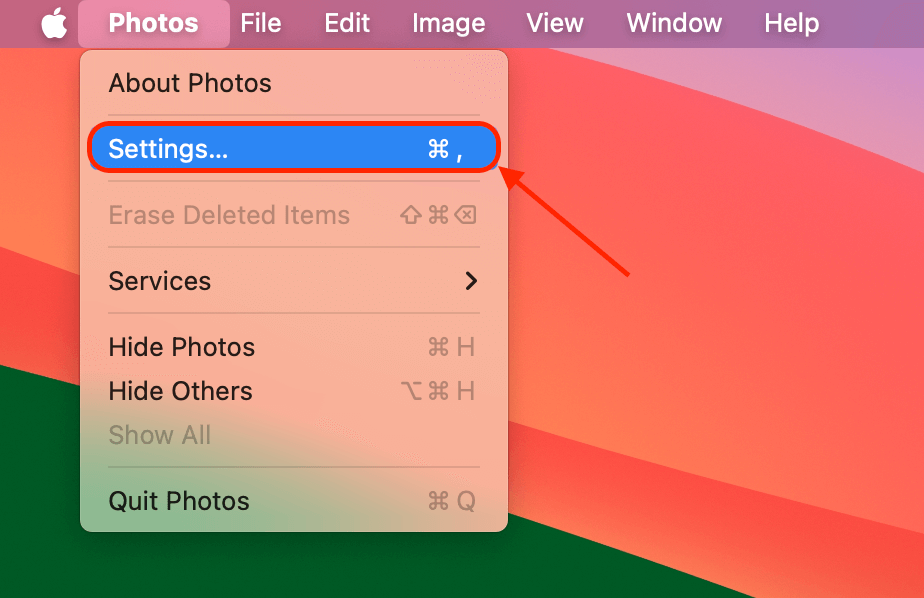
- Open the Photos app. On the menu bar, click Photos > Settings…
- Select Optimize Mac Storage. Then, close the window.


iCloud will now start the synchronization process. It may take a while depending on how much data you have in the affected folders.
FAQ
To get rid of the “disk full” message on Mac, you need to delete files or apps to free up storage space. Here are the first 3 things we think you should do:
- Empty your Trash folder
- Uninstall unused apps
- Delete large files from the Downloads folder
Yes, it’s safe to clean up your Mac’s startup disk as long as you only delete personal data and apps. Avoid deleting system data, except for cache files. Here are some safe ways to clear your startup disk:
- Clear cache files
- Empty your Trash folder
- Delete old downloads
- Find and eliminate duplicate files
- Uninstall apps you don’t use
- Delete old and large files
- Delete backups you don’t need
- Utilize cloud storage features
You can also use a Mac disk space analyzer to automatically get rid of all these junk files and unnecessary system data without manually going through them yourself.
Conclusion
Due to its role as the Mac system’s home drive, properly managing the storage space on your startup disk is critical for a lot of reasons. You can continue saving data, installing apps, and freely updating macOS. Most importantly, you’ll avoid errors, performance issues, and potentially even system crashes.
To ensure that you have enough space on your startup disk for system processes and personal data, make sure to purge old files, apps, and backups regularly. Keep your Trash folder empty. And consider utilizing cloud storage to increase your Mac’s day-to-day storage management efficiency.