Table of Contents
As iPhones get better cameras, common issues like storage overload and challenges in photo sharing arise due to larger photo sizes. These problems become more noticeable as your photo gallery expands.
To help solve this persisting problem, we’ve gathered and tested some of the best methods on how to compress photos on an iPhone. These techniques are streamlined into an easy-to-follow guide tailored to your specific needs.
What to Consider When Choosing the Method to Compress iPhone Photos
Before we proceed with any method to compress iPhone photos, it’s crucial to consider key factors in selecting the right solution. Here are fundamental questions to guide your decision:
- What’s the right method for YOUR needs? One compression method might fit better for your specific needs. Ask yourself why you need your photos compressed. Do you need to clean up iPhone photos? Do you want to resize a particular image to upload it, or simply need a convenient image editing tool?
- How can you maintain image quality while reducing size? While some methods to reduce image size on iPhone are simple to follow, the image quality size might be the trade-off. No one wants their photos to be pixelated or blurry just to save some space. To maintain image quality, you can use methods that feature lossless image compression algorithms.
- How does managing photo storage positively impact your device? Choosing the right method to compress image on iPhone not only creates space for more photos but also enhances device performance. Adequate free space ensures smoother operation and prevents issues like app failures, necessitating a device restart and storage cleanup.
How to Compress Pictures on iPhone
To get a better idea of which method to use to compress pictures on an iPhone, we’ll delve into each one in this section. Our evaluations and recommendations will be shared based on their simplicity, efficiency, accessibility, and overall experience when employing each technique.
Method 1: Cropping and Editing Photos Directly in the Photos App
| Evaluation Parameters | Score (0-5) |
| Method Simplicity | 4 – Fairly Easy |
| Method Efficiency | 2 – Somewhat Time-Consuming |
| Additional Costs | 0 – Not applicable |
Using the native Photos app on your iPhone is one of the most accessible ways to shrink a photo on an iPhone. This method is straightforward and can be easily implemented by non-tech-savvy users. It also doesn’t have any additional costs to use.
However, cropping obviously cuts out a part of your image. Plus, it doesn’t have any advanced compression algorithms. If you have thousands of photos to compress, manually cropping them one by one is significantly time-consuming.
Follow the steps below for a quick and easy way to reduce photo size on an iPhone. But if you have a huge collection of photos, we don’t recommend this method to you.
Here’s how you can manually crop a photo to reduce its file size:
- To get started, open the Photos app on your iPhone.
- Next, open the photo you want to crop.
- Select Edit in the top-right corner. Then, choose Crop on the menu at the bottom.
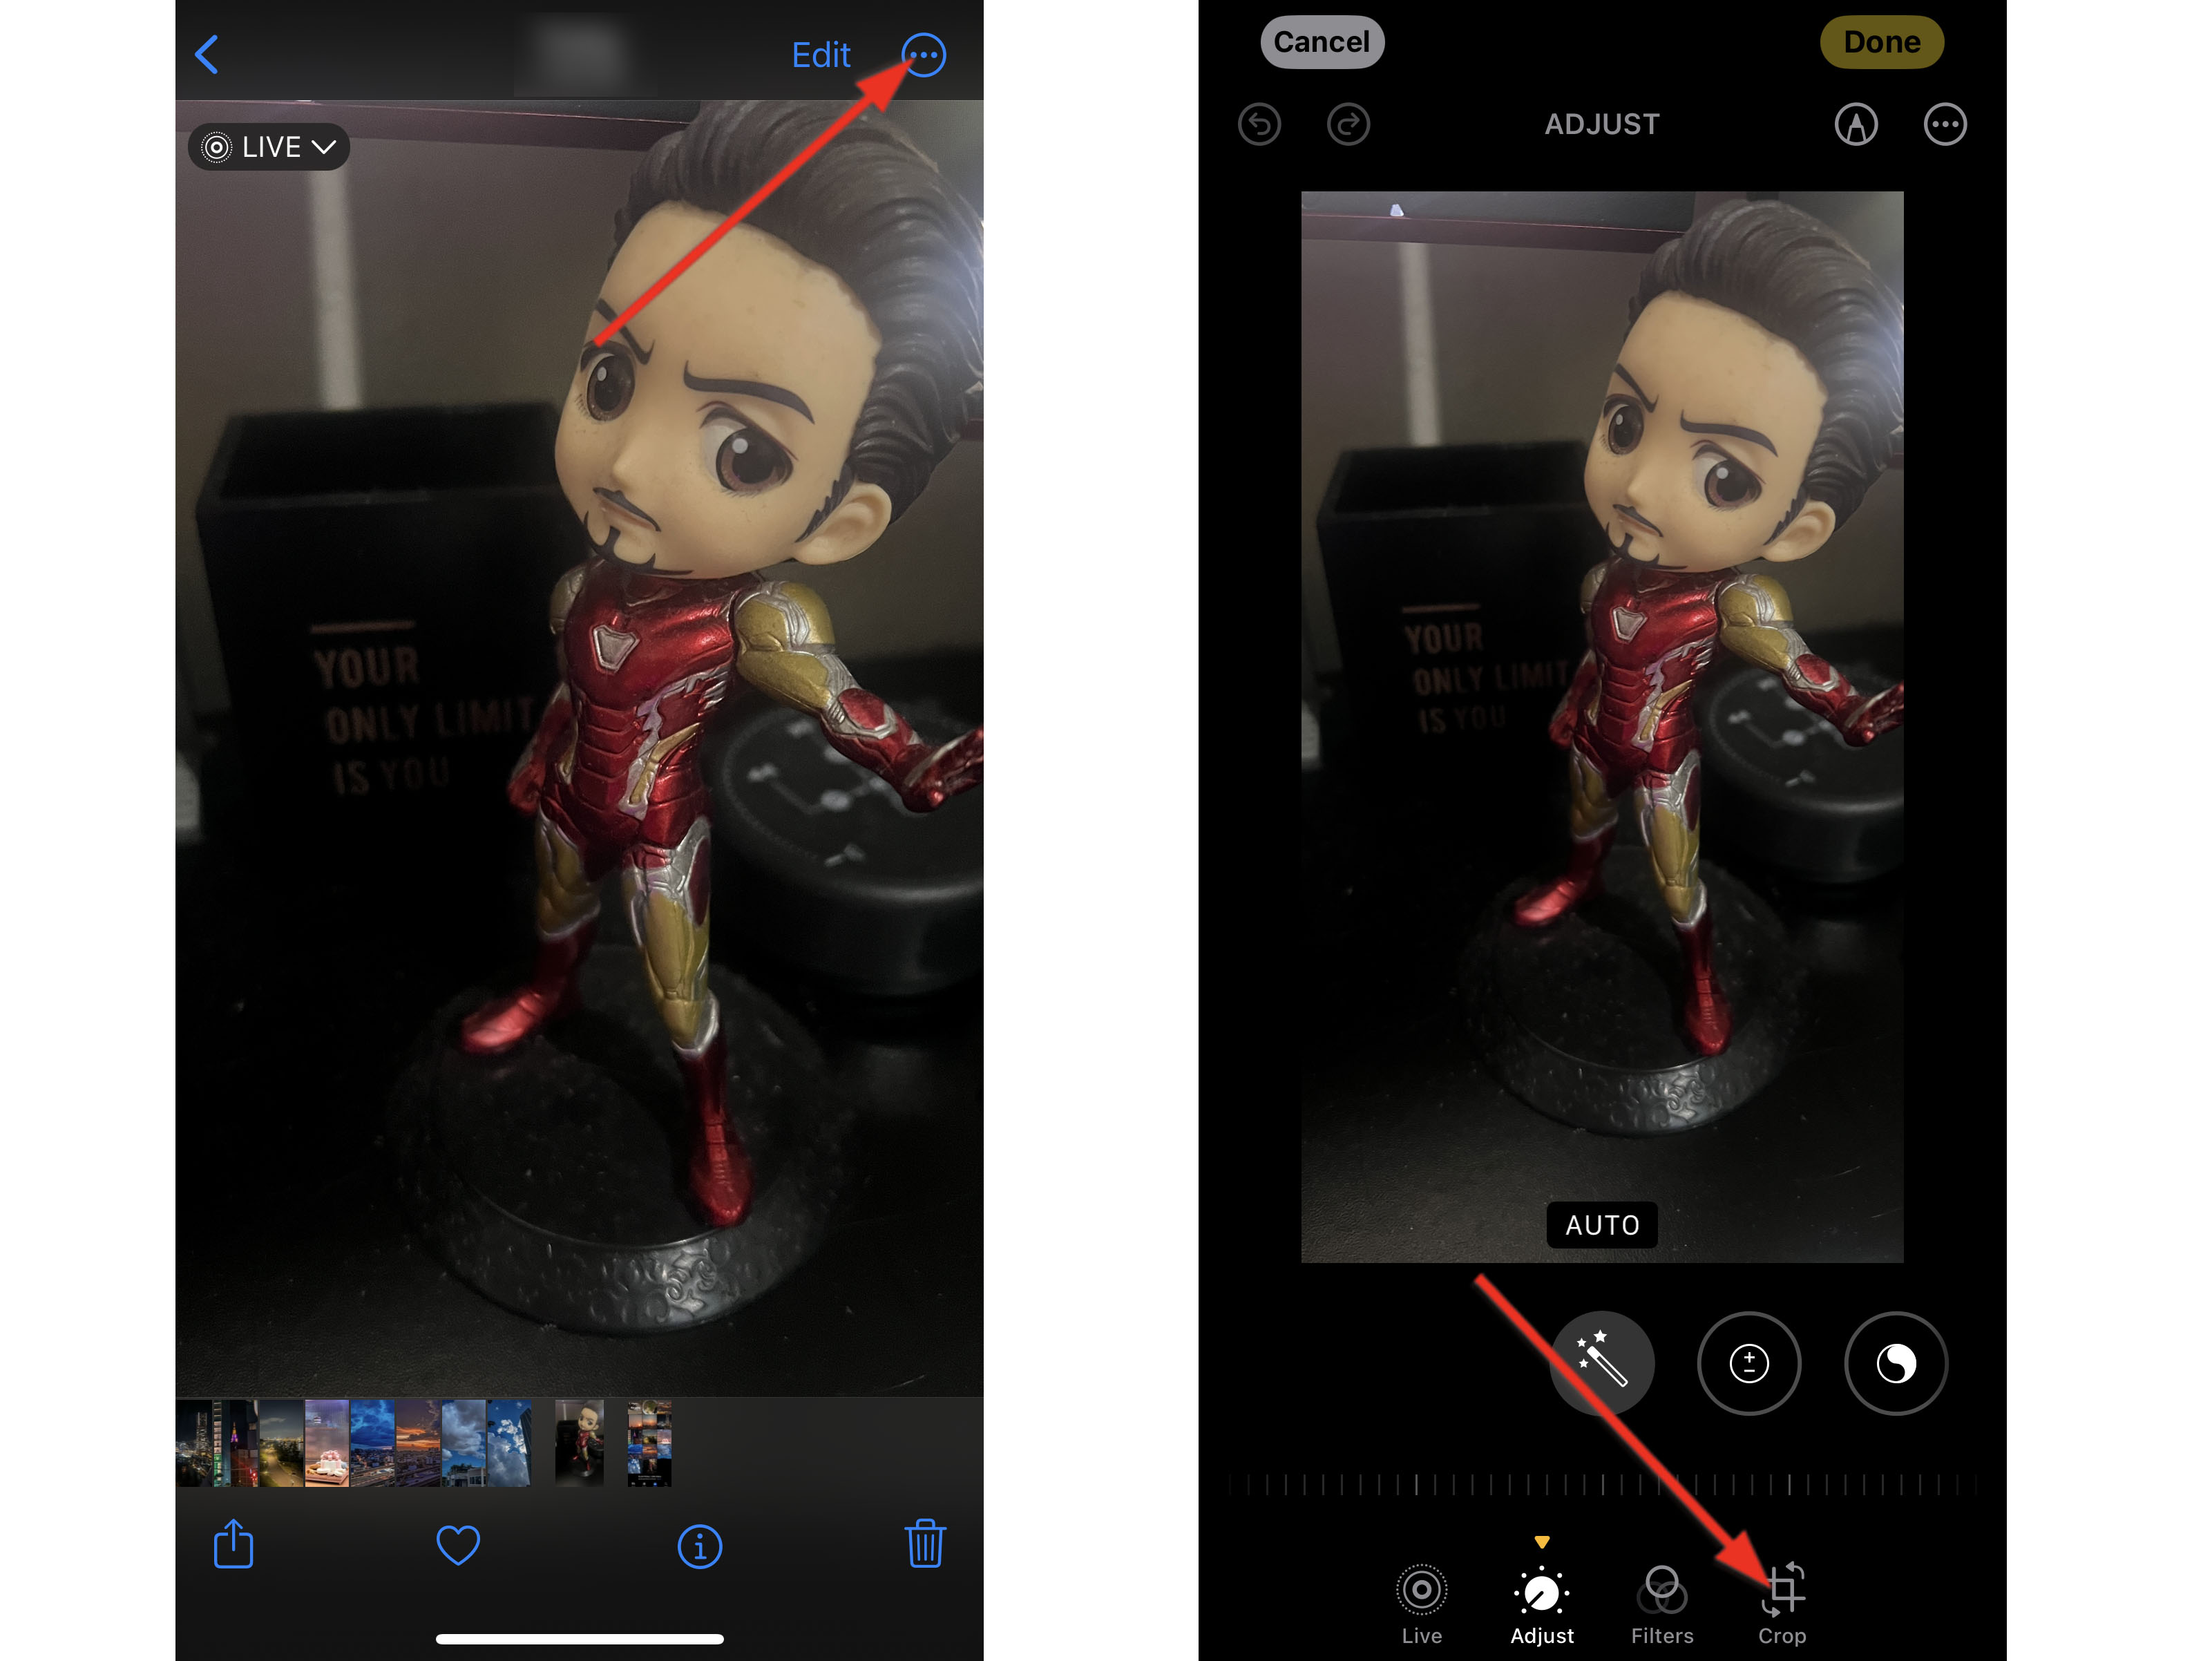
- The edges of your photo should now be highlighted. You can now drag any corner in the opposite direction to reduce the size of your image.
a. Modify the proportion settings to Freeform to edit the height and width individually.
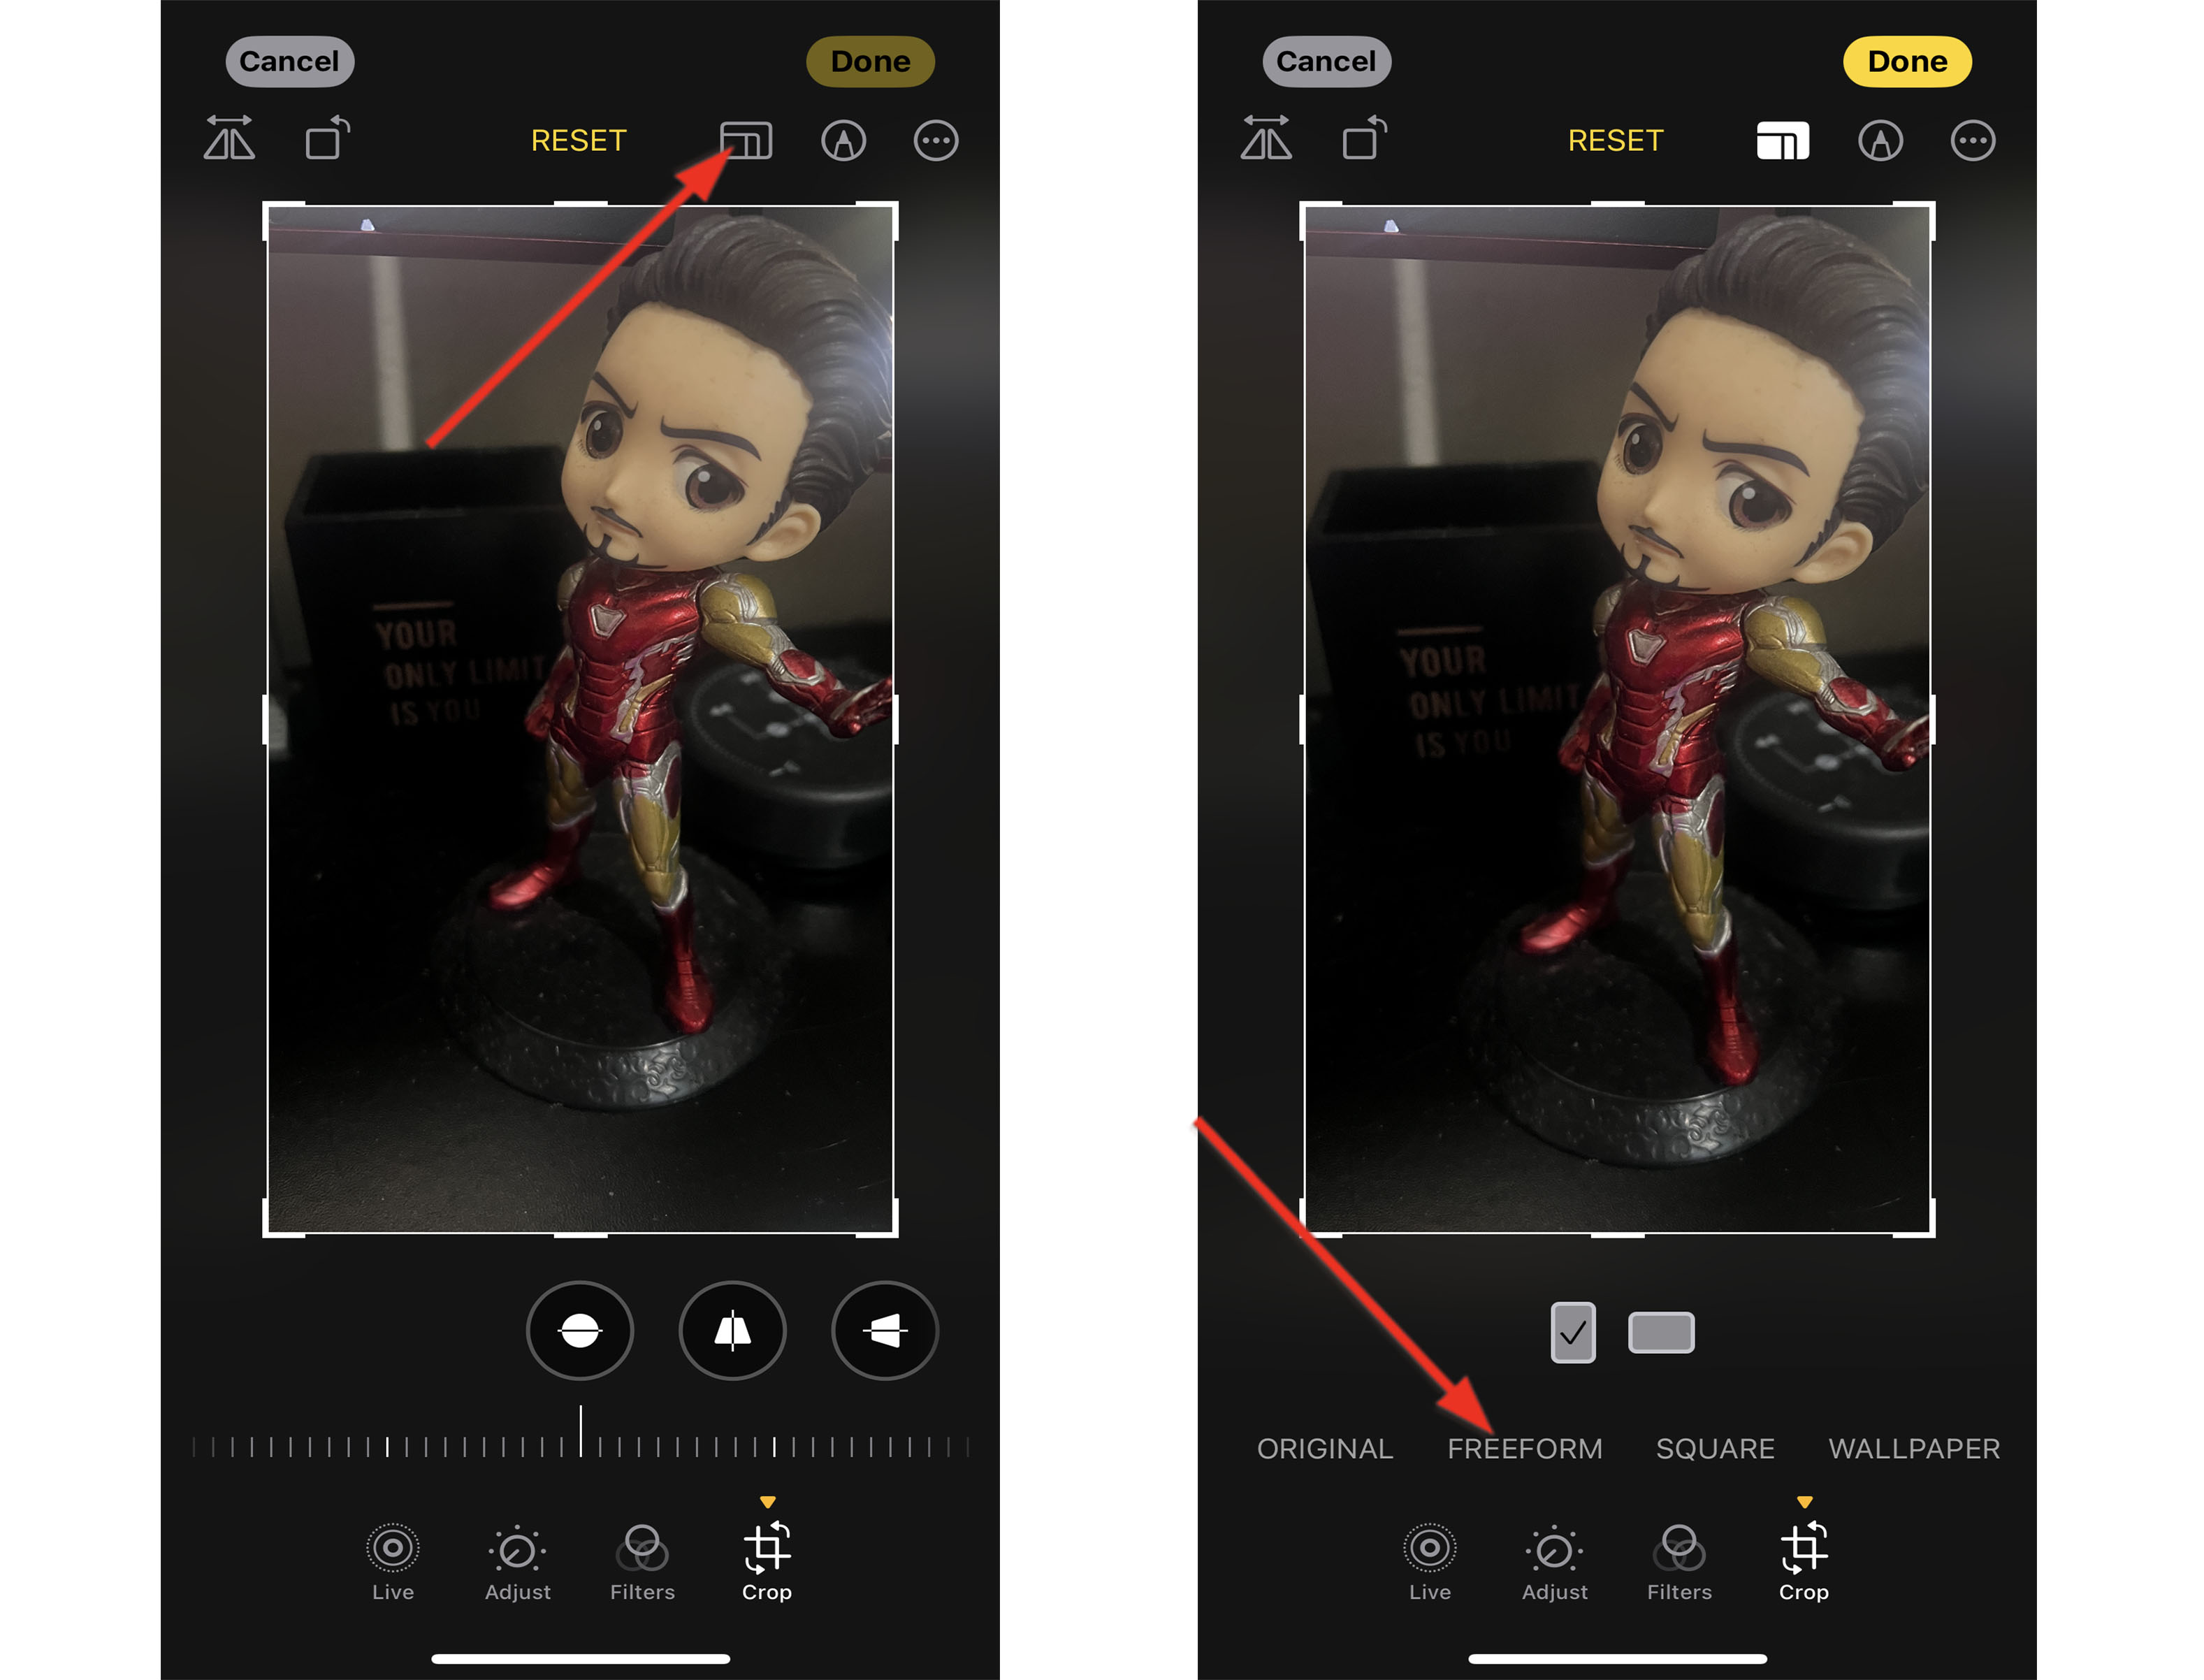
b. To reduce the height of your image, drag the upper or the bottom edges of the photo in the opposite direction.
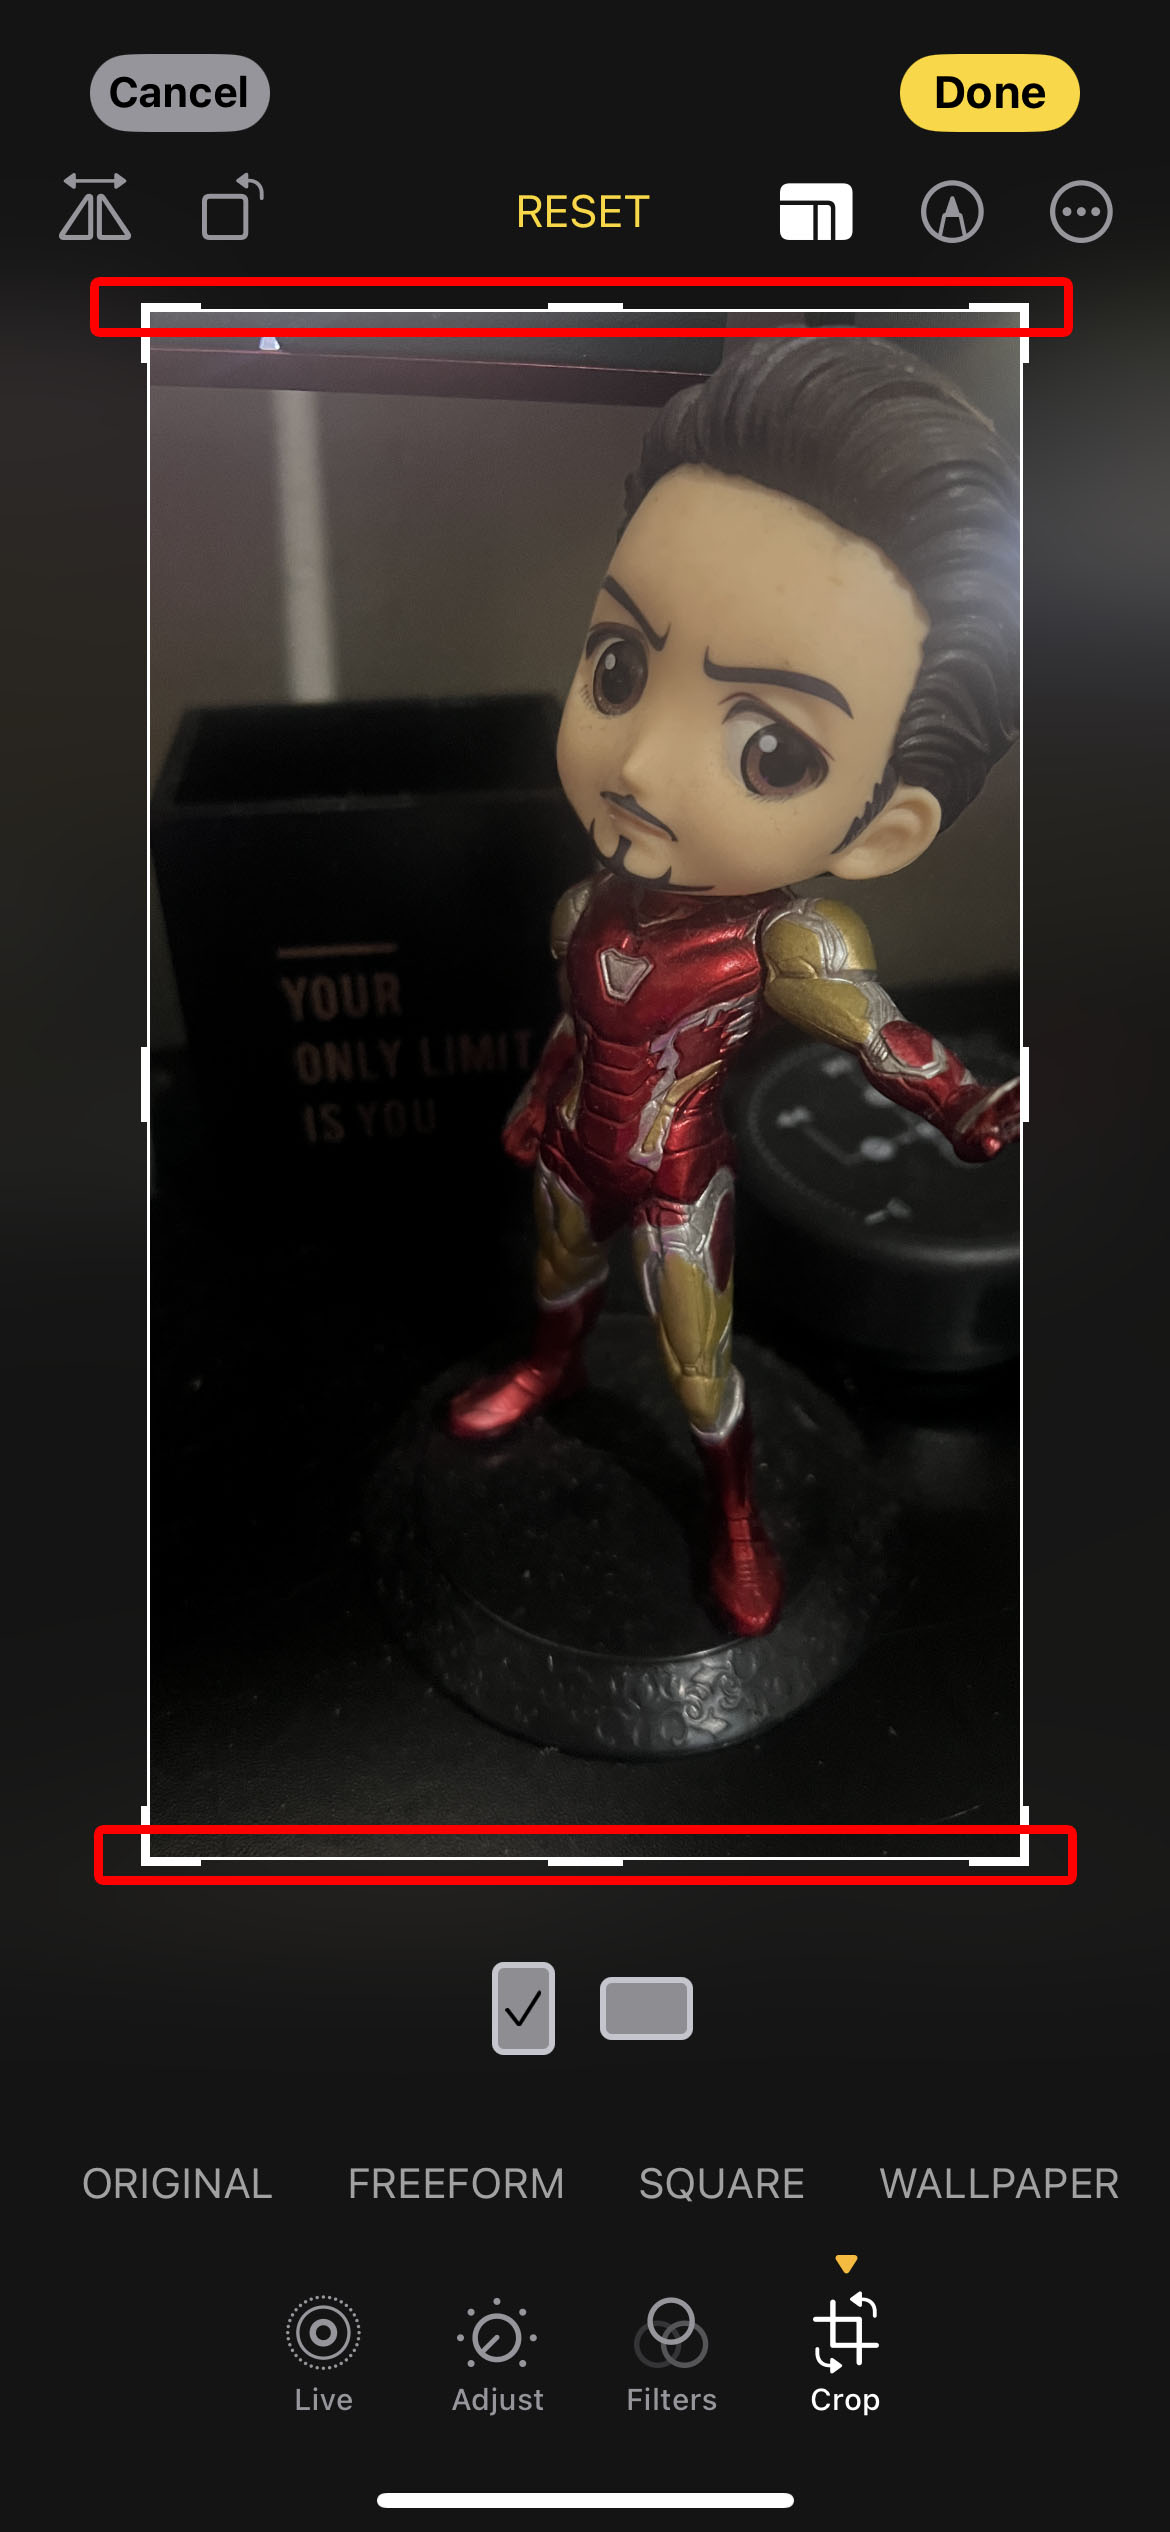
c. To reduce the width of your image, drag the right or left edges of the photo in the opposite direction.

- Once you’re finished editing, tap Done.
You can then see how much file size was cut in the resulting image by swiping up to view its additional details.
Method 2: Optimizing File Sizes Through iPhone Camera Settings
| Evaluation Parameters | Score (0-5) |
| Method Simplicity | 5 – Very Easy |
| Method Efficiency | 4 – Fairly Quick |
| Additional Costs | 0 – Not Applicable |
If you’re looking to optimize the file sizes of future photos you want to capture, you can change the camera settings on your iPhone.
To change the Camera Capture setting, head to the Settings app > Camera > Formats.

Remember to choose High Efficiency (results in photos being saved with High Efficiency Image Format or HEIF) to capture compressed photos without compromising image quality.
Images with this file format will take less space while maintaining good-quality colors and image quality. The downside to HEIF is its cross-compatibility with non-Apple devices, including Windows PCs.
Choose Most Compatible (results in photos being saved with JPEG format) to make sure your photos are readable on different devices. This file format might result in larger file sizes.
Method 3: Resizing Images via Apple Mail
| Evaluation Parameters | Score (0-5) |
| Method Simplicity | 3 – Moderate |
| Method Efficiency | 3 – Moderate |
| Additional Costs | 0 – Not Applicable |
The Apple Mail app has a built-in option to resize image attachments before sending them. This way to compress iPhone photos is easy to do but requires multiple steps. Ideally, you’d have to send your images through the Mail, delete the original photos, and download the resized ones if needed. Because of this, we recommend this method if you only have a few photos to compress.
Here’s how to resize images via Apple Mail:
- Open the Photos app. Then, select the photos you want to compress.
- Tap the Share icon in the bottom-left corner.

- Choose the Mail option among the suggested apps.

- Fill out the recipient email and other details of your message. Optionally, you can name the subject of your email. Once you have filled in the information, tap Send.

- You would be prompted to reduce the message size by rescaling images to different options. You can choose between “Small,” “Medium,” “Large,” or “Actual Size” file compression sizes. This option will adjust the image dimensions to reduce file size.

Method 4: Using Optimize iPhone Storage Feature
| Evaluation Parameters | Score (0-5) |
| Method Simplicity | 5 – Very Easy |
| Method Efficiency | 5 – Very Quick |
| Additional Costs | 4 – Significant |
iCloud has a handy solution for compressing a vast amount of photos from your gallery. Simply enable the “Optimize iPhone Storage” feature to get started. With this option, your device uploads full-resolution photos and videos to the iCloud.
When your device runs low on storage, it automatically replaces your local copies with smaller-sized versions, saving significant storage. Meanwhile, the full-sized versions are still readily available for download from iCloud.
To use the Optimize iPhone Storage feature, simply do the following:
- Go to your device’s Settings.
- Then, navigate to Photos. Alternatively, you can go to Settings > [Apple ID] > iCloud > Photos (for iOS 15, 16, 17).
- If your iCloud Photos are not yet activated, toggle the option on. Otherwise, skip to the next step.
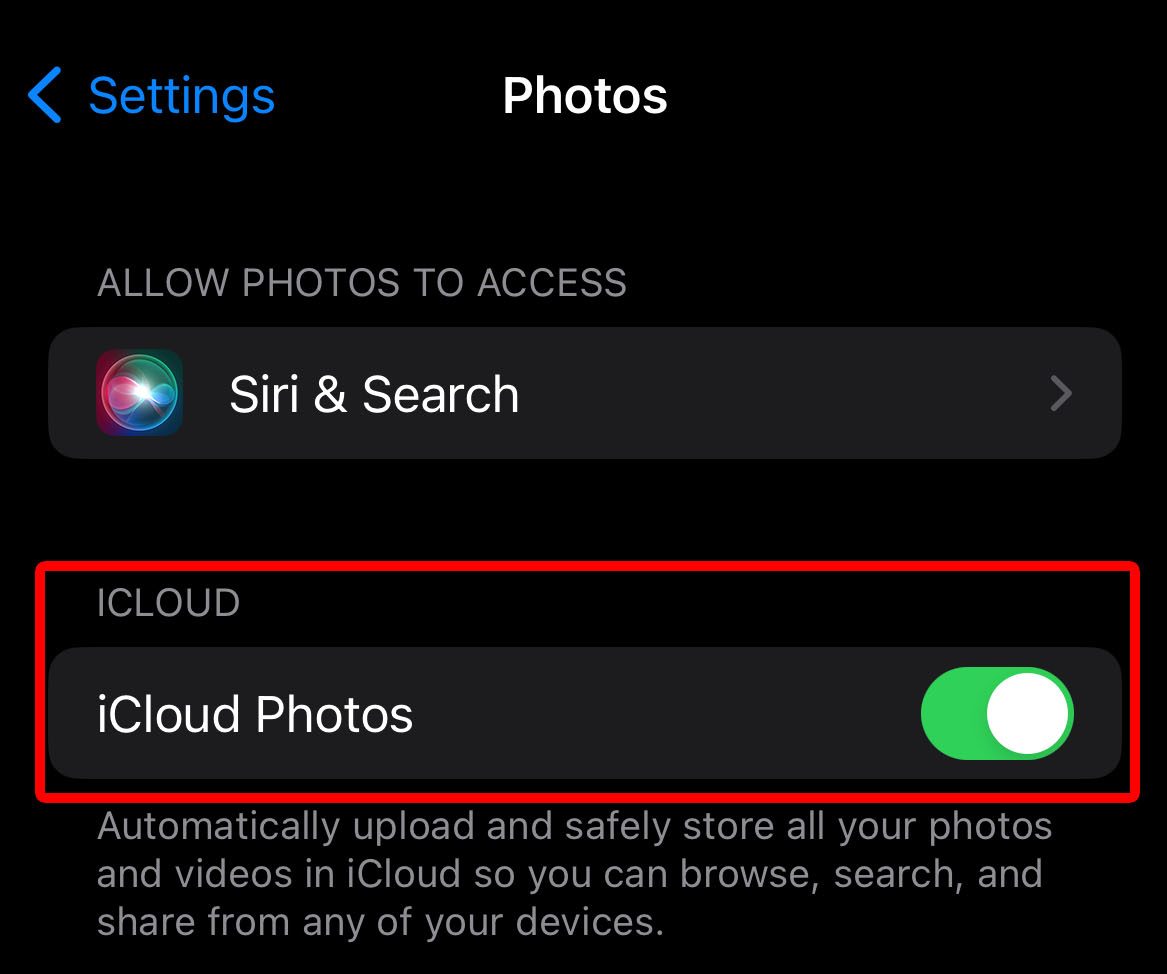
- Below the iCloud section of your settings, you should see the Optimize iPhone Storage option. Make sure to select this option.
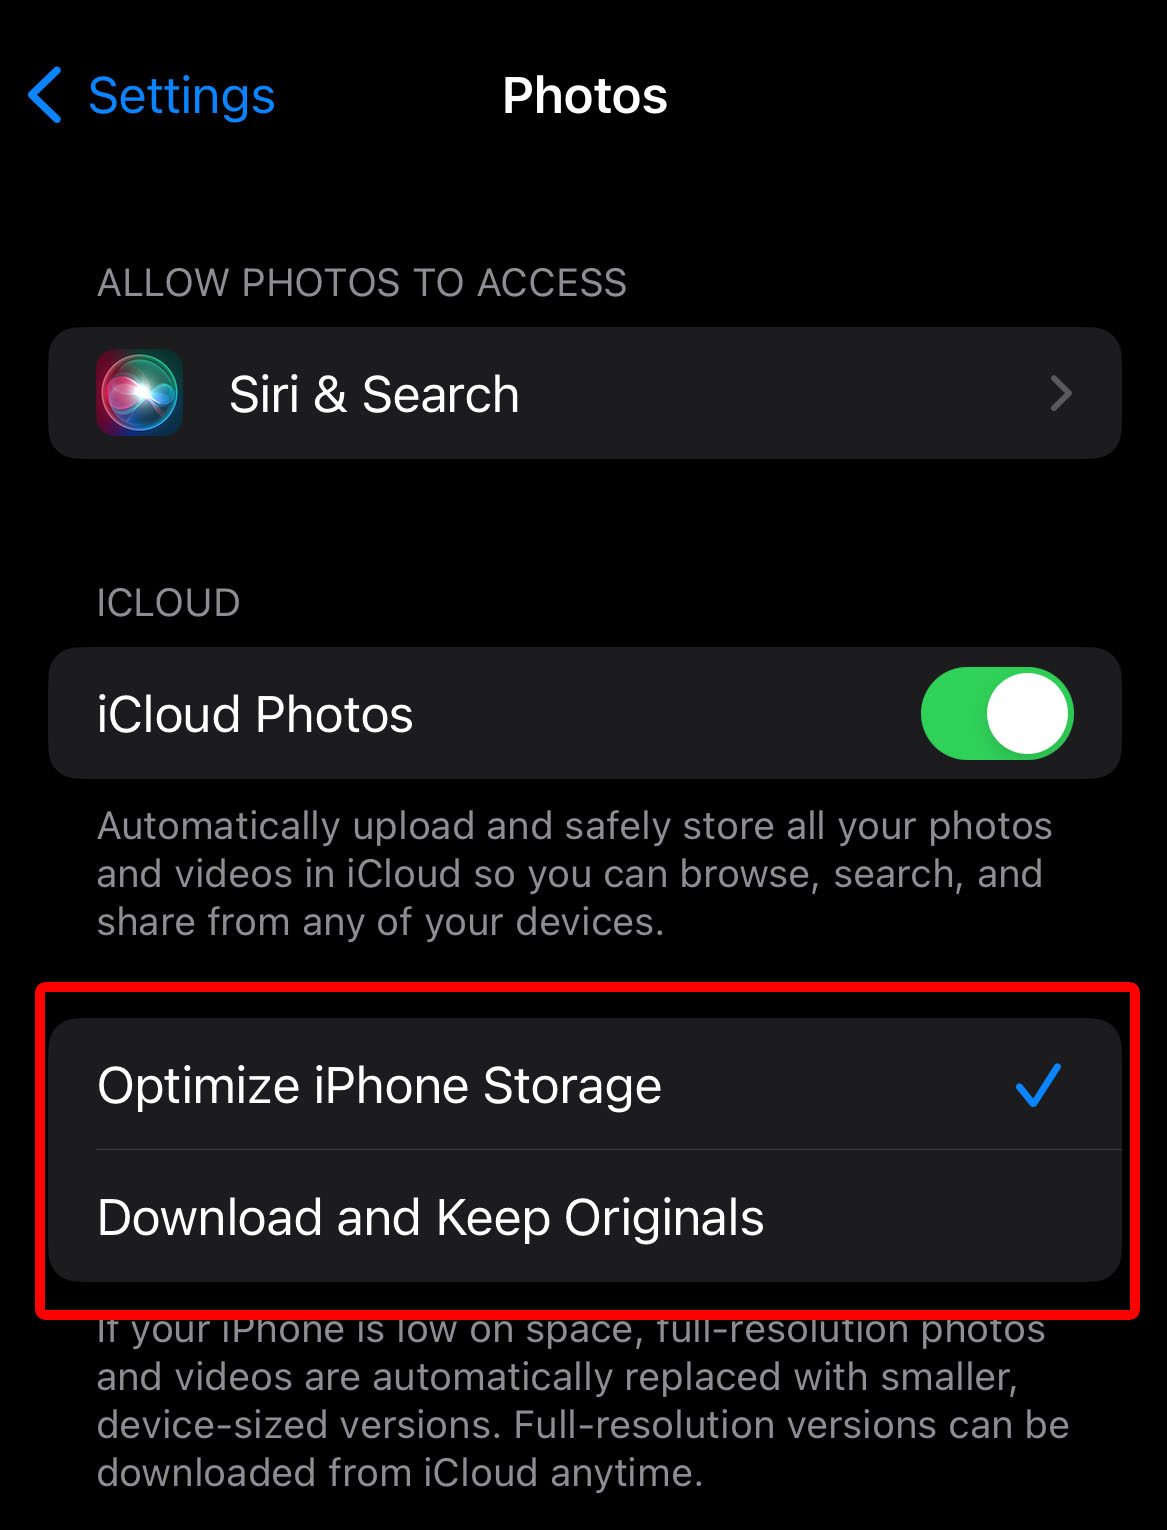
This method can compress your whole gallery while retaining seamless access to full-resolution versions of your photos. So, if you’re not in a hurry and have many photos to compress, we strongly recommend using iCloud Photos.
Method 5: Quick Photo Compression with Instant Messaging Apps
| Evaluation Parameters | Score (0-5) |
| Method Simplicity | 4 – Fairly Easy |
| Method Efficiency | 3 – Somewhat Time-Consuming |
| Additional Costs | 0 – Not Applicable |
If you need another way to quickly compress photos, you can use instant messaging apps like Telegram or WhatsApp to send photos. This method is similar to sending images using Mail, except you won’t be able to select how compressed your images will be.
Instant messaging apps feature photo attachment options that automatically reduce file size after sending them. However, there will be a noticeable compromise in image quality in your uploads.
Plus, you have to download back all the photos you sent and may have to fix the blurry photos. You can’t also upload thousands of photos at once, so it might take a bit of time if you have a huge gallery.
Here’s how to do quick photo compression using Telegram:
- Open Telegram and select your recipient.
- Tap the Attach icon (the paperclip icon).
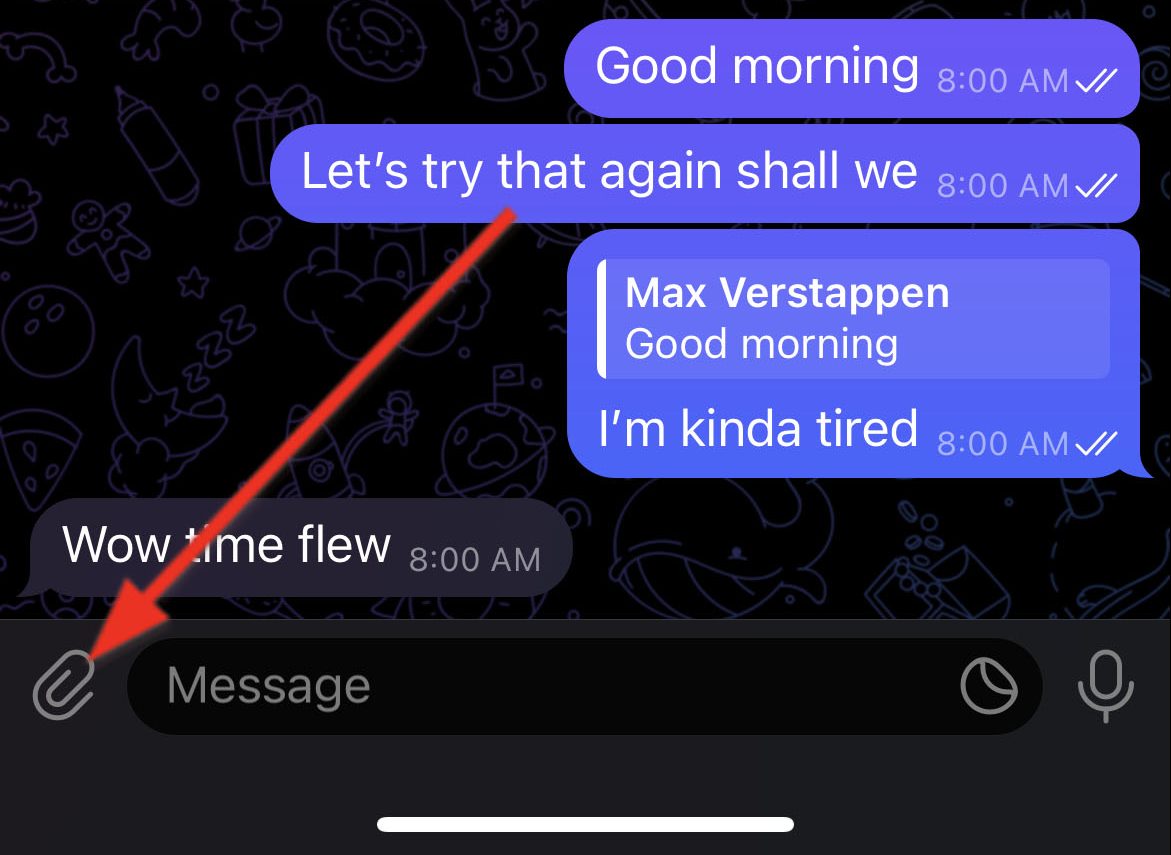
- Then, select the photos you want to send.
- After selecting all the photos you want to compress, tap the Send button.

If you only need quick image compression for a few photos, this method should be useful enough for you.
Method 6: Advanced Resizing and Compression with Third-Party Apps
| Evaluation Parameters | Score (0-5) |
| Method Simplicity | 4 – Fairly Easy |
| Method Efficiency | 4 – Fairly Quick |
| Additional Costs | 3 – Moderate |
We recommend trying out third-party apps if you want more advanced compression options with little to no image quality loss. Some of these apps offer features to customize the resulting image file size and quality.
Just remember to only allow these apps to access the photos you want to compress to make sure your privacy is protected.
These are some of the apps we have tested:
Compress Photos & Pictures

This app allows you to compress 3 photos at once in the free version. You can change the dimensions and photo quality of the resulting images.
You can also save photos to their original album and delete the original photo or delete multiple photos after compression. The Pro version removes ads, allows you to compress more than 3 photos at once, and grants access to extra features.
Photo Compress

This app can also adjust image quality and image size, preview the photo to compare the copies before and after the compression and delete the original copy after compression. With the app’s Pro version, you get full access to the rest of its features without ad interruption.
Image Size

Image Size is a versatile app that not only functions as a compressor but also as an image editor. You can change the image proportion, preview the resulting image, and even customize the photos with filters and other image editing features.
However, it only allows you to select one image at a time. Meanwhile, the Pro version eliminates ads with a one-time payment.
Method 7: Utilizing Online Services for Image Compression
| Evaluation Parameters | Score (0-5) |
| Method Simplicity | 4 – Fairly Easy |
| Method Efficiency | 3 – Moderate |
| Additional Costs | 3 – Moderate |
If you don’t want to download a third-party image compressor app, you can use platform-independent apps you can access on the web. These services are easy to use, can select multiple photos at once, and produce lossless images.
Here are some of the websites you can use to compress photo size on iPhone:
- Optimizilla – We have been using this website for months now, and it has produced satisfactory results without fail. The page is easy to use and quick to process. You can upload up to 20 images at once. After uploading your files, wait for the compression to finish. After that, you can click the thumbnails in the queue to customize image quality and size.

- Image Resizer – Image Resizer allows you to compress up to 50 images at a time. It uses lossy compression optimizations to compress your images by up to 80% or more.
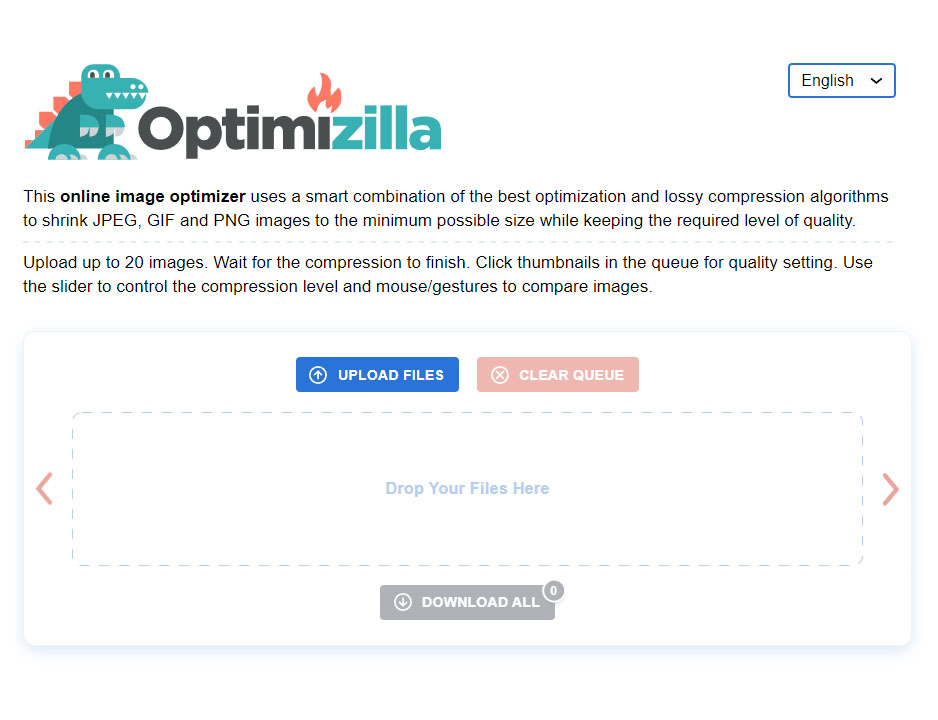
When using a web-based third-party image compressor, we recommend you always move with caution and look out for potential security concerns. You should also check for possible extra charges before uploading your files.
FAQ
Conclusion
Managing and optimizing your iPhone photos is vital to maintaining your device’s optimal performance. Just remember to consider your priorities (image speed, quality) before trying out these methods to compress pictures on your iPhone.
If you only need to compress a few photos, you can use native apps like the Photos app to manually crop your images one by one. You can also use Apple Mail or instant messaging apps like Telegram or Whatsapp, which automatically compress your photos before sending them to your recipient.
Third-party apps and online services are also available if you want a more comprehensive set of features. You can also rely on iCloud for its seamless image compression while backing up your original photos.

